manual radio set CHEVROLET TRAVERSE 2013 1.G Owners Manual
[x] Cancel search | Manufacturer: CHEVROLET, Model Year: 2013, Model line: TRAVERSE, Model: CHEVROLET TRAVERSE 2013 1.GPages: 444
Page 1 of 444

Black plate (1,1)Chevrolet Traverse Owner Manual - 2013 - CRC 2nd Edition - 11/13/12
2013 Chevrolet Traverse Owner ManualM
In Brief. . . . . . . . . . . . . . . . . . . . . . . . 1-1
Instrument Panel . . . . . . . . . . . . . . 1-2
Initial Drive Information . . . . . . . . 1-4
Vehicle Features . . . . . . . . . . . . . 1-17
Performance and Maintenance . . . . . . . . . . . . . . . . 1-24
Keys, Doors, and Windows . . . . . . . . . . . . . . . . . . . . 2-1
Keys and Locks . . . . . . . . . . . . . . . 2-1
Doors . . . . . . . . . . . . . . . . . . . . . . . . . . 2-9
Vehicle Security . . . . . . . . . . . . . . 2-12
Exterior Mirrors . . . . . . . . . . . . . . . 2-15
Interior Mirrors . . . . . . . . . . . . . . . . 2-18
Windows . . . . . . . . . . . . . . . . . . . . . 2-18
Roof . . . . . . . . . . . . . . . . . . . . . . . . . . 2-21
Seats and Restraints . . . . . . . . . 3-1
Head Restraints . . . . . . . . . . . . . . . 3-2
Front Seats . . . . . . . . . . . . . . . . . . . . 3-3
Rear Seats . . . . . . . . . . . . . . . . . . . . 3-9
Safety Belts . . . . . . . . . . . . . . . . . . 3-13
Airbag System . . . . . . . . . . . . . . . . 3-23
Child Restraints . . . . . . . . . . . . . . 3-37 Storage
. . . . . . . . . . . . . . . . . . . . . . . 4-1
Storage Compartments . . . . . . . . 4-1
Additional Storage Features . . . 4-3
Roof Rack System . . . . . . . . . . . . . 4-4
Instruments and Controls . . . . 5-1
Controls . . . . . . . . . . . . . . . . . . . . . . . 5-2
Warning Lights, Gauges, and
Indicators . . . . . . . . . . . . . . . . . . . 5-10
Information Displays . . . . . . . . . . 5-24
Vehicle Messages . . . . . . . . . . . . 5-31
Vehicle Personalization . . . . . . . 5-41
Universal Remote System . . . . 5-48
Lighting . . . . . . . . . . . . . . . . . . . . . . . 6-1
Exterior Lighting . . . . . . . . . . . . . . . 6-1
Interior Lighting . . . . . . . . . . . . . . . . 6-5
Lighting Features . . . . . . . . . . . . . . 6-7
Infotainment System . . . . . . . . . 7-1
Introduction . . . . . . . . . . . . . . . . . . . . 7-1
Radio . . . . . . . . . . . . . . . . . . . . . . . . . 7-11
Audio Players . . . . . . . . . . . . . . . . 7-21
Rear Seat Infotainment . . . . . . . 7-36
Phone . . . . . . . . . . . . . . . . . . . . . . . . 7-46
Settings . . . . . . . . . . . . . . . . . . . . . . 7-53 Trademarks and License
Agreements . . . . . . . . . . . . . . . . . 7-56
Climate Controls . . . . . . . . . . . . . 8-1
Climate Control Systems . . . . . . 8-1
Air Vents . . . . . . . . . . . . . . . . . . . . . 8-10
Maintenance . . . . . . . . . . . . . . . . . . 8-11
Driving and Operating . . . . . . . . 9-1
Driving Information . . . . . . . . . . . . . 9-2
Starting and Operating . . . . . . . 9-13
Engine Exhaust . . . . . . . . . . . . . . 9-20
Automatic Transmission . . . . . . 9-21
Drive Systems . . . . . . . . . . . . . . . . 9-24
Brakes . . . . . . . . . . . . . . . . . . . . . . . 9-25
Ride Control Systems . . . . . . . . 9-27
Cruise Control . . . . . . . . . . . . . . . . 9-29
Object Detection Systems . . . . 9-31
Fuel . . . . . . . . . . . . . . . . . . . . . . . . . . 9-38
Towing . . . . . . . . . . . . . . . . . . . . . . . 9-43
Conversions and Add-Ons . . . 9-50
Page 24 of 444
Black plate (18,1)Chevrolet Traverse Owner Manual - 2013 - CRC 2nd Edition - 11/13/12
1-18 In Brief
Storing a Favorite Station
A maximum of 36 stations can be
stored as favorites using the six
softkeys located below the radio
station frequency tabs and by using
the radio FAV button. Press FAV to
go through up to six pages of
favorites, each having six favorite
stations available per page. Each
page of favorites can contain any
combination of AM, FM, or SiriusXM
stations.
SeeAM-FM Radio (Radio without
Touchscreen) on page 7‑11 or
AM-FM Radio (Radio with
Touchscreen) on page 7‑12.
Setting the Clock
To set the time and date:
1. Turn the ignition key to ACC/ ACCESSORY or ON/RUN, then
press
Oto turn the radio on.
2. Press
Hto display HR, MIN,
MM, DD, YYYY (hour, minute,
month, day, and year).
3. Press the pushbutton located under any one of the labels to be
changed.
4. To increase or decrease the time or date, turn
fclockwise or
counterclockwise.
See Clock (Radio with Touchscreen)
on page 5‑8 orClock (Radio without
Touchscreen) on page 5‑7.
Page 25 of 444
Black plate (19,1)Chevrolet Traverse Owner Manual - 2013 - CRC 2nd Edition - 11/13/12
In Brief 1-19
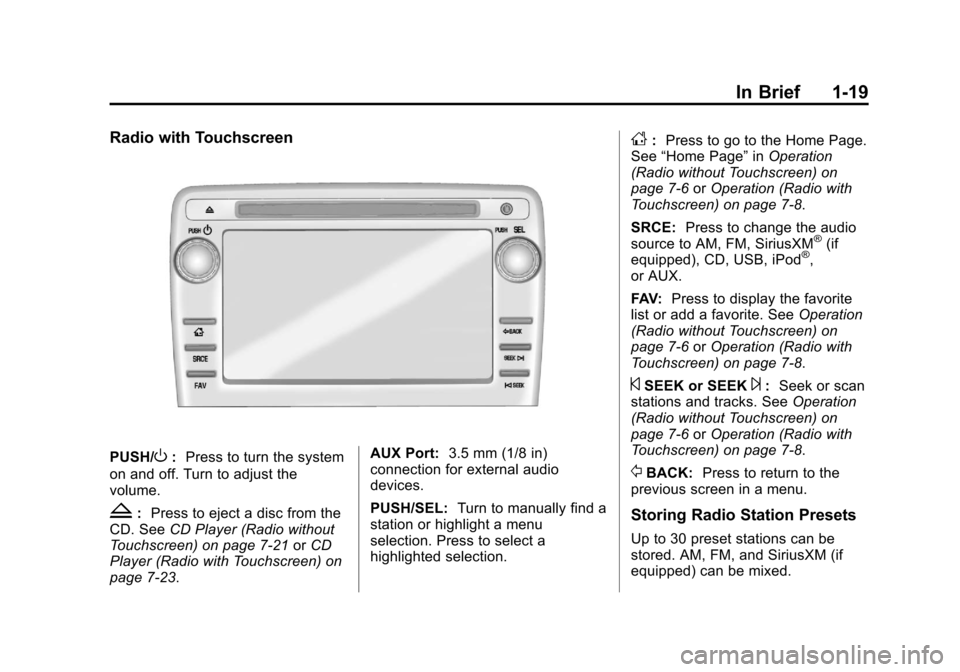
Radio with Touchscreen
PUSH/O:Press to turn the system
on and off. Turn to adjust the
volume.
Z: Press to eject a disc from the
CD. See CD Player (Radio without
Touchscreen) on page 7‑21 orCD
Player (Radio with Touchscreen) on
page 7‑23. AUX Port:
3.5 mm (1/8 in)
connection for external audio
devices.
PUSH/SEL: Turn to manually find a
station or highlight a menu
selection. Press to select a
highlighted selection.
D: Press to go to the Home Page.
See “Home Page” inOperation
(Radio without Touchscreen) on
page 7‑6 orOperation (Radio with
Touchscreen) on page 7‑8.
SRCE: Press to change the audio
source to AM, FM, SiriusXM
®(if
equipped), CD, USB, iPod®,
or AUX.
FAV: Press to display the favorite
list or add a favorite. See Operation
(Radio without Touchscreen) on
page 7‑6 orOperation (Radio with
Touchscreen) on page 7‑8.
©SEEK or SEEK¨: Seek or scan
stations and tracks. See Operation
(Radio without Touchscreen) on
page 7‑6 orOperation (Radio with
Touchscreen) on page 7‑8.
/BACK: Press to return to the
previous screen in a menu.
Storing Radio Station Presets
Up to 30 preset stations can be
stored. AM, FM, and SiriusXM (if
equipped) can be mixed.
Page 26 of 444
Black plate (20,1)Chevrolet Traverse Owner Manual - 2013 - CRC 2nd Edition - 11/13/12
1-20 In Brief
1. From the AM, FM, or SiriusXMmain page, press and hold any
1−5 buttons or one of the preset
screen buttons at the bottom of
the screen. After a few seconds,
a beep is heard and the new
preset information displays on
that screen button.
2. Repeat for each preset.
Setting the Time and Date
Press Settings on the Home Page,
then press the Set Time or Set Date
settings screen button to display the
different options for setting the time
and date.
Set Time:
.Press the up or down arrows to
increase or decrease the Hours,
Minutes, AM, PM, or 24 hr on
the clock.
.Press and hold to quickly
increase or decrease the time
settings.
.Press OK or the Back screen
button to save the adjustments
that were made.
Set Date:
.Press the up or down arrows to
increase or decrease the Month,
Day, and Year settings.
.Press and hold to quickly
increase or decrease the date
settings.
.Press OK or the Back screen
button to save the adjustments
that were made.
See Clock (Radio with Touchscreen)
on page 5‑8 orClock (Radio without
Touchscreen) on page 5‑7.
Satellite Radio
Vehicles with a SiriusXM®satellite
radio tuner and a valid SiriusXM
satellite radio subscription can
receive SiriusXM programming.
SiriusXM Satellite Radio
Service
SiriusXM is a satellite radio service
based in the 48 contiguous United
States and 10 Canadian provinces.
SiriusXM satellite radio has a wide
variety of programming and
commercial-free music, coast to
coast, and in digital-quality sound.
A fee is required to receive the
SiriusXM service.
Refer to:
.www.siriusxm.com or call
1-866-635-2349 (U.S.).
.www.xmradio.ca or call
1-877-209-0079 (Canada).
See Satellite Radio (Radio without
Touchscreen) on page 7‑15 or
Satellite Radio (Radio with
Touchscreen) on page 7‑19.
Portable Audio Devices
This vehicle may have an auxiliary
input on the radio faceplate and a
USB port in the instrument panel
storage area. External devices such
Page 27 of 444
Black plate (21,1)Chevrolet Traverse Owner Manual - 2013 - CRC 2nd Edition - 11/13/12
In Brief 1-21
as iPods®, laptop computers, MP3
players, CD changers, USB storage
devices, etc. can be connected to
the auxiliary port using a 3.5 mm
(1/8 in) input jack or the USB port
depending on the audio system.
See Auxiliary Devices on page 7‑35.
Bluetooth®
The Bluetooth®system allows users
with a Bluetooth-enabled mobile
phone to make and receive
hands-free calls using the vehicle
audio system and controls.
The Bluetooth-enabled mobile
phone must be paired with the
in-vehicle Bluetooth system before it
can be used in the vehicle. Not all
phones will support all functions.
See Bluetooth on page 7‑46.
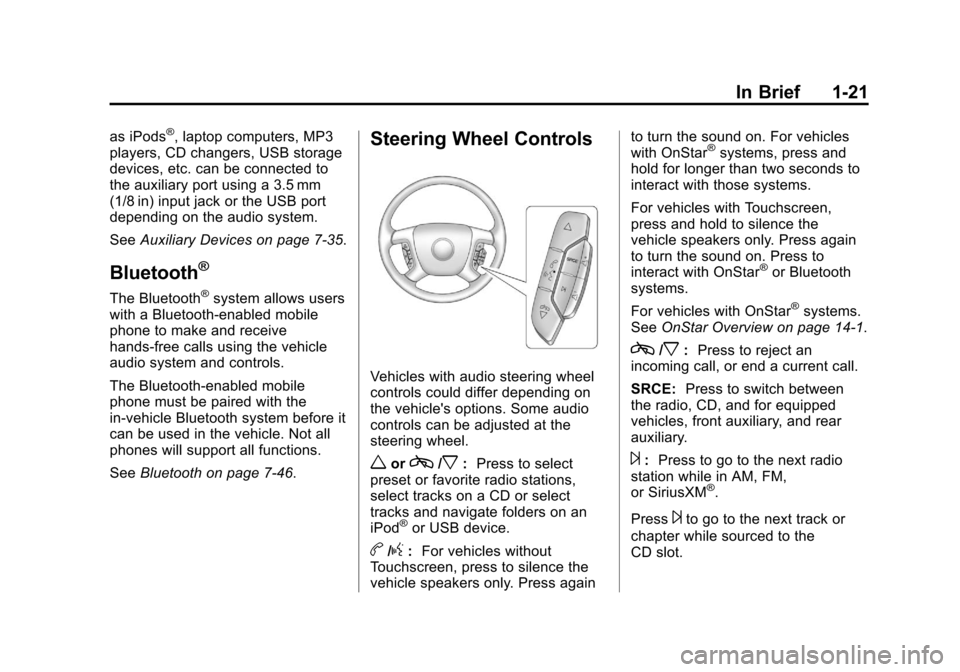
Steering Wheel Controls
Vehicles with audio steering wheel
controls could differ depending on
the vehicle's options. Some audio
controls can be adjusted at the
steering wheel.
worc/x:Press to select
preset or favorite radio stations,
select tracks on a CD or select
tracks and navigate folders on an
iPod
®or USB device.
b/g: For vehicles without
Touchscreen, press to silence the
vehicle speakers only. Press again to turn the sound on. For vehicles
with OnStar
®systems, press and
hold for longer than two seconds to
interact with those systems.
For vehicles with Touchscreen,
press and hold to silence the
vehicle speakers only. Press again
to turn the sound on. Press to
interact with OnStar
®or Bluetooth
systems.
For vehicles with OnStar
®systems.
See OnStar Overview on page 14‑1.
c/x:Press to reject an
incoming call, or end a current call.
SRCE: Press to switch between
the radio, CD, and for equipped
vehicles, front auxiliary, and rear
auxiliary.
¨: Press to go to the next radio
station while in AM, FM,
or SiriusXM
®.
Press
¨to go to the next track or
chapter while sourced to the
CD slot.
Page 28 of 444
Black plate (22,1)Chevrolet Traverse Owner Manual - 2013 - CRC 2nd Edition - 11/13/12
1-22 In Brief
Press¨to select a track or a folder
when navigating folders on an iPod
or USB device.
+
eor −e:Press to increase or to
decrease the volume.
See Steering Wheel Controls on
page 5‑2.
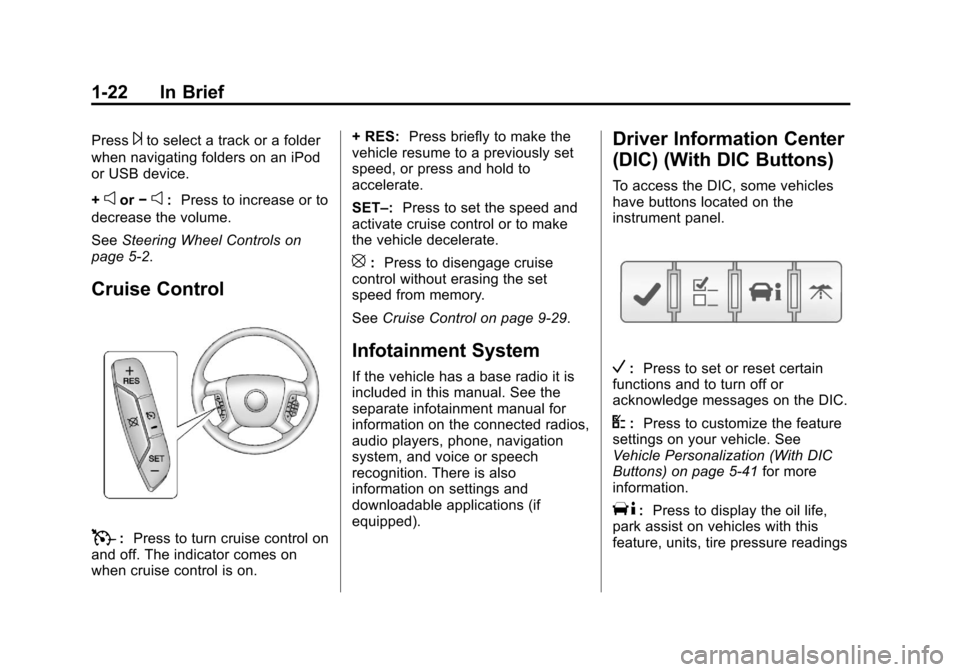
Cruise Control
T: Press to turn cruise control on
and off. The indicator comes on
when cruise control is on. + RES:
Press briefly to make the
vehicle resume to a previously set
speed, or press and hold to
accelerate.
SET–: Press to set the speed and
activate cruise control or to make
the vehicle decelerate.
[: Press to disengage cruise
control without erasing the set
speed from memory.
See Cruise Control on page 9‑29.
Infotainment System
If the vehicle has a base radio it is
included in this manual. See the
separate infotainment manual for
information on the connected radios,
audio players, phone, navigation
system, and voice or speech
recognition. There is also
information on settings and
downloadable applications (if
equipped).
Driver Information Center
(DIC) (With DIC Buttons)
To access the DIC, some vehicles
have buttons located on the
instrument panel.
V:Press to set or reset certain
functions and to turn off or
acknowledge messages on the DIC.
U: Press to customize the feature
settings on your vehicle. See
Vehicle Personalization (With DIC
Buttons) on page 5‑41 for more
information.
T: Press to display the oil life,
park assist on vehicles with this
feature, units, tire pressure readings
Page 45 of 444
Black plate (13,1)Chevrolet Traverse Owner Manual - 2013 - CRC 2nd Edition - 11/13/12
Keys, Doors, and Windows 2-13
Testing the Alarm
To test the alarm:
1. From inside the vehicle, lowerthe driver side window, and open
the driver door.
2. Press
Q.
3. Get out of the vehicle, close the door, and wait for the security
light to go out.
4. Reach in through the window, unlock the door with the manual
door lock, and open the door.
This should set off the alarm.
If the alarm does not sound when it
should, but the headlamps flash,
check to see if the horn works. The
horn fuse may be blown. To replace
the fuse, see Fuses and Circuit
Breakers on page 10‑29.
If the alarm does not sound or the
headlamps do not flash, see your
dealer for service.
Immobilizer
See Radio Frequency Statement on
page 13‑21 for information
regarding Part 15 of the Federal
Communications Commission (FCC)
rules and Industry Canada
Standards RSS-GEN/210/220/310.
Immobilizer Operation
This vehicle has PASS-Key®III+
(Personalized Automotive Security
System) theft-deterrent system.
PASS-Key III+ is a passive
theft-deterrent system.
The system is automatically armed
when the key is removed from the
ignition.
The system is automatically
disarmed when the key is turned to
ON/RUN, ACC/ACCESSORY,
or START from the LOCK/OFF
position.
You do not have to manually arm or
disarm the system. The security light comes on if there
is a problem with arming or
disarming the theft-deterrent
system.
When the PASS-Key III+ system
senses an incorrect key, the vehicle
does not start. Anyone using a
trial-and-error method to start the
vehicle will be discouraged because
of the high number of electrical key
codes.
If the engine does not start and the
security light on the instrument
panel comes on when trying to start
the vehicle, there may be a problem
with the theft-deterrent system. Turn
the ignition off and try again.
If the engine still does not start, and
the key appears to be undamaged,
try another ignition key and check
the fuses. See
Fuses and Circuit
Breakers on page 10‑29 for
additional information. If the engine
still does not start with the other key,
the vehicle needs service. If the
vehicle does start, the first key may
be faulty. See your dealer who can
Page 120 of 444
Black plate (2,1)Chevrolet Traverse Owner Manual - 2013 - CRC 2nd Edition - 11/13/12
5-2 Instruments and Controls
Transmission Messages . . . . . 5-39
Vehicle ReminderMessages . . . . . . . . . . . . . . . . . . 5-40
Vehicle Speed Messages . . . . 5-40
Washer Fluid Messages . . . . . 5-41
Vehicle Personalization
Vehicle Personalization (With DIC Buttons) . . . . . . . . . . . . . . . 5-41
Universal Remote System
Universal Remote System . . . 5-48
Universal Remote SystemProgramming . . . . . . . . . . . . . . . 5-48
Universal Remote System Operation . . . . . . . . . . . . . . . . . . 5-51
Controls
Steering Wheel
Adjustment
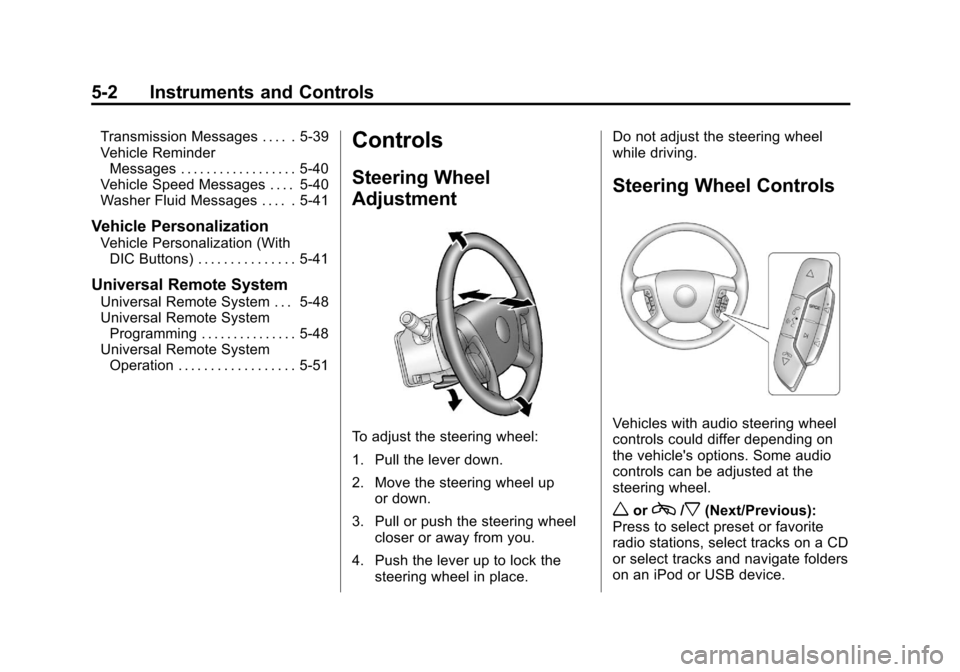
To adjust the steering wheel:
1. Pull the lever down.
2. Move the steering wheel up
or down.
3. Pull or push the steering wheel closer or away from you.
4. Push the lever up to lock the steering wheel in place. Do not adjust the steering wheel
while driving.
Steering Wheel Controls
Vehicles with audio steering wheel
controls could differ depending on
the vehicle's options. Some audio
controls can be adjusted at the
steering wheel.
worc/x(Next/Previous):
Press to select preset or favorite
radio stations, select tracks on a CD
or select tracks and navigate folders
on an iPod or USB device.
Page 121 of 444
Black plate (3,1)Chevrolet Traverse Owner Manual - 2013 - CRC 2nd Edition - 11/13/12
Instruments and Controls 5-3
To select preset or favorite radio
stations:
.Press and releaseworc/x
to go to the next or previous
radio station stored as a preset
or favorite.
To select tracks on a CD:
Press and release
worc/xto
go to the next or previous track.
To select tracks on an iPod or USB
device:
1. Press and hold
worc/x
while listening to a song until the
contents of the current folder
display on the radio display.
2. Press and release
worc/x
to scroll up or down the list, then
press and hold , or press to play
the highlighted track.
1. Press and hold
worc/x
while listening to a song until the
contents of the current folder
display on the radio display. 2. Press and release
worc/x
to go back to the previous
folder list.
3. Press and release
worc/x
to scroll up or down the list
.To select a folder, press
and hold
w, or press¨
when the folder is
highlighted.
.To go back further in the
folder list, press and hold
c/x.
b/g(Mute/Push to Talk): For
vehicles without Touchscreen, press
to silence the vehicle speakers only.
Press again to turn the sound on.
For vehicles with OnStar
®systems,
press and hold for longer than
two seconds to interact with those
systems.
For vehicles with Touchscreen,
press and hold to silence the
vehicle speakers only. Press again
to turn the sound on. Press to
interact with OnStar
®or Bluetooth
systems. For vehicles with OnStar
®systems.
See OnStar Overview on page 14‑1.
c/x(End): Press to reject an
incoming call, or end a current call.
SRCE (Source): Press to switch
between the radio, CD, and for
equipped vehicles, front auxiliary,
and rear auxiliary.
¨(Seek): Press to go to the next
radio station while in AM, FM,
or SiriusXM
®.
Press
¨to go to the next track or
chapter while sourced to the
CD slot.
Press
¨to select a track or a folder
when navigating folders on an iPod
or USB device.
+
eor −e(Volume): Press to
increase or to decrease the volume.
Page 125 of 444
Black plate (7,1)Chevrolet Traverse Owner Manual - 2013 - CRC 2nd Edition - 11/13/12
Instruments and Controls 5-7
To calibrate the compass, use the
following procedure:
Compass Calibration Procedure
1. Before calibrating the compass,make sure the compass zone is
set to the variance zone in which
the vehicle is located. See
“Compass Variance (Zone)
Procedure” earlier in this
section.
Do not operate any switches
such as window, sunroof,
climate controls, seats, etc.
during the calibration procedure.
2. Press the vehicle information button until PRESS
VTO
CALIBRATE COMPASS
displays.
3. Press the set/reset button to start the compass calibration.
4. The DIC will display CALIBRATING: DRIVE IN
CIRCLES. Drive the vehicle in
tight circles at less than 8 km/h
(5 mph) to complete the
calibration. The DIC will display CALIBRATION COMPLETE for a
few seconds when the
calibration is complete. The DIC
display will then return to the
previous menu.
Clock (Radio without
Touchscreen)
To adjust the time and date:
1. Turn the ignition key to ACC/
ACCESSORY or ON/RUN, then
press
Oto turn the radio on.
2. Press
Gto display HR, MIN,
MM, DD, YYYY (hour, minute,
month, day, and year).
3. Press the pushbutton located under any one of the labels to be
changed.
4. To increase the time or date, do one of the following:
.Press the pushbutton below
the selected label.
.Press¨SEEK.
.Press\FWD.
.Turnfclockwise.
5. To decrease the time or date, do one of the following:
.Press©SEEK.
.PresssREV.
.Turnfcounterclockwise.
To change the time default setting
from 12 hour to 24 hour or to
change the date default setting from
month/day/year to day/month/year:
1. Press
Gand then the
pushbutton located under the
forward arrow that displays on
the radio screen until the time
12H (hour) and 24H (hour), and
the date MM/DD (month and
day) and DD/MM (day and
month) display.
2. Press the pushbutton located under the desired option.