park assist CHEVROLET TRAVERSE 2013 Owners Manual
[x] Cancel search | Manufacturer: CHEVROLET, Model Year: 2013, Model line: TRAVERSE, Model: CHEVROLET TRAVERSE 2013Pages: 444, PDF Size: 7.45 MB
Page 7 of 444
Black plate (1,1)Chevrolet Traverse Owner Manual - 2013 - CRC 2nd Edition - 11/13/12
In Brief 1-1
In Brief
Instrument Panel
Instrument Panel . . . . . . . . . . . . . . 1-2
Initial Drive Information
Initial Drive Information . . . . . . . . 1-4
Remote Keyless Entry (RKE)System . . . . . . . . . . . . . . . . . . . . . . 1-4
Remote Vehicle Start . . . . . . . . . 1-5
Door Locks . . . . . . . . . . . . . . . . . . . 1-5
Liftgate . . . . . . . . . . . . . . . . . . . . . . . . 1-6
Windows . . . . . . . . . . . . . . . . . . . . . . 1-7
Seat Adjustment . . . . . . . . . . . . . . 1-7
Memory Features . . . . . . . . . . . . . 1-8
Second Row Seats . . . . . . . . . . . 1-8
Third Row Seats . . . . . . . . . . . . . . 1-9
Heated and Ventilated Seats . . . . . . . . . . . . . . . . . . . . . . . . 1-9 Head Restraint
Adjustment . . . . . . . . . . . . . . . . . 1-10
Safety Belts . . . . . . . . . . . . . . . . . . 1-10
Passenger Sensing System . . . . . . . . . . . . . . . . . . . . . 1-10
Mirror Adjustment . . . . . . . . . . . . 1-11
Steering Wheel Adjustment . . . . . . . . . . . . . . . . . 1-12
Interior Lighting . . . . . . . . . . . . . . 1-12
Exterior Lighting . . . . . . . . . . . . . 1-13
Windshield Wiper/Washer . . . . 1-14
Climate Controls . . . . . . . . . . . . . 1-15
Transmission . . . . . . . . . . . . . . . . 1-16
Vehicle Features
Radio(s) . . . . . . . . . . . . . . . . . . . . . 1-17
Satellite Radio . . . . . . . . . . . . . . . 1-20
Portable Audio Devices . . . . . . 1-20
Bluetooth
®. . . . . . . . . . . . . . . . . . . 1-21
Steering Wheel Controls . . . . . 1-21 Cruise Control . . . . . . . . . . . . . . . 1-22
Infotainment System . . . . . . . . . 1-22
Driver Information Center
(DIC) (With DIC Buttons) . . . 1-22
Ultrasonic Parking Assist . . . . 1-23
Power Outlets . . . . . . . . . . . . . . . 1-23
Universal Remote System . . . 1-23
Sunroof . . . . . . . . . . . . . . . . . . . . . . 1-23
Performance and Maintenance
StabiliTrak®System . . . . . . . . . 1-24
Tire Pressure Monitor . . . . . . . . 1-24
Engine Oil Life System . . . . . . 1-25
Driving for Better Fuel Economy . . . . . . . . . . . . . . . . . . . 1-25
Roadside Assistance Program . . . . . . . . . . . . . . . . . . . . 1-26
OnStar
®. . . . . . . . . . . . . . . . . . . . . 1-26
ProCarManuals.com
Page 28 of 444
Black plate (22,1)Chevrolet Traverse Owner Manual - 2013 - CRC 2nd Edition - 11/13/12
1-22 In Brief
Press¨to select a track or a folder
when navigating folders on an iPod
or USB device.
+
eor −e:Press to increase or to
decrease the volume.
See Steering Wheel Controls on
page 5‑2.
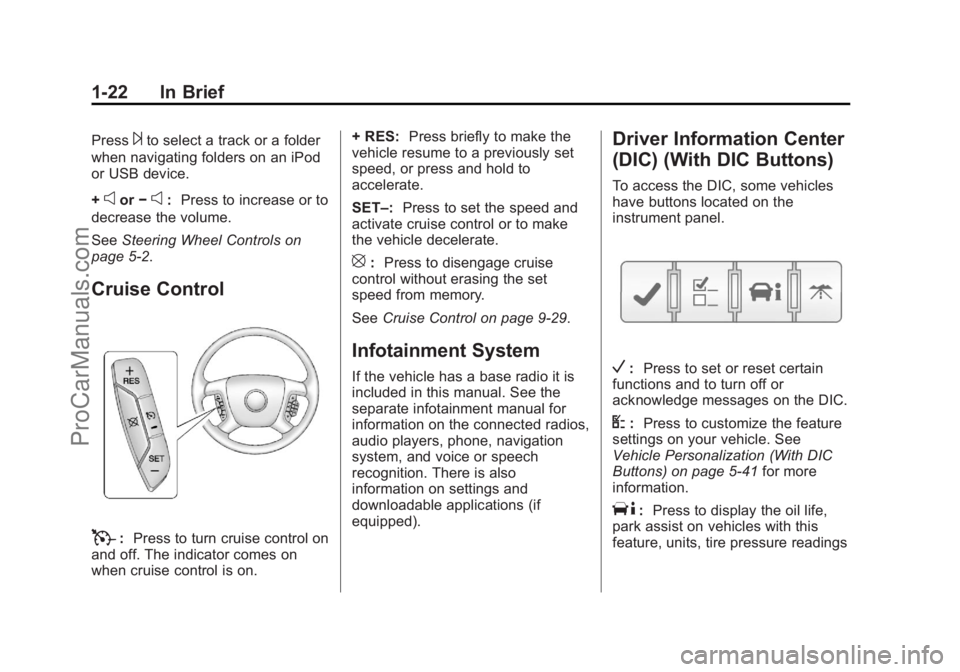
Cruise Control
T: Press to turn cruise control on
and off. The indicator comes on
when cruise control is on. + RES:
Press briefly to make the
vehicle resume to a previously set
speed, or press and hold to
accelerate.
SET–: Press to set the speed and
activate cruise control or to make
the vehicle decelerate.
[: Press to disengage cruise
control without erasing the set
speed from memory.
See Cruise Control on page 9‑29.
Infotainment System
If the vehicle has a base radio it is
included in this manual. See the
separate infotainment manual for
information on the connected radios,
audio players, phone, navigation
system, and voice or speech
recognition. There is also
information on settings and
downloadable applications (if
equipped).
Driver Information Center
(DIC) (With DIC Buttons)
To access the DIC, some vehicles
have buttons located on the
instrument panel.
V:Press to set or reset certain
functions and to turn off or
acknowledge messages on the DIC.
U: Press to customize the feature
settings on your vehicle. See
Vehicle Personalization (With DIC
Buttons) on page 5‑41 for more
information.
T: Press to display the oil life,
park assist on vehicles with this
feature, units, tire pressure readings
ProCarManuals.com
Page 29 of 444
Black plate (23,1)Chevrolet Traverse Owner Manual - 2013 - CRC 2nd Edition - 11/13/12
In Brief 1-23
on vehicles with this feature, and
compass calibration and zone
setting on vehicles with this feature.
3:Press this button to display
the odometer, trip odometers, fuel
range, average economy, timer, fuel
used, and average speed.
Some vehicles do not have the
buttons shown, however some of
the menus can be viewed by using
the trip odometer reset stem.
See Driver Information Center (DIC)
(Without DIC Buttons) on page 5‑29
or Driver Information Center (DIC)
(With DIC Buttons) on page 5‑24.
Ultrasonic Parking Assist
If available, this system uses
sensors on the rear bumper to
assist with parking and avoiding
objects while in R (Reverse).
It operates at speeds less than
8 km/h (5 mph). URPA uses audible
beeps to provide distance and
system information. Keep the sensors on the vehicle's
rear bumper clean to ensure proper
operation.
See
Ultrasonic Parking Assist on
page 9‑31.
Power Outlets
The vehicle has 12-volt accessory
power outlets which can be used to
plug in electrical equipment, such as
a cell phone or MP3 player.
The power outlets are located:
.On the instrument panel below
the climate controls.
.Inside the center floor console.
.At the rear of the center floor
console.
.In the rear cargo area.
To use the outlets, remove the
cover.
See Power Outlets on page 5‑8.
Universal Remote System
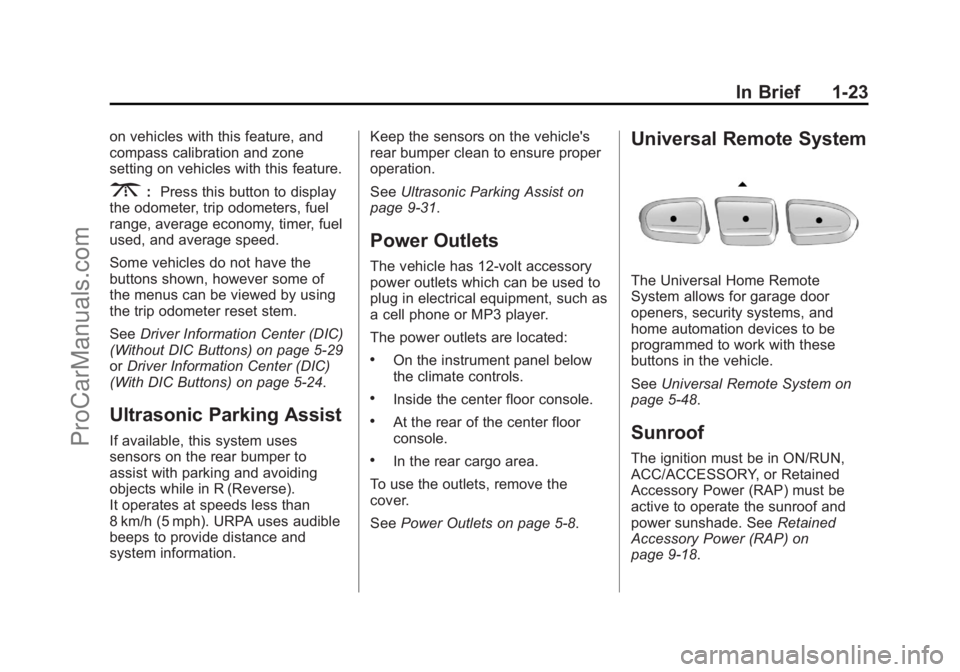
The Universal Home Remote
System allows for garage door
openers, security systems, and
home automation devices to be
programmed to work with these
buttons in the vehicle.
SeeUniversal Remote System on
page 5‑48.
Sunroof
The ignition must be in ON/RUN,
ACC/ACCESSORY, or Retained
Accessory Power (RAP) must be
active to operate the sunroof and
power sunshade. See Retained
Accessory Power (RAP) on
page 9‑18.
ProCarManuals.com
Page 143 of 444
Black plate (25,1)Chevrolet Traverse Owner Manual - 2013 - CRC 2nd Edition - 11/13/12
Instruments and Controls 5-25
T(Vehicle Information):Press
this button to display the oil life,
park assist on vehicles with this
feature, units, tire pressure readings
on vehicles with this feature, and
compass calibration and zone
setting on vehicles with this feature.
3(Trip/Fuel): Press this button
to display the odometer, trip
odometers, fuel range, average
economy, timer, fuel used, and
average speed.
Vehicle Information Menu
Items
T(Vehicle Information): Press
this button to scroll through the
following menu items:
OIL LIFE
Press the vehicle information button
until OIL LIFE REMAINING
displays. This display shows an
estimate of the oil's remaining useful
life. If you see 99% OIL LIFE
REMAINING on the display, that
means 99% of the current oil life
remains. The engine oil life system will alert you to change the oil on a
schedule consistent with your
driving conditions.
When the remaining oil life is low,
the CHANGE ENGINE OIL SOON
message will appear on the display.
See
“CHANGE ENGINE OIL SOON”
under Engine Oil Messages on
page 5‑34. You should change the
oil as soon as you can. See Engine
Oil on page 10‑7. In addition to the
engine oil life system monitoring the
oil life, additional maintenance is
recommended in the Maintenance
Schedule in this manual. See
Maintenance Schedule on
page 11‑2 for more information.
Remember, you must reset the OIL
LIFE display yourself after each oil
change. It will not reset itself. Also,
be careful not to reset the OIL LIFE
display accidentally at any time
other than when the oil has just
been changed. It cannot be reset
accurately until the next oil change.
To reset the engine oil life system,
see Engine Oil Life System on
page 10‑9. SIDE BLIND ZONE ALERT
If the vehicle has the Side Blind
Zone Alert (SBZA) system, this
display allows the system to be
turned on or off. Once in this
display, press the set/reset button to
select between ON or OFF. If you
choose ON, the system will be
turned on. If you choose OFF, the
system will be turned off. When the
SBZA system is turned off, the DIC
will display the SIDE BLIND ZONE
ALERT SYSTEM OFF message as
a reminder that the system has
been turned off. See
Object
Detection System Messages on
page 5‑36 andSide Blind Zone Alert
(SBZA) on page 9‑32 for more
information.
PARK ASSIST
If your vehicle has the Ultrasonic
Rear Parking Assist (URPA) system,
press the vehicle information button
until PARK ASSIST displays. This
display allows the system to be
turned on or off. Once in this
display, press the set/reset button to
ProCarManuals.com
Page 144 of 444
Black plate (26,1)Chevrolet Traverse Owner Manual - 2013 - CRC 2nd Edition - 11/13/12
5-26 Instruments and Controls
select between ON or OFF. If you
choose ON, the system will be
turned on. If you choose OFF, the
system will be turned off. The URPA
system automatically turns back on
after each vehicle start. When the
URPA system is turned off and the
vehicle is shifted out of P (Park), the
DIC will display the PARK ASSIST
OFF message as a reminder that
the system has been turned off. See
Object Detection System Messages
on page 5‑36andUltrasonic
Parking Assist on page 9‑31 for
more information.
REAR CROSS TRAFFIC ALERT
If the vehicle has the Rear Cross
Traffic Alert (RCTA) system, this
display allows the system to be
turned on or off. Once in this
display, press the set/reset button to
select between ON or OFF. If you
choose ON, the system will be
turned on. If you choose OFF, the
system will be turned off. When the
RCTA system is turned off, the DIC
will display the REAR CROSS
TRAFFIC ALERT SYSTEM OFF message as a reminder that the
system has been turned off. See
Object Detection System Messages
on page 5‑36
andRear Vision
Camera (RVC) on page 9‑35.
UNITS
Press the vehicle information button
until UNITS displays. This display
allows you to select between metric
or English units of measurement.
Once in this display, press the set/
reset button to select between
METRIC or ENGLISH units. All of
the vehicle information will then be
displayed in the unit of
measurement selected.
FRONT TIRES or REAR TIRES
On vehicles with the Tire Pressure
Monitor System (TPMS), the
pressure for each tire can be viewed
in the DIC. The tire pressure will be
shown in either kilopascals (kPa) or
pounds per square inch (psi). Press
the vehicle information button until
the DIC displays FRONT
TIRES kPa (PSI) LEFT ##
RIGHT ##. Press the vehicle information button again until the
DIC displays REAR TIRES kPa
(PSI) LEFT ## RIGHT ##.
If a low tire pressure condition is
detected by the system while
driving, a message advising you to
add air to a specific tire will appear
in the display. See
Tire Pressure on
page 10‑42 andTire Messages on
page 5‑39 for more information.
If the tire pressure display shows
dashes instead of a value, there
may be a problem with your vehicle.
If this consistently occurs, see your
dealer for service.
COMPASS ZONE SETTING
This display will be available if the
vehicle has a compass. See
Compass on page 5‑5 for more
information.
COMPASS RECALIBRATION
This display will be available if the
vehicle has a compass. See
Compass on page 5‑5 for more
information.
ProCarManuals.com
Page 147 of 444
Black plate (29,1)Chevrolet Traverse Owner Manual - 2013 - CRC 2nd Edition - 11/13/12
Instruments and Controls 5-29
since the last reset of this value. To
reset the value to zero, press and
hold the set/reset button.
Blank Display
This display shows no information.
Driver Information Center
(DIC) (Without DIC
Buttons)
If your vehicle does not have DIC
buttons, the information below
explains the operation of this
system.
The DIC has different displays
which can be accessed by pressing
the trip odometer reset stem located
on the instrument panel cluster.
Pressing the trip odometer reset
stem will also turn off,
or acknowledge, DIC messages.
The DIC displays trip and vehicle
system information, and warning
messages if a system problem is
detected.If your vehicle does not have DIC
buttons, you can use the trip
odometer reset stem to view the
following displays: odometer, trip
odometers, oil life, park assist menu
for vehicles with the Ultrasonic Rear
Parking Assist (URPA) system,
units, and display language.
If your vehicle has DIC buttons, you
can use the trip odometer reset
stem to view the following displays:
odometer and trip odometers.
Trip Odometer Reset Stem
Menu Items
ODOMETER
Press the trip odometer reset stem
until ODOMETER displays. This
display shows the distance the
vehicle has been driven in either
kilometers (km) or miles (mi).
To switch between English and
metric measurements, see
“UNITS”
later in this section. TRIP A or TRIP B
Press the trip odometer reset stem
until TRIP A or TRIP B displays. This
display shows the current distance
traveled in either kilometers (km) or
miles (mi) since the last reset for
each trip odometer. Both trip
odometers can be used at the
same time.
Each trip odometer can be reset to
zero separately by pressing and
holding the trip odometer reset stem
while the desired trip odometer is
displayed.
The trip odometer has a feature
called the retroactive reset. This can
be used to set the trip odometer to
the number of kilometers (miles)
driven since the ignition was last
turned on. This can be used if the
trip odometer is not reset at the
beginning of the trip.
To use the retroactive reset feature,
press and hold the trip odometer
reset stem for at least four seconds.
The trip odometer will display the
number of kilometers (km) or
ProCarManuals.com
Page 148 of 444
Black plate (30,1)Chevrolet Traverse Owner Manual - 2013 - CRC 2nd Edition - 11/13/12
5-30 Instruments and Controls
miles (mi) driven since the ignition
was last turned on and the vehicle
was moving. Once the vehicle
begins moving, the trip odometer
will accumulate mileage. For
example, if the vehicle was driven
8 km (5 mi) before it is started again,
and then the retroactive reset
feature is activated, the display will
show 8 km (5 mi). As the vehicle
begins moving, the display will then
increase to 8.2 km (5.1 mi), 8.4 km
(5.2 mi), etc.
If the retroactive reset feature is
activated after the vehicle is started,
but before it begins moving, the
display will show the number of
kilometers (km) or miles (mi) driven
during the last ignition cycle.
OIL LIFE
To access this display, the vehicle
must be in P (Park). Press the trip
odometer reset stem until OIL LIFE
REMAINING displays. This display
shows an estimate of the oil's
remaining useful life. If you see
99% OIL LIFE REMAINING on thedisplay, that means 99% of the
current oil life remains. The engine
oil life system will alert you to
change the oil on a schedule
consistent with your driving
conditions.
When the remaining oil life is low,
the CHANGE ENGINE OIL SOON
message will appear on the display.
See
“CHANGE ENGINE OIL SOON”
under Engine Oil Messages on
page 5‑34. You should change the
oil as soon as you can. See Engine
Oil on page 10‑7. In addition to the
engine oil life system monitoring the
oil life, additional maintenance is
recommended in the Maintenance
Schedule in this manual. See
Maintenance Schedule on
page 11‑2 for more information.
Remember, you must reset the OIL
LIFE display yourself after each oil
change. It will not reset itself. Also,
be careful not to reset the OIL LIFE
display accidentally at any time
other than when the oil has just
been changed. It cannot be reset
accurately until the next oil change. To reset the engine oil life system,
see
Engine Oil Life System on
page 10‑9.
PARK ASSIST
To access this display, the vehicle
must be in P (Park). If your vehicle
has the Ultrasonic Rear Parking
Assist (URPA) system, press the trip
odometer reset stem until PARK
ASSIST displays. This display
allows the system to be turned on or
off. Once in this display, press and
hold the trip odometer reset stem to
select between ON or OFF. If you
choose ON, the system will be
turned on. If you choose OFF, the
system will be turned off. The URPA
system automatically turns back on
after each vehicle start. When the
URPA system is turned off and the
vehicle is shifted out of P (Park), the
DIC will display the PARK ASSIST
OFF message as a reminder that
the system has been turned off. See
Object Detection System Messages
on page 5‑36 andUltrasonic
Parking Assist on page 9‑31 for
more information.
ProCarManuals.com
Page 154 of 444
Black plate (36,1)Chevrolet Traverse Owner Manual - 2013 - CRC 2nd Edition - 11/13/12
5-36 Instruments and Controls
Lamp Messages
AUTOMATIC LIGHT
CONTROL OFF
This message displays when the
automatic headlamps are turned off.
This message clears itself after
10 seconds.
AUTOMATIC LIGHT
CONTROL ON
This message displays when the
automatic headlamps are turned on.
This message clears itself after
10 seconds.
TURN SIGNAL ON
This message displays and a chime
sounds if a turn signal is left on for
1.2 km (0.75 mi). Move the turn
signal lever to the off position.
Object Detection System
Messages
PARK ASST BLOCKED SEE
OWNERS MANUAL
This message displays if there is
something interfering with the park
assist system. SeeUltrasonic
Parking Assist on page 9‑31 for
more information.
PARK ASSIST OFF
After the vehicle has been started,
this message displays to remind the
driver that the URPA system has
been turned off. Press the set/reset
button or the trip odometer reset
stem to acknowledge this message
and clear it from the DIC display. To
turn the URPA system back on, see
Ultrasonic Parking Assist on
page 9‑31.
REAR CROSS TRAFFIC
ALERT SYSTEM OFF
If the vehicle has the Rear Cross
Traffic Alert (RCTA) system, this
message displays when the RCTA
system has been turned off. See
Rear Vision Camera (RVC) on
page 9‑35 andDriver Information
Center (DIC) (Without DIC Buttons)
on page 5‑29 orDriver Information
Center (DIC) (With DIC Buttons) on
page 5‑24.
SERVICE PARK ASSIST
This message displays if there is a
problem with the Ultrasonic Rear
Parking Assist (URPA) system. Do
not use this system to help you
park. See Ultrasonic Parking Assist
on page 9‑31 for more information.
See your dealer for service.
SERVICE SIDE DETECTION
SYSTEM
If your vehicle has the Side Blind
Zone Alert (SBZA) system and this
message displays, both SBZA
displays will remain on indicating
ProCarManuals.com
Page 159 of 444
Black plate (41,1)Chevrolet Traverse Owner Manual - 2013 - CRC 2nd Edition - 11/13/12
Instruments and Controls 5-41
variable assist steering system.
Have your vehicle serviced by your
dealer.
Washer Fluid Messages
WASHER FLUID LOW ADD
FLUID
This message displays when the
windshield washer fluid is low. Fill
the windshield washer fluid reservoir
as soon as possible. SeeEngine
Compartment Overview on
page 10‑5 for the location of the
windshield washer fluid reservoir.
Also, see Washer Fluid on
page 10‑19 for more information.
Vehicle
Personalization
Vehicle Personalization
(With DIC Buttons)
Your vehicle may have
customization capabilities that allow
you to program certain features to
one preferred setting. Customization
features can only be programmed to
one setting on the vehicle and
cannot be programmed to a
preferred setting for two different
drivers.
All of the customization options may
not be available on your vehicle.
Only the options available will be
displayed on the DIC.
The default settings for the
customization features were set
when your vehicle left the factory,
but may have been changed from
their default state since then.
The customization preferences are
automatically recalled. To change customization
preferences, use the following
procedure.
Entering the Feature
Settings Menu
1. Turn the ignition on and place
the vehicle in P (Park).
To avoid excessive drain on the
battery, it is recommended that
the headlamps are turned off.
2. Press the customization button to enter the feature
settings menu.
If the menu is not available,
FEATURE SETTINGS
AVAILABLE IN PARK will
display. Before entering the
menu, make sure the vehicle is
in P (Park).
ProCarManuals.com
Page 167 of 444
Black plate (49,1)Chevrolet Traverse Owner Manual - 2013 - CRC 2nd Edition - 11/13/12
Instruments and Controls 5-49
devices such as garage door
openers, security systems, and
home automation devices.
Do not use the Universal Remote
system with any garage door opener
that does not have the stop and
reverse feature. This includes any
garage door opener model
manufactured before April 1,1982.
Read the instructions completely
before attempting to program the
Universal Remote system. Because
of the steps involved, it may be
helpful to have another person
available to assist with programming
the Universal Remote system.
Keep the original hand-held
transmitter for use in other vehicles
as well as for future Universal
Remote system programming. It is
also recommended that upon the
sale of the vehicle, the programmed
Universal Remote system buttons
be erased for security purposes.
See“Erasing Universal Remote
System Buttons” later in this
section. When programming a garage door,
park outside of the garage. Park
directly in line with and facing the
garage door opener motor-head or
gate motor-head. Be sure that
people and objects are clear of the
garage door or gate being
programmed.
It is recommended that a new
battery be installed in the hand-held
transmitter for quicker and more
accurate transmission of the
radio-frequency signal.
Programming the Universal
Remote System
For questions or help programming
the Universal Remote system, call
1-800-355-3515 or go to
www.homelink.com.
Programming a garage door opener
involves time-sensitive actions, so
read the entire procedure before
starting. Otherwise, the device will
time out and the procedure will have
to be repeated.
To program up to three devices:
1. Hold the end of the hand-held
transmitter about 3 to 8 cm
(1 to 3 in) away from the
Universal Remote system
buttons while keeping the
indicator light in view. The
hand-held transmitter was
supplied by the manufacturer of
the garage door opener receiver
(motor-head unit).
2. At the same time, press and hold both the hand-held
transmitter button and one of the
three Universal Remote system
buttons to be used to operate
the garage door. Do not release
the Universal Remote system
button or the hand-held
transmitter button until the
indicator light changes from a
slowly to a rapidly flashing light.
You now may release both
buttons.
Some entry gates and garage
door openers may require
substitution of Step 2 with the
ProCarManuals.com