clock setting CHEVROLET TRAVERSE 2015 1.G Owners Manual
[x] Cancel search | Manufacturer: CHEVROLET, Model Year: 2015, Model line: TRAVERSE, Model: CHEVROLET TRAVERSE 2015 1.GPages: 434, PDF Size: 5.84 MB
Page 26 of 434
Black plate (18,1)Chevrolet Traverse Owner Manual (GMNA-Localizing-U.S./Canada/Mexico-
7576032) - 2015 - CRC - 8/19/14
1-18 In Brief
4:Change the display between the
radio station frequency and the
time, if equipped. While the ignition
is off, press
4to display the time.
For more information about these
and other radio features, see
Operation (Radio without
Touchscreen) on page 7-5 or
Operation (Radio with Touchscreen)
on page 7-8.
If equipped with Rear Seat
Entertainment (RSE), see the
infotainment manual.
Storing a Favorite Station
A maximum of 36 stations can be
stored as favorites using the six
softkeys located below the radio
station frequency tabs and by using
the radio FAV button. Press FAV to
go through up to six pages of
favorites, each having six favorite
stations available per page. Each
page of favorites can contain any
combination of AM, FM, or SiriusXM
stations, if equipped.
See AM-FM Radio (Radio without
Touchscreen) on page 7-10 or
AM-FM Radio (Radio with
Touchscreen) on page 7-12.
Setting the Clock
To set the time and date:
1. Turn the ignition key to ACC/ ACCESSORY or ON/RUN, then
press
Oto turn the radio on.
2. Press
Hto display HR, MIN,
MM, DD, YYYY (hour, minute,
month, day, and year).
3. Press the pushbutton located under any one of the labels to be
changed.
4. To increase or decrease the time or date, turn
fclockwise or
counterclockwise.
See Clock (Radio without
Touchscreen) on page 5-8 orClock
(Radio with Touchscreen) on
page 5-8.
Page 28 of 434
Black plate (20,1)Chevrolet Traverse Owner Manual (GMNA-Localizing-U.S./Canada/Mexico-
7576032) - 2015 - CRC - 8/19/14
1-20 In Brief
Storing Radio Station Presets
Up to 30 preset stations can be
stored. AM, FM, and SiriusXM (if
equipped) can be mixed.
1. From the AM, FM, or SiriusXMmain page, press and hold
any 1−5 buttons or one of the
preset screen buttons at the
bottom of the screen. After a few
seconds, a beep is heard and
the new preset information
displays on that screen button.
2. Repeat for each preset.
Setting the Clock
Press Settings on the Home Page,
then press the Set Time or Set Date
settings screen button to display the
different options for setting the time
and date.
Set Time:
.Press the up or down arrows to
change the Hours, Minutes, AM,
PM, or 24 hour setting on the
clock.
.Press and hold to quickly
increase or decrease the time
settings.
.Press OK to save the
adjustments.
.Press the Back or Cancel screen
button to cancel the
adjustments.
Set Date:
.Press the up or down arrows to
increase or decrease the Month,
Day, and Year settings.
.Press and hold to quickly
increase or decrease the date
settings.
.Press OK to save the
adjustments.
.Press the Back or Cancel screen
button to cancel the
adjustments.
Satellite Radio
If equipped, vehicles with a
SiriusXM®satellite radio tuner and a
valid SiriusXM satellite radio
subscription can receive SiriusXM
programming.
SiriusXM Satellite Radio
Service
SiriusXM is a satellite radio service
based in the 48 contiguous United
States and 10 Canadian provinces.
SiriusXM satellite radio has a wide
variety of programming and
commercial-free music, coast to
coast, and in digital-quality sound.
A fee is required to receive the
SiriusXM service.
Refer to:
.www.siriusxm.com or call
1-866-635-2349 (U.S.).
.www.xmradio.ca or call
1-877-209-0079 (Canada).
Page 126 of 434
Black plate (8,1)Chevrolet Traverse Owner Manual (GMNA-Localizing-U.S./Canada/Mexico-
7576032) - 2015 - CRC - 8/19/14
5-8 Instruments and Controls
CALIBRATION COMPLETE for a
few seconds when the
calibration is complete. The DIC
display will then return to the
previous menu.
Clock (Radio without
Touchscreen)
To adjust the time and date:
1. Turn the ignition key to ACC/ACCESSORY or ON/RUN, then
press
Oto turn the radio on.
2. Press
Gto display HR, MIN,
MM, DD, YYYY (hour, minute,
month, day, and year).
3. Press the pushbutton located under any one of the labels to be
changed.
4. To increase the time or date, do one of the following:
.Press the pushbutton below
the selected label.
.Press¨SEEK.
.Press\FWD.
.Turnfclockwise.
5. To decrease the time or date, do one of the following:
.Press©SEEK.
.PresssREV.
.Turnfcounterclockwise.
To change the time default setting
from 12 hour to 24 hour or to
change the date default setting from
month/day/year to day/month/year:
1. Press
Gand then the
pushbutton located under the
forward arrow that displays on
the radio screen until the time
12H (hour) and 24H (hour), and
the date MM/DD (month and
day) and DD/MM (day and
month) display.
2. Press the pushbutton located under the desired option. 3. Press
Gagain to apply the
selected default, or let the
screen time out.
Clock (Radio with
Touchscreen)
Press Settings on the Home Page
Menu, then press the Set Time or
Set Date settings screen button to
display the different options for
setting the time and date.
Set Time:
.Press the up or down arrows to
increase or decrease the Hours,
Minutes, AM, PM, or the 24 hour
setting on the clock.
.Press and hold to quickly
increase or decrease the time
settings.
.Press OK to save the
adjustments.
.Press Back or Cancel screen
button to cancel the
adjustments.
Page 191 of 434
Black plate (7,1)Chevrolet Traverse Owner Manual (GMNA-Localizing-U.S./Canada/Mexico-
7576032) - 2015 - CRC - 8/19/14
Infotainment System 7-7
2. Continue pressingfto highlight
the tab, or press the softkey
under the tab.
3. To adjust the highlighted setting, do one of the following until the
levels are obtained:
.Turnfclockwise or
counterclockwise.
.Press\FWD, orsREV.
If a station's frequency is weak or if
there is static, decrease the treble.
To quickly adjust bass, midrange,
or treble to the middle position,
press the softkey under the BASS,
MID, or TREB tab for more than
two seconds. A beep sounds and
the level adjusts to the middle
position.
To quickly adjust all tone and
speaker controls to the middle
position when in the Tone menu,
press
ffor more than two seconds
until a beep sounds. EQ (Equalization):
Press to
choose bass and treble equalization
settings designed for different types
of music. The choices are pop, rock,
country, talk, jazz, and classical.
Selecting MANUAL or changing
bass or treble, returns the EQ to the
manual bass and treble settings.
Unique EQ settings can be saved
for each source.
If the radio has a Bose
®audio
system, the EQ settings are either
MANUAL or TALK.
Adjusting the Speakers
(Balance/Fade)
BAL/FADE (Balance/Fade): To
adjust the balance or fade:
1. Press
funtil the speaker control
tabs display.
2. Continue pressing
fto highlight
the tab, or press the softkey
under the tab. 3. To adjust the highlighted setting,
do one of the following until the
levels are obtained:
.Turnfclockwise or
counterclockwise.
.Press\FWD, orsREV.
To quickly adjust balance or fade to
the middle position, press the
softkey under the BAL or FADE tab
for more than two seconds. A beep
sounds and the level adjusts to the
middle position.
To quickly adjust all speaker and
tone controls to the middle position,
press
ffor more than two seconds
until a beep sounds.
Radio Messages
Calibration Error: The audio
system has been calibrated for the
vehicle from the factory. If the
message displays, it means that the
radio has not been configured
properly for the vehicle and it must
be returned to your dealer for
service.
Page 226 of 434
Black plate (42,1)Chevrolet Traverse Owner Manual (GMNA-Localizing-U.S./Canada/Mexico-
7576032) - 2015 - CRC - 8/19/14
7-42 Infotainment System
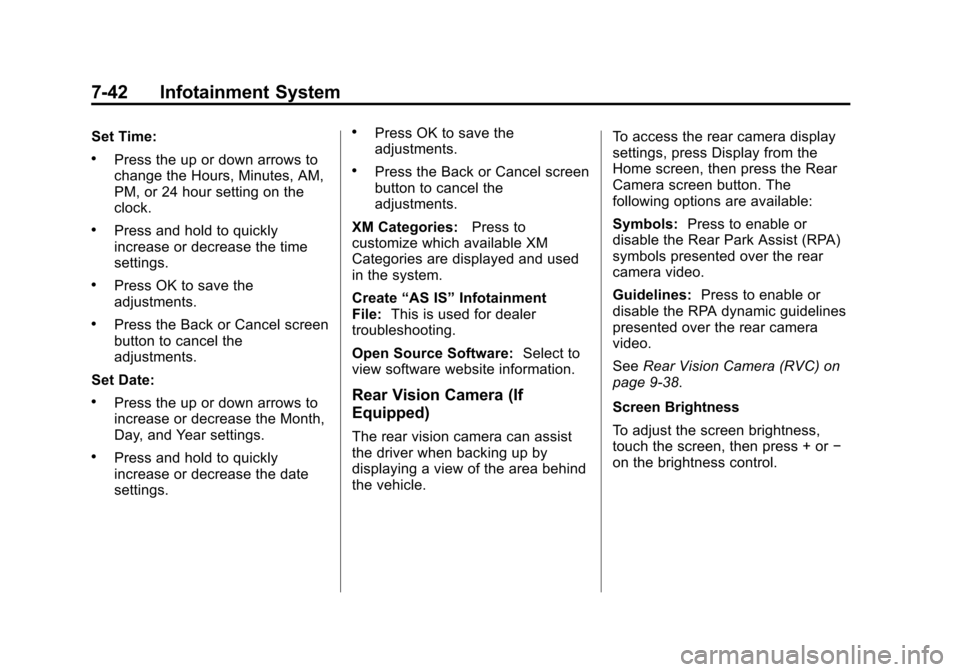
Set Time:
.Press the up or down arrows to
change the Hours, Minutes, AM,
PM, or 24 hour setting on the
clock.
.Press and hold to quickly
increase or decrease the time
settings.
.Press OK to save the
adjustments.
.Press the Back or Cancel screen
button to cancel the
adjustments.
Set Date:
.Press the up or down arrows to
increase or decrease the Month,
Day, and Year settings.
.Press and hold to quickly
increase or decrease the date
settings.
.Press OK to save the
adjustments.
.Press the Back or Cancel screen
button to cancel the
adjustments.
XM Categories: Press to
customize which available XM
Categories are displayed and used
in the system.
Create “AS IS” Infotainment
File: This is used for dealer
troubleshooting.
Open Source Software: Select to
view software website information.
Rear Vision Camera (If
Equipped)
The rear vision camera can assist
the driver when backing up by
displaying a view of the area behind
the vehicle. To access the rear camera display
settings, press Display from the
Home screen, then press the Rear
Camera screen button. The
following options are available:
Symbols:
Press to enable or
disable the Rear Park Assist (RPA)
symbols presented over the rear
camera video.
Guidelines: Press to enable or
disable the RPA dynamic guidelines
presented over the rear camera
video.
See Rear Vision Camera (RVC) on
page 9-38.
Screen Brightness
To adjust the screen brightness,
touch the screen, then press + or −
on the brightness control.
Page 230 of 434
Black plate (2,1)Chevrolet Traverse Owner Manual (GMNA-Localizing-U.S./Canada/Mexico-
7576032) - 2015 - CRC - 8/19/14
8-2 Climate Controls
Temperature Control:Turn
clockwise or counterclockwise to
increase or decrease the
temperature of the air flowing from
the system.
Air Delivery Mode Control: Turn
clockwise or counterclockwise to
change the current airflow mode.
By positioning the right knob
between two modes, a combination
of those two modes is selected.
H(Vent): Air is directed to the
instrument panel outlets.
)(Bi-Level): Air is divided
between the instrument panel and
floor outlets. Some air is directed
toward the windshield and side
window outlets. Cooler air is
directed to the upper outlets and
warmer air to the floor outlets.
6(Floor): Air is directed to the
floor outlets, with some of the air
directed to the windshield, side
window, and second row floor
outlets. In this mode, the system automatically selects outside air.
Recirculation cannot be selected
while in floor mode.
-(Defog):
This clears the
windows of fog or moisture. Air is
directed to the windshield, floor
outlets, and side window vents.
When this mode is selected, the
system turns off recirculation and
runs the air conditioning unless the
outside temperature is less than 4°C
(40°F). Recirculation cannot be
selected while in the defog mode.
Do not drive the vehicle until all the
windows are clear.
0(Defrost): This clears the
windshield of fog or frost more
quickly. Air is directed to the
windshield and side window vents,
with some to the floor vents. In this
mode, outside air is pulled inside
the vehicle. Recirculation cannot be
selected while in the defrost mode.
The air conditioning system runs
automatically in this setting, unless
the outside temperature is less than
4°C (40°F). Do not drive the vehicle
until all windows are clear.
#(Air Conditioning): Press to
turn the air conditioning system on
or off. An indicator light comes on
when A/C is on. The air conditioning
system does not operate when the
outside temperature is below 4°C
(40°F). The indicator light flashes
three times and turns off when
outside conditions affect air
conditioning operation. This is
normal.
For quicker cool down on hot days:
1. Open the windows to let hot air escape.
2. Select
Hmode.
3. Select
#.
4. Select the coolest temperature.
5. Select the highest fan speed.
6. Close the windows after the hot air has escaped.
7. Once the vehicle's interior temperature is below the outside
temperature, select
@mode
for faster cooling.
Page 232 of 434
Black plate (4,1)Chevrolet Traverse Owner Manual (GMNA-Localizing-U.S./Canada/Mexico-
7576032) - 2015 - CRC - 8/19/14
8-4 Climate Controls
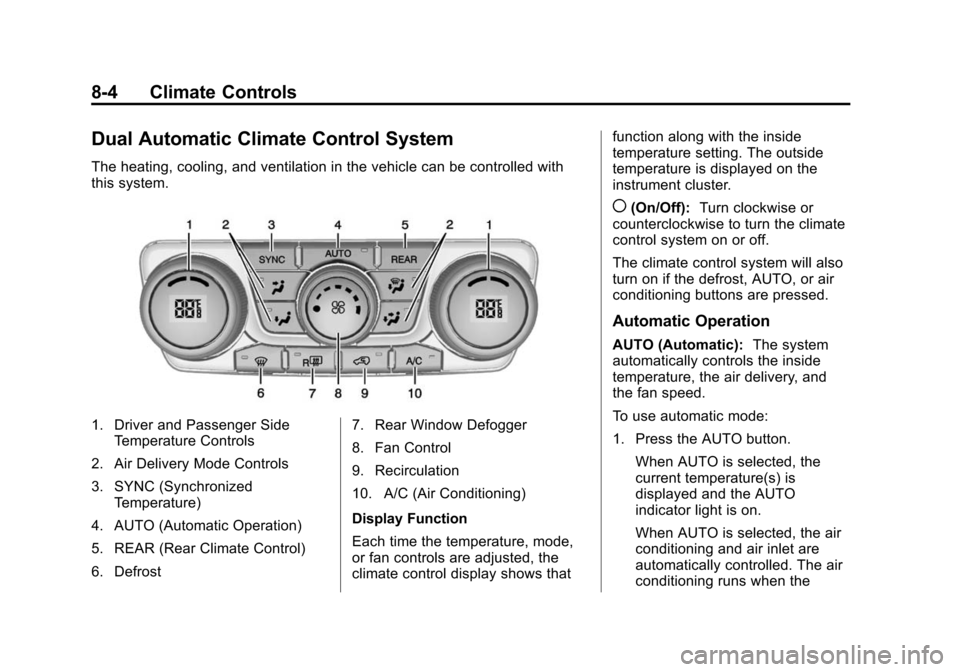
Dual Automatic Climate Control System
The heating, cooling, and ventilation in the vehicle can be controlled with
this system.
1. Driver and Passenger SideTemperature Controls
2. Air Delivery Mode Controls
3. SYNC (Synchronized Temperature)
4. AUTO (Automatic Operation)
5. REAR (Rear Climate Control)
6. Defrost 7. Rear Window Defogger
8. Fan Control
9. Recirculation
10. A/C (Air Conditioning)
Display Function
Each time the temperature, mode,
or fan controls are adjusted, the
climate control display shows thatfunction along with the inside
temperature setting. The outside
temperature is displayed on the
instrument cluster.
((On/Off):
Turn clockwise or
counterclockwise to turn the climate
control system on or off.
The climate control system will also
turn on if the defrost, AUTO, or air
conditioning buttons are pressed.
Automatic Operation
AUTO (Automatic): The system
automatically controls the inside
temperature, the air delivery, and
the fan speed.
To use automatic mode:
1. Press the AUTO button.
When AUTO is selected, the
current temperature(s) is
displayed and the AUTO
indicator light is on.
When AUTO is selected, the air
conditioning and air inlet are
automatically controlled. The air
conditioning runs when the
Page 233 of 434
Black plate (5,1)Chevrolet Traverse Owner Manual (GMNA-Localizing-U.S./Canada/Mexico-
7576032) - 2015 - CRC - 8/19/14
Climate Controls 8-5
outside temperature is over 4°C
(40°F). The system is
automatically set to outside air,
unless it is hot outside and then
the air inlet changes to
recirculation mode to help
quickly cool the vehicle. The
recirculation indicator light will
come on.
2. Set the temperature for the driver and passenger.
To find a comfortable setting,
start with a 22°C (73°F)
temperature setting and allow
about 20 minutes for the system
to regulate. Use the driver side
or passenger side temperature
control to adjust the temperature
setting as necessary. The
system will remain at the
selected setting. Choosing the
warmest or coolest temperatures
does not cause the vehicle to
heat or cool more quickly. To avoid blowing cold air in cold
weather, the system delays
turning on the fan until warm air
is available. Turn the fan knob to
override this delay and select
the fan speed.
Temperature Control
The driver and passenger side
temperature controls are used to
adjust the temperature of the air
coming through the system. The
temperature can be adjusted even if
the system is turned off since
outside air still enters the vehicle,
unless the recirculation mode is
selected. See “Recirculation” later in
this section.
Driver Side Temperature
Control: Turn clockwise or
counterclockwise to increase or
decrease the driver side
temperature. The driver side
temperature display will show the
temperature setting. Passenger Side Temperature
Control:
Turn clockwise or
counterclockwise to increase or
decrease the passenger side
temperature. The passenger side
display will show the temperature
setting.
SYNC (Synchronized
Temperature): Press to set the
passenger temperature to match the
driver temperature setting.
Manual Operation
The air delivery mode or fan speed
can be manually adjusted.
9(Fan Control): Turn the knob
clockwise or counterclockwise to
increase or decrease the fan speed.
Turning the fan control knob while in
automatic control places the fan
speed under manual control.
The air delivery mode remains in
automatic control. The fan setting
displays momentarily and then no
longer displays.
Page 237 of 434
Black plate (9,1)Chevrolet Traverse Owner Manual (GMNA-Localizing-U.S./Canada/Mexico-
7576032) - 2015 - CRC - 8/19/14
Climate Controls 8-9
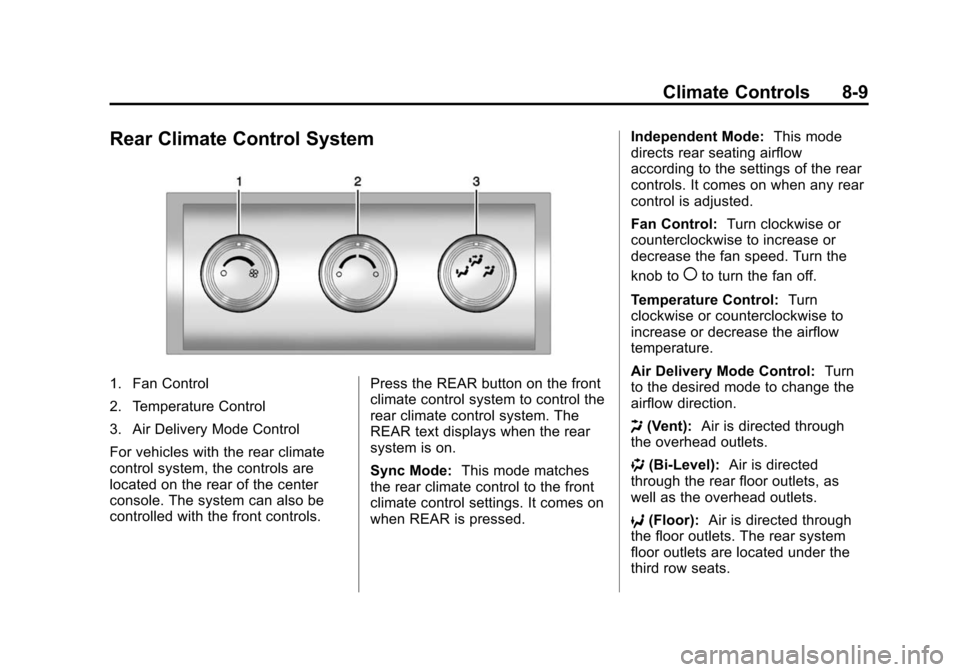
Rear Climate Control System
1. Fan Control
2. Temperature Control
3. Air Delivery Mode Control
For vehicles with the rear climate
control system, the controls are
located on the rear of the center
console. The system can also be
controlled with the front controls.Press the REAR button on the front
climate control system to control the
rear climate control system. The
REAR text displays when the rear
system is on.
Sync Mode:
This mode matches
the rear climate control to the front
climate control settings. It comes on
when REAR is pressed. Independent Mode:
This mode
directs rear seating airflow
according to the settings of the rear
controls. It comes on when any rear
control is adjusted.
Fan Control: Turn clockwise or
counterclockwise to increase or
decrease the fan speed. Turn the
knob to
(to turn the fan off.
Temperature Control: Turn
clockwise or counterclockwise to
increase or decrease the airflow
temperature.
Air Delivery Mode Control: Turn
to the desired mode to change the
airflow direction.
H (Vent): Air is directed through
the overhead outlets.
) (Bi-Level): Air is directed
through the rear floor outlets, as
well as the overhead outlets.
6 (Floor): Air is directed through
the floor outlets. The rear system
floor outlets are located under the
third row seats.