wiring CHEVROLET TRAVERSE 2015 1.G Owners Manual
[x] Cancel search | Manufacturer: CHEVROLET, Model Year: 2015, Model line: TRAVERSE, Model: CHEVROLET TRAVERSE 2015 1.GPages: 434, PDF Size: 5.84 MB
Page 90 of 434
Black plate (34,1)Chevrolet Traverse Owner Manual (GMNA-Localizing-U.S./Canada/Mexico-
7576032) - 2015 - CRC - 8/19/14
3-34 Seats and Restraints
Servicing the
Airbag-Equipped Vehicle
Airbags affect how the vehicle
should be serviced. There are parts
of the airbag system in several
places around the vehicle. Your
dealer and the service manual have
information about servicing the
vehicle and the airbag system. To
purchase a service manual, see
Service Publications Ordering
Information on page 13-11.
{Warning
For up to 10 seconds after the
vehicle is turned off and the
battery is disconnected, an airbag
can still inflate during improper
service. You can be injured if you
are close to an airbag when it
inflates. Avoid yellow connectors.
They are probably part of the
airbag system. Be sure to follow(Continued)
Warning (Continued)
proper service procedures, and
make sure the person performing
work for you is qualified to do so.
Adding Equipment to the
Airbag-Equipped Vehicle
Adding accessories that change the
vehicle's frame, bumper system,
height, front end, or side sheet
metal may keep the airbag system
from working properly.
The operation of the airbag system
can also be affected by changing
any parts of the front seats, safety
belts, airbag sensing and diagnostic
module, steering wheel, instrument
panel, roof-rail airbag modules,
ceiling or pillar garnish trim,
overhead console, front sensors,
side impact sensors, airbag wiring,
or the front center console if the
vehicle has a front center airbag. Your dealer and the service manual
have information about the location
of the airbag sensors, sensing and
diagnostic module, and airbag
wiring.
In addition, the vehicle has a
passenger sensing system that
includes sensors as part of the front
outboard passenger seat. The
passenger sensing system may not
operate properly if the original seat
trim is replaced with non-GM
covers, upholstery, or trim, or; with
GM covers, upholstery, or trim
designed for a different vehicle. Any
object, such as an aftermarket seat
heater or a comfort-enhancing pad
or device, installed under or on top
of the seat fabric, could also
interfere with the operation of the
passenger sensing system. This
could either prevent proper
deployment of the passenger
airbag(s) or prevent the passenger
sensing system from properly
turning off the passenger airbag(s).
See
Passenger Sensing System on
page 3-29.
Page 129 of 434
Black plate (11,1)Chevrolet Traverse Owner Manual (GMNA-Localizing-U.S./Canada/Mexico-
7576032) - 2015 - CRC - 8/19/14
Instruments and Controls 5-11
The power outlet is not designed for
and may not work properly, if the
following are plugged in:
.Equipment with high initial peak
wattage such as:
compressor-driven refrigerators
and electric power tools.
.Other equipment requiring an
extremely stable power supply
such as:
microcomputer-controlled
electric blankets, touch sensor
lamps, etc.
.Medical equipment.
See High Voltage Devices and
Wiring on page 10-28.
Warning Lights,
Gauges, and
Indicators
Warning lights and gauges can
signal that something is wrong
before it becomes serious enough
to cause an expensive repair or
replacement. Paying attention to the
warning lights and gauges could
prevent injury.
Warning lights come on when there
could be a problem with a vehicle
function. Some warning lights come
on briefly when the engine is started
to indicate they are working. Gauges can indicate when there
could be a problem with a vehicle
function. Often gauges and warning
lights work together to indicate a
problem with the vehicle.
When one of the warning lights
comes on and stays on while
driving, or when one of the gauges
shows there may be a problem,
check the section that explains what
to do. Waiting to do repairs can be
costly and even dangerous.
Page 134 of 434
Black plate (16,1)Chevrolet Traverse Owner Manual (GMNA-Localizing-U.S./Canada/Mexico-
7576032) - 2015 - CRC - 8/19/14
5-16 Instruments and Controls
When the vehicle is started, this
light flashes and a chime may come
on to remind passengers to fasten
their safety belt. Then the light stays
on solid until the belt is buckled.
This cycle continues several times if
the passenger remains or becomes
unbuckled while the vehicle is
moving.
If the passenger safety belt is
buckled, neither the chime nor the
light comes on.
The front passenger safety belt
reminder light and chime may turn
on if an object is put on the seat
such as a briefcase, handbag,
grocery bag, laptop, or other
electronic device. To turn off the
reminder light and/or chime, remove
the object from the seat or buckle
the safety belt.
Airbag Readiness Light
This light shows if there is an
electrical problem with the airbag
system. The system check includes
the airbag sensor(s), passenger
sensing system, the pretensioners,
the airbag modules, the wiring, and
the crash sensing and diagnostic
module. For more information on the
airbag system, seeAirbag System
on page 3-22.
The airbag readiness light comes on
for several seconds when the
vehicle is started. If the light does
not come on then, have it fixed
immediately.
{Warning
If the airbag readiness light stays
on after the vehicle is started or
comes on while driving, it means
the airbag system might not be
working properly. The airbags in
the vehicle might not inflate in a
crash, or they could even inflate
without a crash. To help avoid
injury, have the vehicle serviced
right away.
If there is a problem with the airbag
system, a Driver Information Center
(DIC) message may also come on.
See Airbag System Messages on
page 5-41.
Passenger Airbag Status
Indicator
The vehicle has a passenger
sensing system. See Passenger
Sensing System on page 3-29 for
Page 293 of 434
Black plate (53,1)Chevrolet Traverse Owner Manual (GMNA-Localizing-U.S./Canada/Mexico-
7576032) - 2015 - CRC - 8/19/14
Driving and Operating 9-53
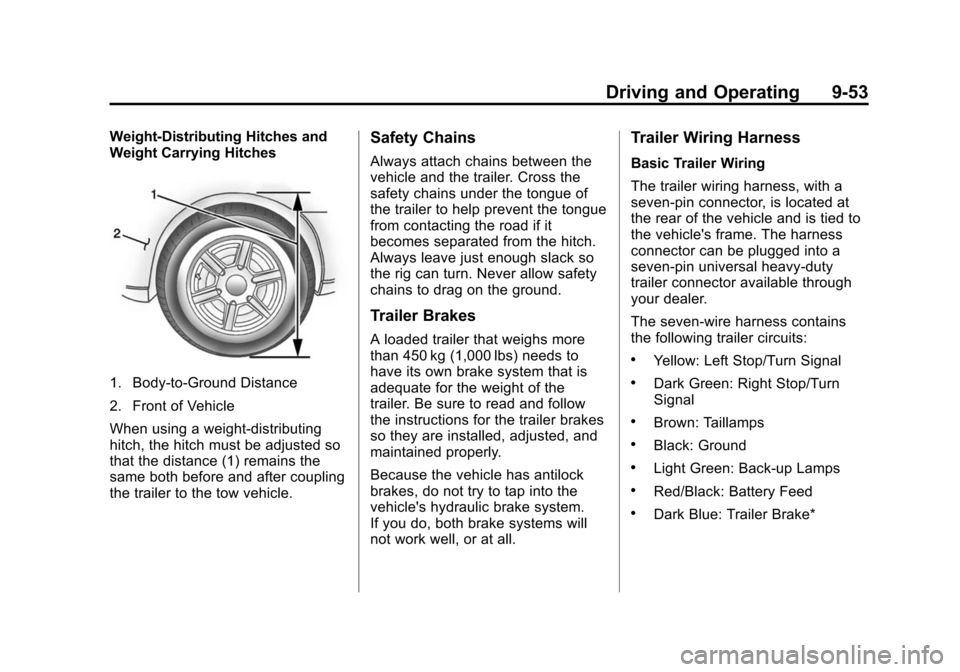
Weight-Distributing Hitches and
Weight Carrying Hitches
1. Body-to-Ground Distance
2. Front of Vehicle
When using a weight-distributing
hitch, the hitch must be adjusted so
that the distance (1) remains the
same both before and after coupling
the trailer to the tow vehicle.
Safety Chains
Always attach chains between the
vehicle and the trailer. Cross the
safety chains under the tongue of
the trailer to help prevent the tongue
from contacting the road if it
becomes separated from the hitch.
Always leave just enough slack so
the rig can turn. Never allow safety
chains to drag on the ground.
Trailer Brakes
A loaded trailer that weighs more
than 450 kg (1,000 lbs) needs to
have its own brake system that is
adequate for the weight of the
trailer. Be sure to read and follow
the instructions for the trailer brakes
so they are installed, adjusted, and
maintained properly.
Because the vehicle has antilock
brakes, do not try to tap into the
vehicle's hydraulic brake system.
If you do, both brake systems will
not work well, or at all.
Trailer Wiring Harness
Basic Trailer Wiring
The trailer wiring harness, with a
seven-pin connector, is located at
the rear of the vehicle and is tied to
the vehicle's frame. The harness
connector can be plugged into a
seven-pin universal heavy-duty
trailer connector available through
your dealer.
The seven-wire harness contains
the following trailer circuits:
.Yellow: Left Stop/Turn Signal
.Dark Green: Right Stop/Turn
Signal
.Brown: Taillamps
.Black: Ground
.Light Green: Back-up Lamps
.Red/Black: Battery Feed
.Dark Blue: Trailer Brake*
Page 294 of 434
Black plate (54,1)Chevrolet Traverse Owner Manual (GMNA-Localizing-U.S./Canada/Mexico-
7576032) - 2015 - CRC - 8/19/14
9-54 Driving and Operating
*The fuse for this circuit is installed
in the underhood electrical center,
but the wires are not connected.
They should be connected by your
dealer or a qualified service center.
If the back-up lamp circuit is not
functional, contact your dealer.
If a remote (non-vehicle) battery is
being charged, press the Tow/Haul
mode switch located on the center
console near the climate controls.
This will boost the vehicle system
voltage and properly charge the
battery. If the trailer is too light for
Tow/Haul mode, turn on the
headlamps (non-HID only) as a
second way to boost the vehicle
system and charge the battery.Electric Trailer Brake Control
Wiring Provisions
These wiring provisions for an
electric trailer brake controller are
included with the vehicle as part of
the trailer wiring package. The
instrument panel contains blunt cut
wires above the parking brake
assembly for the electric trailer
brake controller. The harness
contains the following wires:
.Red/Black: Power Supply
.White: Brake Switch Signal
.Gray: Illumination
.Dark Blue: Trailer Brake Signal
.Black: Ground
The electric trailer brake controller
should be installed by your dealer or
a qualified service center.
Conversions and
Add-Ons
Add-On Electrical
Equipment
{Caution
Some electrical equipment can
damage the vehicle or cause
components to not work and
would not be covered by the
warranty. Always check with your
dealer before adding electrical
equipment.
Add-on equipment can drain the
vehicle's 12-volt battery, even if the
vehicle is not operating.
The vehicle has an airbag system.
Before attempting to add anything
electrical to the vehicle, see
Servicing the Airbag-Equipped
Vehicle on page 3-34 andAdding
Equipment to the Airbag-Equipped
Vehicle on page 3-34.
Page 295 of 434
Black plate (1,1)Chevrolet Traverse Owner Manual (GMNA-Localizing-U.S./Canada/Mexico-
7576032) - 2015 - CRC - 8/19/14
Vehicle Care 10-1
Vehicle Care
General Information
General Information . . . . . . . . . . 10-2
California Proposition65 Warning . . . . . . . . . . . . . . . . . 10-2
California Perchlorate Materials Requirements . . . . 10-2
Accessories and Modifications . . . . . . . . . . . . . . . 10-2
Vehicle Checks
Doing Your OwnService Work . . . . . . . . . . . . . . . 10-3
Hood . . . . . . . . . . . . . . . . . . . . . . . . 10-4
Engine Compartment Overview . . . . . . . . . . . . . . . . . . . 10-5
Engine Cover . . . . . . . . . . . . . . . . 10-6
Engine Oil . . . . . . . . . . . . . . . . . . . 10-7
Engine Oil Life System . . . . . . 10-9
Automatic Transmission Fluid . . . . . . . . . . . . . . . . . . . . . . 10-10
Engine Air Cleaner/Filter . . . . 10-11
Cooling System . . . . . . . . . . . . 10-12
Engine Coolant . . . . . . . . . . . . . 10-12
Engine Overheating . . . . . . . . 10-16 Overheated Engine
Protection
Operating Mode . . . . . . . . . . . 10-18
Power Steering Fluid . . . . . . . 10-19
Washer Fluid . . . . . . . . . . . . . . . 10-19
Brakes . . . . . . . . . . . . . . . . . . . . . 10-20
Brake Fluid . . . . . . . . . . . . . . . . . 10-21
Battery . . . . . . . . . . . . . . . . . . . . . 10-22
All-Wheel Drive . . . . . . . . . . . . . 10-23
Starter Switch Check . . . . . . . 10-23
Automatic Transmission Shift Lock Control Function
Check . . . . . . . . . . . . . . . . . . . . . 10-23
Ignition Transmission Lock Check . . . . . . . . . . . . . . . . . . . . . 10-24
Park Brake and P (Park) Mechanism Check . . . . . . . . 10-24
Wiper Blade Replacement . . . . . . . . . . . . . . 10-24
Headlamp Aiming
Headlamp Aiming . . . . . . . . . . 10-26
Bulb Replacement
Bulb Replacement . . . . . . . . . . 10-26
Taillamps, Turn Signal, andStoplamps . . . . . . . . . . . . . . . . 10-26
License Plate Lamp . . . . . . . . 10-27
Replacement Bulbs . . . . . . . . . 10-28
Electrical System
High Voltage Devices and Wiring . . . . . . . . . . . . . . . . . . . . . 10-28
Electrical System Overload . . . . . . . . . . . . . . . . . . 10-28
Fuses and Circuit
Breakers . . . . . . . . . . . . . . . . . . 10-29
Engine Compartment Fuse Block . . . . . . . . . . . . . . . . . . . . . 10-29
Instrument Panel Fuse Block . . . . . . . . . . . . . . . . . . . . . 10-32
Wheels and Tires
Tires . . . . . . . . . . . . . . . . . . . . . . . . 10-35
All-Season Tires . . . . . . . . . . . . 10-36
Winter Tires . . . . . . . . . . . . . . . . 10-36
Summer Tires . . . . . . . . . . . . . . 10-37
Tire Sidewall Labeling . . . . . . 10-37
Tire Designations . . . . . . . . . . . 10-39
Tire Terminology andDefinitions . . . . . . . . . . . . . . . . 10-40
Tire Pressure . . . . . . . . . . . . . . . 10-43
Tire Pressure Monitor System . . . . . . . . . . . . . . . . . . . 10-44
Tire Pressure Monitor Operation . . . . . . . . . . . . . . . . . 10-45
Tire Inspection . . . . . . . . . . . . . . 10-48
Tire Rotation . . . . . . . . . . . . . . . 10-49
Page 322 of 434
Black plate (28,1)Chevrolet Traverse Owner Manual (GMNA-Localizing-U.S./Canada/Mexico-
7576032) - 2015 - CRC - 8/19/14
10-28 Vehicle Care
8. Push on the lamp side oppositethe clip until the lamp assembly
snaps into place.
Replacement Bulbs
Exterior Lamp Bulb
Number
License Plate Lamp 194 LL
Rear Turn
Signal Lamp 7443 NA
Taillamp/Stop Lamp 7444 LL
For replacement bulbs not listed
here, contact your dealer.
Electrical System
High Voltage Devices and
Wiring
{Warning
Exposure to high voltage can
cause shock, burns, and even
death. The high voltage
components in the vehicle can
only be serviced by technicians
with special training.
High voltage components are
identified by labels. Do not
remove, open, take apart,
or modify these components.
High voltage cable or wiring has
orange covering. Do not probe,
tamper with, cut, or modify high
voltage cable or wiring.
Electrical System
Overload
The vehicle has fuses and circuit
breakers to protect against an
electrical system overload.
When the current electrical load is
too heavy, the circuit breaker opens
and closes, protecting the circuit
until the current load returns to
normal or the problem is fixed. This
greatly reduces the chance of circuit
overload and fire caused by
electrical problems.
Fuses and circuit breakers protect
power devices in the vehicle.
Replace a bad fuse with a new one
of the identical size and rating.
If there is a problem on the road and
a fuse needs to be replaced, the
same amperage fuse can be
borrowed. Choose some feature of
the vehicle that is not needed to use
and replace it as soon as possible.
Page 323 of 434
Black plate (29,1)Chevrolet Traverse Owner Manual (GMNA-Localizing-U.S./Canada/Mexico-
7576032) - 2015 - CRC - 8/19/14
Vehicle Care 10-29
Headlamp Wiring
An electrical overload may cause
the lamps to go on and off, or in
some cases to remain off. Have the
headlamp wiring checked right away
if the lamps go on and off or
remain off.
Windshield Wipers
If the wiper motor overheats due to
heavy snow or ice, the windshield
wipers will stop until the motor cools
and will then restart.
Although the circuit is protected
from electrical overload, overload
due to heavy snow or ice may
cause wiper linkage damage.
Always clear ice and heavy snow
from the windshield before using the
windshield wipers.
If the overload is caused by an
electrical problem and not snow or
ice, be sure to get it fixed.
Fuses and Circuit
Breakers
The wiring circuits in your vehicle
are protected from short circuits by
a combination of fuses, circuit
breakers and fusible thermal links.
This greatly reduces the chance of
fires caused by electrical problems.
Look at the silver-colored band
inside the fuse. If the band is broken
or melted, replace the fuse. Be sure
you replace a bad fuse with a new
one of the identical size and rating.
Fuses of the same amperage can
be temporarily borrowed from
another fuse location, if a fuse goes
out. Replace the fuse as soon as
you can.
Engine Compartment
Fuse Block
The underhood fuse block is in the
engine compartment, on the
passenger side of the vehicle.
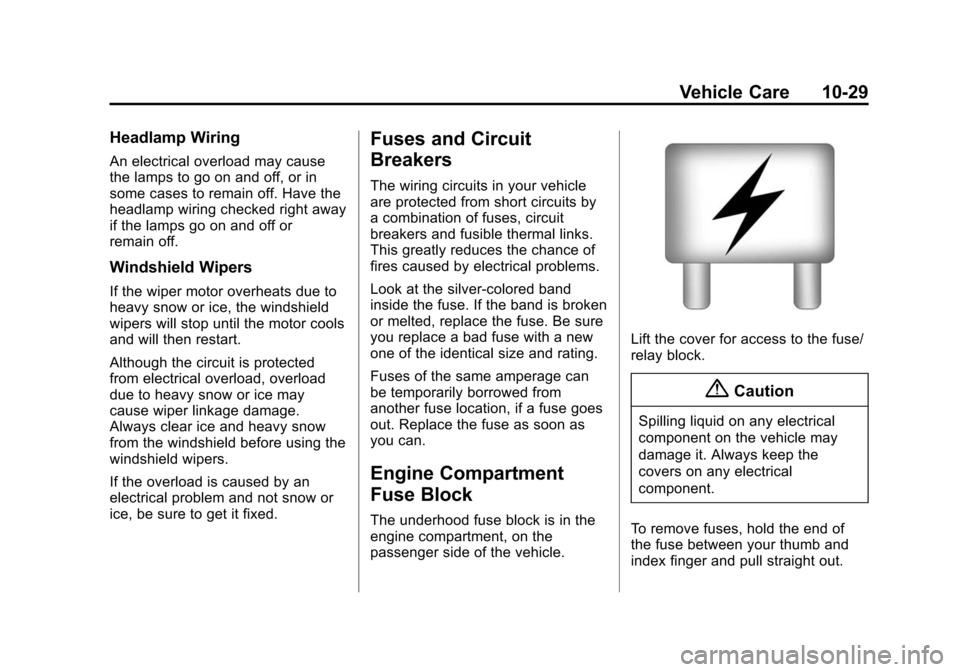
Lift the cover for access to the fuse/
relay block.
{Caution
Spilling liquid on any electrical
component on the vehicle may
damage it. Always keep the
covers on any electrical
component.
To remove fuses, hold the end of
the fuse between your thumb and
index finger and pull straight out.
Page 426 of 434

Black plate (6,1)Chevrolet Traverse Owner Manual (GMNA-Localizing-U.S./Canada/Mexico-
7576032) - 2015 - CRC - 8/19/14
i-6 INDEX
HeaterEngine . . . . . . . . . . . . . . . . . . . . . . . . 9-17
Heating and Air Conditioning . . . 8-1
High Voltage Devices and Wiring . . . . . . . . . . . . . . . . . . . . . . . 10-28
High-Beam On Light . . . . . . . . . . . 5-25
Hill and Mountain Roads . . . . . . . . 9-6
Hill Start Assist (HSA) . . . . . . . . . 9-28
Hood . . . . . . . . . . . . . . . . . . . . . . . . . . 10-4
Horn . . . . . . . . . . . . . . . . . . . . . . . . . . . . 5-4
How to Wear Safety Belts Properly . . . . . . . . . . . . . . . . . . . . . . 3-15
I
Ignition Positions . . . . . . . . . . . . . . 9-14
Ignition Transmission LockCheck . . . . . . . . . . . . . . . . . . . . . . . 10-24
Immobilizer . . . . . . . . . . . . . . . . . . . . 2-13
Indicator
Vehicle Ahead . . . . . . . . . . . . . . . . 5-22
Infants and Young Children, Restraints . . . . . . . . . . . . . . . . . . . . 3-38
Infotainment . . . . . . . . . . . . . . . . . . . . 7-1
Infotainment System . . . . . . . . . . 13-15
Instrument Cluster . . . . . . . . . . . . . 5-12 Instrument Panel
Storage Area . . . . . . . . . . . . . . . . . . 4-1
Interior Rearview Mirrors . . . . . . . 2-16
Introduction . . . . . . . . . . . . . . . . . . . . . . . iii
J
Jump Starting . . . . . . . . . . . . . . . . . 10-67
K
Key and Lock Messages . . . . . . . 5-38
Keyless Entry Remote (RKE) System . . . . . . . . 2-2
Keys . . . . . . . . . . . . . . . . . . . . . . . . . . . . 2-1
L
Labeling, Tire Sidewall . . . . . . . . 10-37
Lamps Courtesy . . . . . . . . . . . . . . . . . . . . . . . 6-5
Dome . . . . . . . . . . . . . . . . . . . . . . . . . . 6-6
Exterior Controls . . . . . . . . . . . . . . . 6-1
Fog . . . . . . . . . . . . . . . . . . . . . . . . . . . . 6-4
License Plate . . . . . . . . . . . . . . . 10-27 Lamps (cont'd)
Malfunction Indicator . . . . . . . . . 5-18
Messages . . . . . . . . . . . . . . . . . . . . 5-38
Reading . . . . . . . . . . . . . . . . . . . . . . . 6-6
Lane Departure Warning (LDW) . . . . . . . . . . . . . . . 9-41
Lane Departure Warning Light . . . . . . . . . . . . . . . . . . . . . . . . . 5-22
Lap-Shoulder Belt . . . . . . . . . . . . . 3-16
LATCH System
Replacing Parts after aCrash . . . . . . . . . . . . . . . . . . . . . . . 3-50
LATCH, Lower Anchors and Tethers for Children . . . . . . . . . . 3-43
Liftgate . . . . . . . . . . . . . . . . . . . . . . . . . 2-8
Lighting Delayed Entry . . . . . . . . . . . . . . . . . 6-7
Delayed Exit . . . . . . . . . . . . . . . . . . . 6-7
Entry . . . . . . . . . . . . . . . . . . . . . . . . . . 6-7
Illumination Control . . . . . . . . . . . . 6-5
Parade Dimming . . . . . . . . . . . . . . . 6-8
Lights Airbag Readiness . . . . . . . . . . . . . 5-16
Antilock Brake System
(ABS) Warning . . . . . . . . . . . . . . 5-21
Brake System Warning . . . . . . . 5-20
Charging System . . . . . . . . . . . . . 5-17
Page 432 of 434

Black plate (12,1)Chevrolet Traverse Owner Manual (GMNA-Localizing-U.S./Canada/Mexico-
7576032) - 2015 - CRC - 8/19/14
i-12 INDEX
Traction Control/ElectronicStability Control . . . . . . . . . . . . . . 9-28
Trademarks and License Agreements . . . . . . . . . . . . . . . . . . 7-43
Trailer Towing . . . . . . . . . . . . . . . . . . . . . . . . 9-50
Transmission
Automatic . . . . . . . . . . . . . . . . . . . . . 9-22
Fluid, Automatic . . . . . . . . . . . . 10-10
Messages . . . . . . . . . . . . . . . . . . . . 5-43
Transportation Program,
Courtesy . . . . . . . . . . . . . . . . . . . . . 13-7
Turn and Lane-Change Signals . . . . . . . . . . . . . . . . . . . . . . . . 6-4
U
Uniform Tire QualityGrading . . . . . . . . . . . . . . . . . . . . . 10-53
Universal Remote System . . . . . 5-52 Operation . . . . . . . . . . . . . . . . . . . . . 5-55
Programming . . . . . . . . . . . . . . . . . 5-52
Using This Manual . . . . . . . . . . . . . . . . iii
V
Vehicle Alarm System . . . . . . . . . . . . . . . . 2-12
Canadian Owners . . . . . . . . . . . . . . . iii
Control . . . . . . . . . . . . . . . . . . . . . . . . 9-3
IdentificationNumber (VIN) . . . . . . . . . . . . . . . 12-1
Load Limits . . . . . . . . . . . . . . . . . . . . 9-9
Messages . . . . . . . . . . . . . . . . . . . . 5-34
Personalization . . . . . . . . . . . . . . . 5-45
Reminder Messages . . . . . . . . . . 5-44
Remote Start . . . . . . . . . . . . . . . . . . 2-4
Security . . . . . . . . . . . . . . . . . . . . . . 2-12
Speed Messages . . . . . . . . . . . . . 5-44
Towing . . . . . . . . . . . . . . . . . . . . . . 10-70
Vehicle Ahead Indicator . . . . . . . 5-22
Vehicle Care
Tire Pressure . . . . . . . . . . . . . . . 10-43
Vehicle Data Recording and Privacy . . . . . . . . . . . . . . . . . 13-14
Vehicle Diagnostics OnStar
®. . . . . . . . . . . . . . . . . . . . . . 14-6
Ventilation, Air . . . . . . . . . . . . . . . . . 8-11
Visors . . . . . . . . . . . . . . . . . . . . . . . . . 2-19 Voltage Devices and
Wiring . . . . . . . . . . . . . . . . . . . . . . . 10-28
Voltmeter Gauge . . . . . . . . . . . . . . 5-15
W
Warning Brake System Light . . . . . . . . . . . 5-20
Lane Departure (LDW) . . . . . . . 9-41
Warning Lights, Gauges,
and Indicators . . . . . . . . . . . . . . . . 5-11
Warnings . . . . . . . . . . . . . . . . . . . . . . . . . iv Cautions and Danger . . . . . . . . . . . .iv
Hazard Flashers . . . . . . . . . . . . . . . 6-3
Washer Fluid . . . . . . . . . . . . . . . . . 10-19 Messages . . . . . . . . . . . . . . . . . . . . 5-44
Wheels Alignment and TireBalance . . . . . . . . . . . . . . . . . . . 10-54
Different Size . . . . . . . . . . . . . . . 10-52
Replacement . . . . . . . . . . . . . . . 10-55
When It Is Time for New Tires . . . . . . . . . . . . . . . . . . . . . . . . 10-50
Where to Put the Restraint . . . . 3-42
Windows . . . . . . . . . . . . . . . . . . . . . . 2-17
Power . . . . . . . . . . . . . . . . . . . . . . . . 2-17