manual radio set CHEVROLET TRAVERSE 2017 1.G Owners Manual
[x] Cancel search | Manufacturer: CHEVROLET, Model Year: 2017, Model line: TRAVERSE, Model: CHEVROLET TRAVERSE 2017 1.GPages: 394, PDF Size: 6.47 MB
Page 21 of 394
Chevrolet Traverse Owner Manual (GMNA-Localizing-U.S./Canada/Mexico-
9955676) - 2017 - crc - 3/29/16
20 In Brief
Vehicle Features
Infotainment System
If the vehicle has a base radio it is
included in this manual. See the
separate infotainment manual for
information on the connected radios,
audio players, phone, navigation
system, and voice or speech
recognition. There is also
information on settings and
downloadable applications
(if equipped).
Radio(s)
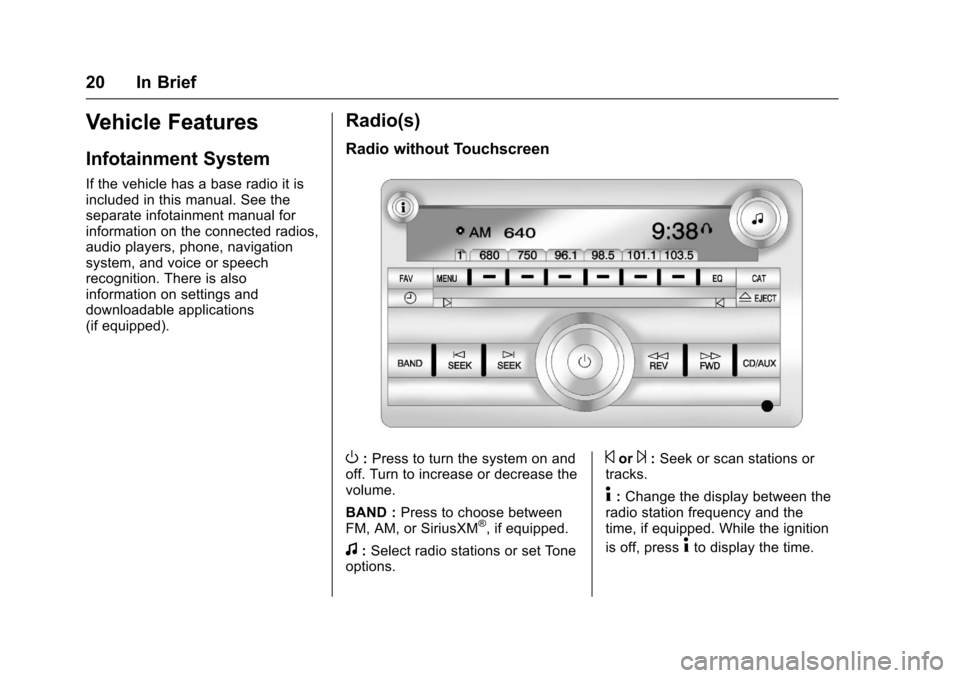
Radio without Touchscreen
O:Press to turn the system on and
off. Turn to increase or decrease the
volume.
BAND : Press to choose between
FM, AM, or SiriusXM
®, if equipped.
f: Select radio stations or set Tone
options.
©or¨: Seek or scan stations or
tracks.
4: Change the display between the
radio station frequency and the
time, if equipped. While the ignition
is off, press
4to display the time.
Page 22 of 394
Chevrolet Traverse Owner Manual (GMNA-Localizing-U.S./Canada/Mexico-
9955676) - 2017 - crc - 3/29/16
In Brief 21
For more information about these
and other radio features, see
Operation (Radio without
Touchscreen)0168 orOperation
(Radio with Touchscreen) 0170.
If equipped with Rear Seat
Entertainment (RSE), see the
infotainment manual.
Storing a Favorite Station
A maximum of 36 stations can be
stored as favorites using the six
softkeys located below the radio
station frequency tabs and by using
the radio FAV button. Press FAV to
go through up to six pages of
favorites, each having six favorite
stations available per page. Each
page of favorites can contain any
combination of AM, FM, or SiriusXM
stations, if equipped.
See AM-FM Radio (Radio without
Touchscreen) 0173 orAM-FM
Radio (Radio with
Touchscreen) 0174.
Setting the Clock
To set the time and date:
1. Turn the ignition key to ACC/ ACCESSORY or ON/RUN,
then press
Oto turn the
radio on.
2. Press
Hto display HR, MIN,
MM, DD, YYYY (hour, minute,
month, day, and year).
3. Press the pushbutton located under any one of the labels to
be changed.
4. To increase or decrease the time or date, turn
fclockwise
or counterclockwise.
See Clock (Radio without
Touchscreen) 0114 orClock (Radio
with Touchscreen) 0115.
Page 23 of 394
Chevrolet Traverse Owner Manual (GMNA-Localizing-U.S./Canada/Mexico-
9955676) - 2017 - crc - 3/29/16
22 In Brief
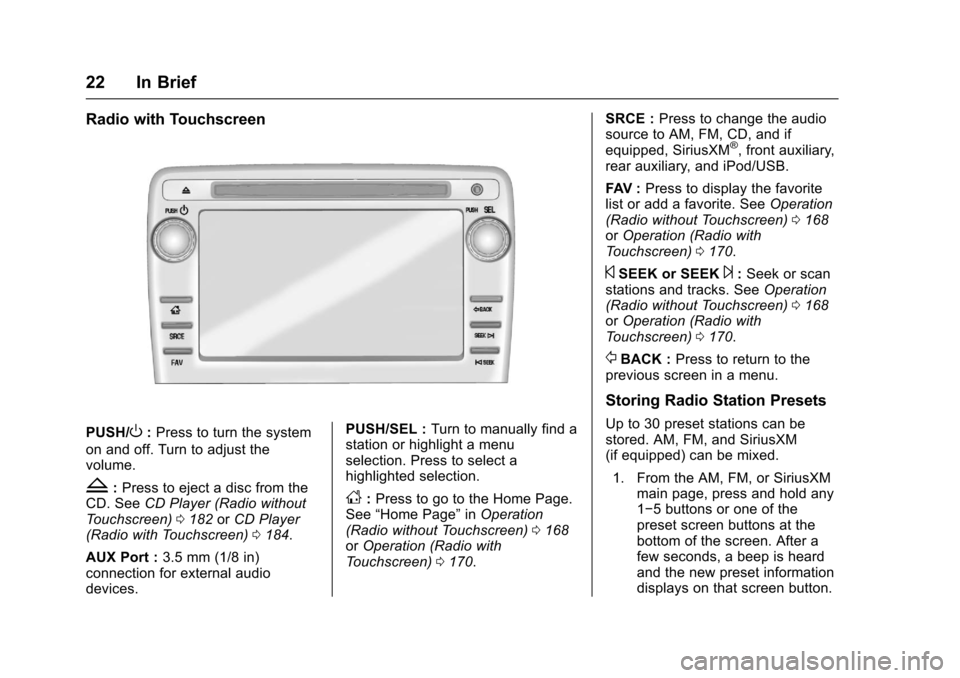
Radio with Touchscreen
PUSH/O:Press to turn the system
on and off. Turn to adjust the
volume.
Z: Press to eject a disc from the
CD. See CD Player (Radio without
Touchscreen) 0182 orCD Player
(Radio with Touchscreen) 0184.
AUX Port : 3.5 mm (1/8 in)
connection for external audio
devices. PUSH/SEL :
Turn to manually find a
station or highlight a menu
selection. Press to select a
highlighted selection.D: Press to go to the Home Page.
See “Home Page” inOperation
(Radio without Touchscreen) 0168
or Operation (Radio with
Touchscreen) 0170. SRCE :
Press to change the audio
source to AM, FM, CD, and if
equipped, SiriusXM
®, front auxiliary,
rear auxiliary, and iPod/USB.
FAV : Press to display the favorite
list or add a favorite. See Operation
(Radio without Touchscreen) 0168
or Operation (Radio with
Touchscreen) 0170.
©SEEK or SEEK¨:Seek or scan
stations and tracks. See Operation
(Radio without Touchscreen) 0168
or Operation (Radio with
Touchscreen) 0170.
/BACK : Press to return to the
previous screen in a menu.
Storing Radio Station Presets
Up to 30 preset stations can be
stored. AM, FM, and SiriusXM
(if equipped) can be mixed.
1. From the AM, FM, or SiriusXM main page, press and hold any
1−5 buttons or one of the
preset screen buttons at the
bottom of the screen. After a
few seconds, a beep is heard
and the new preset information
displays on that screen button.
Page 24 of 394
Chevrolet Traverse Owner Manual (GMNA-Localizing-U.S./Canada/Mexico-
9955676) - 2017 - crc - 3/29/16
In Brief 23
2. Repeat for each preset.
Setting the Clock
Press Settings on the Home Page,
then press the Set Time or Set Date
settings screen button to display the
different options for setting the time
and date.
Set Time:
.Press the up or down arrows to
change the Hours, Minutes, AM,
PM, or 24 hour setting on the
clock.
. Press and hold to quickly
increase or decrease the time
settings.
. Press OK to save the
adjustments.
. Press the Back or Cancel screen
button to cancel the
adjustments.
Set Date:
. Press the up or down arrows to
increase or decrease the Month,
Day, and Year settings. .
Press and hold to quickly
increase or decrease the date
settings.
. Press OK to save the
adjustments.
. Press the Back or Cancel screen
button to cancel the
adjustments.
Satellite Radio
If equipped, vehicles with a
SiriusXM®satellite radio tuner and a
valid SiriusXM satellite radio
subscription can receive SiriusXM
programming.
SiriusXM Satellite Radio
Service
SiriusXM is a satellite radio service
based in the 48 contiguous United
States and 10 Canadian provinces.
SiriusXM satellite radio has a wide
variety of programming and
commercial-free music, coast to
coast, and in digital-quality sound.
A fee is required to receive the
SiriusXM service. Refer to:
.
www.siriusxm.com or call
1-888-601-6296 (U.S.).
. www.siriusxm.ca or call
1-877-438-9677 (Canada).
See Satellite Radio (Radio without
Touchscreen) 0177 orSatellite
Radio (Radio with
Touchscreen) 0180.
Portable Audio Devices
The vehicle has a 3.5 mm (1/8 in)
auxiliary input jack on the faceplate
and a USB port in the center stack.
External devices such as iPods,
laptop computers, MP3 players, CD
changers, USB storage devices,
etc. can be connected to the
auxiliary port using a 3.5 mm (1/8 in)
input jack or the USB port
depending on the audio system.
If equipped, there are two USB
ports on the rear of the center
console that can be used for
charging only. They can charge
devices that draw 2.1 amps or less.
See the device’ s owner manual for
the specification.
Page 26 of 394
Chevrolet Traverse Owner Manual (GMNA-Localizing-U.S./Canada/Mexico-
9955676) - 2017 - crc - 3/29/16
In Brief 25
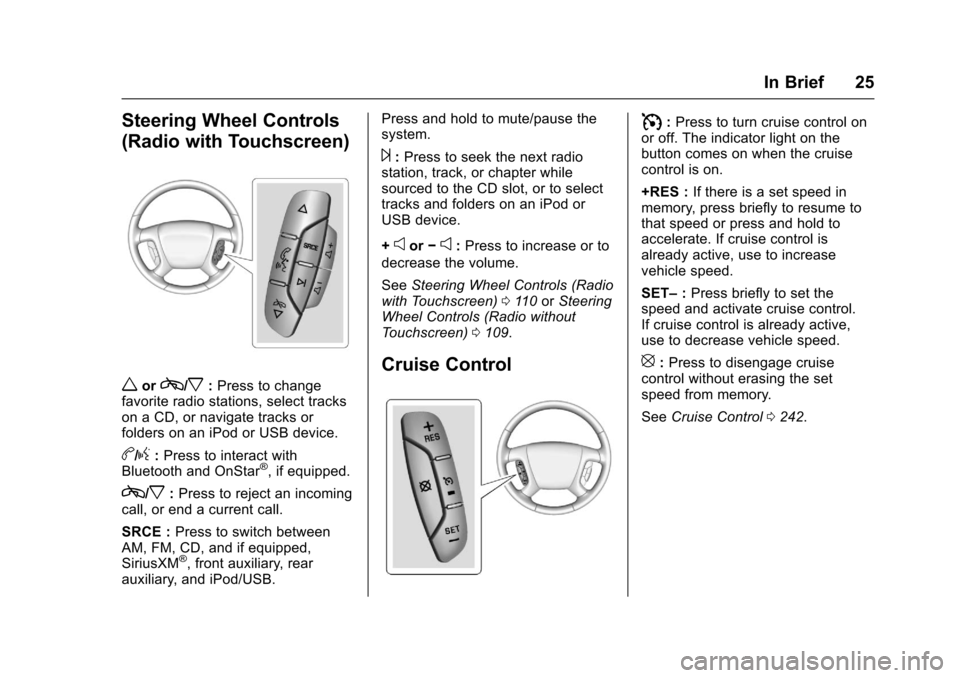
Steering Wheel Controls
(Radio with Touchscreen)
worc/x:Press to change
favorite radio stations, select tracks
on a CD, or navigate tracks or
folders on an iPod or USB device.
b/g: Press to interact with
Bluetooth and OnStar®, if equipped.
c/x: Press to reject an incoming
call, or end a current call.
SRCE : Press to switch between
AM, FM, CD, and if equipped,
SiriusXM
®, front auxiliary, rear
auxiliary, and iPod/USB. Press and hold to mute/pause the
system.
¨:
Press to seek the next radio
station, track, or chapter while
sourced to the CD slot, or to select
tracks and folders on an iPod or
USB device.
+
eor −e:Press to increase or to
decrease the volume.
See Steering Wheel Controls (Radio
with Touchscreen) 0110 orSteering
Wheel Controls (Radio without
Touchscreen) 0109.
Cruise Control
I:Press to turn cruise control on
or off. The indicator light on the
button comes on when the cruise
control is on.
+RES : If there is a set speed in
memory, press briefly to resume to
that speed or press and hold to
accelerate. If cruise control is
already active, use to increase
vehicle speed.
SET– :Press briefly to set the
speed and activate cruise control.
If cruise control is already active,
use to decrease vehicle speed.
[: Press to disengage cruise
control without erasing the set
speed from memory.
See Cruise Control 0242.
Page 44 of 394
Chevrolet Traverse Owner Manual (GMNA-Localizing-U.S./Canada/Mexico-
9955676) - 2017 - crc - 3/29/16
Keys, Doors, and Windows 43
disarming the system. When the
alarm is activated, the turn signals
flash and the horn sounds for about
30 seconds. The alarm system will
then re-arm to monitor for the next
unauthorized event.
The vehicle can be started with the
correct ignition key if the alarm has
been set off.
To avoid setting off the alarm by
accident:
.Lock the vehicle with the door
key after the doors are closed.
. Unlock the door with the RKE
transmitter. Unlocking a door any
other way sets off the alarm if
the system has been armed.
Press
Kor place the key in the
ignition and turn it to START to turn
off the alarm.
Testing the Alarm
To test the alarm:
1. From inside the vehicle, lower the driver side window, and
open the driver door.
2. Press
Q. 3. Get out of the vehicle, close
the door, and wait for the
security light to go out.
4. Reach in through the window, unlock the door with the
manual door lock, and open
the door. This should set off the
alarm.
If the alarm does not sound when it
should, but the headlamps flash,
check to see if the horn works. The
horn fuse may be blown. To replace
the fuse, see Fuses and Circuit
Breakers 0291.
If the alarm does not sound or the
headlamps do not flash, see your
dealer for service.
Immobilizer
See Radio Frequency
Statement 0369.
Immobilizer Operation
This vehicle has PASS-Key®III+
(Personalized Automotive Security
System) theft-deterrent system.
PASS-Key III+ is a passive
theft-deterrent system. The system is automatically armed
when the key is removed from the
ignition.
The system is automatically
disarmed when the key is turned to
ON/RUN, ACC/ACCESSORY,
or START from the LOCK/OFF
position.
You do not have to manually arm or
disarm the system.
The security light comes on if there
is a problem with arming or
disarming the theft-deterrent
system.
When the PASS-Key III+ system
senses an incorrect key, the vehicle
does not start. Anyone using a
trial-and-error method to start the
vehicle will be discouraged because
of the high number of electrical key
codes.
If the engine does not start and the
security light on the instrument
panel comes on when trying to start
the vehicle, there may be a problem
with the theft-deterrent system. Turn
the ignition off and try again.
Page 110 of 394
Chevrolet Traverse Owner Manual (GMNA-Localizing-U.S./Canada/Mexico-
9955676) - 2017 - crc - 3/29/16
Instruments and Controls 109
Vehicle Speed Messages . . . . . 146
Washer Fluid Messages . . . . . . 146
Vehicle Personalization
Vehicle Personalization (WithDIC Buttons) . . . . . . . . . . . . . . . . 146
Universal Remote System
Universal Remote System . . . . 153
Universal Remote SystemProgramming . . . . . . . . . . . . . . . 153
Universal Remote System Operation . . . . . . . . . . . . . . . . . . . 156
Controls
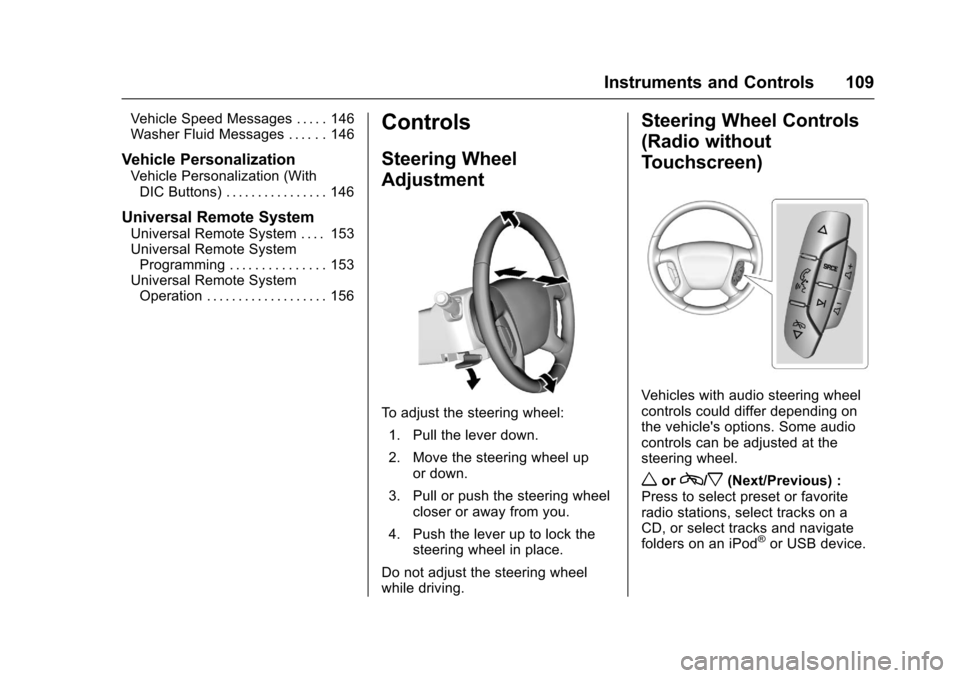
Steering Wheel
Adjustment
To adjust the steering wheel:
1. Pull the lever down.
2. Move the steering wheel up or down.
3. Pull or push the steering wheel closer or away from you.
4. Push the lever up to lock the steering wheel in place.
Do not adjust the steering wheel
while driving.
Steering Wheel Controls
(Radio without
Touchscreen)
Vehicles with audio steering wheel
controls could differ depending on
the vehicle's options. Some audio
controls can be adjusted at the
steering wheel.
worc/x(Next/Previous) :
Press to select preset or favorite
radio stations, select tracks on a
CD, or select tracks and navigate
folders on an iPod
®or USB device.
Page 111 of 394
Chevrolet Traverse Owner Manual (GMNA-Localizing-U.S./Canada/Mexico-
9955676) - 2017 - crc - 3/29/16
110 Instruments and Controls
To select tracks on an iPod or USB
device:
.Press and hold
worc/x
while listening to a song listed in
the main audio page to quickly
move forward or in reverse
through the tracks.
. Track information is displayed on
the screen. Release
worc
/xwhen the desired track is
reached.
b/g(Mute/Press to Talk) : Press
to mute the speakers. Press again
to unmute. Press and hold to
interact with Bluetooth and OnStar
®,
if equipped. See Bluetooth0196
and “OnStar,” if equipped.
c/x(End) :Press to reject an
incoming call or end a current call.
SRCE (Source) : Press to switch
between AM, FM, CD, and if
equipped, SiriusXM
®, front auxiliary,
rear auxiliary, and iPod/USB.
¨(Seek) : Press to go to the next
radio station while in AM, FM,
or SiriusXM
®, if equipped. Press
¨to go to the next track or
chapter while sourced to the
CD slot.
Press
¨to select a track or a folder
when navigating folders on an iPod
or USB device.
+
eor −e(Volume) : Press to
increase or to decrease the volume.
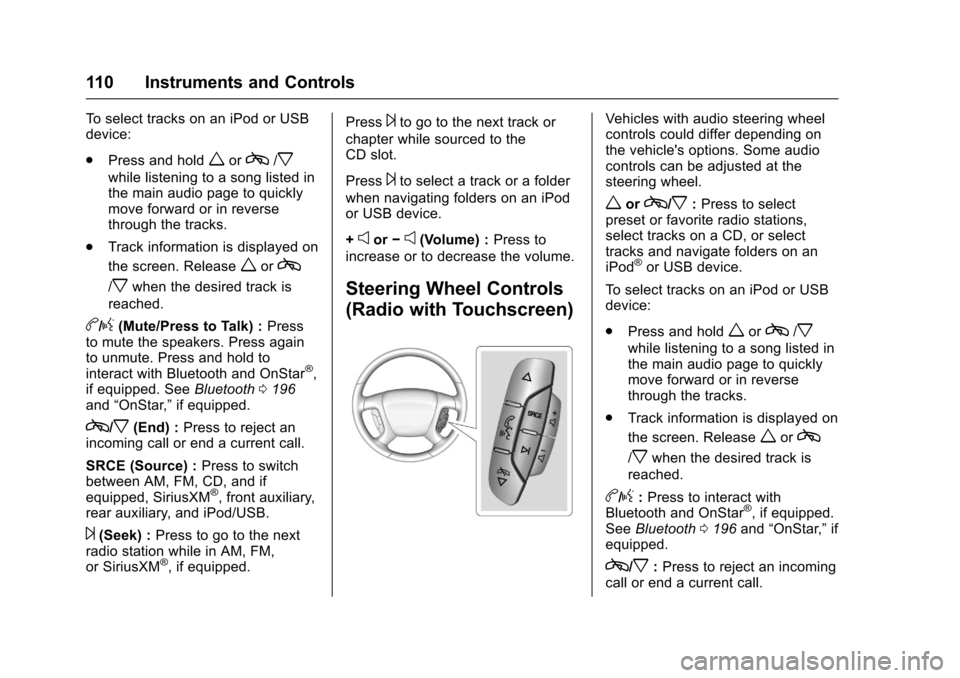
Steering Wheel Controls
(Radio with Touchscreen)
Vehicles with audio steering wheel
controls could differ depending on
the vehicle's options. Some audio
controls can be adjusted at the
steering wheel.
worc/x: Press to select
preset or favorite radio stations,
select tracks on a CD, or select
tracks and navigate folders on an
iPod
®or USB device.
To select tracks on an iPod or USB
device:
. Press and hold
worc/x
while listening to a song listed in
the main audio page to quickly
move forward or in reverse
through the tracks.
. Track information is displayed on
the screen. Release
worc
/xwhen the desired track is
reached.
b/g: Press to interact with
Bluetooth and OnStar®, if equipped.
See Bluetooth 0196 and“OnStar,” if
equipped.
c/x: Press to reject an incoming
call or end a current call.
Page 115 of 394
Chevrolet Traverse Owner Manual (GMNA-Localizing-U.S./Canada/Mexico-
9955676) - 2017 - crc - 3/29/16
114 Instruments and Controls
Do not operate any switches
such as window, sunroof,
climate controls, seats, etc.
during the calibration
procedure.
2. Press the vehicle information button until PRESS
VTO
CALIBRATE COMPASS
displays.
3. Press the set/reset button to start the compass calibration.
4. The DIC will display CALIBRATING: DRIVE IN
CIRCLES. Drive the vehicle in
tight circles at less than 8 km/h
(5 mph) to complete the
calibration. The DIC will display
CALIBRATION COMPLETE for
a few seconds when the
calibration is complete. The
DIC display will then return to
the previous menu.
Clock (Radio without
Touchscreen)
To adjust the time and date:
1. Turn the ignition key to ACC/ ACCESSORY or ON/RUN,
then press
Oto turn the
radio on.
2. Press
Hto display HR, MIN,
MM, DD, YYYY (hour, minute,
month, day, and year).
3. Press the pushbutton located under any one of the labels to
be changed.
4. To increase the time or date, do one of the following:
.Press the pushbutton below
the selected label.
. Press
¨SEEK.
. Press
\FWD.
. Turn
fclockwise.
5. To decrease the time or date, do one of the following:
.Press
©SEEK. .
Press
sREV.
. Turn
fcounterclockwise.
To change the time default setting
from 12 hour to 24 hour or to
change the date default setting from
month/day/year to day/month/year:
1. Press
Hand then the
pushbutton located under the
forward arrow that displays on
the radio screen until the time
12H (hour) and 24H (hour), and
the date MM/DD (month and
day) and DD/MM (day and
month) display.
2. Press the pushbutton located under the desired option.
3. Press
Hagain to apply the
selected default, or let the
screen time out.
Page 116 of 394
Chevrolet Traverse Owner Manual (GMNA-Localizing-U.S./Canada/Mexico-
9955676) - 2017 - crc - 3/29/16
Instruments and Controls 115
Clock (Radio with
Touchscreen)
Touch Settings on the Home Page
Menu, then touch the Set Time or
Set Date settings screen button to
display the different options for
setting the time and date.
Set Time:
.Touch the up or down arrows to
increase or decrease the Hours,
Minutes, AM, PM, or the 24 hour
setting on the clock.
. Touch and hold to quickly
increase or decrease the time
settings.
. Touch OK to save the
adjustments.
. Touch the Back or Cancel
screen button to cancel the
adjustments.
Set Date:
. Touch the up or down arrows to
increase or decrease the Month,
Day, and Year settings. .
Touch and hold to quickly
increase or decrease the date
settings.
. Touch OK to save the
adjustments.
. Touch the Back or Cancel
screen button to cancel the
adjustments.
Power Outlets
The vehicle has 12-volt outlets that
can be used to plug in electrical
equipment, such as a cell phone or
MP3 player.
The power outlets are located:
.On the center stack below the
climate controls.
. Inside the center console.
. At the rear of the center console.
. In the rear cargo area.
Lift the cover to access the outlet
and replace when not in use.
{Warning
Power is always supplied to the
outlets. Do not leave electrical
equipment plugged in when the
vehicle is not in use because the
vehicle could catch fire and cause
injury or death.
Caution
Leaving electrical equipment
plugged in for an extended period
of time while the vehicle is off will
drain the battery. Always unplug
electrical equipment when not in
use and do not plug in equipment
that exceeds the maximum
20 amp rating.
Certain accessory plugs may not be
compatible with the accessory
power outlet and could overload
vehicle and adapter fuses. If a
problem is experienced, see your
dealer.