warning lights CHEVROLET TRAVERSE 2017 1.G Owners Manual
[x] Cancel search | Manufacturer: CHEVROLET, Model Year: 2017, Model line: TRAVERSE, Model: CHEVROLET TRAVERSE 2017 1.GPages: 394, PDF Size: 6.47 MB
Page 18 of 394
Chevrolet Traverse Owner Manual (GMNA-Localizing-U.S./Canada/Mexico-
9955676) - 2017 - crc - 3/29/16
In Brief 17
;:Turns on the parking lamps
including all lamps, except the
headlamps.
5: Turns on the headlamps
together with the parking lamps and
instrument panel lights. A warning
chime sounds if the driver door is
opened when the ignition switch is
off and the headlamps are on.
#: If equipped, it turns the fog
lamps on or off.
See:
. Exterior Lamp Controls 0157.
. Fog Lamps 0159.
Windshield Wiper/Washer
The windshield wiper/washer lever
is located on the left side of the
steering column.
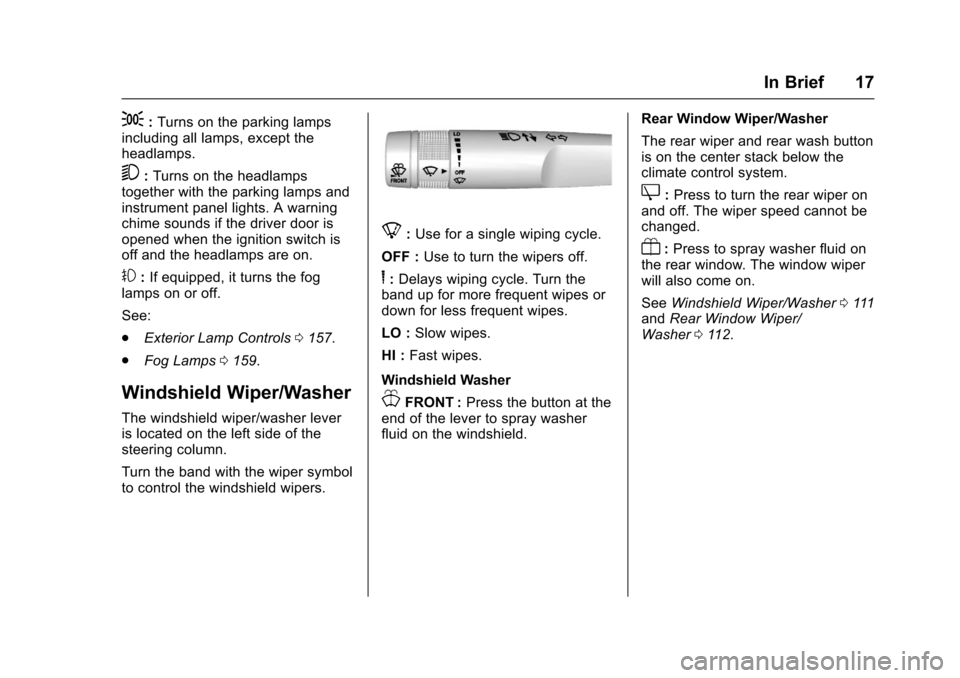
Turn the band with the wiper symbol
to control the windshield wipers.
8:Use for a single wiping cycle.
OFF : Use to turn the wipers off.
6:Delays wiping cycle. Turn the
band up for more frequent wipes or
down for less frequent wipes.
LO : Slow wipes.
HI : Fast wipes.
Windshield Washer
JFRONT : Press the button at the
end of the lever to spray washer
fluid on the windshield. Rear Window Wiper/Washer
The rear wiper and rear wash button
is on the center stack below the
climate control system.
Z:
Press to turn the rear wiper on
and off. The wiper speed cannot be
changed.
Y: Press to spray washer fluid on
the rear window. The window wiper
will also come on.
See Windshield Wiper/Washer 0111
and Rear Window Wiper/
Washer 0112.
Page 60 of 394

Chevrolet Traverse Owner Manual (GMNA-Localizing-U.S./Canada/Mexico-
9955676) - 2017 - crc - 3/29/16
Seats and Restraints 59
Heated and Cooled Seat ButtonsShown, Heated Seat Buttons Similar
If equipped, the buttons are on the
center stack. To operate, the engine
must be running.
I: If equipped, press to heat the
seatback only.
H: If equipped, press to cool the
entire seat.
J: Press to heat the seat and
seatback.
Press the button once for the
highest setting. With each press of
the button, the seat will change to
the next lower setting, and then to the off setting. The lights indicate
three for the highest setting and one
for the lowest.
The passenger heated seat may
take longer to heat up.
The heated and/or cooled seats are
canceled after the ignition is
turned off.
Remote Start Heated Seats
When it is cold outside, the heated
seats may turn on automatically
during a remote vehicle start. The
heated seats will be canceled when
the ignition is turned on. Press the
desired heated seat button to use
the heated seats after the vehicle is
started.
The heated seat button lights will
not turn on during a remote start.
The temperature of an unoccupied
seat may be reduced.
See
Remote Vehicle Start 035.
Rear Seats
1. Seat Adjustment Handle
2. Reclining Seatback Strap
3. Sliding Seat Lever
Entering and Exiting the
Third Row
{Warning
Using the third row seating
position while the second row is
folded, or folded and tumbled,
could cause injury in a sudden
(Continued)
Page 109 of 394
Chevrolet Traverse Owner Manual (GMNA-Localizing-U.S./Canada/Mexico-
9955676) - 2017 - crc - 3/29/16
108 Instruments and Controls
Instruments and
Controls
Controls
Steering Wheel Adjustment . . . 109
Steering Wheel Controls(Radio without
Touchscreen) . . . . . . . . . . . . . . . 109
Steering Wheel Controls (Radio with Touchscreen) . . . 110
Heated Steering Wheel . . . . . . . 111
Horn . . . . . . . . . . . . . . . . . . . . . . . . . . 111
Windshield Wiper/Washer . . . . . 111
Rear Window Wiper/ Washer . . . . . . . . . . . . . . . . . . . . . . 112
Compass . . . . . . . . . . . . . . . . . . . . . 112
Clock (Radio without Touchscreen) . . . . . . . . . . . . . . . . 114
Clock (Radio with Touchscreen) . . . . . . . . . . . . . . . . 115
Power Outlets . . . . . . . . . . . . . . . . 115
Warning Lights, Gauges, and
Indicators
Warning Lights, Gauges, and Indicators . . . . . . . . . . . . . . . . . . . 117
Instrument Cluster . . . . . . . . . . . . 118
Speedometer . . . . . . . . . . . . . . . . . 119
Odometer . . . . . . . . . . . . . . . . . . . . . 119 Tachometer . . . . . . . . . . . . . . . . . . . 119
Fuel Gauge . . . . . . . . . . . . . . . . . . . 119
Engine Coolant Temperature
Gauge . . . . . . . . . . . . . . . . . . . . . . 120
Voltmeter Gauge . . . . . . . . . . . . . 121
Safety Belt Reminders . . . . . . . . 121
Airbag Readiness Light . . . . . . . 122
Passenger Airbag Status
Indicator . . . . . . . . . . . . . . . . . . . . 122
Charging System Light . . . . . . . 123
Malfunction Indicator Lamp (Check Engine Light) . . . . . . . . 124
Brake System Warning Light . . . . . . . . . . . . . . . . . . . . . . . . 126
Antilock Brake System (ABS) Warning Light . . . . . . . . . . . . . . . 126
Tow/Haul Mode Light . . . . . . . . . 127
Lane Departure Warning (LDW) Light . . . . . . . . . . . . . . . . . 127
Vehicle Ahead Indicator . . . . . . 127
StabiliTrak
®Indicator Light . . . 127
Engine Coolant Temperature Warning Light . . . . . . . . . . . . . . . 128
Tire Pressure Light . . . . . . . . . . . 128
Engine Oil Pressure Light . . . . 128
Security Light . . . . . . . . . . . . . . . . . 129
High-Beam On Light . . . . . . . . . . 129
Cruise Control Light . . . . . . . . . . 130
Information Displays
Driver Information Center (DIC) (With DIC Buttons) . . . . . . . . . . 130
Driver Information Center (DIC) (Without DIC Buttons) . . . . . . . 135
Vehicle Messages
Vehicle Messages . . . . . . . . . . . . 137
Battery Voltage and ChargingMessages . . . . . . . . . . . . . . . . . . . 138
Brake System Messages . . . . . 138
Cruise Control Messages . . . . . 138
Door Ajar Messages . . . . . . . . . . 138
Engine Cooling System Messages . . . . . . . . . . . . . . . . . . . 139
Engine Oil Messages . . . . . . . . . 140
Engine Power Messages . . . . . 140
Fuel System Messages . . . . . . . 141
Key and Lock Messages . . . . . 141
Lamp Messages . . . . . . . . . . . . . . 141
Object Detection System Messages . . . . . . . . . . . . . . . . . . . 141
Ride Control System Messages . . . . . . . . . . . . . . . . . . . 143
Airbag System Messages . . . . 143
Security Messages . . . . . . . . . . . 143
Service Vehicle Messages . . . . 144
Tire Messages . . . . . . . . . . . . . . . . 144
Transmission Messages . . . . . . 145
Vehicle Reminder Messages . . . . . . . . . . . . . . . . . . . 146
Page 118 of 394
Chevrolet Traverse Owner Manual (GMNA-Localizing-U.S./Canada/Mexico-
9955676) - 2017 - crc - 3/29/16
Instruments and Controls 117
Warning Lights,
Gauges, and
Indicators
Warning lights and gauges can
signal that something is wrong
before it becomes serious enough
to cause an expensive repair or
replacement. Paying attention to the
warning lights and gauges could
prevent injury.
Some warning lights come on briefly
when the engine is started to
indicate they are working. When
one of the warning lights comes on
and stays on while driving, or when
one of the gauges shows there may
be a problem, check the section that
explains what to do. Waiting to do
repairs can be costly and even
dangerous.
Page 124 of 394
Chevrolet Traverse Owner Manual (GMNA-Localizing-U.S./Canada/Mexico-
9955676) - 2017 - crc - 3/29/16
Instruments and Controls 123
United States
Canada and Mexico
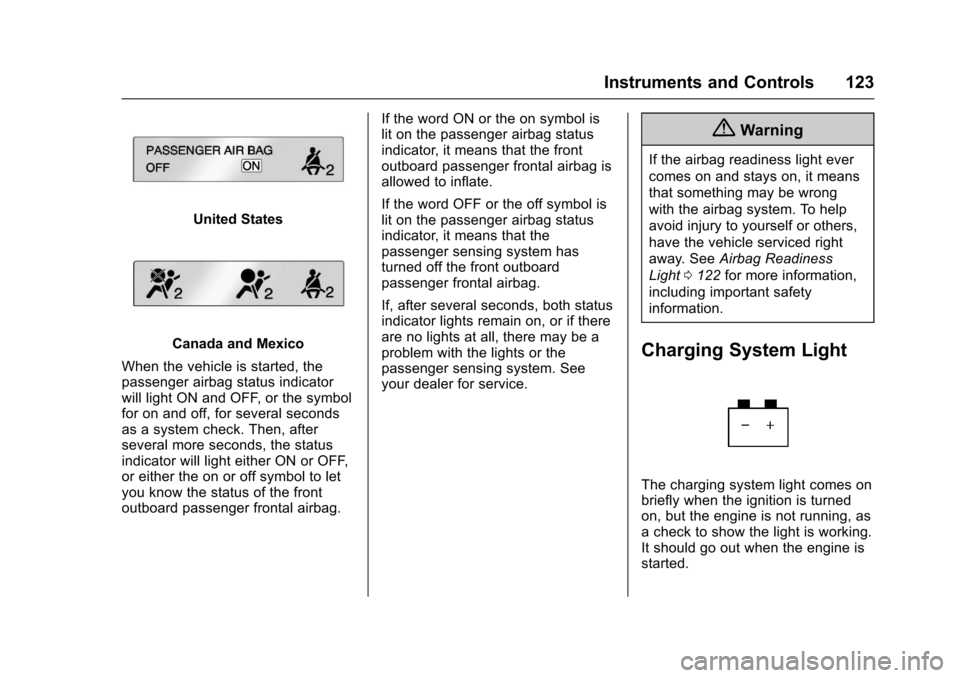
When the vehicle is started, the
passenger airbag status indicator
will light ON and OFF, or the symbol
for on and off, for several seconds
as a system check. Then, after
several more seconds, the status
indicator will light either ON or OFF,
or either the on or off symbol to let
you know the status of the front
outboard passenger frontal airbag. If the word ON or the on symbol is
lit on the passenger airbag status
indicator, it means that the front
outboard passenger frontal airbag is
allowed to inflate.
If the word OFF or the off symbol is
lit on the passenger airbag status
indicator, it means that the
passenger sensing system has
turned off the front outboard
passenger frontal airbag.
If, after several seconds, both status
indicator lights remain on, or if there
are no lights at all, there may be a
problem with the lights or the
passenger sensing system. See
your dealer for service.
{Warning
If the airbag readiness light ever
comes on and stays on, it means
that something may be wrong
with the airbag system. To help
avoid injury to yourself or others,
have the vehicle serviced right
away. See
Airbag Readiness
Light 0122 for more information,
including important safety
information.
Charging System Light
The charging system light comes on
briefly when the ignition is turned
on, but the engine is not running, as
a check to show the light is working.
It should go out when the engine is
started.
Page 158 of 394
Chevrolet Traverse Owner Manual (GMNA-Localizing-U.S./Canada/Mexico-
9955676) - 2017 - crc - 3/29/16
Lighting 157
Lighting
Exterior Lighting
Exterior Lamp Controls . . . . . . . 157
Headlamp High/Low-BeamChanger . . . . . . . . . . . . . . . . . . . . 157
Flash-to-Pass . . . . . . . . . . . . . . . . 158
Daytime Running Lamps (DRL)/Automatic Headlamp
System . . . . . . . . . . . . . . . . . . . . . . 158
Delayed Headlamps . . . . . . . . . . 158
Hazard Warning Flashers . . . . . 159
Turn and Lane-Change Signals . . . . . . . . . . . . . . . . . . . . . . 159
Fog Lamps . . . . . . . . . . . . . . . . . . . 159
Interior Lighting
Instrument Panel Illumination Control . . . . . . . . . . . . . . . . . . . . . . 160
Courtesy Lamps . . . . . . . . . . . . . . 160
Dome Lamps . . . . . . . . . . . . . . . . . 160
Reading Lamps . . . . . . . . . . . . . . 161
Lighting Features
Entry Lighting . . . . . . . . . . . . . . . . 161
Delayed Entry Lighting . . . . . . . 162
Delayed Exit Lighting . . . . . . . . . 162
Parade Dimming . . . . . . . . . . . . . 162
Battery Load Management . . . 162
Battery Power Protection . . . . . 163
Exterior Lighting
Exterior Lamp Controls
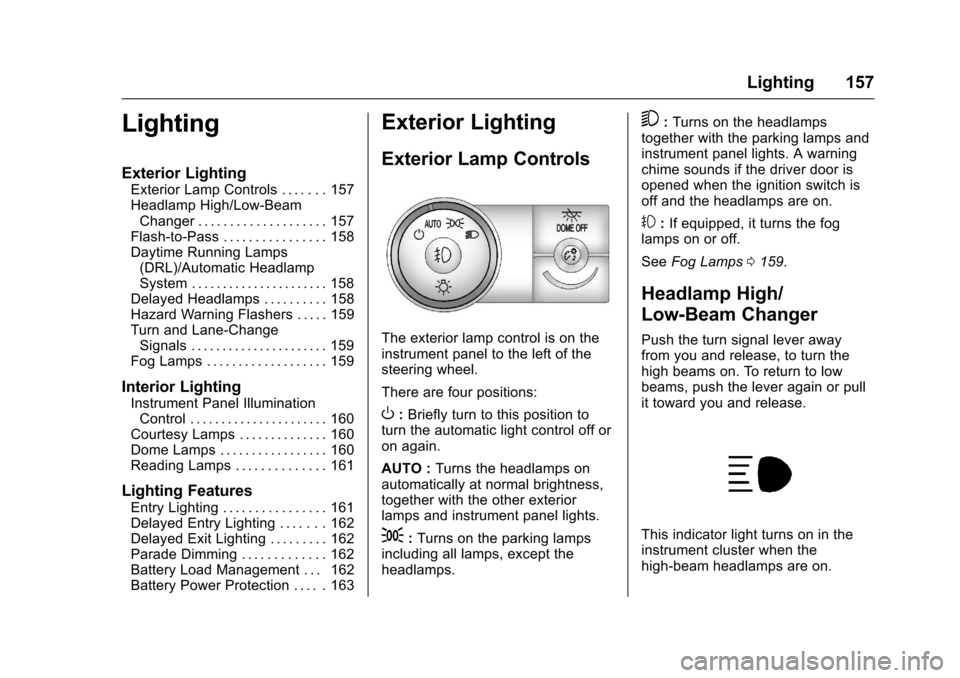
The exterior lamp control is on the
instrument panel to the left of the
steering wheel.
There are four positions:
O: Briefly turn to this position to
turn the automatic light control off or
on again.
AUTO : Turns the headlamps on
automatically at normal brightness,
together with the other exterior
lamps and instrument panel lights.
;: Turns on the parking lamps
including all lamps, except the
headlamps.
5: Turns on the headlamps
together with the parking lamps and
instrument panel lights. A warning
chime sounds if the driver door is
opened when the ignition switch is
off and the headlamps are on.
#: If equipped, it turns the fog
lamps on or off.
See Fog Lamps 0159.
Headlamp High/
Low-Beam Changer
Push the turn signal lever away
from you and release, to turn the
high beams on. To return to low
beams, push the lever again or pull
it toward you and release.
This indicator light turns on in the
instrument cluster when the
high-beam headlamps are on.
Page 230 of 394
Chevrolet Traverse Owner Manual (GMNA-Localizing-U.S./Canada/Mexico-
9955676) - 2017 - crc - 4/1/16
Driving and Operating 229
R(ON/RUN) :This position can be
used to operate the electrical
accessories and to display some
instrument panel warning and
indicator lights. This position can
also be used for service and
diagnostics, and to verify the proper
operation of the malfunction
indicator lamp as may be required
for emission inspection purposes.
The switch stays in this position
when the engine is running. The
transmission is also unlocked in this
position. If you leave the key in the
ACC/ACCESSORY or ON/RUN
position with the engine off, the
battery could be drained. You may
not be able to start the vehicle if the
battery is allowed to drain for an
extended period of time.
/(START) : This is the position
that starts the engine. When the
engine starts, release the key. The
ignition switch will return to ON/RUN
for driving.
Key Lock Release
The vehicle has an electronic key
lock release system. This system is
to prevent ignition key removal
unless the shift lever is in P (Park).
The key lock release will not work if
the battery is charged less than
9-volts, or uncharged. Try charging
or jump starting the battery. See
Jump Starting - North
America 0326
Starting the Engine
Move the shift lever to P (Park) or
N (Neutral). The engine will not start
in any other position. To restart the
engine when the vehicle is already
moving, use N (Neutral) only.
Caution
Do not try to shift to P (Park) if the
vehicle is moving. If you do, you
could damage the transmission.
Shift to P (Park) only when the
vehicle is stopped.
Caution
If you add electrical parts or
accessories, you could change
the way the engine operates. Any
resulting damage would not be
covered by the vehicle warranty.
See Add-On Electrical
Equipment 0264.
Caution
If the steering wheel is turned
until it reaches the end of its
travel, and is held in that position
while starting the vehicle, damage
may occur to the hydraulic power
steering system and there may be
loss of power steering assist.
Starting Procedure 1. With your foot off the accelerator pedal, turn the
ignition to START. When the
engine starts, let go of the key.
The idle speed will slow down
as the engine warms. Do not
Page 249 of 394
Chevrolet Traverse Owner Manual (GMNA-Localizing-U.S./Canada/Mexico-
9955676) - 2017 - crc - 4/1/16
248 Driving and Operating
An obstacle is indicated by audible
beeps. The interval between the
beeps becomes shorter as the
vehicle gets closer to the obstacle.
When the distance is less than
30 cm (12 in) the beeping is
continuous for five seconds.
Turning the System On and Off
The system can be disabled through
the Driver Information Center (DIC).
See“Park Assist” underDriver
Information Center (DIC) (With DIC
Buttons) 0130 orDriver Information
Center (DIC) (Without DIC
Buttons) 0135.
Turn off RPA when towing a trailer.
RPA defaults to the on setting each
time the vehicle is started.
When the System Does Not
Seem to Work Properly
The following messages may be
displayed on the DIC:
SERVICE PARK ASSIST : If this
message occurs, take the vehicle to
your dealer to repair the system. PARK ASST BLOCKED SEE
OWNERS MANUAL :
This
message can occur under the
following conditions:
. The sensors are not clean. Keep
the vehicle's rear bumper free of
mud, dirt, snow, ice, and slush.
For cleaning instructions, see
Exterior Care 0333.
. The sensors are covered by
frost or ice. Frost or ice can form
around and behind the sensors
and may not always be seen;
this can occur after washing the
vehicle in cold weather. The
message may not clear until the
frost or ice has melted.
. A trailer was attached to the
vehicle, or an object was
hanging out of the liftgate during
the last drive cycle. Once the
object is removed, RPA will
return to normal operation.
. A tow bar is attached to the
vehicle.
. The bumper is damaged. Take
the vehicle to your dealer to
repair the system. .
Other conditions, such as
vibrations from a jackhammer or
the compression of air brakes on
a very large truck, are affecting
system performance.
Forward Collision Alert
(FCA) System
If equipped, the FCA system may
help to avoid or reduce the harm
caused by front-end crashes. When
approaching a vehicle ahead too
quickly, FCA provides a red flashing
alert on the windshield and rapidly
beeps. FCA also lights an amber
visual alert if following another
vehicle much too closely.
FCA detects vehicles within a
distance of approximately 60 m
(197 ft) and operates at speeds
above 40 km/h (25 mph).
{Warning
FCA is a warning system and
does not apply the brakes. When
approaching a slower-moving or
(Continued)
Page 252 of 394

Chevrolet Traverse Owner Manual (GMNA-Localizing-U.S./Canada/Mexico-
9955676) - 2017 - crc - 4/1/16
Driving and Operating 251
The SBZA sensor covers a zone of
approximately one lane over from
both sides of the vehicle, or 3.5 m
(11 ft). The height of the zone is
approximately between 0.5 m (1.5 ft)
and 2 m (6 ft) off the ground. This
zone starts at approximately the
middle of the vehicle and goes back
5 m (16 ft).
How the System Works
The SBZA symbol lights up in the
side mirrors when the system
detects a moving vehicle in the next
lane over that is in the side blind
zone. This indicates it may be
unsafe to change lanes. Before
making a lane change, check the
SBZA display, check mirrors, glance
over your shoulder, and use the turn
signals.
Left Side MirrorDisplayRight Side Mirror Display When the vehicle is started, both
outside mirror SBZA displays will
briefly come on to indicate the
system is operating. When the
vehicle is in a forward gear, the left-
or right-side mirror display will light
up if a moving vehicle is detected in
that blind zone. If the turn signal is
activated in the same direction of a
detected vehicle, this display will
flash as an extra warning not to
change lanes.
SBZA can be disabled through the
Driver Information Center (DIC). See
Driver Information Center (DIC)
(With DIC Buttons)
0130 orDriver
Information Center (DIC) (Without
DIC Buttons) 0135. If SBZA is
disabled by the driver, the SBZA
mirror displays will not light up.
When the System Does Not
Seem to Work Properly
SBZA displays may not come on
when passing a vehicle quickly, for
a stopped vehicle, or when towing a
trailer. Keep in mind the SBZA
detection zones that extend back
from the side of the vehicle do not
move further back when a trailer is towed. Use extra caution while
changing lanes when towing a
trailer. SBZA may alert you to
objects attached to the vehicle, such
as a trailer, bicycle, or object
extending out to either side of the
vehicle. This is normal system
operation; the vehicle does not need
service.
SBZA may not always alert the
driver to vehicles in the side blind
zone, especially in wet conditions.
The system does not need to be
serviced. The system may light up
due to guardrails, signs, trees,
shrubs, and other non-moving
objects. This is normal system
operation; the vehicle does not need
service.
SBZA may not operate when the
SBZA sensors in the left or right
corners of the rear bumper are
covered with mud, dirt, snow, ice,
or slush, or in heavy rainstorms. For
cleaning instructions, see "Washing
the Vehicle" under
Exterior Care
0 333. If the DIC still displays the
system unavailable message after
Page 388 of 394

Chevrolet Traverse Owner Manual (GMNA-Localizing-U.S./Canada/Mexico-
9955676) - 2017 - crc - 3/29/16
Index 387
Fuel (cont'd)Filling a Portable Fuel
Container . . . . . . . . . . . . . . . . . . . 256
Filling the Tank . . . . . . . . . . . . . . . 254
Foreign Countries . . . . . . . . . . . . 254
Gauge . . . . . . . . . . . . . . . . . . . . . . . . .119
Requirements, California . . . . . 254
System Messages . . . . . . . . . . . . 141
Fuses
Engine Compartment FuseBlock . . . . . . . . . . . . . . . . . . . . . . . . 291
Fuses and Circuit Breakers . . . 291
Instrument Panel Fuse Block . . . . . . . . . . . . . . . . . . . . . . . . 294
G
Garage Door Opener . . . . . . . . . . . 153
Programming . . . . . . . . . . . . . . . . . 153
Gauges
Engine CoolantTemperature . . . . . . . . . . . . . . . . 120
Fuel . . . . . . . . . . . . . . . . . . . . . . . . . . .119
Odometer . . . . . . . . . . . . . . . . . . . . . .119
Speedometer . . . . . . . . . . . . . . . . . .119
Tachometer . . . . . . . . . . . . . . . . . . . .119
Voltmeter . . . . . . . . . . . . . . . . . . . . . 121
Warning Lights and Indicators . . . . . . . . . . . . . . . . . . . .117 General Information
Service and Maintenance . . . . . 343
Towing . . . . . . . . . . . . . . . . . . . . . . . . 256
Vehicle Care . . . . . . . . . . . . . . . . . . 266
Glove Box . . . . . . . . . . . . . . . . . . . . . . 103
GM Mobility Reimbursement Program . . . . . . . . . . . . . . . . . . . . . . . 363
H
Hazard Warning Flashers . . . . . . . 159
Head Restraints . . . . . . . . . . . . . . . . . 53
Headlamps
Aiming . . . . . . . . . . . . . . . . . . . . . . . . 288
Bulb Replacement . . . . . . . . . . . . 288
Daytime Running Lamps/Automatic Headlamp
System . . . . . . . . . . . . . . . . . . . . . . 158
Delayed . . . . . . . . . . . . . . . . . . . . . . 158
Flash-to-Pass . . . . . . . . . . . . . . . . . 158
High-Beam On Light . . . . . . . . . . 129
High/Low Beam Changer . . . . . 157
Heated Steering Wheel . . . . . . . . . . . . . . . . 111
Heated and Cooled Front Seats . . . . . . . . . . . . . . . . . . . . . . . . . . 58
Heated Mirrors . . . . . . . . . . . . . . . . . . . 46
Heater
Engine . . . . . . . . . . . . . . . . . . . . . . . . 230
Heating and Air Conditioning . . . 205 High Voltage Devices and
Wiring . . . . . . . . . . . . . . . . . . . . . . . . . 290
High-Beam On Light . . . . . . . . . . . . 129
Hill and Mountain Roads . . . . . . . . 221
Hill Start Assist (HSA) . . . . . . . . . . 240
Hood . . . . . . . . . . . . . . . . . . . . . . . . . . . 268
Horn . . . . . . . . . . . . . . . . . . . . . . . . . . . . 111
How to Wear Safety Belts Properly . . . . . . . . . . . . . . . . . . . . . . . . 65
I
Ignition Positions . . . . . . . . . . . . . . . 227
Ignition Transmission LockCheck . . . . . . . . . . . . . . . . . . . . . . . . . 286
Immobilizer . . . . . . . . . . . . . . . . . . . . . . 43
Indicator Vehicle Ahead . . . . . . . . . . . . . . . . 127
Infants and Young Children, Restraints . . . . . . . . . . . . . . . . . . . . . . 85
Infotainment . . . . . . . . . . . . . . . . . . . . 164
Infotainment System . . . . . . . . . . . . 372
Instrument Cluster . . . . . . . . . . . . . . 118
Instrument Panel Storage Area . . . . . . . . . . . . . . . . . 103
Interior Rearview Mirrors . . . . . . . . . 47
Introduction . . . . . . . . . . . . . . . . . . . . . . . 2