headlamp CHEVROLET TRAVERSE 2018 Owner's Guide
[x] Cancel search | Manufacturer: CHEVROLET, Model Year: 2018, Model line: TRAVERSE, Model: CHEVROLET TRAVERSE 2018Pages: 419, PDF Size: 5.92 MB
Page 269 of 419

Chevrolet Traverse Owner Manual (GMNA-Localizing-U.S./Canada/Mexico-
10603118) - 2018 - CRC - 1/29/18
268 Driving and Operating
Warning (Continued)
.Detect lane markings under
poor weather or visibility
conditions. This can occur if
the windshield or
headlamps are blocked by
dirt, snow, or ice, if they are
not in proper condition, or if
the sun shines directly into
the camera.
. Detect road edges.
. Detect lanes on winding or
hilly roads.
If LKA only detects lane markings
on one side of the road, it will
only assist or provide an LDW
alert when approaching the lane
on the side where it has detected
a lane marking. Even with LKA
and LDW, you must steer the
vehicle. Always keep your
attention on the road and
maintain proper vehicle position
within the lane, or vehicle
damage, injury, or death could (Continued)
Warning (Continued)
occur. Always keep the
windshield, headlamps, and
camera sensors clean and in
good repair. Do not use LKA in
bad weather conditions.
{Warning
Using LKA while towing a trailer
or on slippery roads could cause
loss of control of the vehicle and
a crash. Turn the system off.
How the System Works
The LKA camera sensor is on the
windshield ahead of the rearview
mirror.
To turn LKA on and off, press
A
on the center console.
When on,
Ais green if LKA is
available to assist and provide LDW
alerts. It may assist by gently
turning the steering wheel and display
Aas amber if the vehicle
approaches a detected lane marking
without using a turn signal in that
direction. It may also provide an
LDW alert by flashing
Aamber
as the lane marking is crossed.
Additionally, there may be three
beeps, or the driver seat may pulse
three times, on the right or left,
depending on the lane departure
direction.
Take Steering
The LKA system does not
continuously steer the vehicle.
If LKA does not detect active driver
steering, an alert, chime, or DIC
message may be provided. Steer
the vehicle to dismiss.
When the System Does Not
Seem to Work Properly
The system performance may be
affected by:
. Close vehicles ahead.
. Sudden lighting changes, such
as when driving through tunnels.
. Banked roads.
Page 281 of 419
Chevrolet Traverse Owner Manual (GMNA-Localizing-U.S./Canada/Mexico-
10603118) - 2018 - CRC - 1/29/18
280 Driving and Operating
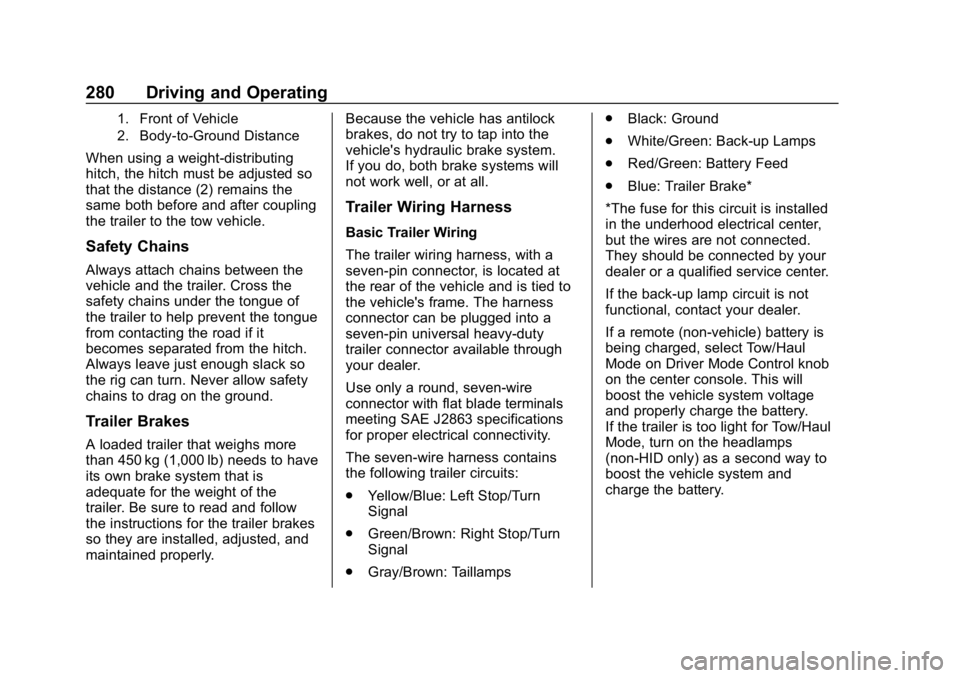
1. Front of Vehicle
2. Body-to-Ground Distance
When using a weight-distributing
hitch, the hitch must be adjusted so
that the distance (2) remains the
same both before and after coupling
the trailer to the tow vehicle.
Safety Chains
Always attach chains between the
vehicle and the trailer. Cross the
safety chains under the tongue of
the trailer to help prevent the tongue
from contacting the road if it
becomes separated from the hitch.
Always leave just enough slack so
the rig can turn. Never allow safety
chains to drag on the ground.
Trailer Brakes
A loaded trailer that weighs more
than 450 kg (1,000 lb) needs to have
its own brake system that is
adequate for the weight of the
trailer. Be sure to read and follow
the instructions for the trailer brakes
so they are installed, adjusted, and
maintained properly.Because the vehicle has antilock
brakes, do not try to tap into the
vehicle's hydraulic brake system.
If you do, both brake systems will
not work well, or at all.
Trailer Wiring Harness
Basic Trailer Wiring
The trailer wiring harness, with a
seven-pin connector, is located at
the rear of the vehicle and is tied to
the vehicle's frame. The harness
connector can be plugged into a
seven-pin universal heavy-duty
trailer connector available through
your dealer.
Use only a round, seven-wire
connector with flat blade terminals
meeting SAE J2863 specifications
for proper electrical connectivity.
The seven-wire harness contains
the following trailer circuits:
.
Yellow/Blue: Left Stop/Turn
Signal
. Green/Brown: Right Stop/Turn
Signal
. Gray/Brown: Taillamps .
Black: Ground
. White/Green: Back-up Lamps
. Red/Green: Battery Feed
. Blue: Trailer Brake*
*The fuse for this circuit is installed
in the underhood electrical center,
but the wires are not connected.
They should be connected by your
dealer or a qualified service center.
If the back-up lamp circuit is not
functional, contact your dealer.
If a remote (non-vehicle) battery is
being charged, select Tow/Haul
Mode on Driver Mode Control knob
on the center console. This will
boost the vehicle system voltage
and properly charge the battery.
If the trailer is too light for Tow/Haul
Mode, turn on the headlamps
(non-HID only) as a second way to
boost the vehicle system and
charge the battery.
Page 282 of 419
Chevrolet Traverse Owner Manual (GMNA-Localizing-U.S./Canada/Mexico-
10603118) - 2018 - CRC - 1/29/18
Driving and Operating 281
Electric Trailer Brake Control
Wiring Provisions
These wiring provisions for an
electric trailer brake controller are
included with the vehicle as part of
the trailer wiring package. The body
harness, inside the front driver side
instrument panel, contains blunt cut
wires below the headlamp switch for
the electric trailer brake controller.
The harness contains the following
wires:
.Blue: “To Trailer”
. Red/Black or Red/Blue:
Battery Feed
. White/Blue: Brake Apply Signal
. Black: Ground
The electric trailer brake controller
should be installed by your dealer or
a qualified service center.Conversions and
Add-Ons
Add-On Electrical
Equipment
{Warning
The Data Link Connector (DLC) is
used for vehicle service
and Emission Inspection/
Maintenance testing. See
Malfunction Indicator Lamp
(Check Engine Light) 0141.
A device connected to the DLC —
such as an aftermarket fleet or
driver-behavior tracking device —
may interfere with vehicle
systems. This could affect vehicle
operation and cause a crash.
Such devices may also access
information stored in the vehicle’s
systems.
Caution
Some electrical equipment can
damage the vehicle or cause
components to not work and
would not be covered by the
vehicle warranty. Always check
with your dealer before adding
electrical equipment.
Add-on equipment can drain the
vehicle's 12-volt battery, even if the
vehicle is not operating.
The vehicle has an airbag system.
Before attempting to add anything
electrical to the vehicle, see
Servicing the Airbag-Equipped
Vehicle 095 and Adding Equipment
to the Airbag-Equipped Vehicle
0 95.
Page 283 of 419
Chevrolet Traverse Owner Manual (GMNA-Localizing-U.S./Canada/Mexico-
10603118) - 2018 - CRC - 1/29/18
282 Vehicle Care
Vehicle Care
General Information
General Information . . . . . . . . . . 283
California Proposition65 Warning . . . . . . . . . . . . . . . . . 283
California Perchlorate Materials Requirements . . . . . 284
Accessories and Modifications . . . . . . . . . . . . . . . . 284
Vehicle Checks
Doing Your OwnService Work . . . . . . . . . . . . . . . 284
Hood . . . . . . . . . . . . . . . . . . . . . . . . . 285
Engine Compartment Overview . . . . . . . . . . . . . . . . . . . . 286
Engine Oil . . . . . . . . . . . . . . . . . . . . 289
Engine Oil Life System . . . . . . . 291
Automatic Transmission Fluid . . . . . . . . . . . . . . . . . . . . . . . . 292
Engine Air Cleaner/Filter . . . . . . 293
Cooling System . . . . . . . . . . . . . . 294
Engine Overheating . . . . . . . . . . 298
Washer Fluid . . . . . . . . . . . . . . . . . 299
Brakes . . . . . . . . . . . . . . . . . . . . . . . 300
Brake Fluid . . . . . . . . . . . . . . . . . . . 301
Battery - North America . . . . . . 302
All-Wheel Drive . . . . . . . . . . . . . . . 303 Starter Switch Check . . . . . . . . . 303
Automatic Transmission Shift
Lock Control Function
Check . . . . . . . . . . . . . . . . . . . . . . . 303
Park Brake and P (Park)
Mechanism Check . . . . . . . . . . 304
Wiper Blade Replacement . . . . 304
Windshield Replacement . . . . . 306
Gas Strut(s) . . . . . . . . . . . . . . . . . . 306
Headlamp Aiming
Headlamp Aiming . . . . . . . . . . . . 307
Bulb Replacement
Bulb Replacement . . . . . . . . . . . . 307
High Intensity Discharge (HID) Lighting . . . . . . . . . . . . . . . . . . . . . 307
LED Lighting . . . . . . . . . . . . . . . . . 308
Headlamps, Front Turn Signal, and Sidemarker . . . . . . . . . . . . . 308
License Plate Lamp . . . . . . . . . . 308
Electrical System
High Voltage Devices and Wiring . . . . . . . . . . . . . . . . . . . . . . . 309
Electrical System Overload . . . 309
Fuses and Circuit Breakers . . . 310
Engine Compartment Fuse Block . . . . . . . . . . . . . . . . . . . . . . . . 310
Instrument Panel Fuse Block . . . . . . . . . . . . . . . . . . . . . . . . 314 Rear Compartment Fuse
Block . . . . . . . . . . . . . . . . . . . . . . . . 316
Wheels and Tires
Tires . . . . . . . . . . . . . . . . . . . . . . . . . . 318
All-Season Tires . . . . . . . . . . . . . . 319
Winter Tires . . . . . . . . . . . . . . . . . . 319
Summer Tires . . . . . . . . . . . . . . . . 320
Tire Sidewall Labeling . . . . . . . . 320
Tire Designations . . . . . . . . . . . . . 322
Tire Terminology andDefinitions . . . . . . . . . . . . . . . . . . 323
Tire Pressure . . . . . . . . . . . . . . . . . 326
Tire Pressure for High-Speed Operation . . . . . . . . . . . . . . . . . . . 327
Tire Pressure Monitor System . . . . . . . . . . . . . . . . . . . . . . 327
Tire Pressure Monitor Operation . . . . . . . . . . . . . . . . . . . 328
Tire Inspection . . . . . . . . . . . . . . . . 332
Tire Rotation . . . . . . . . . . . . . . . . . 333
When It Is Time for New Tires . . . . . . . . . . . . . . . . . . . . . . . . 334
Buying New Tires . . . . . . . . . . . . . 334
Different Size Tires and Wheels . . . . . . . . . . . . . . . . . . . . . . 336
Uniform Tire Quality Grading . . . . . . . . . . . . . . . . . . . . . 336
Wheel Alignment and Tire Balance . . . . . . . . . . . . . . . . . . . . . 338
Wheel Replacement . . . . . . . . . . 338
Page 308 of 419
Chevrolet Traverse Owner Manual (GMNA-Localizing-U.S./Canada/Mexico-
10603118) - 2018 - CRC - 1/29/18
Vehicle Care 307
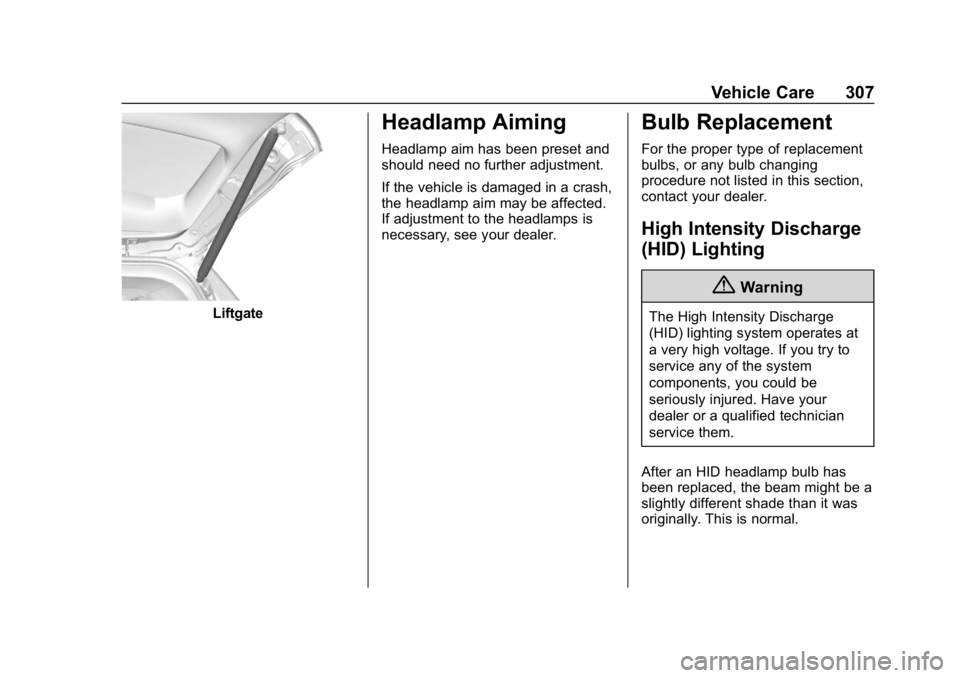
Liftgate
Headlamp Aiming
Headlamp aim has been preset and
should need no further adjustment.
If the vehicle is damaged in a crash,
the headlamp aim may be affected.
If adjustment to the headlamps is
necessary, see your dealer.
Bulb Replacement
For the proper type of replacement
bulbs, or any bulb changing
procedure not listed in this section,
contact your dealer.
High Intensity Discharge
(HID) Lighting
{Warning
The High Intensity Discharge
(HID) lighting system operates at
a very high voltage. If you try to
service any of the system
components, you could be
seriously injured. Have your
dealer or a qualified technician
service them.
After an HID headlamp bulb has
been replaced, the beam might be a
slightly different shade than it was
originally. This is normal.
Page 309 of 419
Chevrolet Traverse Owner Manual (GMNA-Localizing-U.S./Canada/Mexico-
10603118) - 2018 - CRC - 1/29/18
308 Vehicle Care
LED Lighting
This vehicle has several LED lamps.
For replacement of any LED lighting
assembly, contact your dealer.
Headlamps, Front Turn
Signal, and Sidemarker
The headlamp is either an HID or an
LED. See“High Intensity Discharge
(HID) Lighting” and“LED Lighting”
earlier in this section.
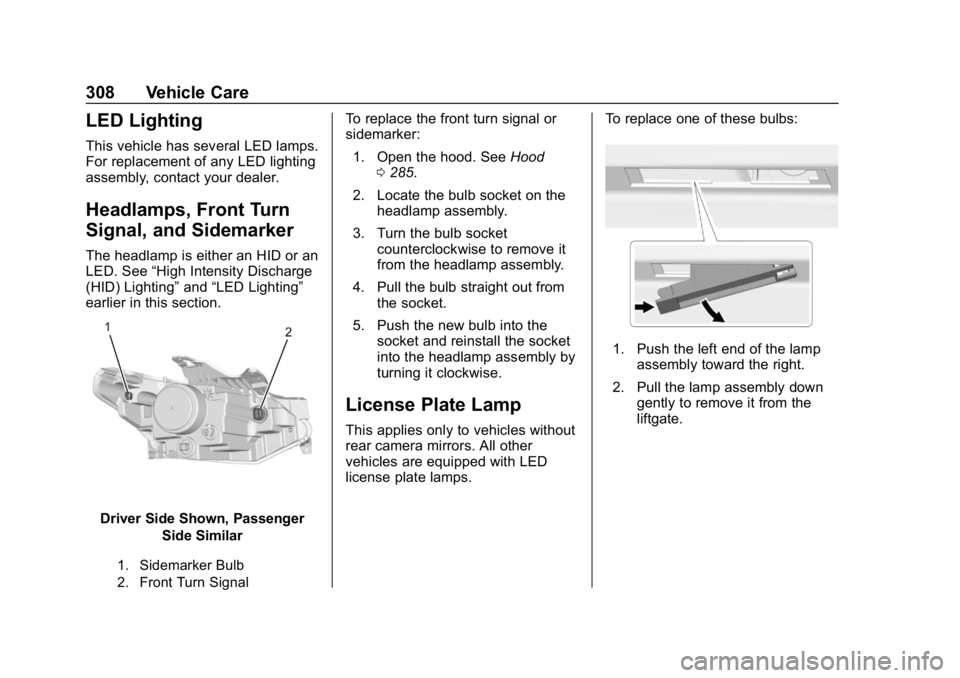
Driver Side Shown, Passenger
Side Similar
1. Sidemarker Bulb
2. Front Turn Signal
To replace the front turn signal or
sidemarker:
1. Open the hood. See Hood
0 285.
2. Locate the bulb socket on the headlamp assembly.
3. Turn the bulb socket counterclockwise to remove it
from the headlamp assembly.
4. Pull the bulb straight out from the socket.
5. Push the new bulb into the socket and reinstall the socket
into the headlamp assembly by
turning it clockwise.
License Plate Lamp
This applies only to vehicles without
rear camera mirrors. All other
vehicles are equipped with LED
license plate lamps. To replace one of these bulbs:
1. Push the left end of the lamp
assembly toward the right.
2. Pull the lamp assembly down gently to remove it from the
liftgate.
Page 311 of 419
Chevrolet Traverse Owner Manual (GMNA-Localizing-U.S./Canada/Mexico-
10603118) - 2018 - CRC - 1/29/18
310 Vehicle Care
Headlamp Wiring
An electrical overload may cause
the lamps to go on and off, or in
some cases to remain off. Have the
headlamp wiring checked right away
if the lamps go on and off or
remain off.
Windshield Wipers
If the wiper motor overheats due to
heavy snow or ice, the windshield
wipers will stop until the motor cools
and will then restart.
Although the circuit is protected
from electrical overload, overload
due to heavy snow or ice may
cause wiper linkage damage.
Always clear ice and heavy snow
from the windshield before using the
windshield wipers.
If the overload is caused by an
electrical problem and not snow or
ice, be sure to get it fixed.
Fuses and Circuit
Breakers
The wiring circuits in the vehicle are
protected from short circuits by a
combination of fuses and circuit
breakers. This greatly reduces the
chance of damage caused by
electrical problems.
{Danger
Fuses and circuit breakers are
marked with their ampere rating.
Do not exceed the
specified amperage rating when
replacing fuses and circuit
breakers. Use of an oversized
fuse or circuit breaker can result
in a vehicle fire. You and others
could be seriously injured or
killed.
To check a fuse, look at the
silver-colored band inside the fuse.
If the band is broken or melted,
replace the fuse. Be sure to replace
a bad fuse with a new one of the
identical size and rating. Fuses of the same amperage can
be temporarily borrowed from
another fuse location, if a fuse goes
out. Replace the fuse as soon as
possible.
Engine Compartment
Fuse Block
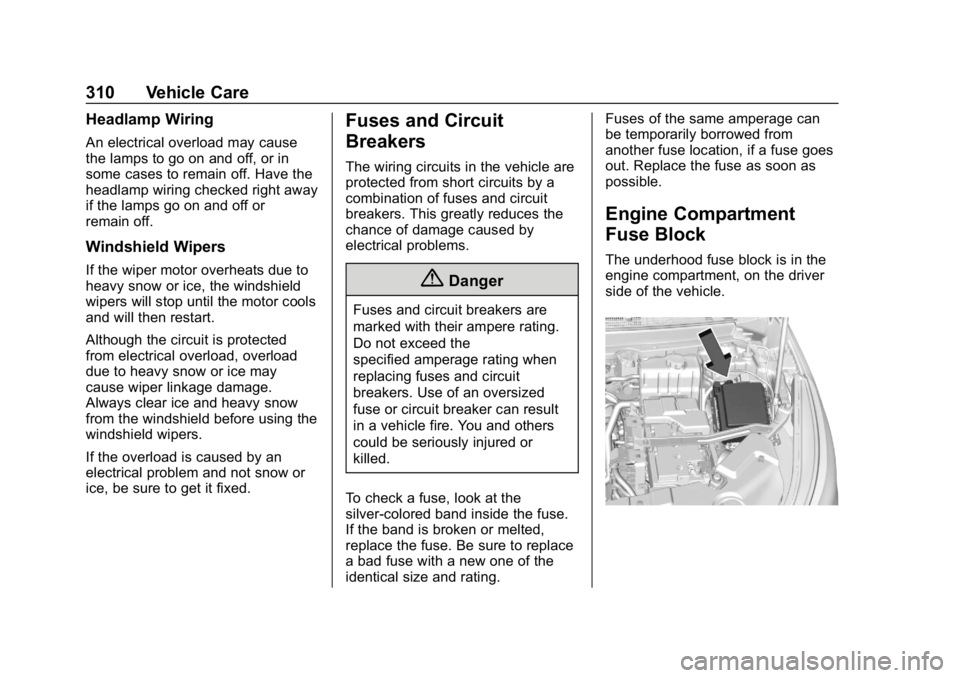
The underhood fuse block is in the
engine compartment, on the driver
side of the vehicle.
Page 313 of 419
Chevrolet Traverse Owner Manual (GMNA-Localizing-U.S./Canada/Mexico-
10603118) - 2018 - CRC - 1/29/18
312 Vehicle Care
FusesUsage
F2 Starter 1
F3 DC DC transformer 1
F4 –
F5 DC DC transformer 2
F6 –
F7 –
F8 –
F9 Vacuum pump
F10 Front wiper F11 –
F12 –
F13 Starter 2
F14 –
F15 Rear wiper
F16 –
F17 –
F18 –
F19 – Fuses
Usage
F20 –
F21 –
F22 Electronic brake control module
F23 Parking/Trailer lamps
F24 Right trailer stoplamp/Turnlamp
F25 Steering column lock
F26 –
F27 Left trailer stoplamp/Turnlamp
F28 –
F29 –
F30 Washer pump
F31 –
F32 Left low –beam
headlamp
F33 Front fog lamps
F34 Horn
F35 – Fuses
Usage
F36 –
F37 Right low –beam
headlamp
F38 Automatic headlamp leveling
motor (if equipped)
F39 Transmission control module
F40 Left rear bus electrical center/
Ignition
F41 Instrument cluster
F42 Heating, ventilation, and air
conditioning
F43 Head-up display (if equipped)
F44 Communication gateway module/
Run/Crank (if
equipped)
F45 –
F46 –
Page 339 of 419
Chevrolet Traverse Owner Manual (GMNA-Localizing-U.S./Canada/Mexico-
10603118) - 2018 - CRC - 1/29/18
338 Vehicle Care
underinflation, or excessive
loading, either separately or in
combination, can cause heat
buildup and possible tire failure.
Wheel Alignment and Tire
Balance
The tires and wheels were aligned
and balanced at the factory to
provide the longest tire life and best
overall performance. Adjustments to
wheel alignment and tire balancing
are not necessary on a regular
basis. Consider an alignment check
if there is unusual tire wear or the
vehicle is significantly pulling to one
side or the other. Some slight pull to
the left or right, depending on the
crown of the road and/or other road
surface variations such as troughs
or ruts, is normal. If the vehicle is
vibrating when driving on a smooth
road, the tires and wheels may need
to be rebalanced. See your dealer
for proper diagnosis.
Wheel Replacement
Replace any wheel that is bent,
cracked, or badly rusted or
corroded. If wheel nuts keep coming
loose, the wheel, wheel bolts, and
wheel nuts should be replaced.
If the wheel leaks air, replace it.
Some aluminum wheels can be
repaired. See your dealer if any of
these conditions exist.
Your dealer will know the kind of
wheel that is needed.
Each new wheel should have the
same load-carrying capacity,
diameter, width, offset, and be
mounted the same way as the one it
replaces.
Replace wheels, wheel bolts, wheel
nuts, or Tire Pressure Monitor
System (TPMS) sensors with new
GM original equipment parts.{Warning
Using the wrong replacement
wheels, wheel bolts, or wheel
nuts can be dangerous. It could
affect the braking and handling of
the vehicle. Tires can lose air,
and cause loss of control, causing
a crash. Always use the correct
wheel, wheel bolts, and wheel
nuts for replacement.
Caution
The wrong wheel can also cause
problems with bearing life, brake
cooling, speedometer or
odometer calibration, headlamp
aim, bumper height, vehicle
ground clearance, and tire or tire
chain clearance to the body and
chassis.
Page 372 of 419
Chevrolet Traverse Owner Manual (GMNA-Localizing-U.S./Canada/Mexico-
10603118) - 2018 - CRC - 1/29/18
Service and Maintenance 371
Battery
The 12-volt battery supplies power
to start the engine and operate any
additional electrical accessories.
.To avoid break-down or failure to
start the vehicle, maintain a
battery with full cranking power.
. Trained dealer technicians have
the diagnostic equipment to test
the battery and ensure that the
connections and cables are
corrosion-free.
Belts
. Belts may need replacing if they
squeak or show signs of
cracking or splitting.
. Trained dealer technicians have
access to tools and equipment
to inspect the belts and
recommend adjustment or
replacement when necessary. Brakes
Brakes stop the vehicle and are
crucial to safe driving.
.
Signs of brake wear may include
chirping, grinding, or squealing
noises, or difficulty stopping.
. Trained dealer technicians have
access to tools and equipment
to inspect the brakes and
recommend quality parts
engineered for the vehicle.
Fluids
Proper fluid levels and approved
fluids protect the vehicle’s systems
and components. See
Recommended Fluids and
Lubricants 0373 for GM approved
fluids.
. Engine oil and windshield
washer fluid levels should be
checked at every fuel fill.
. Instrument cluster lights may
come on to indicate that fluids
may be low and need to be
filled. Hoses
Hoses transport fluids and should
be regularly inspected to ensure
that there are no cracks or leaks.
With a multi-point inspection, your
dealer can inspect the hoses and
advise if replacement is needed.
Lamps
Properly working headlamps,
taillamps, and brake lamps are
important to see and be seen on
the road.
.
Signs that the headlamps need
attention include dimming, failure
to light, cracking, or damage.
The brake lamps need to be
checked periodically to ensure
that they light when braking.
. With a multi-point inspection,
your dealer can check the lamps
and note any concerns.