spec CHEVROLET TRAVERSE 2019 Workshop Manual
[x] Cancel search | Manufacturer: CHEVROLET, Model Year: 2019, Model line: TRAVERSE, Model: CHEVROLET TRAVERSE 2019Pages: 428, PDF Size: 6.28 MB
Page 305 of 428
Chevrolet Traverse Owner Manual (GMNA-Localizing-U.S./Canada/Mexico-
12146157) - 2019 - CRC - 11/1/18
304 Vehicle Care
{Warning
Plain water, or other liquids such
as alcohol, can boil before the
proper coolant mixture will. With
plain water or the wrong mixture,
the engine could get too hot but
there would not be an overheat
warning. The engine could catch
fire and you or others could be
burned.
{Warning
Spilling coolant on hot engine
parts can burn you. Coolant
contains ethylene glycol and it will
burn if the engine parts are hot
enough.
Caution
Failure to follow the specific
coolant fill procedure could cause
the engine to overheat and could
cause system damage. If coolant
is not visible in the surge tank,
contact your dealer.
If no problem is found, check to see
if coolant is visible in the coolant
surge tank. If coolant is visible but
the coolant level is not at the
indicated level mark, add a
50/50 mixture of clean, drinkable
water and DEX-COOL coolant at the
coolant surge tank, but be sure the
cooling system, including the
coolant surge tank pressure cap, is
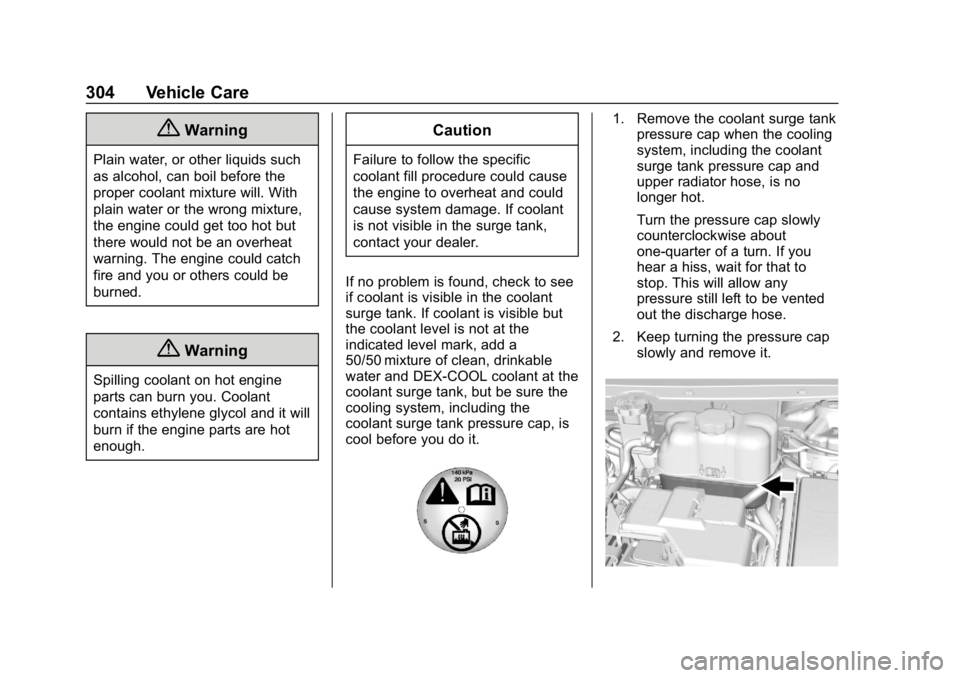
cool before you do it.
1. Remove the coolant surge tank pressure cap when the cooling
system, including the coolant
surge tank pressure cap and
upper radiator hose, is no
longer hot.
Turn the pressure cap slowly
counterclockwise about
one-quarter of a turn. If you
hear a hiss, wait for that to
stop. This will allow any
pressure still left to be vented
out the discharge hose.
2. Keep turning the pressure cap slowly and remove it.
Page 308 of 428
Chevrolet Traverse Owner Manual (GMNA-Localizing-U.S./Canada/Mexico-
12146157) - 2019 - CRC - 11/1/18
Vehicle Care 307
Caution
.Do not use washer fluid that
contains any type of water
repellent coating. This can
cause the wiper blades to
chatter or skip.
. Do not use engine coolant
(antifreeze) in the
windshield washer. It can
damage the windshield
washer system and paint.
. Do not mix water with
ready-to-use washer fluid.
Water can cause the
solution to freeze and
damage the washer fluid
tank and other parts of the
washer system.
. When using concentrated
washer fluid, follow the
manufacturer instructions for
adding water.
. Fill the washer fluid tank
only three-quarters full when
it is very cold. This allows
(Continued)
Caution (Continued)
for fluid expansion if
freezing occurs, which could
damage the tank if it is
completely full.
Brakes
Disc brake pads have built-in wear
indicators that make a high-pitched
warning sound when the brake pads
are worn and new pads are needed.
The sound can come and go or can
be heard all the time when the
vehicle is moving, except when
applying the brake pedal firmly.
{Warning
The brake wear warning sound
means that soon the brakes will
not work well. That could lead to
a crash. When the brake wear
warning sound is heard, have the
vehicle serviced.
Caution
Continuing to drive with worn-out
brake pads could result in costly
brake repair.
Some driving conditions or climates
can cause a brake squeal when the
brakes are first applied or lightly
applied. This does not mean
something is wrong with the brakes.
Properly torqued wheel nuts are
necessary to help prevent brake
pulsation. When tires are rotated,
inspect brake pads for wear and
evenly tighten wheel nuts in the
proper sequence to torque
specifications. See Capacities and
Specifications 0386.
Brake pads should be replaced as
complete sets.
Brake Pedal Travel
See your dealer if the brake pedal
does not return to normal height,
or if there is a rapid increase in
pedal travel. This could be a sign
that brake service may be required.
Page 309 of 428
Chevrolet Traverse Owner Manual (GMNA-Localizing-U.S./Canada/Mexico-
12146157) - 2019 - CRC - 11/1/18
308 Vehicle Care
Replacing Brake System Parts
Always replace brake system parts
with new, approved replacement
parts. If this is not done, the brakes
may not work properly. The braking
performance expected can change
in many other ways if the wrong
replacement brake parts are
installed or if parts are improperly
installed.
Brake Fluid
The brake master cylinder reservoir
is filled with GM approved DOT 3
brake fluid as indicated on the
reservoir cap. SeeEngine
Compartment Overview 0293 for
the location of the reservoir. Checking Brake Fluid
With the vehicle in P (Park) on a
level surface, the brake fluid level
should be between the minimum
and maximum marks on the brake
fluid reservoir.
There are only two reasons why the
brake fluid level in the reservoir may
go down:
.
Normal brake lining wear. When
new linings are installed, the
fluid level goes back up.
. A fluid leak in the brake
hydraulic system. Have the
brake hydraulic system fixed.
With a leak, the brakes will not
work well.
Always clean the brake fluid
reservoir cap and the area around
the cap before removing it.
Do not top off the brake fluid.
Adding fluid does not correct a leak.
If fluid is added when the linings are
worn, there will be too much fluid
when new brake linings are installed. Add or remove fluid, as
necessary, only when work is done
on the brake hydraulic system.
{Warning
If too much brake fluid is added, it
can spill on the engine and burn,
if the engine is hot enough. You
or others could be burned, and
the vehicle could be damaged.
Add brake fluid only when work is
done on the brake hydraulic
system.
When the brake fluid falls to a low
level, the brake warning light comes
on. See Brake System Warning
Light 0144.
Brake fluid absorbs water over time
which degrades the effectiveness of
the brake fluid. Replace brake fluid
at the specified intervals to prevent
increased stopping distance. See
Maintenance Schedule 0373.
Page 311 of 428
Chevrolet Traverse Owner Manual (GMNA-Localizing-U.S./Canada/Mexico-
12146157) - 2019 - CRC - 11/1/18
310 Vehicle Care
Warning (Continued)
not careful. SeeJump Starting -
North America 0356 for tips on
working around a battery without
getting hurt.
Infrequent Usage: Remove the
12-volt battery black, negative (−)
cable from the battery to keep the
battery from running down.
Extended Storage: Remove the
12-volt battery black, negative (−)
cable from the battery or use a
battery trickle charger.
Remember to reconnect the battery
when ready to drive the vehicle.
All-Wheel Drive
Transfer Case
Under normal driving conditions,
transfer case fluid does not require
maintenance unless there is a fluid
leak or unusual noise. If required,
have the transfer case serviced by
your dealer.
Starter Switch Check
{Warning
When you are doing this
inspection, the vehicle could
move suddenly. If the vehicle
moves, you or others could be
injured.
1. Before starting this check, be sure there is enough room
around the vehicle.
2. Apply both the parking brake and the regular brake.
Do not use the accelerator
pedal, and be ready to turn off
the engine immediately if it
starts.
3. Try to start the engine in each gear. The vehicle should start
only in P (Park) or N (Neutral).
If the vehicle starts in any other
position, contact your dealer for
service.
Automatic Transmission
Shift Lock Control
Function Check
{Warning
When you are doing this
inspection, the vehicle could
move suddenly. If the vehicle
moves, you or others could be
injured.
1. Before starting this check, be sure there is enough room
around the vehicle. It should be
parked on a level surface.
2. Apply the parking brake. Be ready to apply the regular
brake immediately if the vehicle
begins to move.
3. With the engine off, turn the ignition on, but do not start the
engine. Without applying the
regular brake, try to move the
shift lever out of P (Park) with
Page 312 of 428
Chevrolet Traverse Owner Manual (GMNA-Localizing-U.S./Canada/Mexico-
12146157) - 2019 - CRC - 11/1/18
Vehicle Care 311
normal effort. If the shift lever
moves out of P (Park), contact
your dealer for service.
Park Brake and P (Park)
Mechanism Check
{Warning
When you are doing this check,
the vehicle could begin to move.
You or others could be injured
and property could be damaged.
Make sure there is room in front
of the vehicle in case it begins to
roll. Be ready to apply the regular
brake at once should the vehicle
begin to move.
Park on a fairly steep hill, with the
vehicle facing downhill. Keeping
your foot on the regular brake, set
the parking brake.
. To check the parking brake's
holding ability: With the engine
running and the transmission in
N (Neutral), slowly remove foot pressure from the regular brake
pedal. Do this until the vehicle is
held by the parking brake only.
. To check the P (Park)
mechanism's holding ability:
With the engine running, shift to
P (Park). Then release the
parking brake followed by the
regular brake.
Contact your dealer if service is
required.
Wiper Blade Replacement
Windshield wiper blades should be
inspected for wear and cracking.
See Maintenance Schedule 0373.
Replacement blades come in
different types and are removed in
different ways. For proper type and
length, see Maintenance
Replacement Parts 0383.
Caution
Allowing the wiper arm to touch
the windshield when no wiper
blade is installed could damage
the windshield. Any damage that
occurs would not be covered by
the vehicle warranty. Do not allow
the wiper arm to touch the
windshield.
Front Wiper Blade
Replacement
To replace the front wiper blades:
1. Pull the windshield wiper assembly away from the
windshield.
Page 314 of 428
Chevrolet Traverse Owner Manual (GMNA-Localizing-U.S./Canada/Mexico-
12146157) - 2019 - CRC - 11/1/18
Vehicle Care 313
Windshield Replacement
Driver Assistance Systems
If the windshield needs to be
replaced and the vehicle is
equipped with a front camera sensor
for the Driver Assistance Systems, a
GM replacement windshield is
recommended. The replacement
windshield must be installed
according to GM specifications for
proper alignment. If it is not, these
systems may not work properly, they
may display messages, or they may
not work at all. See your dealer for
proper windshield replacement.
Gas Strut(s)
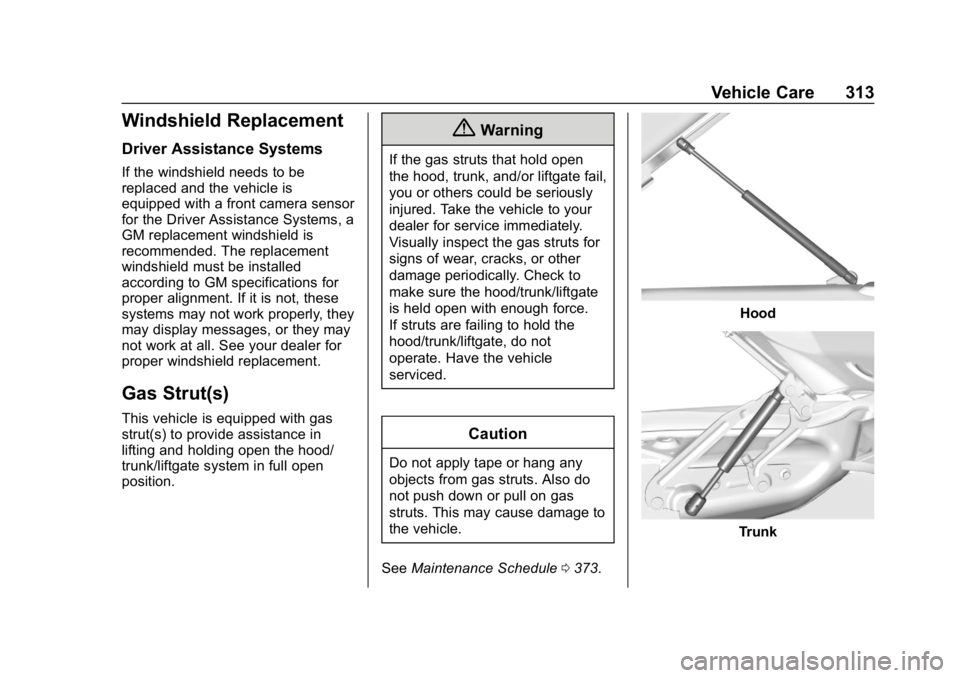
This vehicle is equipped with gas
strut(s) to provide assistance in
lifting and holding open the hood/
trunk/liftgate system in full open
position.
{Warning
If the gas struts that hold open
the hood, trunk, and/or liftgate fail,
you or others could be seriously
injured. Take the vehicle to your
dealer for service immediately.
Visually inspect the gas struts for
signs of wear, cracks, or other
damage periodically. Check to
make sure the hood/trunk/liftgate
is held open with enough force.
If struts are failing to hold the
hood/trunk/liftgate, do not
operate. Have the vehicle
serviced.
Caution
Do not apply tape or hang any
objects from gas struts. Also do
not push down or pull on gas
struts. This may cause damage to
the vehicle.
See Maintenance Schedule 0373.
Hood
Trunk
Page 317 of 428
Chevrolet Traverse Owner Manual (GMNA-Localizing-U.S./Canada/Mexico-
12146157) - 2019 - CRC - 11/1/18
316 Vehicle Care
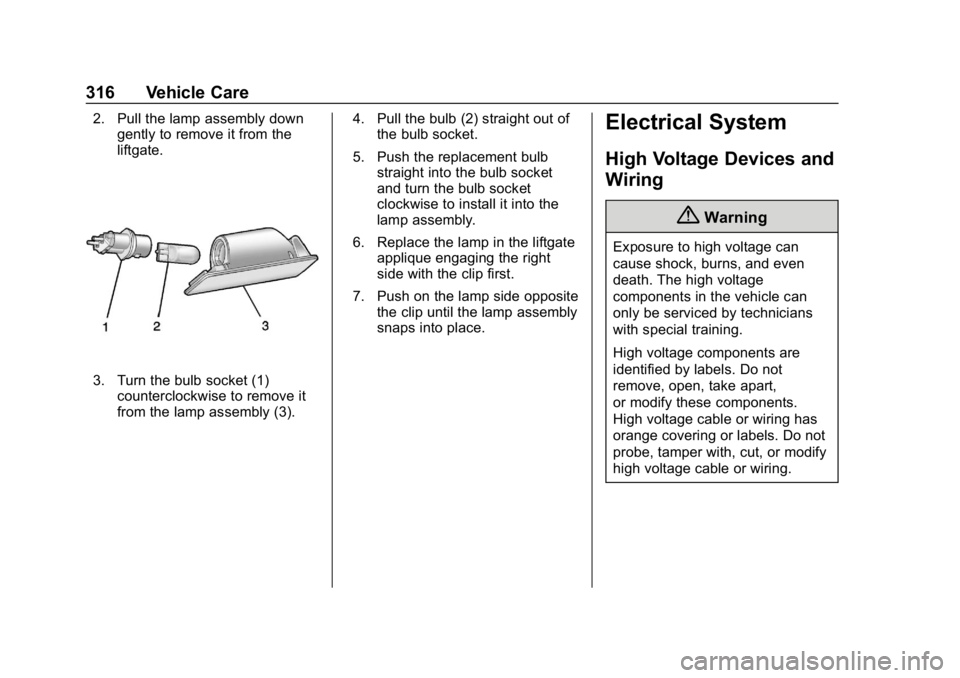
2. Pull the lamp assembly downgently to remove it from the
liftgate.
3. Turn the bulb socket (1)
counterclockwise to remove it
from the lamp assembly (3). 4. Pull the bulb (2) straight out of
the bulb socket.
5. Push the replacement bulb straight into the bulb socket
and turn the bulb socket
clockwise to install it into the
lamp assembly.
6. Replace the lamp in the liftgate applique engaging the right
side with the clip first.
7. Push on the lamp side opposite the clip until the lamp assembly
snaps into place.
Electrical System
High Voltage Devices and
Wiring
{Warning
Exposure to high voltage can
cause shock, burns, and even
death. The high voltage
components in the vehicle can
only be serviced by technicians
with special training.
High voltage components are
identified by labels. Do not
remove, open, take apart,
or modify these components.
High voltage cable or wiring has
orange covering or labels. Do not
probe, tamper with, cut, or modify
high voltage cable or wiring.
Page 318 of 428
Chevrolet Traverse Owner Manual (GMNA-Localizing-U.S./Canada/Mexico-
12146157) - 2019 - CRC - 11/1/18
Vehicle Care 317
Electrical System
Overload
The vehicle has fuses and circuit
breakers to protect against an
electrical system overload.
When the current electrical load is
too heavy, the circuit breaker opens
and closes, protecting the circuit
until the current load returns to
normal or the problem is fixed. This
greatly reduces the chance of circuit
overload and fire caused by
electrical problems.
Fuses and circuit breakers protect
power devices in the vehicle.
Replace a bad fuse with a new one
of the identical size and rating.
If there is a problem on the road and
a fuse needs to be replaced, the
same amperage fuse can be
borrowed. Choose some feature of
the vehicle that is not needed to use
and replace it as soon as possible.
Headlamp Wiring
An electrical overload may cause
the lamps to go on and off, or in
some cases to remain off. Have the
headlamp wiring checked right away
if the lamps go on and off or
remain off.
Windshield Wipers
If the wiper motor overheats due to
heavy snow or ice, the windshield
wipers will stop until the motor cools
and will then restart.
Although the circuit is protected
from electrical overload, overload
due to heavy snow or ice may
cause wiper linkage damage.
Always clear ice and heavy snow
from the windshield before using the
windshield wipers.
If the overload is caused by an
electrical problem and not snow or
ice, be sure to get it fixed.
Fuses and Circuit
Breakers
The wiring circuits in the vehicle are
protected from short circuits by a
combination of fuses and circuit
breakers. This greatly reduces the
chance of damage caused by
electrical problems.
{Danger
Fuses and circuit breakers are
marked with their ampere rating.
Do not exceed the
specified amperage rating when
replacing fuses and circuit
breakers. Use of an oversized
fuse or circuit breaker can result
in a vehicle fire. You and others
could be seriously injured or
killed.
Page 328 of 428
Chevrolet Traverse Owner Manual (GMNA-Localizing-U.S./Canada/Mexico-
12146157) - 2019 - CRC - 11/1/18
Vehicle Care 327
Warning (Continued)
.Replace any tires that
have been damaged by
impacts with potholes,
curbs, etc.
.Improperly repaired tires
can cause a crash. Only
the dealer or an
authorized tire service
center should repair,
replace, dismount, and
mount the tires.
.Do not spin the tires in
excess of 56 km/h
(35 mph) on slippery
surfaces such as snow,
mud, ice, etc. Excessive
spinning may cause the
tires to explode.
See Tire Pressure for
High-Speed Operation 0334 for
inflation pressure adjustment for
high-speed driving.
All-Season Tires
This vehicle may come with
all-season tires. These tires are
designed to provide good overall
performance on most road surfaces
and weather conditions. Original
equipment tires designed to GM's
specific tire performance criteria
have a TPC specification code
molded onto the sidewall. Original
equipment all-season tires can be
identified by the last two characters
of this TPC code, which will
be “MS.”
Consider installing winter tires on
the vehicle if frequent driving on
snow or ice-covered roads is
expected. All-season tires provide
adequate performance for most
winter driving conditions, but they
may not offer the same level of
traction or performance as winter
tires on snow or ice-covered roads.
See Winter Tires 0327.
Winter Tires
This vehicle was not originally
equipped with winter tires. Winter
tires are designed for increased
traction on snow and ice-covered
roads. Consider installing winter
tires on the vehicle if frequent
driving on ice or snow covered
roads is expected. See your dealer
for details regarding winter tire
availability and proper tire selection.
Also, see Buying New Tires 0342.
With winter tires, there may be
decreased dry road traction,
increased road noise, and shorter
tread life. After changing to winter
tires, be alert for changes in vehicle
handling and braking.
If using winter tires:
. Use tires of the same brand and
tread type on all four wheel
positions.
. Use only radial ply tires of the
same size, load range, and
speed rating as the original
equipment tires.
Page 329 of 428
Chevrolet Traverse Owner Manual (GMNA-Localizing-U.S./Canada/Mexico-
12146157) - 2019 - CRC - 11/1/18
328 Vehicle Care
Winter tires with the same speed
rating as the original equipment tires
may not be available for H, V, W, Y,
and ZR speed rated tires. If winter
tires with a lower speed rating are
chosen, never exceed the tire's
maximum speed capability.
Tire Sidewall Labeling
Useful information about a tire is
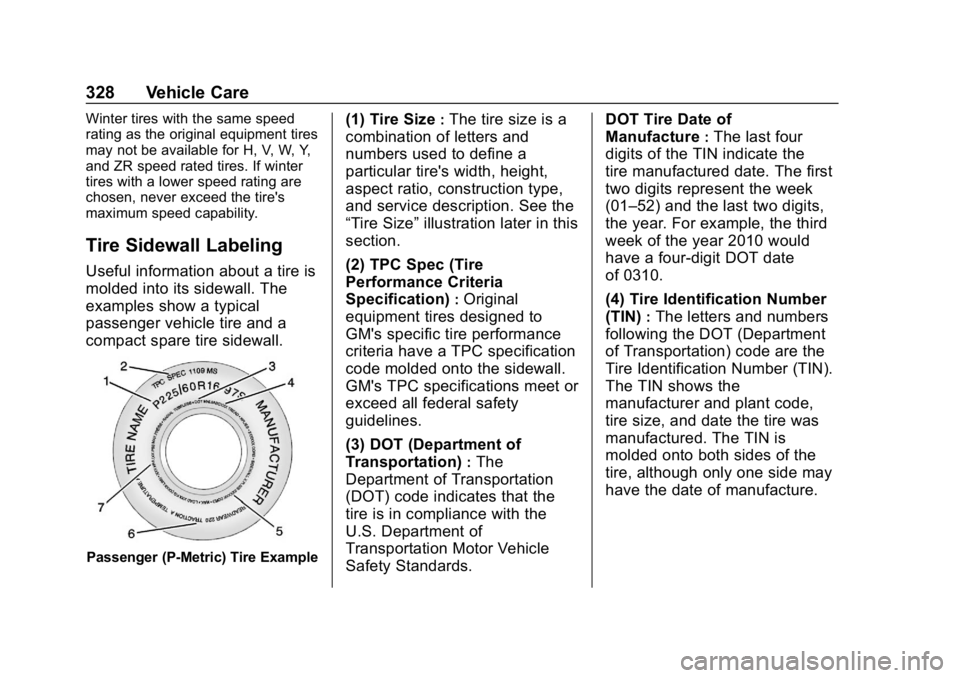
molded into its sidewall. The
examples show a typical
passenger vehicle tire and a
compact spare tire sidewall.
Passenger (P-Metric) Tire Example
(1) Tire Size:The tire size is a
combination of letters and
numbers used to define a
particular tire's width, height,
aspect ratio, construction type,
and service description. See the
“Tire Size” illustration later in this
section.
(2) TPC Spec (Tire
Performance Criteria
Specification)
:Original
equipment tires designed to
GM's specific tire performance
criteria have a TPC specification
code molded onto the sidewall.
GM's TPC specifications meet or
exceed all federal safety
guidelines.
(3) DOT (Department of
Transportation)
:The
Department of Transportation
(DOT) code indicates that the
tire is in compliance with the
U.S. Department of
Transportation Motor Vehicle
Safety Standards. DOT Tire Date of
Manufacture
:The last four
digits of the TIN indicate the
tire manufactured date. The first
two digits represent the week
(01–52) and the last two digits,
the year. For example, the third
week of the year 2010 would
have a four-digit DOT date
of 0310.
(4) Tire Identification Number
(TIN)
:The letters and numbers
following the DOT (Department
of Transportation) code are the
Tire Identification Number (TIN).
The TIN shows the
manufacturer and plant code,
tire size, and date the tire was
manufactured. The TIN is
molded onto both sides of the
tire, although only one side may
have the date of manufacture.