replace CHEVROLET TRAVERSE 2019 Repair Manual
[x] Cancel search | Manufacturer: CHEVROLET, Model Year: 2019, Model line: TRAVERSE, Model: CHEVROLET TRAVERSE 2019Pages: 428, PDF Size: 6.28 MB
Page 348 of 428
Chevrolet Traverse Owner Manual (GMNA-Localizing-U.S./Canada/Mexico-
12146157) - 2019 - CRC - 11/1/18
Vehicle Care 347
Caution
If the vehicle is equipped with
255/65R18 size tires, use tire
chains only where legal and only
when necessary. Use low profile
chains that add no more than
12 mm thickness to the tire tread
and inner sidewall. Use chains
that are the proper size for the
tires. Install them on the tires of
the front axle. Do not use chains
on the tires of the rear axle.
Tighten them as tightly as
possible with the ends securely
fastened. Drive slowly and follow
the chain manufacturer's
instructions. If the chains contact
the vehicle, stop and retighten
them. If the contact continues,
slow down until it stops. Driving
too fast or spinning the wheels
with chains on will damage the
vehicle.
If a Tire Goes Flat
It is unusual for a tire to blow out
while driving, especially if the tires
are maintained properly. SeeTires
0 326. If air goes out of a tire, it is
much more likely to leak out slowly.
But if there ever is a blowout, here
are a few tips about what to expect
and what to do:
If a front tire fails, the flat tire
creates a drag that pulls the vehicle
toward that side. Take your foot off
the accelerator pedal and grip the
steering wheel firmly. Steer to
maintain lane position, and then
gently brake to a stop, well off the
road, if possible.
A rear blowout, particularly on a
curve, acts much like a skid and
may require the same correction as
used in a skid. Stop pressing the
accelerator pedal and steer to
straighten the vehicle. It may be
very bumpy and noisy. Gently brake
to a stop, well off the road,
if possible.{Warning
Driving on a flat tire will cause
permanent damage to the tire.
Re-inflating a tire after it has been
driven on while severely
underinflated or flat may cause a
blowout and a serious crash.
Never attempt to re-inflate a tire
that has been driven on while
severely underinflated or flat.
Have your dealer or an authorized
tire service center repair or
replace the flat tire as soon as
possible.
{Warning
Lifting a vehicle and getting under
it to do maintenance or repairs is
dangerous without the
appropriate safety equipment and
training. If a jack is provided with
the vehicle, it is designed only for
changing a flat tire. If it is used for
(Continued)
Page 355 of 428
Chevrolet Traverse Owner Manual (GMNA-Localizing-U.S./Canada/Mexico-
12146157) - 2019 - CRC - 11/1/18
354 Vehicle Care
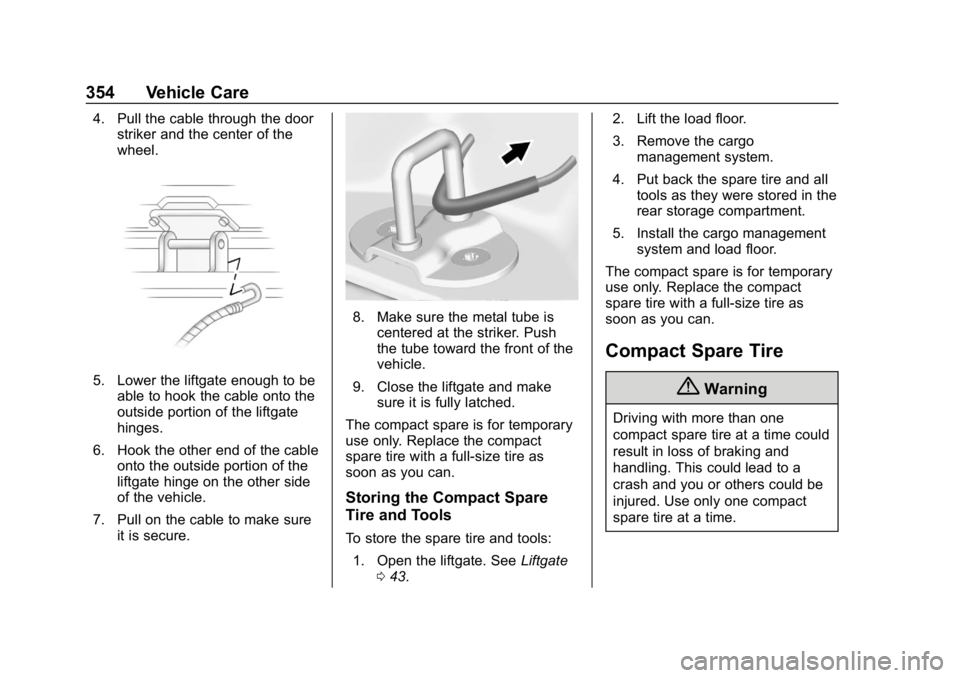
4. Pull the cable through the doorstriker and the center of the
wheel.
5. Lower the liftgate enough to be
able to hook the cable onto the
outside portion of the liftgate
hinges.
6. Hook the other end of the cable onto the outside portion of the
liftgate hinge on the other side
of the vehicle.
7. Pull on the cable to make sure it is secure.
8. Make sure the metal tube iscentered at the striker. Push
the tube toward the front of the
vehicle.
9. Close the liftgate and make sure it is fully latched.
The compact spare is for temporary
use only. Replace the compact
spare tire with a full-size tire as
soon as you can.
Storing the Compact Spare
Tire and Tools
To store the spare tire and tools: 1. Open the liftgate. See Liftgate
0 43. 2. Lift the load floor.
3. Remove the cargo
management system.
4. Put back the spare tire and all tools as they were stored in the
rear storage compartment.
5. Install the cargo management system and load floor.
The compact spare is for temporary
use only. Replace the compact
spare tire with a full-size tire as
soon as you can.
Compact Spare Tire
{Warning
Driving with more than one
compact spare tire at a time could
result in loss of braking and
handling. This could lead to a
crash and you or others could be
injured. Use only one compact
spare tire at a time.
Page 356 of 428
Chevrolet Traverse Owner Manual (GMNA-Localizing-U.S./Canada/Mexico-
12146157) - 2019 - CRC - 11/1/18
Vehicle Care 355
If this vehicle has a compact spare
tire, it was fully inflated when new;
however, it can lose air over time.
Check the inflation pressure
regularly. It should be 420 kPa
(60 psi).
Stop as soon as possible and check
that the spare tire is correctly
inflated after being installed on the
vehicle. The compact spare tire is
designed for temporary use only.
The vehicle will perform differently
with the spare tire installed and it is
recommended that the vehicle
speed be limited to 80 km/h (50
mph). To conserve the tread of the
spare tire, have the standard tire
repaired or replaced as soon as
convenient and return the spare tire
to the storage area.
When using a compact spare tire,
the ABS and Traction Control
systems may engage until the spare
tire is recognized by the vehicle,
especially on slippery roads. Adjust
driving to reduce possible
wheel slip.Performance of the All-Wheel
Drive (AWD) system will be
automatically reduced to protect the
system when using the compact
spare. To restore the AWD and
prevent excessive wear on the
clutch in the AWD, replace the
compact spare tire with a full-size
tire as soon as possible.
Caution
When the compact spare is
installed, do not take the vehicle
through an automatic car wash
with guide rails. The compact
spare can get caught on the rails
which can damage the tire, wheel,
and other parts of the vehicle.
Do not use the compact spare on
other vehicles.
Do not mix the compact spare tire or
wheel with other wheels or tires.
They will not fit. Keep the spare tire
and its wheel together.
Caution
Tire chains will not fit the compact
spare. Using them can damage
the vehicle and the chains. Do not
use tire chains on the compact
spare.
Page 366 of 428
Chevrolet Traverse Owner Manual (GMNA-Localizing-U.S./Canada/Mexico-
12146157) - 2019 - CRC - 11/1/18
Vehicle Care 365
a buildup of vehicle wash/wax
treatments may cause wiper
streaking.
Replace the wiper blades if they are
worn or damaged. Damage can be
caused by extreme dusty
conditions, sand, salt, heat, sun,
snow, and ice.
Weatherstrips
Apply weatherstrip lubricant on
weatherstrips to make them last
longer, seal better, and not stick or
squeak. Lubricate weatherstrips at
least once a year. Hot, dry climates
may require more frequent
application. Black marks from
rubber material on painted surfaces
can be removed by rubbing with a
clean cloth. SeeRecommended
Fluids and Lubricants 0382.
Tires
Use a stiff brush with tire cleaner to
clean the tires.
Caution
Using petroleum-based tire
dressing products on the vehicle
may damage the paint finish and/
or tires. When applying a tire
dressing, always wipe off any
overspray from all painted
surfaces on the vehicle.
Wheels and Wheel Trim
Use a soft, clean cloth with mild
soap and water to clean the wheels.
After rinsing thoroughly with clean
water, dry with a soft, clean towel.
A wax may then be applied.
Caution
Chrome wheels and chrome
wheel trim may be damaged if the
vehicle is not washed after driving
on roads that have been sprayed
with magnesium chloride or
calcium chloride. These are used
on roads for conditions such as
(Continued)
Caution (Continued)
dust and ice. Always wash the
chrome with soap and water after
exposure.
Caution
To avoid surface damage on
wheels and wheel trim, do not
use strong soaps, chemicals,
abrasive polishes, cleaners,
or brushes. Use only GM
approved cleaners. Do not drive
the vehicle through an automatic
car wash that uses silicon carbide
tire/wheel cleaning brushes.
Damage could occur and the
repairs would not be covered by
the vehicle warranty.
Brake System
Visually inspect brake lines and
hoses for proper attachment,
connections, binding, leaks, cracks,
chafing, etc. Inspect disc brake
Page 367 of 428
Chevrolet Traverse Owner Manual (GMNA-Localizing-U.S./Canada/Mexico-
12146157) - 2019 - CRC - 11/1/18
366 Vehicle Care
pads for wear and rotors for surface
condition. Inspect drum brake
linings/shoes for wear or cracks.
Inspect all other brake parts for
cracks and leaks.
Steering, Suspension, and
Chassis Components
Visually inspect steering,
suspension, and chassis
components for damaged, loose,
or missing parts or signs of wear at
least once a year.
Inspect power steering for proper
electrical connections, binding,
cracks, chafing, etc.
Visually check constant velocity joint
boots and axle seals for leaks.
Body Component Lubrication
Lubricate all key lock cylinders,
hood hinges, liftgate hinges, and the
steel fuel door hinges, unless the
components are plastic. Applying
silicone grease on weatherstrips
with a clean cloth will make them
last longer, seal better, and not stick
or squeak.
Underbody Maintenance
At least twice a year, spring and fall,
use plain water to flush any
corrosive materials from the
underbody. Take care to thoroughly
clean any areas where mud and
other debris can collect.
Do not directly power wash the
transfer case and/or front/rear axle
output seals. High pressure water
can overcome the seals and
contaminate the fluid. Contaminated
fluid will decrease the life of the
transfer case and/or axles and
should be replaced.
Sheet Metal Damage
If the vehicle is damaged and
requires sheet metal repair or
replacement, make sure the body
repair shop applies anti-corrosion
material to parts repaired or
replaced to restore corrosion
protection.
Original manufacturer replacement
parts will provide the corrosion
protection while maintaining the
vehicle warranty.
Finish Damage
Quickly repair minor chips and
scratches with touch-up materials
available from your dealer to avoid
corrosion. Larger areas of finish
damage can be corrected in your
dealer's body and paint shop.
Chemical Paint Spotting
Airborne pollutants can fall upon
and attack painted vehicle surfaces
causing blotchy, ring-shaped
discolorations, and small, irregular
dark spots etched into the paint
surface. See“Finish Care”
previously in this section.
Interior Care
To prevent dirt particle abrasions,
regularly clean the vehicle's interior.
Immediately remove any soils.
Newspapers or dark garments can
transfer color to the vehicle’s
interior.
Use a soft bristle brush to remove
dust from knobs and crevices on the
instrument cluster. Using a mild
soap solution, immediately remove
Page 372 of 428
Chevrolet Traverse Owner Manual (GMNA-Localizing-U.S./Canada/Mexico-
12146157) - 2019 - CRC - 10/31/18
Service and Maintenance 371
Service and
Maintenance
General Information
General Information . . . . . . . . . . 371
Maintenance Schedule
Maintenance Schedule . . . . . . . 373
Special Application Services
Special ApplicationServices . . . . . . . . . . . . . . . . . . . . 378
Additional Maintenance
and Care
Additional Maintenanceand Care . . . . . . . . . . . . . . . . . . . . 379
Recommended Fluids,
Lubricants, and Parts
Recommended Fluids andLubricants . . . . . . . . . . . . . . . . . . . 382
Maintenance Replacement Parts . . . . . . . . . . . . . . . . . . . . . . . . 383
Maintenance Records
Maintenance Records . . . . . . . . 384
General Information
Your vehicle is an important
investment. This section describes
the required maintenance for the
vehicle. Follow this schedule to help
protect against major repair
expenses resulting from neglect or
inadequate maintenance. It may
also help to maintain the value of
the vehicle if it is sold. It is the
responsibility of the owner to have
all required maintenance performed.
Your dealer has trained technicians
who can perform required
maintenance using genuine
replacement parts. They have
up-to-date tools and equipment for
fast and accurate diagnostics. Many
dealers have extended evening and
Saturday hours, courtesy
transportation, and online
scheduling to assist with service
needs.
Your dealer recognizes the
importance of providing
competitively priced maintenance
and repair services. With trained
technicians, the dealer is the place for routine maintenance such as oil
changes and tire rotations and
additional maintenance items like
tires, brakes, batteries, and wiper
blades.
Caution
Damage caused by improper
maintenance can lead to costly
repairs and may not be covered
by the vehicle warranty.
Maintenance intervals, checks,
inspections, recommended fluids,
and lubricants are important to
keep the vehicle in good working
condition.
Do not have chemical flushes that
are not approved by GM
performed on the vehicle. The
use of flushes, solvents, cleaners,
or lubricants that are not
approved by GM could damage
the vehicle, requiring expensive
repairs that are not covered by
the vehicle warranty.
Page 374 of 428
Chevrolet Traverse Owner Manual (GMNA-Localizing-U.S./Canada/Mexico-
12146157) - 2019 - CRC - 10/31/18
Service and Maintenance 373
Maintenance
Schedule
Owner Checks and Services
At Each Fuel Stop
.Check the engine oil level. See
Engine Oil 0296.
Once a Month
. Check the tire inflation
pressures. See Tire Pressure
0 333.
. Inspect the tires for wear. See
Tire Inspection 0340.
. Check the windshield washer
fluid level. See Washer Fluid
0 306.
Engine Oil Change
When the CHANGE ENGINE OIL
SOON message displays, have the
engine oil and filter changed within
the next 1 000 km/600 mi. If driven
under the best conditions, the engine oil life system may not
indicate the need for vehicle service
for up to a year. The engine oil and
filter must be changed at least once
a year and the oil life system must
be reset. Your trained dealer
technician can perform this work.
If the engine oil life system is reset
accidentally, service the vehicle
within 5 000 km/3,000 mi since the
last service. Reset the oil life
system when the oil is changed.
See
Engine Oil Life System 0298.
Air Conditioning Desiccant
(Replace Every Seven Years)
The air conditioning system requires
maintenance every seven years.
This service requires replacement of
the desiccant to help the longevity
and efficient operation of the air
conditioning system. This service
can be complex. See your dealer.
Tire Rotation and Required
Services Every 12 000 km/
7,500 mi
Rotate the tires, if recommended for
the vehicle, and perform the
following services. See Tire
Rotation 0340.
. Check engine oil level and oil
life percentage. If needed,
change engine oil and filter, and
reset oil life system. See Engine
Oil 0296 andEngine Oil Life
System 0298.
. Check engine coolant level. See
Cooling System 0301.
. Check windshield washer fluid
level. See Washer Fluid 0306.
. Check tire inflation pressures.
See Tire Pressure 0333.
. Inspect tire wear. See Tire
Inspection 0340.
Page 375 of 428

Chevrolet Traverse Owner Manual (GMNA-Localizing-U.S./Canada/Mexico-
12146157) - 2019 - CRC - 10/31/18
374 Service and Maintenance
.Visually check for fluid leaks.
. Inspect engine air cleaner filter.
See Engine Air Cleaner/Filter
0 300.
. Inspect brake system. See
Exterior Care 0362.
. Visually inspect steering,
suspension, and chassis
components for damage,
including cracks or tears in the
rubber boots, loose or missing
parts, or signs of wear at least
once a year. See Exterior Care
0 362.
. Inspect power steering for
proper attachment, connections,
binding, leaks, cracks,
chafing, etc. .
Visually inspect halfshafts and
drive shafts for excessive wear,
lubricant leaks, and/or damage
including: tube dents or cracks,
constant velocity joint or
universal joint looseness,
cracked or missing boots, loose
or missing boot clamps, center
bearing excessive looseness,
loose or missing fasteners, and
axle seal leaks.
. Check restraint system
components. See Safety System
Check 083.
. Visually inspect fuel system for
damage or leaks.
. Visually inspect exhaust system
and nearby heat shields for
loose or damaged parts.
. Lubricate body components. See
Exterior Care 0362. .
Check starter switch. See Starter
Switch Check 0310.
. Check parking brake and
automatic transmission park
mechanism. See Park Brake and
P (Park) Mechanism Check
0 311.
. Check accelerator pedal for
damage, high effort, or binding.
Replace if needed.
. Visually inspect gas strut for
signs of wear, cracks, or other
damage. Check the hold open
ability of the strut. If the hold
open ability is low, service the
gas strut. See Gas Strut(s)
0 313.
. Inspect sunroof track and seal,
if equipped. See Sunroof058.
Page 376 of 428
Chevrolet Traverse Owner Manual (GMNA-Localizing-U.S./Canada/Mexico-
12146157) - 2019 - CRC - 10/31/18
Service and Maintenance 375
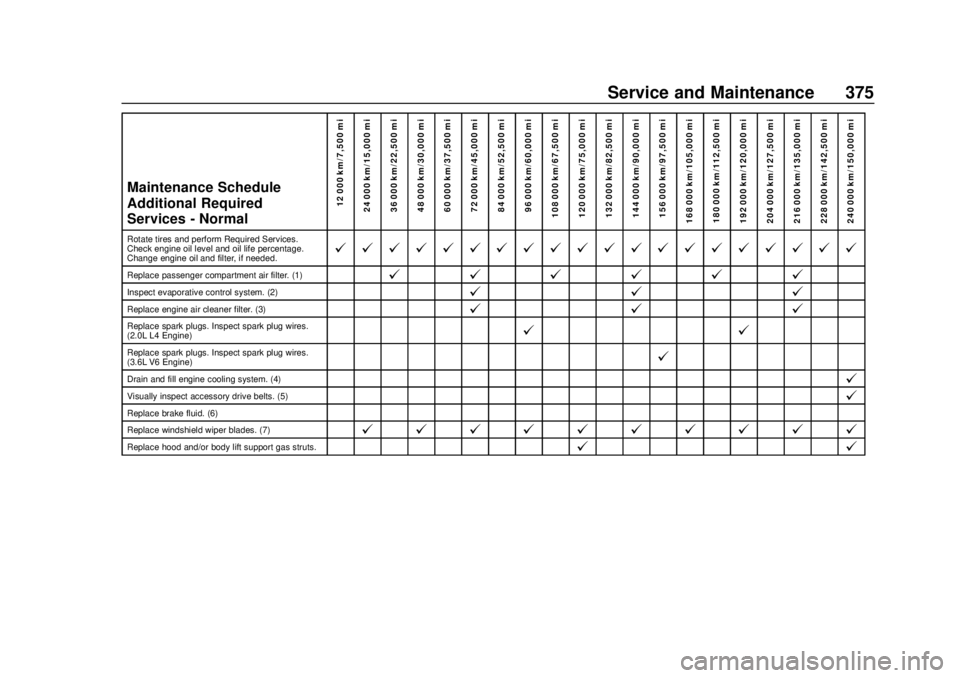
Maintenance Schedule
Additional Required
Services - Normal12 000 km/7,500 mi
24 000 km/15,000 mi
36 000 km/22,500 mi
48 000 km/30,000 mi
60 000 km/37,500 mi
72 000 km/45,000 mi
84 000 km/52,500 mi
96 000 km/60,000 mi
108 000 km/67,500 mi
120 000 km/75,000 mi
132 000 km/82,500 mi
144 000 km/90,000 mi
156 000 km/97,500 mi
168 000 km/105,000 mi 180 000 km/112,500 mi
192 000 km/120,000 mi
204 000 km/127,500 mi
216 000 km/135,000 mi
228 000 km/142,500 mi
240 000 km/150,000 mi
Rotate tires and perform Required Services.
Check engine oil level and oil life percentage.
Change engine oil and filter, if needed.@ @ @ @ @ @ @ @ @ @ @ @ @ @ @ @ @ @ @ @
Replace passenger compartment air filter. (1)@ @@@@@
Inspect evaporative control system. (2)@ @@
Replace engine air cleaner filter. (3)@@@
Replace spark plugs. Inspect spark plug wires.
(2.0L L4 Engine)@ @
Replace spark plugs. Inspect spark plug wires.
(3.6L V6 Engine)@
Drain and fill engine cooling system. (4)@
Visually inspect accessory drive belts. (5)@
Replace brake fluid. (6)
Replace windshield wiper blades. (7)
@ @ @ @ @ @ @ @ @ @
Replace hood and/or body lift support gas struts.@ @
Page 377 of 428
Chevrolet Traverse Owner Manual (GMNA-Localizing-U.S./Canada/Mexico-
12146157) - 2019 - CRC - 10/31/18
376 Service and Maintenance
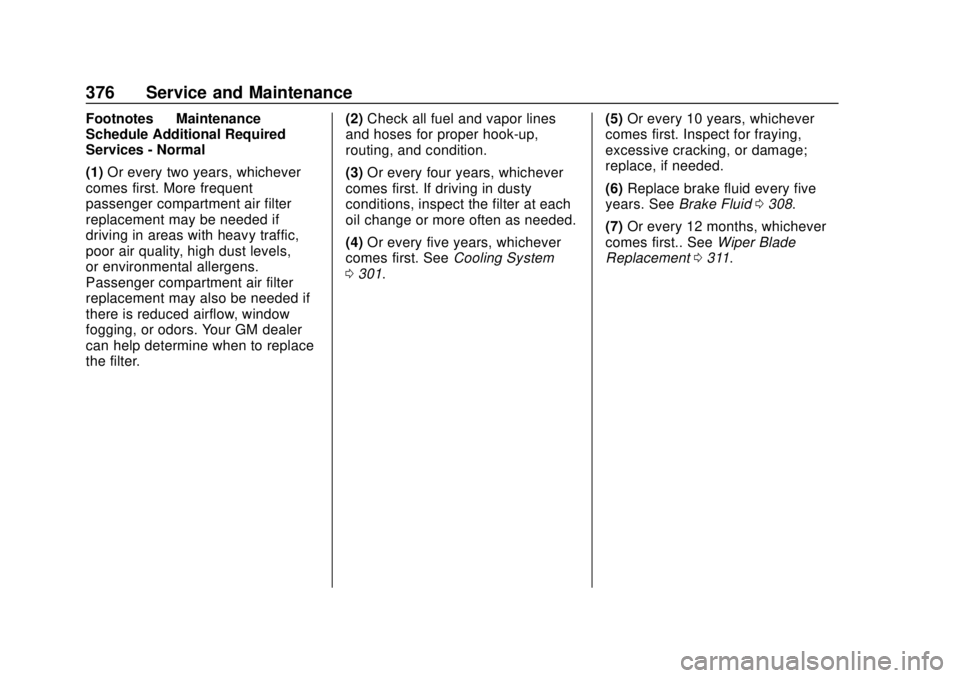
Footnotes—Maintenance
Schedule Additional Required
Services - Normal
(1) Or every two years, whichever
comes first. More frequent
passenger compartment air filter
replacement may be needed if
driving in areas with heavy traffic,
poor air quality, high dust levels,
or environmental allergens.
Passenger compartment air filter
replacement may also be needed if
there is reduced airflow, window
fogging, or odors. Your GM dealer
can help determine when to replace
the filter. (2)
Check all fuel and vapor lines
and hoses for proper hook-up,
routing, and condition.
(3) Or every four years, whichever
comes first. If driving in dusty
conditions, inspect the filter at each
oil change or more often as needed.
(4) Or every five years, whichever
comes first. See Cooling System
0 301. (5)
Or every 10 years, whichever
comes first. Inspect for fraying,
excessive cracking, or damage;
replace, if needed.
(6) Replace brake fluid every five
years. See Brake Fluid 0308.
(7) Or every 12 months, whichever
comes first.. See Wiper Blade
Replacement 0311.