window CHEVROLET TRAVERSE 2021 Get To Know Guide
[x] Cancel search | Manufacturer: CHEVROLET, Model Year: 2021, Model line: TRAVERSE, Model: CHEVROLET TRAVERSE 2021Pages: 20, PDF Size: 4.01 MB
Page 2 of 20
2
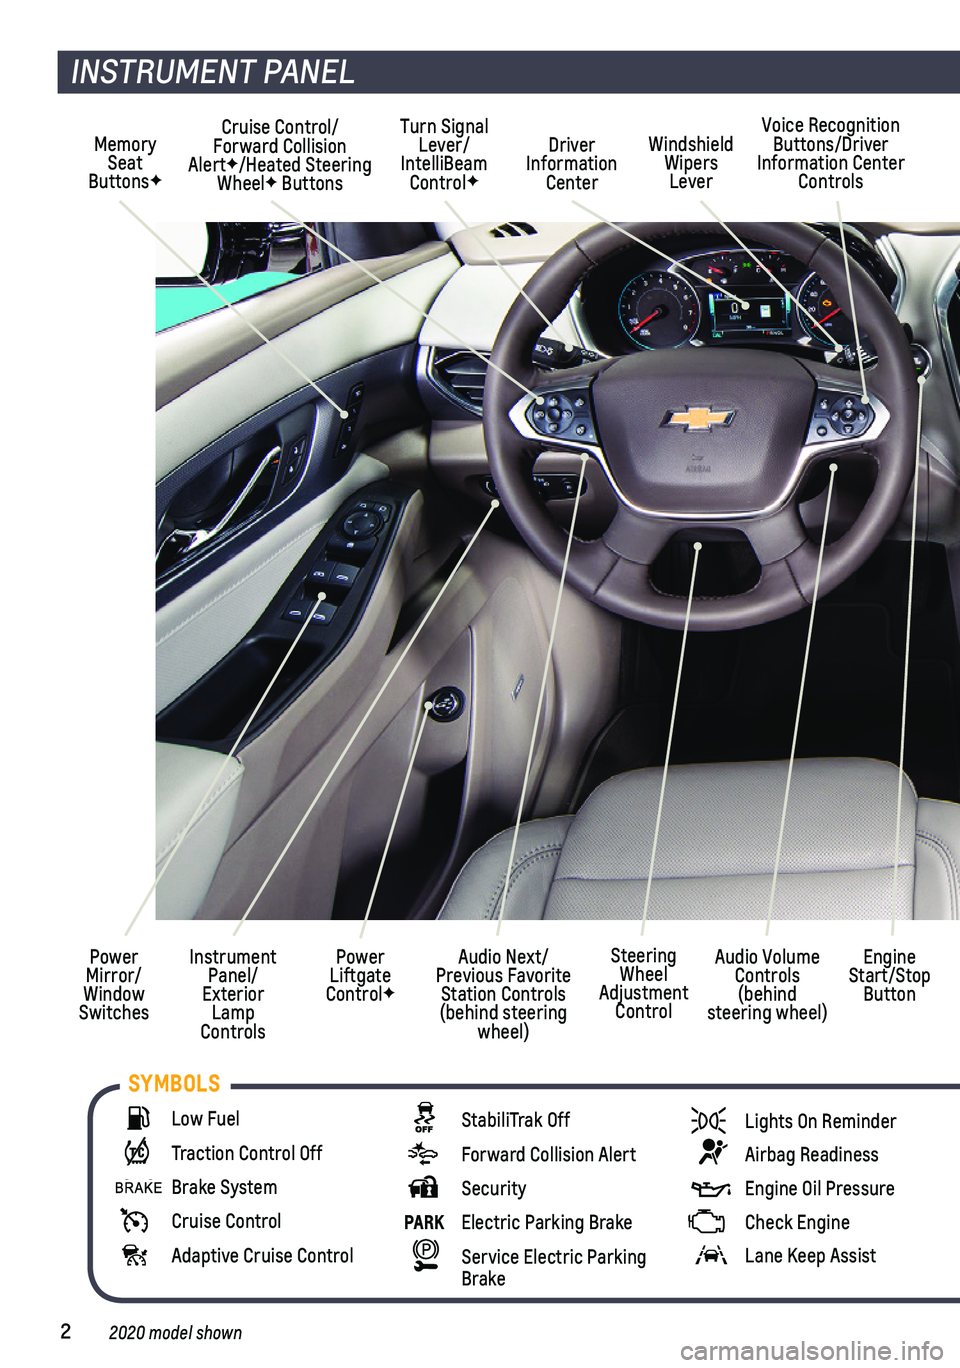
Memory Seat ButtonsF
Cruise Control/ Forward Collision AlertF/Heated Steering WheelF Buttons
Driver Information Center
Voice Recognition Buttons/Driver Information Center Controls
Windshield Wipers Lever
Audio Next/Previous Favorite Station Controls (behind steering wheel)
Turn Signal Lever/IntelliBeam ControlF
Power Liftgate ControlF
Instrument Panel/Exterior Lamp Controls
Power Mirror/Window Switches
INSTRUMENT PANEL
Engine Start/Stop Button
Audio Volume Controls (behind steering wheel)
Steering Wheel Adjustment Control
Low Fuel
Traction Control Off
Brake System
Cruise Control
Adaptive Cruise Control
StabiliTrak Off
Forward Collision Alert
Security
PARK Electric Parking Brake
Service Electric Parking Brake
Lights On Reminder
Airbag Readiness
Engine Oil Pressure
Check Engine
Lane Keep Assist
SYMBOLS
2020 model shown
Page 4 of 20
4
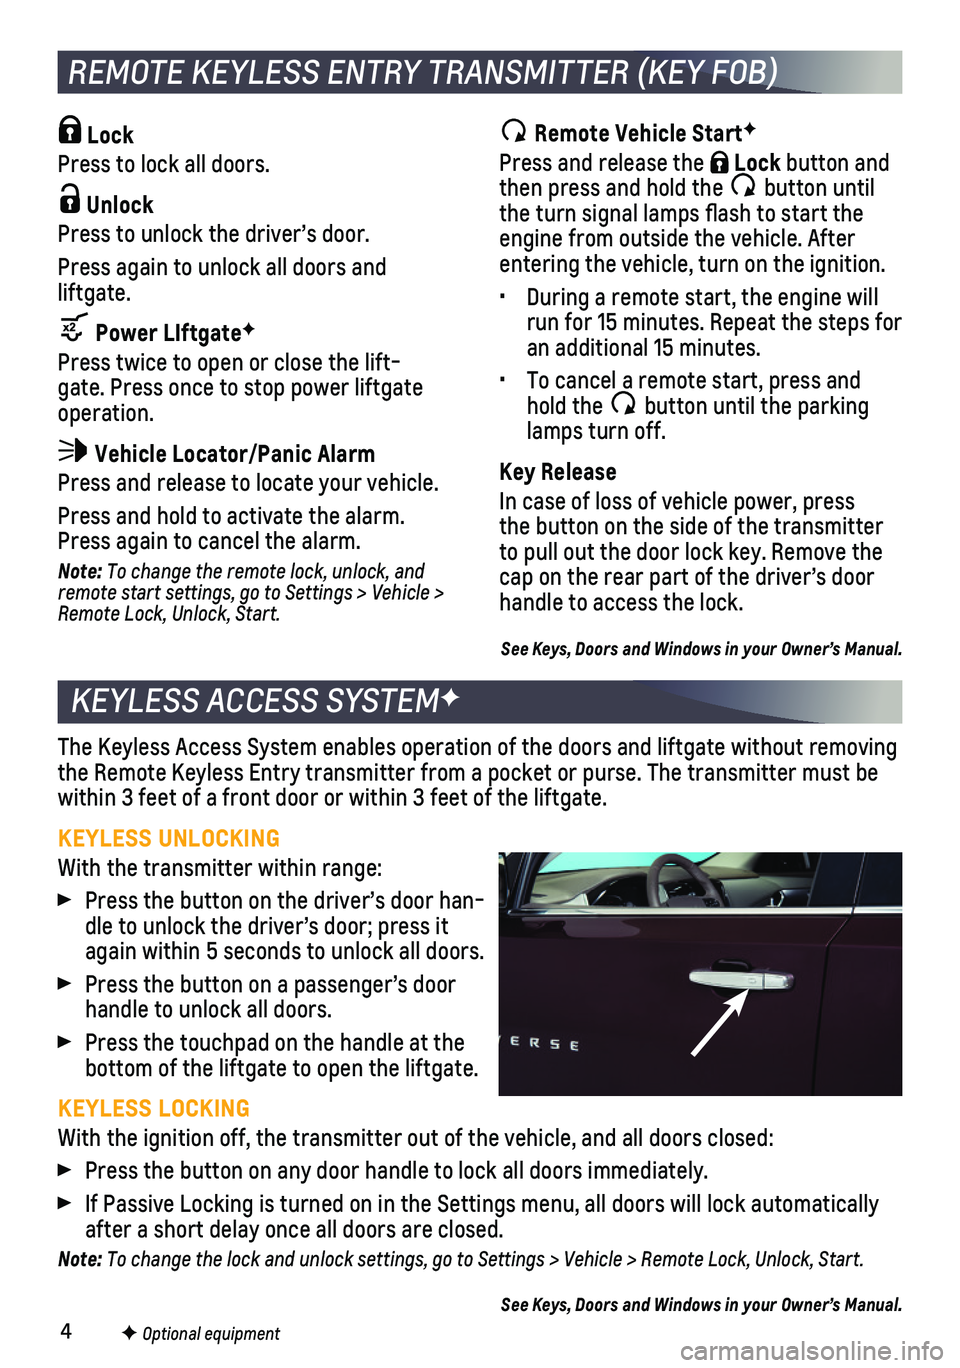
KEYLESS ACCESS SYSTEMF
The Keyless Access System enables operation of the doors and liftgate wi\
thout removing the Remote Keyless Entry transmitter from a pocket or purse. The transmi\
tter must be within 3 feet of a front door or within 3 feet of the liftgate.
KEYLESS UNLOCKING
With the transmitter within range:
Press the button on the driver’s door han-dle to unlock the driver’s door; press it again within 5 seconds to unlock all doors.
Press the button on a passenger’s door handle to unlock all doors.
Press the touchpad on the handle at the bottom of the liftgate to open the liftgate.
KEYLESS LOCKING
With the ignition off, the transmitter out of the vehicle, and all doors\
closed:
Press the button on any door handle to lock all doors immediately.
If Passive Locking is turned on in the Settings menu, all doors will loc\
k automatically after a short delay once all doors are closed.
Note: To change the lock and unlock settings, go to Settings > Vehicle > Remote Lock, Unlock, Start.
See Keys, Doors and Windows in your Owner’s Manual.
REMOTE KEYLESS ENTRY TRANSMITTER (KEY FOB)
F Optional equipment
Lock
Press to lock all doors.
Unlock
Press to unlock the driver’s door.
Press again to unlock all doors and liftgate.
Power LIftgateF
Press twice to open or close the lift-gate. Press once to stop power liftgate operation.
Vehicle Locator/Panic Alarm
Press and release to locate your vehicle.
Press and hold to activate the alarm. Press again to cancel the alarm.
Note: To change the remote lock, unlock, and remote start settings, go to Settings > Vehicle > Remote Lock, Unlock, Start.
Remote Vehicle StartF
Press and release the Lock button and then press and hold the button until the turn signal lamps flash to start the engine from outside the vehicle. After entering the vehicle, turn on the ignition.
• During a remote start, the engine will run for 15 minutes. Repeat the steps for an additional 15 minutes.
• To cancel a remote start, press and hold the button until the parking lamps turn off.
Key Release
In case of loss of vehicle power, press the button on the side of the transmitter to pull out the door lock key. Remove the cap on the rear part of the driver’s door handle to access the lock.
See Keys, Doors and Windows in your Owner’s Manual.
Page 8 of 20
8
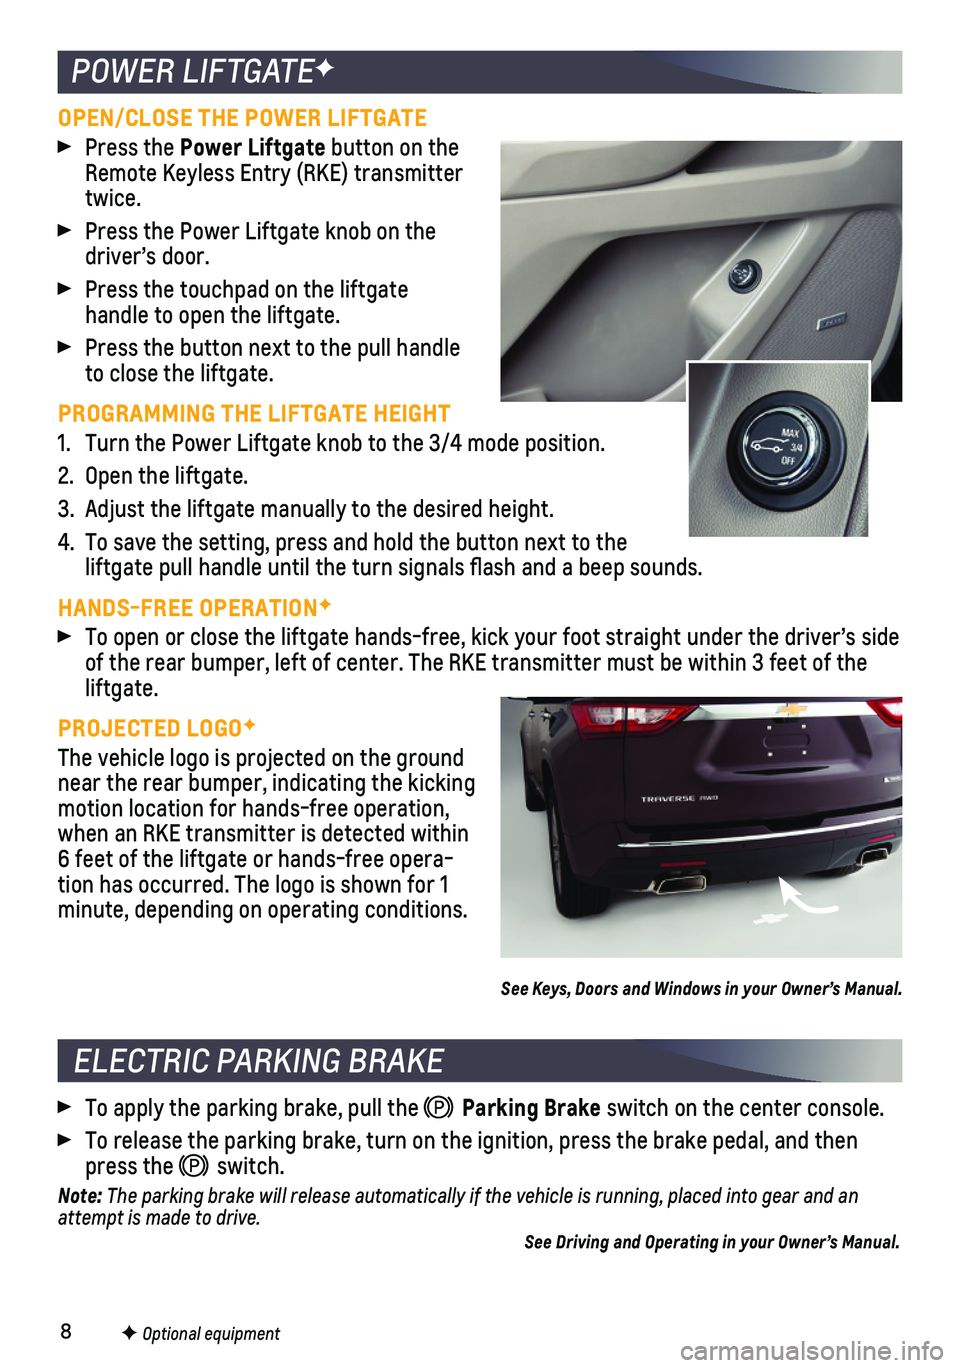
POWER LIFTGATEF
OPEN/CLOSE THE POWER LIFTGATE
Press the Power Liftgate button on the Remote Keyless Entry (RKE) transmitter twice.
Press the Power Liftgate knob on the driver’s door.
Press the touchpad on the liftgate
handle to open the liftgate.
Press the button next to the pull handle to close the liftgate.
PROGRAMMING THE LIFTGATE HEIGHT
1. Turn the Power Liftgate knob to the 3/4 mode position.
2. Open the liftgate.
3. Adjust the liftgate manually to the desired height.
4. To save the setting, press and hold the button next to the liftgate pull handle until the turn signals flash and a beep sounds.
HANDS-FREE OPERATIONF
To open or close the liftgate hands-free, kick your foot straight under \
the driver’s side of the rear bumper, left of center. The RKE transmitter must be within 3\
feet of the liftgate.
PROJECTED LOGOF
The vehicle logo is projected on the ground near the rear bumper, indicating the kicking motion location for hands-free operation, when an RKE transmitter is detected within 6 feet of the liftgate or hands-free opera-tion has occurred. The logo is shown for 1 minute, depending on operating conditions.
See Keys, Doors and Windows in your Owner’s Manual.
F Optional equipment
To apply the parking brake, pull the Parking Brake switch on the center console.
To release the parking brake, turn on the ignition, press the brake peda\
l, and then press the switch.
Note: The parking brake will release automatically if the vehicle is running, plac\
ed into gear and an attempt is made to drive. See Driving and Operating in your Owner’s Manual.
ELECTRIC PARKING BRAKE
Page 13 of 20
13F Optional equipment 2020 model shown
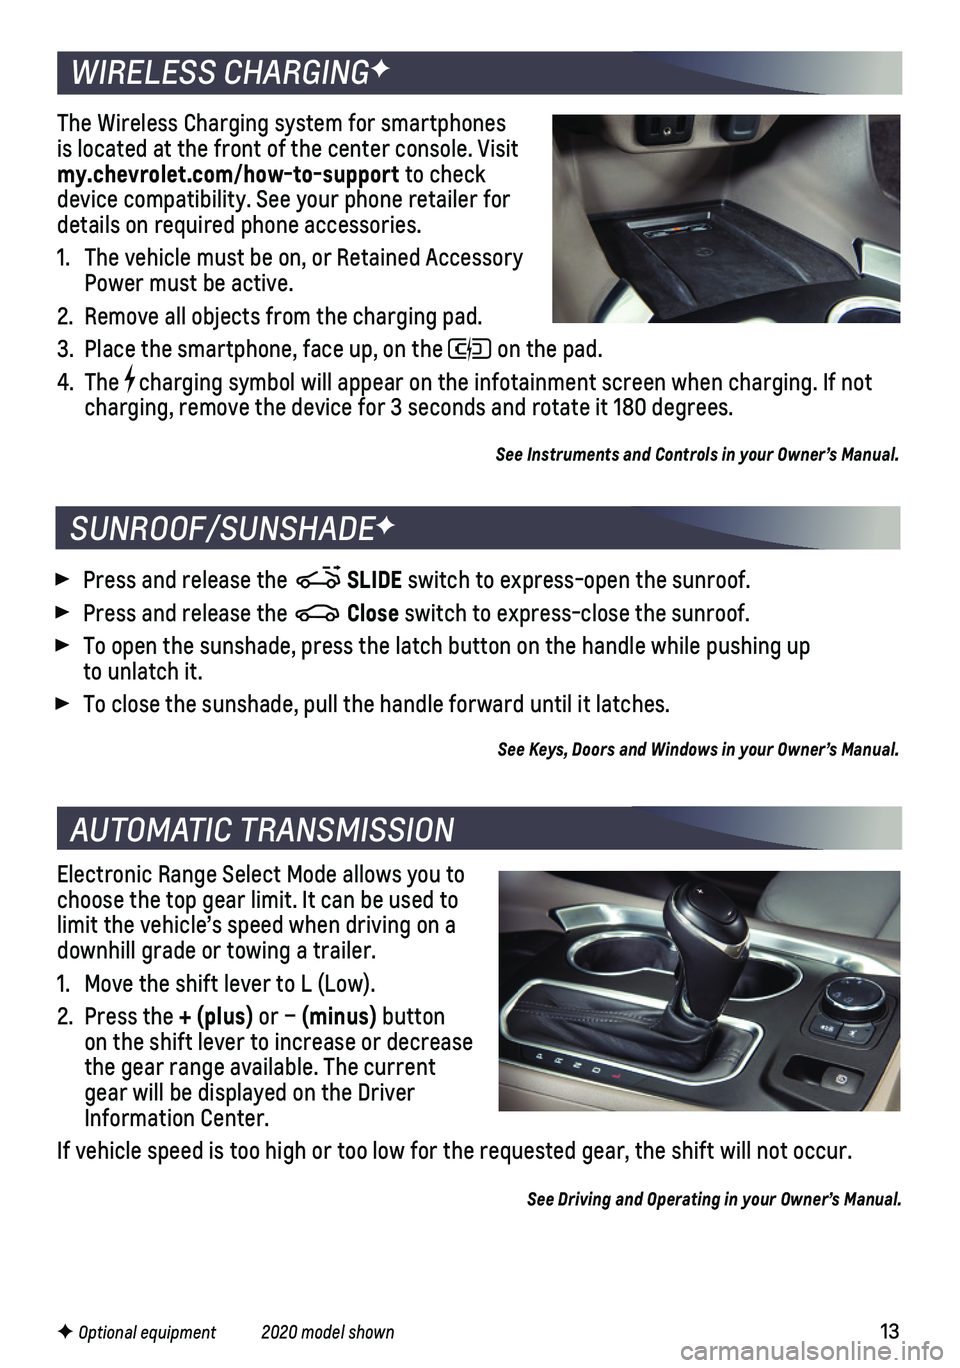
Electronic Range Select Mode allows you to choose the top gear limit. It can be used to limit the vehicle’s speed when driving on a downhill grade or towing a trailer.
1. Move the shift lever to L (Low).
2. Press the + (plus) or – (minus) button on the shift lever to increase or decrease the gear range available. The current gear will be displayed on the Driver Information Center.
If vehicle speed is too high or too low for the requested gear, the shif\
t will not occur.
See Driving and Operating in your Owner’s Manual.
AUTOMATIC TRANSMISSION
WIRELESS CHARGINGF
The Wireless Charging system for smartphones is located at the front of the center console. Visit my.chevrolet.com/how-to-support to check device compatibility. See your phone retailer for details on required phone accessories.
1. The vehicle must be on, or Retained Accessory Power must be active.
2. Remove all objects from the charging pad.
3. Place the smartphone, face up, on the on the pad.
4. The charging symbol will appear on the infotainment screen when charging. If\
not charging, remove the device for 3 seconds and rotate it 180 degrees.
See Instruments and Controls in your Owner’s Manual.
SUNROOF/SUNSHADEF
Press and release the SLIDE switch to express-open the sunroof.
Press and release the Close switch to express-close the sunroof.
To open the sunshade, press the latch button on the handle while pushing\
up to unlatch it.
To close the sunshade, pull the handle forward until it latches.
See Keys, Doors and Windows in your Owner’s Manual.
Page 15 of 20
15
DRIVER ASSISTANCE SYSTEMS
LANE KEEP ASSIST WITH LANE DEPARTURE WARNINGF – The system may help you avoid collisions due to unintentional lane departures. The Lane Keep Assist Indicator is green on the instrument cluster if the system is available to assist.\
If the vehicle approaches a detected lane marking without using a turn signal in that d\
irection, the system may assist by gently turning the steering wheel and displaying an\
amber .
If active driver steering is not detected, the amber may flash and 3 beeps may sound on the side of the departure direction as the lane marking is crossed. T\
he Lane Keep Assist system does not continuously steer the vehicle; the driver needs \
to steer and be in complete control of the vehicle.
To turn on or off, press the Lane Keep Assist button on the center console.
REAR VISION CAMERA – When the vehicle is in Reverse, a view of the area behind the vehicle displays on the infotainment screen. Vehicle speed must be below\
8 mph.
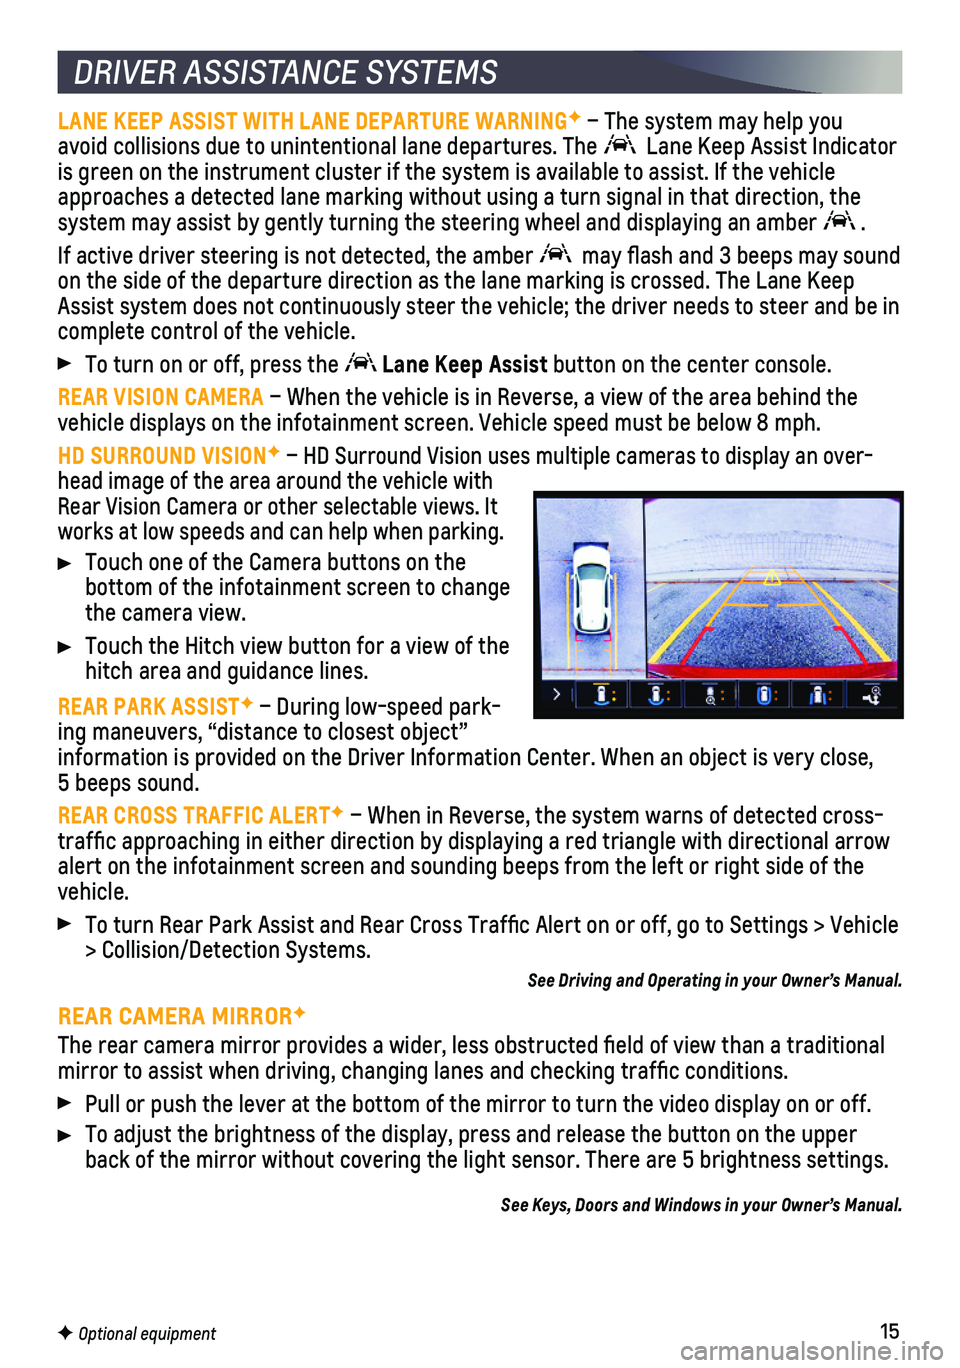
HD SURROUND VISIONF – HD Surround Vision uses multiple cameras to display an over-head image of the area around the vehicle with Rear Vision Camera or other selectable views. It works at low speeds and can help when parking.
Touch one of the Camera buttons on the
bottom of the infotainment screen to change the camera view.
Touch the Hitch view button for a view of the hitch area and guidance lines.
REAR PARK ASSISTF – During low-speed park-ing maneuvers, “distance to closest object” information is provided on the Driver Information Center. When an object\
is very close, 5 beeps sound.
REAR CROSS TRAFFIC ALERTF – When in Reverse, the system warns of detected cross-traffic approaching in either direction by displaying a red triangle w\
ith directional arrow alert on the infotainment screen and sounding beeps from the left or rig\
ht side of the vehicle.
To turn Rear Park Assist and Rear Cross Traffic Alert on or off, go to\
Settings > Vehicle > Collision/Detection Systems.
See Driving and Operating in your Owner’s Manual.
REAR CAMERA MIRRORF
The rear camera mirror provides a wider, less obstructed field of view\
than a traditional mirror to assist when driving, changing lanes and checking traffic con\
ditions.
Pull or push the lever at the bottom of the mirror to turn the video dis\
play on or off.
To adjust the brightness of the display, press and release the button on\
the upper back of the mirror without covering the light sensor. There are 5 bright\
ness settings.
See Keys, Doors and Windows in your Owner’s Manual.
F Optional equipment
Page 17 of 20
17
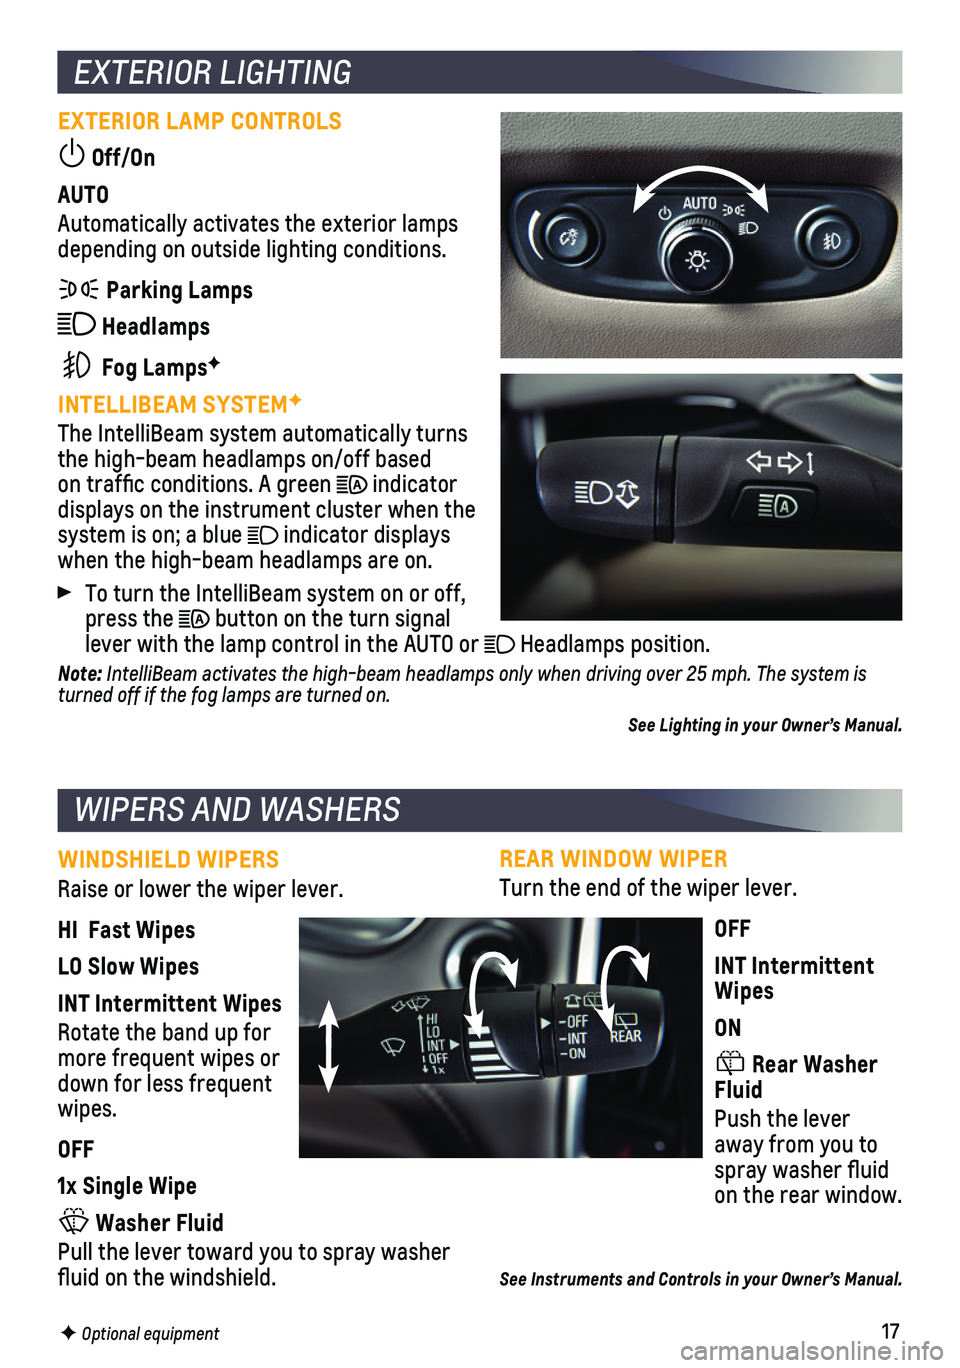
REAR WINDOW WIPER
Turn the end of the wiper lever.
OFF
INT Intermittent Wipes
ON
Rear Washer Fluid
Push the lever away from you to spray washer fluid on the rear window.
See Instruments and Controls in your Owner’s Manual.
EXTERIOR LIGHTING
EXTERIOR LAMP CONTROLS
Off/On
AUTO
Automatically activates the exterior lamps depending on outside lighting conditions.
Parking Lamps
Headlamps
Fog LampsF
INTELLIBEAM SYSTEMF
The IntelliBeam system automatically turns the high-beam headlamps on/off based on traffic conditions. A green indicator displays on the instrument cluster when the system is on; a blue indicator displays when the high-beam headlamps are on.
To turn the IntelliBeam system on or off, press the button on the turn signal lever with the lamp control in the AUTO or Headlamps position.
Note: IntelliBeam activates the high-beam headlamps only when driving over 25 mph. The system is turned off if the fog lamps are turned on.
See Lighting in your Owner’s Manual.
WINDSHIELD WIPERS
Raise or lower the wiper lever.
HI Fast Wipes
LO Slow Wipes
INT Intermittent Wipes
Rotate the band up for more frequent wipes or down for less frequent wipes.
OFF
1x Single Wipe
Washer Fluid
Pull the lever toward you to spray washer fluid on the windshield.
WIPERS AND WASHERS
F Optional equipment
Page 18 of 20
18
When the vehicle is on, the auto heated seats and auto heated steering w\
heel or auto ventilated seats will activate automatically based on the vehicle’s i\
nterior temperature. Manually turn off the heated or ventilated seats using the seat controls\
. Manually turn off the heated steering wheel using the steering wheel control.
To turn the auto heated seats and auto ventilated seats on or off, go to\
Settings > Vehicle > Climate and Air Quality > Auto Heated Seats or Auto Cooled Sea\
ts.
See Instruments and Controls in your Owner’s Manual.
AUTO HEATED/VENTILATED SEATSF
F Optional equipment
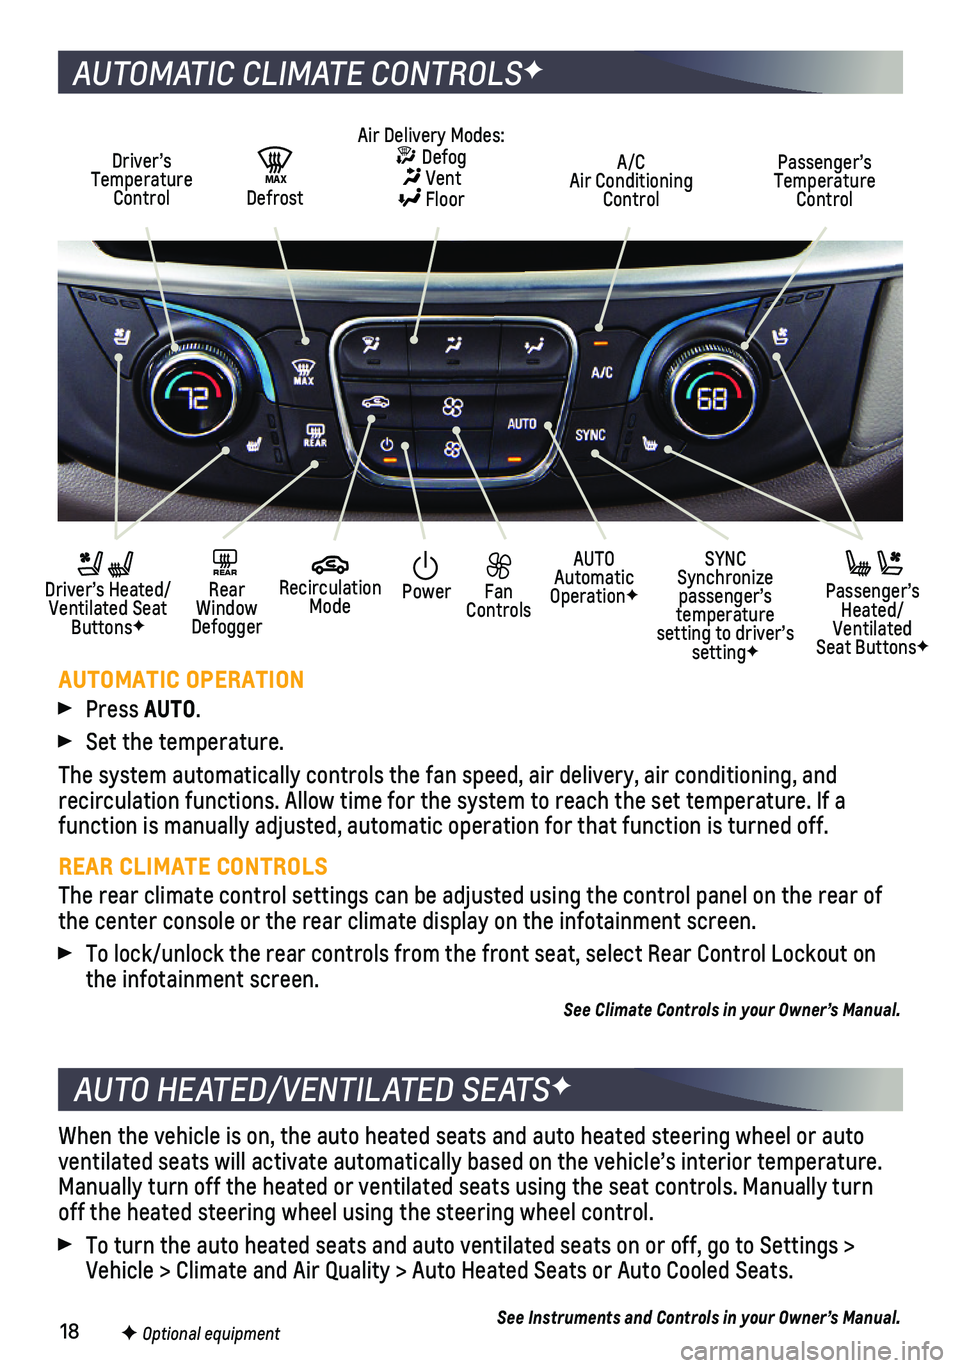
AUTOMATIC CLIMATE CONTROLSF
Driver’s Temperature Control
AUTO Automatic OperationF
A/C Air Conditioning Control
Passenger’s Temperature Control
REAR Rear Window Defogger
Driver’s Heated/ Ventilated Seat ButtonsF
Passenger’s Heated/Ventilated Seat ButtonsF
Air Delivery Modes: Defog Vent Floor
Recirculation Mode
SYNC Synchronize passenger’s temperature setting to driver’s settingF
Power Fan Controls
MAX Defrost
AUTOMATIC OPERATION
Press AUTO.
Set the temperature.
The system automatically controls the fan speed, air delivery, air condi\
tioning, and
recirculation functions. Allow time for the system to reach the set temp\
erature. If a function is manually adjusted, automatic operation for that function is \
turned off.
REAR CLIMATE CONTROLS
The rear climate control settings can be adjusted using the control pane\
l on the rear of the center console or the rear climate display on the infotainment scree\
n.
To lock/unlock the rear controls from the front seat, select Rear Contro\
l Lockout on the infotainment screen.
See Climate Controls in your Owner’s Manual.