spare tire CHEVROLET TRAVERSE 2021 Owner's Manual
[x] Cancel search | Manufacturer: CHEVROLET, Model Year: 2021, Model line: TRAVERSE, Model: CHEVROLET TRAVERSE 2021Pages: 369, PDF Size: 8.12 MB
Page 87 of 369
Chevrolet Traverse Owner Manual (GMNA-Localizing-U.S./Canada/Mexico-
14637844) - 2021 - CRC - 3/26/21
86 Storage
The center console also has the following:
.A forward bin
.An open storage bin on the back of the
console
.If equipped, wireless charging in the front
storage bin
There are also charging only USB ports on
the rear of the center console and in the
third row seating area. See Power Outlets
0 93 and the infotainment manual.
Additional Storage Features
Cargo Management System
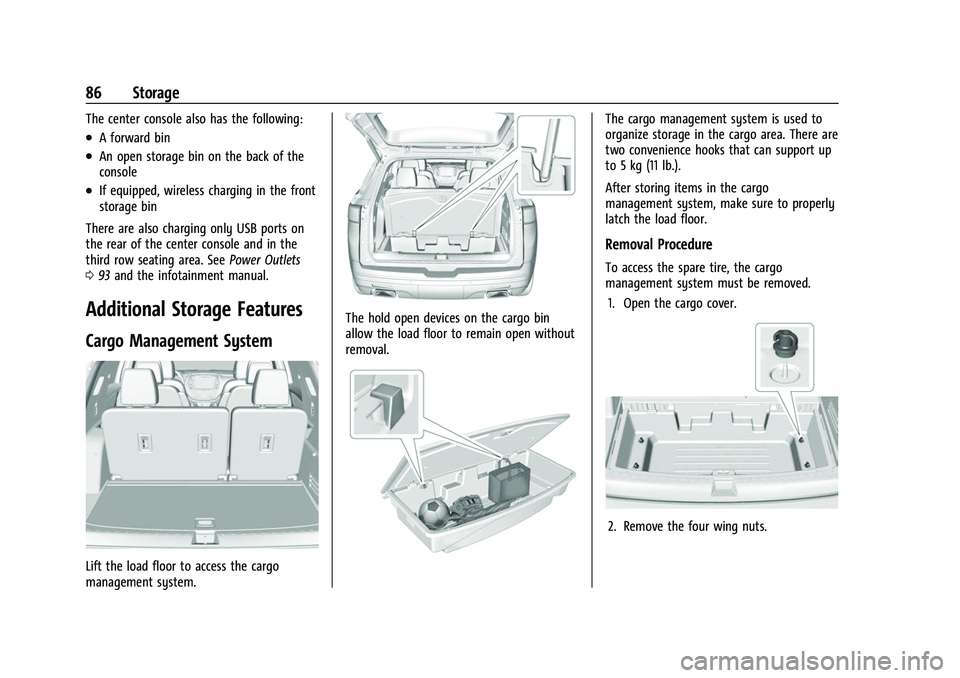
Lift the load floor to access the cargo
management system.
The hold open devices on the cargo bin
allow the load floor to remain open without
removal.
The cargo management system is used to
organize storage in the cargo area. There are
two convenience hooks that can support up
to 5 kg (11 lb.).
After storing items in the cargo
management system, make sure to properly
latch the load floor.
Removal Procedure
To access the spare tire, the cargo
management system must be removed.
1. Open the cargo cover.
2. Remove the four wing nuts.
Page 88 of 369
Chevrolet Traverse Owner Manual (GMNA-Localizing-U.S./Canada/Mexico-
14637844) - 2021 - CRC - 3/26/21
Storage 87
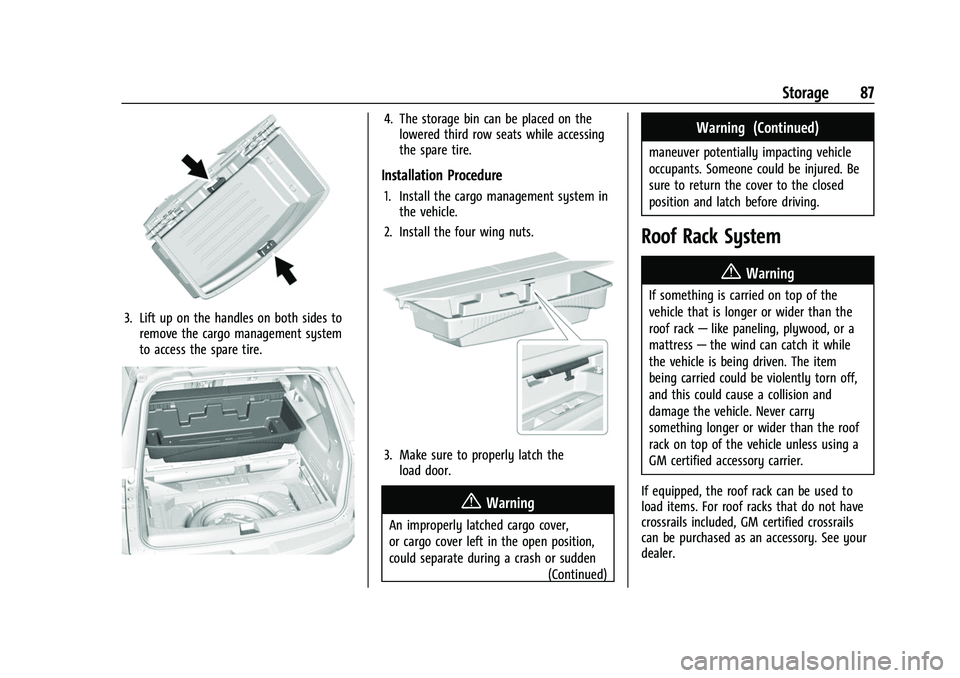
3. Lift up on the handles on both sides toremove the cargo management system
to access the spare tire.
4. The storage bin can be placed on thelowered third row seats while accessing
the spare tire.
Installation Procedure
1. Install the cargo management system inthe vehicle.
2. Install the four wing nuts.
3. Make sure to properly latch the load door.
{Warning
An improperly latched cargo cover,
or cargo cover left in the open position,
could separate during a crash or sudden
(Continued)
Warning (Continued)
maneuver potentially impacting vehicle
occupants. Someone could be injured. Be
sure to return the cover to the closed
position and latch before driving.
Roof Rack System
{
Warning
If something is carried on top of the
vehicle that is longer or wider than the
roof rack—like paneling, plywood, or a
mattress —the wind can catch it while
the vehicle is being driven. The item
being carried could be violently torn off,
and this could cause a collision and
damage the vehicle. Never carry
something longer or wider than the roof
rack on top of the vehicle unless using a
GM certified accessory carrier.
If equipped, the roof rack can be used to
load items. For roof racks that do not have
crossrails included, GM certified crossrails
can be purchased as an accessory. See your
dealer.
Page 193 of 369
Chevrolet Traverse Owner Manual (GMNA-Localizing-U.S./Canada/Mexico-
14637844) - 2021 - CRC - 3/26/21
192 Driving and Operating
Loss of Control
Skidding
There are three types of skids that
correspond to the vehicle's three control
systems:
.Braking Skid—wheels are not rolling.
.Steering or Cornering Skid —too much
speed or steering in a curve causes tires
to slip and lose cornering force.
.Acceleration Skid —too much throttle
causes the driving wheels to spin.
Defensive drivers avoid most skids by taking
reasonable care suited to existing conditions,
and by not overdriving those conditions. But
skids are always possible.
If the vehicle starts to slide, follow these
suggestions:
.Ease your foot off the accelerator pedal
and steer the way you want the vehicle
to go. The vehicle may straighten out. Be
ready for a second skid if it occurs.
.Slow down and adjust your driving
according to weather conditions. Stopping
distance can be longer and vehicle control
can be affected when traction is reduced
by water, snow, ice, gravel, or other
material on the road. Learn to recognize warning clues
—such as enough water,
ice, or packed snow on the road to make
a mirrored surface —and slow down
when you have any doubt.
.Try to avoid sudden steering, acceleration,
or braking, including reducing vehicle
speed by shifting to a lower gear. Any
sudden changes could cause the tires to
slide.
Remember: Antilock brakes help avoid only
the braking skid.
Off-Road Driving
All-wheel-drive vehicles can be used for
off-road driving. Vehicles without all-wheel
drive and vehicles not equipped with All
Terrain (AT) or On-Off Road (OOR) tires must
not be driven off-road except on a level,
solid surface. To contact the tire
manufacturer for more information about
the original equipment tires, see the
warranty manual.
Controlling the vehicle is the key to
successful off-road driving. One of the best
ways to control the vehicle is to control the
speed.
{Warning
When driving off-road, bouncing and
quick changes in direction can easily
throw you out of position. This could
cause you to lose control and crash. You
and your passengers should always wear
seat belts.
Before Driving Off-Road
.Have all necessary maintenance and
service work completed.
.Fuel the vehicle, fill fluid levels, and check
inflation pressure in all tires, including the
spare, if equipped.
.Read all the information about
all-wheel-drive vehicles in this manual.
.Make sure all underbody shields,
if equipped, are properly attached.
.Know the local laws that apply to off-road
driving.
To gain more ground clearance if needed, it
may be necessary to remove the front fascia
lower air dam. However, driving without the
air dam reduces fuel economy.
Page 212 of 369

Chevrolet Traverse Owner Manual (GMNA-Localizing-U.S./Canada/Mexico-
14637844) - 2021 - CRC - 3/26/21
Driving and Operating 211
Automatic Engine Grade Braking
Automatic Engine Grade Braking assists
when driving downhill. It maintains vehicle
speed by automatically implementing a shift
pattern that uses the engine and the
transmission to slow the vehicle. The system
will automatically command downshifts to
reduce vehicle speed. The normal shift
pattern will return once the vehicle is on a
low grade or when the accelerator pedal is
pressed.
While in the Electronic Range Select (ERS)
mode, grade braking is deactivated, allowing
the driver to select a range and limiting the
highest gear available. Grade braking is
available for normal driving and in Tow/
Haul Mode.
SeeAutomatic Transmission 0208.
Drive Systems
All-Wheel Drive
Vehicles with this feature can operate in
All-Wheel Drive (AWD) Mode.
Turn the knob to4to select AWD.
The AWD Mode will stay selected until the
mode is changed. See Driver Mode Control
0 215.
When operated in Two-wheel drive, the
vehicle will deliver power to the front
wheels only and may provide better fuel
economy.
When using a compact spare tire on an
AWD vehicle, the system automatically
detects the compact spare and reduces AWD
performance to protect the system. To
restore full AWD operation and prevent
excessive wear on the system, replace the
compact spare with a full-size tire as soon as
possible. See Compact Spare Tire 0308.
Brakes
Antilock Brake System (ABS)
The Antilock Brake System (ABS) helps
prevent a braking skid and maintain steering
while braking hard.
ABS performs a system check when the
vehicle is first driven. A momentary motor
or clicking noise may be heard while this
test is going on, and the brake pedal may
move slightly. This is normal.
If there is a problem with ABS, this warning
light stays on. See Antilock Brake System
(ABS) Warning Light 0107.
ABS does not change the time needed to
get a foot on the brake pedal and does not
always decrease stopping distance. If you
get too close to the vehicle ahead, there will
not be enough time to apply the brakes if
that vehicle suddenly slows or stops. Always
leave enough room ahead to stop, even
with ABS.
Page 252 of 369
Chevrolet Traverse Owner Manual (GMNA-Localizing-U.S./Canada/Mexico-
14637844) - 2021 - CRC - 3/26/21
Driving and Operating 251
To reinstall hitch cover:1. Hold cover at a 45 degree angle to the vehicle and push the upper tabs into the
slots in the bumper.
2. Push the bottom of the cover forward until the lower tabs line up with the
lower slots.
3. Snap the hitch cover into place by pushing the upper corners forward.
4. Reinstall the two fasteners on the lower tabs.
Consider using mechanical sway controls
with any trailer. Ask a trailering professional
about sway controls or refer to the trailer
manufacturer's recommendations and
instructions.
Weight-Distributing Hitch Adjustment
A weight-distributing hitch may be useful
with some trailers.
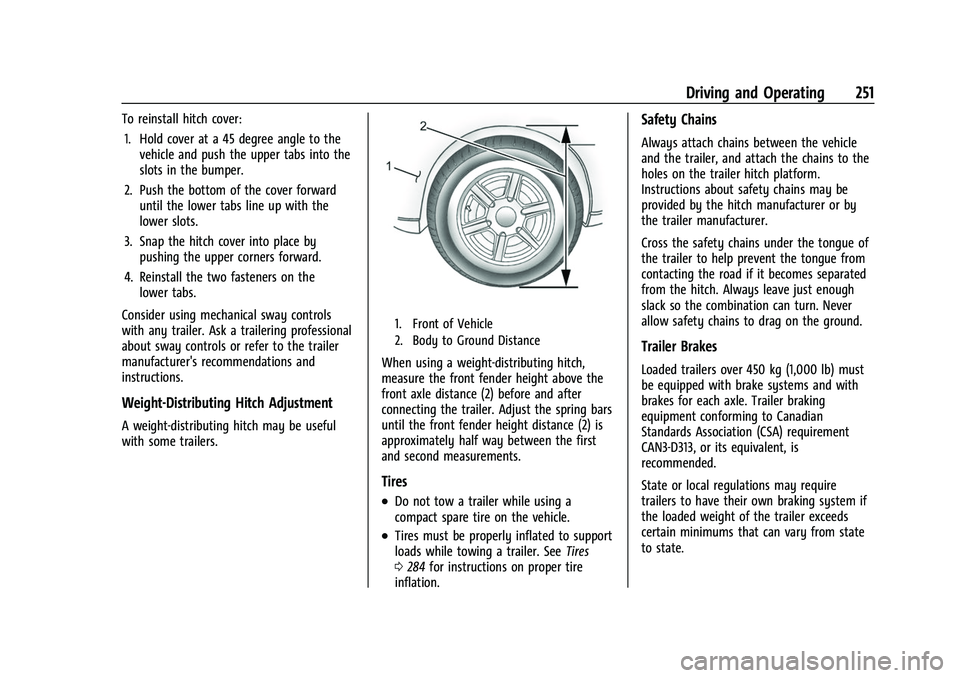
1. Front of Vehicle
2. Body to Ground Distance
When using a weight-distributing hitch,
measure the front fender height above the
front axle distance (2) before and after
connecting the trailer. Adjust the spring bars
until the front fender height distance (2) is
approximately half way between the first
and second measurements.
Tires
.Do not tow a trailer while using a
compact spare tire on the vehicle.
.Tires must be properly inflated to support
loads while towing a trailer. See Tires
0 284 for instructions on proper tire
inflation.
Safety Chains
Always attach chains between the vehicle
and the trailer, and attach the chains to the
holes on the trailer hitch platform.
Instructions about safety chains may be
provided by the hitch manufacturer or by
the trailer manufacturer.
Cross the safety chains under the tongue of
the trailer to help prevent the tongue from
contacting the road if it becomes separated
from the hitch. Always leave just enough
slack so the combination can turn. Never
allow safety chains to drag on the ground.
Trailer Brakes
Loaded trailers over 450 kg (1,000 lb) must
be equipped with brake systems and with
brakes for each axle. Trailer braking
equipment conforming to Canadian
Standards Association (CSA) requirement
CAN3-D313, or its equivalent, is
recommended.
State or local regulations may require
trailers to have their own braking system if
the loaded weight of the trailer exceeds
certain minimums that can vary from state
to state.
Page 256 of 369
Chevrolet Traverse Owner Manual (GMNA-Localizing-U.S./Canada/Mexico-
14637844) - 2021 - CRC - 3/26/21
Vehicle Care 255
Vehicle Care
General Information
General Information . . . . . . . . . . . . . . . . . . . 256
California Proposition 65 Warning . . . . . 256
California Perchlorate MaterialsRequirements . . . . . . . . . . . . . . . . . . . . . . . . 256
Accessories and Modifications . . . . . . . . . 256
Vehicle Checks
Doing Your Own Service Work . . . . . . . . . 257
Hood . . . . . . . . . . . . . . . . . . . . . . . . . . . . . . . . . . 257
Engine Compartment Overview . . . . . . . . 259
Engine Oil . . . . . . . . . . . . . . . . . . . . . . . . . . . . . 260
Engine Oil Life System . . . . . . . . . . . . . . . . 262
Automatic Transmission Fluid . . . . . . . . . 262
Engine Air Filter Life System . . . . . . . . . . 263
Engine Air Cleaner/Filter . . . . . . . . . . . . . . 263
Cooling System . . . . . . . . . . . . . . . . . . . . . . . 264
Engine Overheating . . . . . . . . . . . . . . . . . . . 267
Washer Fluid . . . . . . . . . . . . . . . . . . . . . . . . . . 268
Brakes . . . . . . . . . . . . . . . . . . . . . . . . . . . . . . . . 268
Brake Fluid . . . . . . . . . . . . . . . . . . . . . . . . . . . . 269
Battery - North America . . . . . . . . . . . . . . . 270
All-Wheel Drive . . . . . . . . . . . . . . . . . . . . . . . . 271
Park Brake and P (Park) Mechanism Check . . . . . . . . . . . . . . . . . . . . . . . . . . . . . . . . 271
Wiper Blade Replacement . . . . . . . . . . . . . . 271
Windshield Replacement . . . . . . . . . . . . . . . 272
Gas Strut(s) . . . . . . . . . . . . . . . . . . . . . . . . . . . . 273
Headlamp Aiming
Front Headlamp Aiming . . . . . . . . . . . . . . . 274
Bulb Replacement
Bulb Replacement . . . . . . . . . . . . . . . . . . . . . 274
High Intensity Discharge (HID) Lighting . . . . . . . . . . . . . . . . . . . . . . . . . . . . . 274
LED Lighting . . . . . . . . . . . . . . . . . . . . . . . . . . . 274
Headlamps, Front Turn Signal, and Sidemarker . . . . . . . . . . . . . . . . . . . . . . . . . . 274
License Plate Lamp . . . . . . . . . . . . . . . . . . . . 275
Electrical System
High Voltage Devices and Wiring . . . . . . 275
Electrical System Overload . . . . . . . . . . . . 276
Fuses and Circuit Breakers . . . . . . . . . . . . . 276
Engine Compartment Fuse Block . . . . . . . 277
Instrument Panel Fuse Block . . . . . . . . . . 280
Rear Compartment Fuse Block . . . . . . . . . 282
Wheels and Tires
Tires . . . . . . . . . . . . . . . . . . . . . . . . . . . . . . . . . . 284
All-Season Tires . . . . . . . . . . . . . . . . . . . . . . . . 285
Winter Tires . . . . . . . . . . . . . . . . . . . . . . . . . . . 285
Tire Sidewall Labeling . . . . . . . . . . . . . . . . . 285
Tire Designations . . . . . . . . . . . . . . . . . . . . . . 287
Tire Terminology and Definitions . . . . . . 288
Tire Pressure . . . . . . . . . . . . . . . . . . . . . . . . . . 290
Tire Pressure for High-Speed Operation . . . . . . . . . . . . . . . . . . . . . . . . . . . . 291
Tire Pressure Monitor System . . . . . . . . . 292 Tire Pressure Monitor Operation . . . . . . 293
Tire Inspection . . . . . . . . . . . . . . . . . . . . . . . . 296
Tire Rotation . . . . . . . . . . . . . . . . . . . . . . . . . . 296
When It Is Time for New Tires . . . . . . . . 297
Buying New Tires . . . . . . . . . . . . . . . . . . . . . 298
Different Size Tires and Wheels . . . . . . . 299
Uniform Tire Quality Grading . . . . . . . . . 299
Wheel Alignment and Tire Balance . . . . 301
Wheel Replacement . . . . . . . . . . . . . . . . . . . 301
Tire Chains . . . . . . . . . . . . . . . . . . . . . . . . . . . . 301
If a Tire Goes Flat . . . . . . . . . . . . . . . . . . . . . 302
Tire Changing . . . . . . . . . . . . . . . . . . . . . . . . . 303
Compact Spare Tire . . . . . . . . . . . . . . . . . . . 308
Jump Starting
Jump Starting - North America . . . . . . . . 309
Towing the Vehicle
Towing the Vehicle . . . . . . . . . . . . . . . . . . . . 311
Recreational Vehicle Towing . . . . . . . . . . . 312
Appearance Care
Exterior Care . . . . . . . . . . . . . . . . . . . . . . . . . . . 314
Interior Care . . . . . . . . . . . . . . . . . . . . . . . . . . . 317
Floor Mats . . . . . . . . . . . . . . . . . . . . . . . . . . . . 320
Page 286 of 369

Chevrolet Traverse Owner Manual (GMNA-Localizing-U.S./Canada/Mexico-
14637844) - 2021 - CRC - 3/26/21
Vehicle Care 285
All-Season Tires
This vehicle may come with all-season tires.
These tires are designed to provide good
overall performance on most road surfaces
and weather conditions. Original equipment
tires designed to GM's specific tire
performance criteria have a TPC specification
code molded onto the sidewall. Original
equipment all-season tires can be identified
by the last two characters of this TPC code,
which will be“MS.”
Consider installing winter tires on the
vehicle if frequent driving on snow or
ice-covered roads is expected. All-season tires
provide adequate performance for most
winter driving conditions, but they may not
offer the same level of traction or
performance as winter tires on snow or
ice-covered roads. See Winter Tires0285.
Winter Tires
This vehicle was not originally equipped
with winter tires. Winter tires are designed
for increased traction on snow and
ice-covered roads. Consider installing winter
tires on the vehicle if frequent driving on ice
or snow covered roads is expected. See your
dealer for details regarding winter tire
availability and proper tire selection. Also,
see Buying New Tires 0298.
With winter tires, there may be decreased
dry road traction, increased road noise, and
shorter tread life. After changing to winter
tires, be alert for changes in vehicle
handling and braking.
If using winter tires:
.Use tires of the same brand and tread
type on all four wheel positions.
.Use only radial ply tires of the same size,
load range, and speed rating as the
original equipment tires.
Winter tires with the same speed rating as
the original equipment tires may not be
available for H, V, W, Y, and ZR speed rated
tires. If winter tires with a lower speed
rating are chosen, never exceed the tire's
maximum speed capability.
Tire Sidewall Labeling
Useful information about a tire is
molded into its sidewall. The examples
show a typical passenger vehicle tire
and a compact spare tire sidewall.
Passenger (P-Metric) Tire Example
(1) Tire Size:The tire size is a
combination of letters and numbers
used to define a particular tire's width,
height, aspect ratio, construction type,
and service description. See the “Tire
Size” illustration in this section.
Page 287 of 369
Chevrolet Traverse Owner Manual (GMNA-Localizing-U.S./Canada/Mexico-
14637844) - 2021 - CRC - 3/26/21
286 Vehicle Care
(2) TPC Spec (Tire Performance Criteria
Specification)
:Original equipment tires
designed to GM's specific tire
performance criteria have a TPC
specification code molded onto the
sidewall. GM's TPC specifications meet
or exceed all federal safety guidelines.
(3) DOT (Department of
Transportation)
:The Department of
Transportation (DOT) code indicates that
the tire is in compliance with the U.S.
Department of Transportation Motor
Vehicle Safety Standards.
DOT Tire Date of Manufacture
:The last
four digits of the TIN indicate the tire
manufactured date. The first two digits
represent the week and the last two
digits, the year. For example, the third
week of the year 2020 would have a
4-digit DOT date of 0320. Week 01 is
the first full week (Sunday through
Saturday) of each year. (4) Tire Identification Number (TIN)
:
The letters and numbers following the
DOT (Department of Transportation)
code are the Tire Identification Number
(TIN). The TIN shows the manufacturer
and plant code, tire size, and date the
tire was manufactured. The TIN is
molded onto both sides of the tire,
although only one side may have the
date of manufacture.
(5) Tire Ply Material
:The type of cord
and number of plies in the sidewall and
under the tread.
(6) Uniform Tire Quality Grading
(UTQG)
:Tire manufacturers are
required to grade tires based on three
performance factors: tread wear,
traction, and temperature resistance.
For more information see Uniform Tire
Quality Grading 0299. (7) Maximum Cold Inflation Load
Limit
:Maximum load that can be
carried and the maximum pressure
needed to support that load.
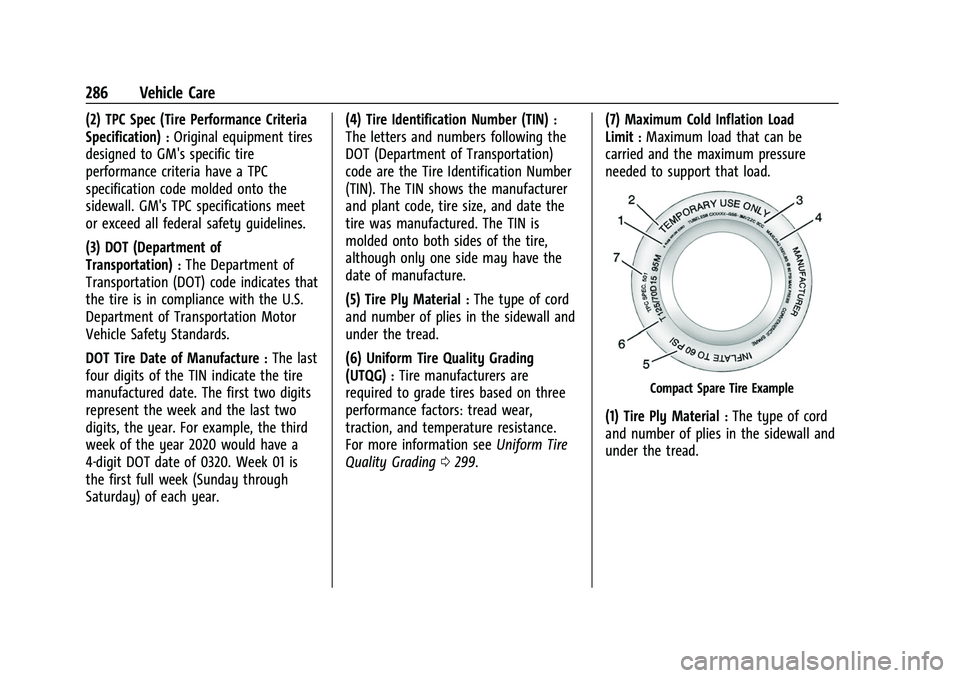
Compact Spare Tire Example
(1) Tire Ply Material:The type of cord
and number of plies in the sidewall and
under the tread.
Page 288 of 369

Chevrolet Traverse Owner Manual (GMNA-Localizing-U.S./Canada/Mexico-
14637844) - 2021 - CRC - 3/26/21
Vehicle Care 287
(2) Temporary Use Only:The compact
spare tire or temporary use tire should
not be driven at speeds over 80 km/h
(50 mph). The compact spare tire is for
emergency use when a regular road tire
has lost air and gone flat. If the vehicle
has a compact spare tire, see Compact
Spare Tire 0308 and
If a Tire Goes Flat 0302.
(3) Tire Identification Number (TIN)
:
The letters and numbers following the
DOT (Department of Transportation)
code are the Tire Identification Number
(TIN). The TIN shows the manufacturer
and plant code, tire size, and date the
tire was manufactured. The TIN is
molded onto both sides of the tire,
although only one side may have the
date of manufacture.
(4) Maximum Cold Inflation Load
Limit
:Maximum load that can be
carried and the maximum pressure
needed to support that load. (5) Tire Inflation
:The temporary use
tire or compact spare tire should be
inflated to 420 kPa (60 psi). For more
information on tire pressure and
inflation see Tire Pressure 0290.
(6) Tire Size
:A combination of letters
and numbers define a tire's width,
height, aspect ratio, construction type,
and service description. The letter “T”as
the first character in the tire size means
the tire is for temporary use only.
(7) TPC Spec (Tire Performance Criteria
Specification)
:Original equipment tires
designed to GM's specific tire
performance criteria have a TPC
specification code molded onto the
sidewall. GM's TPC specifications meet
or exceed all federal safety guidelines.
Tire Designations
Tire Size
The example shows a typical passenger
vehicle tire size.
Passenger (P-Metric) Tire
(1) Passenger (P-Metric) Tire:The
United States version of a metric tire
sizing system. The letter "P" as the first
character in the tire size means a
passenger vehicle tire engineered to
standards set by the U.S. Tire and Rim
Association.
(2) Tire Width
:The 3-digit number
indicates the tire section width in
millimeters from sidewall to sidewall.
(3) Aspect Ratio
:A 2-digit number that
indicates the tire height-to-width
measurements. For example, if the tire
size aspect ratio is 75, as shown in
item (3) of the illustration, it would
mean that the tire's sidewall is
75 percent as high as it is wide.
Page 291 of 369
Chevrolet Traverse Owner Manual (GMNA-Localizing-U.S./Canada/Mexico-
14637844) - 2021 - CRC - 3/26/21
290 Vehicle Care
UTQGS (Uniform Tire Quality Grading
Standards)
:A tire information system
that provides consumers with ratings
for a tire's traction, temperature, and
treadwear. Ratings are determined by
tire manufacturers using government
testing procedures. The ratings are
molded into the sidewall of the tire.
See Uniform Tire Quality Grading 0299.
Vehicle Capacity Weight
:The number
of designated seating positions
multiplied by 68 kg (150 lb) plus the
rated cargo load. See Vehicle Load
Limits 0198.
Vehicle Maximum Load on the Tire
:
Load on an individual tire due to curb
weight, accessory weight, occupant
weight, and cargo weight.
Vehicle Placard
:A label permanently
attached to a vehicle showing the
vehicle capacity weight and the original
equipment tire size and recommended
inflation pressure. See “Tire and Loading
Information Label” underVehicle Load
Limits 0198.
Tire Pressure
Tires need the correct amount of air
pressure to operate effectively.
{Warning
Neither tire underinflation nor
overinflation is good. Underinflated
tires, or tires that do not have
enough air, can result in:
.Tire overloading and overheating,
which could lead to a blowout.
.Premature or irregular wear.
.Poor handling.
.Reduced fuel economy.
Overinflated tires, or tires that have
too much air, can result in:
.Unusual wear.
.Poor handling.
.Rough ride.
.Needless damage from road
hazards. The Tire and Loading Information label
on the vehicle indicates the original
equipment tires and the correct cold
tire inflation pressures. The
recommended pressure is the minimum
air pressure needed to support the
vehicle's maximum load carrying
capacity. See
Vehicle Load Limits 0198.
How the vehicle is loaded affects
vehicle handling and ride comfort.
Never load the vehicle with more
weight than it was designed to carry.
When to Check
Check the pressure of the tires once a
month or more. Do not forget the
compact spare, if the vehicle has one.
The compact spare cold tire pressure
should be at 420 kPa (60 psi). See
Compact Spare Tire 0308.