spare wheel CHEVROLET TRAVERSE 2022 User Guide
[x] Cancel search | Manufacturer: CHEVROLET, Model Year: 2022, Model line: TRAVERSE, Model: CHEVROLET TRAVERSE 2022Pages: 382, PDF Size: 5.87 MB
Page 306 of 382
Chevrolet Traverse Owner Manual (GMNA-Localizing-U.S./Canada/Mexico-
13527526) - 2020 - CRC - 9/5/19
Vehicle Care 305
Warning (Continued)
5. Place wheel blocks,if equipped, on both sides of
the tire at the opposite
corner of the tire being
changed.
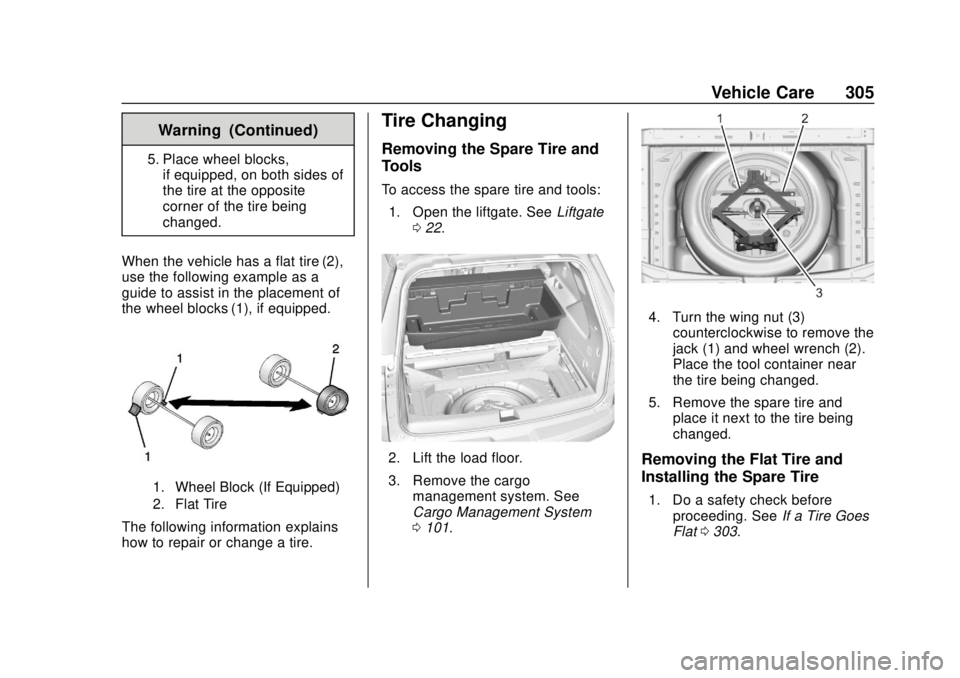
When the vehicle has a flat tire (2),
use the following example as a
guide to assist in the placement of
the wheel blocks (1), if equipped.
1. Wheel Block (If Equipped)
2. Flat Tire
The following information explains
how to repair or change a tire.
Tire Changing
Removing the Spare Tire and
Tools
To access the spare tire and tools: 1. Open the liftgate. See Liftgate
0 22.
2. Lift the load floor.
3. Remove the cargo
management system. See
Cargo Management System
0101.
4. Turn the wing nut (3)
counterclockwise to remove the
jack (1) and wheel wrench (2).
Place the tool container near
the tire being changed.
5. Remove the spare tire and place it next to the tire being
changed.
Removing the Flat Tire and
Installing the Spare Tire
1. Do a safety check beforeproceeding. See If a Tire Goes
Flat 0303.
Page 308 of 382
Chevrolet Traverse Owner Manual (GMNA-Localizing-U.S./Canada/Mexico-
13527526) - 2020 - CRC - 9/5/19
Vehicle Care 307
Warning (Continued)
the vehicle, it is designed only for
changing a flat tire. If it is used for
anything else, you or others could
be badly injured or killed if the
vehicle slips off the jack. If a jack
is provided with the vehicle, only
use it for changing a flat tire.
Caution
Using a jack to raise the vehicle
without positioning it correctly
could damage your vehicle. When
raising your vehicle on a jack, be
sure to position it correctly under
the frame and avoid contact with
the plastic molding.
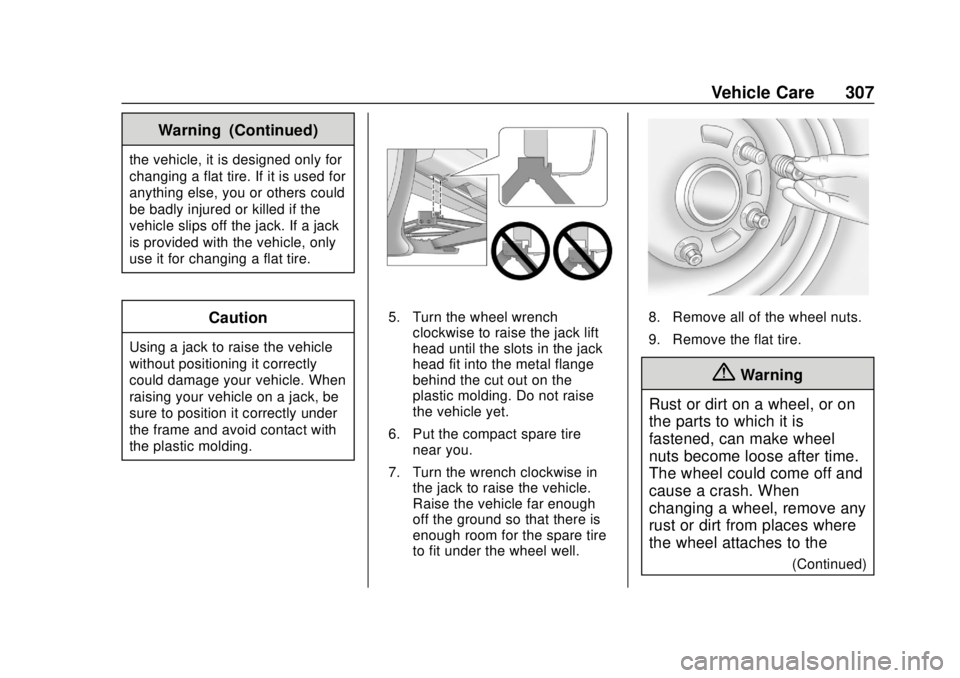
5. Turn the wheel wrenchclockwise to raise the jack lift
head until the slots in the jack
head fit into the metal flange
behind the cut out on the
plastic molding. Do not raise
the vehicle yet.
6. Put the compact spare tire near you.
7. Turn the wrench clockwise in the jack to raise the vehicle.
Raise the vehicle far enough
off the ground so that there is
enough room for the spare tire
to fit under the wheel well.8. Remove all of the wheel nuts.
9. Remove the flat tire.
{Warning
Rust or dirt on a wheel, or on
the parts to which it is
fastened, can make wheel
nuts become loose after time.
The wheel could come off and
cause a crash. When
changing a wheel, remove any
rust or dirt from places where
the wheel attaches to the
(Continued)
Page 309 of 382
Chevrolet Traverse Owner Manual (GMNA-Localizing-U.S./Canada/Mexico-
13527526) - 2020 - CRC - 9/5/19
308 Vehicle Care
Warning (Continued)
vehicle. In an emergency, a
cloth or a paper towel can be
used; however, use a scraper
or wire brush later to remove
all rust or dirt.
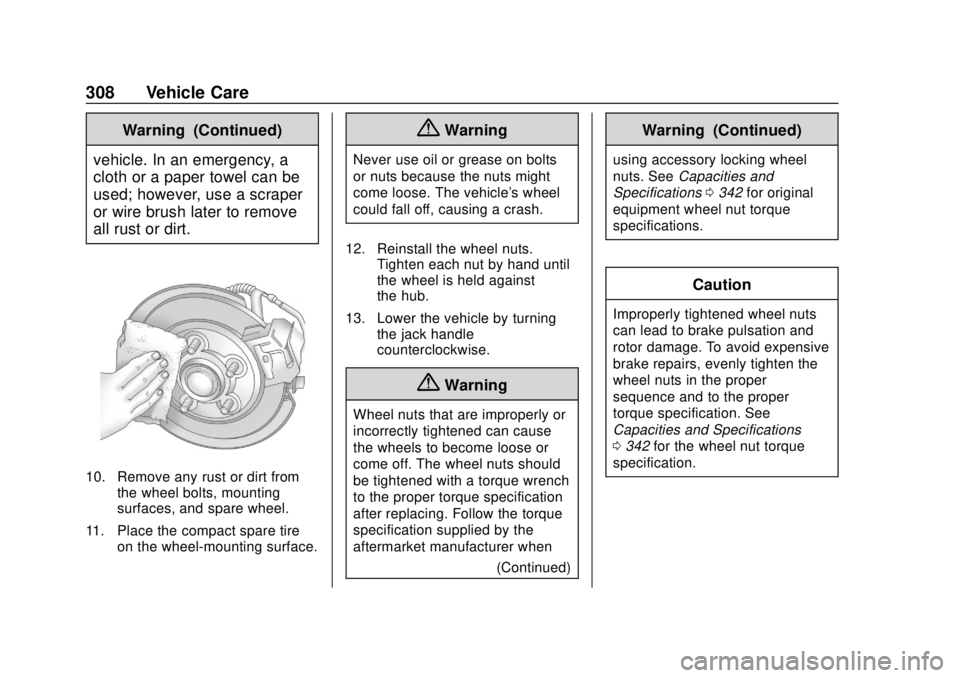
10. Remove any rust or dirt from the wheel bolts, mounting
surfaces, and spare wheel.
11. Place the compact spare tire on the wheel-mounting surface.
{Warning
Never use oil or grease on bolts
or nuts because the nuts might
come loose. The vehicle's wheel
could fall off, causing a crash.
12. Reinstall the wheel nuts. Tighten each nut by hand until
the wheel is held against
the hub.
13. Lower the vehicle by turning the jack handle
counterclockwise.
{Warning
Wheel nuts that are improperly or
incorrectly tightened can cause
the wheels to become loose or
come off. The wheel nuts should
be tightened with a torque wrench
to the proper torque specification
after replacing. Follow the torque
specification supplied by the
aftermarket manufacturer when
(Continued)
Warning (Continued)
using accessory locking wheel
nuts. SeeCapacities and
Specifications 0342 for original
equipment wheel nut torque
specifications.
Caution
Improperly tightened wheel nuts
can lead to brake pulsation and
rotor damage. To avoid expensive
brake repairs, evenly tighten the
wheel nuts in the proper
sequence and to the proper
torque specification. See
Capacities and Specifications
0 342 for the wheel nut torque
specification.
Page 310 of 382
Chevrolet Traverse Owner Manual (GMNA-Localizing-U.S./Canada/Mexico-
13527526) - 2020 - CRC - 9/5/19
Vehicle Care 309
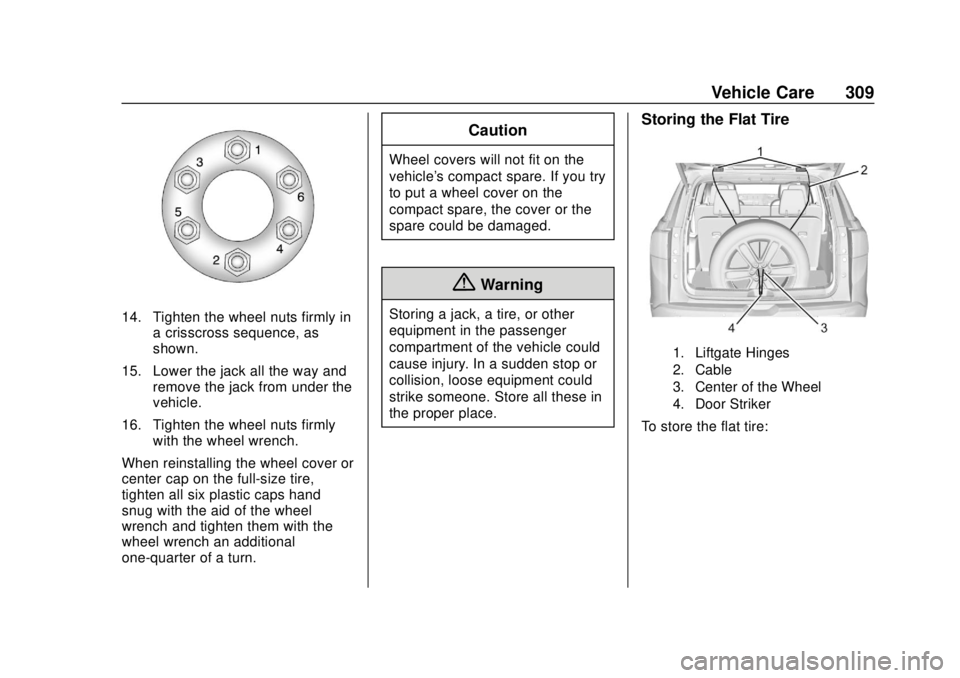
14. Tighten the wheel nuts firmly ina crisscross sequence, as
shown.
15. Lower the jack all the way and remove the jack from under the
vehicle.
16. Tighten the wheel nuts firmly with the wheel wrench.
When reinstalling the wheel cover or
center cap on the full-size tire,
tighten all six plastic caps hand
snug with the aid of the wheel
wrench and tighten them with the
wheel wrench an additional
one-quarter of a turn.
Caution
Wheel covers will not fit on the
vehicle's compact spare. If you try
to put a wheel cover on the
compact spare, the cover or the
spare could be damaged.
{Warning
Storing a jack, a tire, or other
equipment in the passenger
compartment of the vehicle could
cause injury. In a sudden stop or
collision, loose equipment could
strike someone. Store all these in
the proper place.
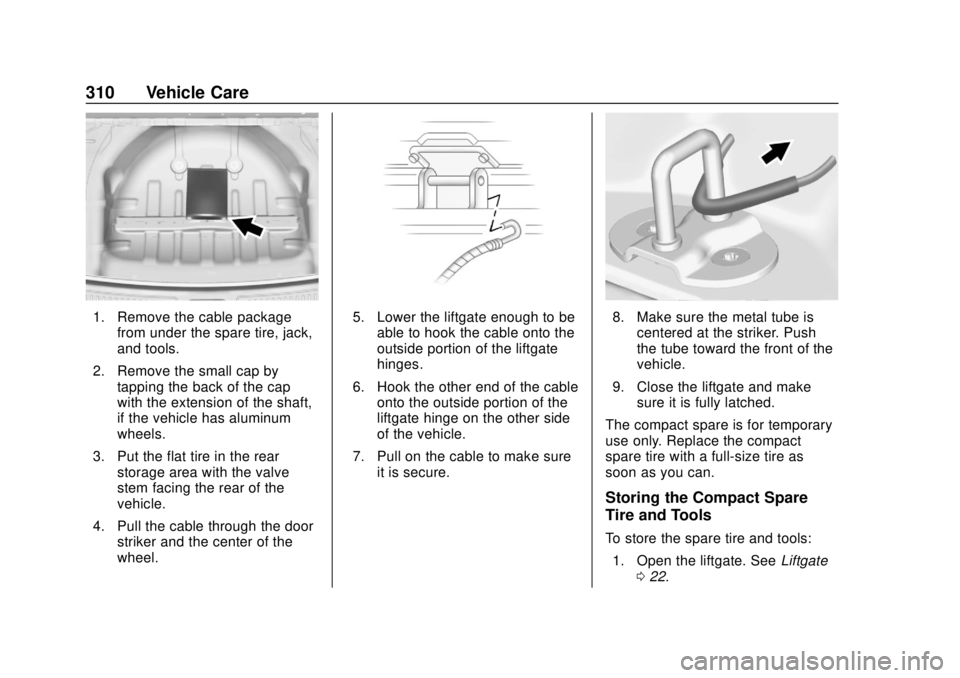
Storing the Flat Tire
1. Liftgate Hinges
2. Cable
3. Center of the Wheel
4. Door Striker
To store the flat tire:
Page 311 of 382
Chevrolet Traverse Owner Manual (GMNA-Localizing-U.S./Canada/Mexico-
13527526) - 2020 - CRC - 9/5/19
310 Vehicle Care
1. Remove the cable packagefrom under the spare tire, jack,
and tools.
2. Remove the small cap by tapping the back of the cap
with the extension of the shaft,
if the vehicle has aluminum
wheels.
3. Put the flat tire in the rear storage area with the valve
stem facing the rear of the
vehicle.
4. Pull the cable through the door striker and the center of the
wheel.5. Lower the liftgate enough to be
able to hook the cable onto the
outside portion of the liftgate
hinges.
6. Hook the other end of the cable onto the outside portion of the
liftgate hinge on the other side
of the vehicle.
7. Pull on the cable to make sure it is secure.8. Make sure the metal tube is
centered at the striker. Push
the tube toward the front of the
vehicle.
9. Close the liftgate and make sure it is fully latched.
The compact spare is for temporary
use only. Replace the compact
spare tire with a full-size tire as
soon as you can.
Storing the Compact Spare
Tire and Tools
To store the spare tire and tools: 1. Open the liftgate. See Liftgate
0 22.
Page 312 of 382
Chevrolet Traverse Owner Manual (GMNA-Localizing-U.S./Canada/Mexico-
13527526) - 2020 - CRC - 9/5/19
Vehicle Care 311
2. Lift the load floor.
3. Remove the cargomanagement system.
4. Put back the spare tire and all tools as they were stored in the
rear storage compartment.
5. Install the cargo management system and load floor.
The compact spare is for temporary
use only. Replace the compact
spare tire with a full-size tire as
soon as you can.
Compact Spare Tire
{Warning
Driving with more than one
compact spare tire at a time could
result in loss of braking and
handling. This could lead to a
crash and you or others could be
injured. Use only one compact
spare tire at a time. If this vehicle has a compact spare
tire, it was fully inflated when new;
however, it can lose air over time.
Check the inflation pressure
regularly. It should be 420 kPa
(60 psi).
Stop as soon as possible and check
that the spare tire is correctly
inflated after being installed on the
vehicle. The compact spare tire is
designed for temporary use only.
The vehicle will perform differently
with the spare tire installed and it is
recommended that the vehicle
speed be limited to 80 km/h (50
mph). To conserve the tread of the
spare tire, have the standard tire
repaired or replaced as soon as
convenient and return the spare tire
to the storage area.
When using a compact spare tire,
the ABS and Traction Control
systems may engage until the spare
tire is recognized by the vehicle,
especially on slippery roads. Adjust
driving to reduce possible
wheel slip. Performance of the All-Wheel
Drive (AWD) system will be
automatically reduced to protect the
system when using the compact
spare. To restore the AWD and
prevent excessive wear on the
clutch in the AWD, replace the
compact spare tire with a full-size
tire as soon as possible.
Caution
When the compact spare is
installed, do not take the vehicle
through an automatic car wash
with guide rails. The compact
spare can get caught on the rails
which can damage the tire, wheel,
and other parts of the vehicle.
Do not use the compact spare on
other vehicles.
Do not mix the compact spare tire or
wheel with other wheels or tires.
They will not fit. Keep the spare tire
and its wheel together.
Page 318 of 382
Chevrolet Traverse Owner Manual (GMNA-Localizing-U.S./Canada/Mexico-
13527526) - 2020 - CRC - 9/5/19
Vehicle Care 317
Once the destination is reached:1. Shift the vehicle to P (Park).
2. Reinstall the shift lever boot by inserting the front edge and
pressing the rear of the trim
plate until it snaps into place.
3. Start the engine and let it idle for more than three minutes
before driving the vehicle.
Caution
Too much or too little fluid can
damage the transmission. Be
sure that the transmission fluid is
at the proper level before towing
with all four wheels on the
ground.
Caution
Do not tow a vehicle with the front
drive wheels on the ground if one
of the front tires is a compact
spare tire. Towing with two
(Continued)
Caution (Continued)
different tire sizes on the front of
the vehicle can cause severe
damage to the transmission.
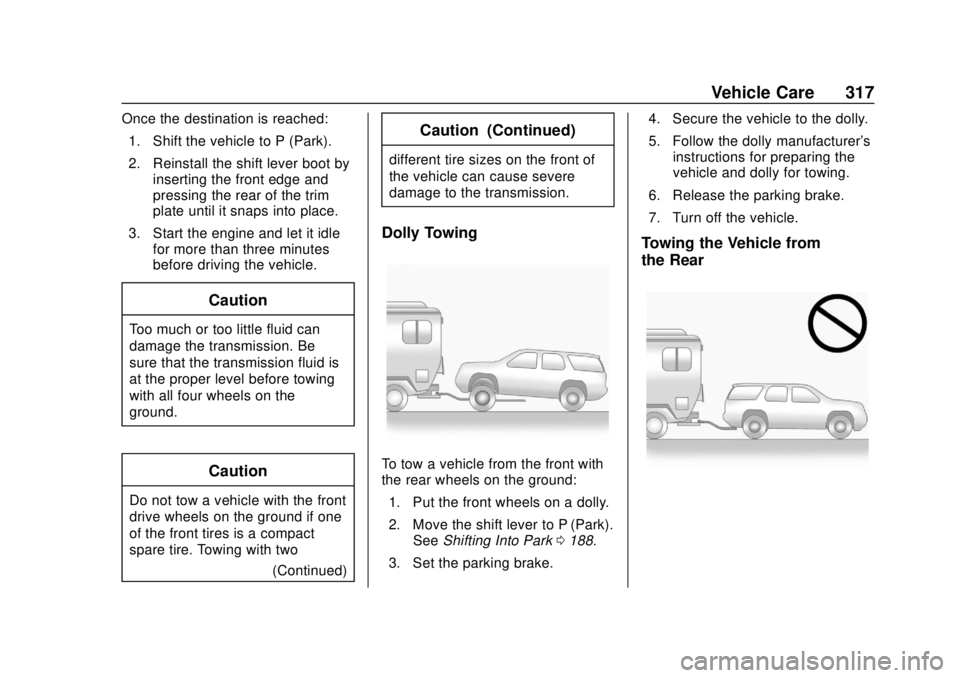
Dolly Towing
To tow a vehicle from the front with
the rear wheels on the ground:
1. Put the front wheels on a dolly.
2. Move the shift lever to P (Park). See Shifting Into Park 0188.
3. Set the parking brake. 4. Secure the vehicle to the dolly.
5. Follow the dolly manufacturer's
instructions for preparing the
vehicle and dolly for towing.
6. Release the parking brake.
7. Turn off the vehicle.
Towing the Vehicle from
the Rear
Page 373 of 382

Chevrolet Traverse Owner Manual (GMNA-Localizing-U.S./Canada/Mexico-
13527526) - 2020 - CRC - 9/5/19
372 Index
Child Restraints (cont'd)Lower Anchors and Tethers
for Children . . . . . . . . . . . . . . . . . . . 84
Older Children . . . . . . . . . . . . . . . . . . 77
Securing . . . . . . . . . . . . . . . . . . . . 94, 96
Systems . . . . . . . . . . . . . . . . . . . . . . . . 81
Circuit Breakers . . . . . . . . . . . . . . . . 274
Cleaning Exterior Care . . . . . . . . . . . . . . . . . 318
Interior Care . . . . . . . . . . . . . . . . . . 323
Climate Control Systems Dual Automatic . . . . . . . . . . . . . . . 157
Rear . . . . . . . . . . . . . . . . . . . . . . . . . . 161
Clock . . . . . . . . . . . . . . . . . . . . . . . . . . . 110
Cluster, Instrument . . . . . . . . 115, 118
Collision Damage Repair . . . . . . . 352
Compact Spare Tire . . . . . . . . . . . . 311
Compartments
Storage . . . . . . . . . . . . . . . . . . . . . . . 100
Compass . . . . . . . . . . . . . . . . . . . . . . . 109
Connected Services Connections . . . . . . . . . . . . . . . . . . 368
Diagnostics . . . . . . . . . . . . . . . . . . . 369
Navigation . . . . . . . . . . . . . . . . . . . . 367
Connections Connected Services . . . . . . . . . . 368 Control
Traction and Electronic
Stability . . . . . . . . . . . . . . . . . . . . . 198
Control of a Vehicle . . . . . . . . . . . . . 168
Convex Mirrors . . . . . . . . . . . . . . . . . . 31
Coolant Engine Temperature Gauge . . 122
Cooling . . . . . . . . . . . . . . . . . . . . 157, 161
Cooling System . . . . . . . . . . . . . . . . . 258
Courtesy Lamps . . . . . . . . . . . . . . . . 152
Courtesy Transportation Program . . . . . . . . . . . . . . . . . . . . . . . 351
Cruise Control . . . . . . . . . . . . . . . . . . 203 Light . . . . . . . . . . . . . . . . . . . . . . . . . . 133
Cruise Control, Adaptive . . . . . . . . 205
Customer Assistance . . . . . . . . . . . 348 Offices . . . . . . . . . . . . . . . . . . . . . . . . 347
Text Telephone (TTY)Users . . . . . . . . . . . . . . . . . . . . . . . 348
Customer Information Publications Ordering
Information . . . . . . . . . . . . . . . . . . 354
Customer Satisfaction Procedure . . . . . . . . . . . . . . . . . . . . . 345
Cybersecurity . . . . . . . . . . . . . . . . . . . 357D
Damage Repair, Collision . . . . . . . 352
Danger, Warning, and Caution . . . . 2
Data Collection Infotainment System . . . . . . . . . . 358
OnStar . . . . . . . . . . . . . . . . . . . . . . . 358
Data Recorders, Event . . . . . . . . . 357
Daytime Running Lamps (DRL) . . . . . . . . . . . . . . . . . . 149
Defensive Driving . . . . . . . . . . . . . . . 167
Delayed Locking . . . . . . . . . . . . . . . . . 20
Diagnostics
Connected Services . . . . . . . . . . 369
Distracted Driving . . . . . . . . . . . . . . . 166
Dome Lamps . . . . . . . . . . . . . . . . . . . 152
Door
Ajar Light . . . . . . . . . . . . . . . . . . . . . 133
Delayed Locking . . . . . . . . . . . . . . . . 20
Locks . . . . . . . . . . . . . . . . . . . . . . . . . . . 17
Power Locks . . . . . . . . . . . . . . . . . . . . 20
Drive Belt Routing, Engine . . . . . . 344
Drive Systems All-Wheel Drive . . . . . . . . . . 194, 267
Driver Assistance Systems . . . . . 213
Driver Information
Center (DIC) . . . . . . . . . . . . . . . . . . 134
Driver Mode Control . . . . . . . . . . . . 200
Page 380 of 382
Chevrolet Traverse Owner Manual (GMNA-Localizing-U.S./Canada/Mexico-
13527526) - 2020 - CRC - 9/5/19
Index 379
Speedometer . . . . . . . . . . . . . . . . . . . 120
StabiliTrakOFF Light . . . . . . . . . . . . . . . . . . . . . 129
Start Assist, Hill . . . . . . . . . . . . . . . . . 197
Start Vehicle, Remote . . . . . . . . . . . 16
Starter Switch Check . . . . . . . . . . . 267
Starting the Engine . . . . . . . . . . . . . 184
Steering . . . . . . . . . . . . . . . . . . . . . . . . 168 Heated Wheel . . . . . . . . . . . . . . . . 106
Wheel Adjustment . . . . . . . . . . . . 106
Wheel Controls . . . . . . . . . . . . . . . 106
Stop/Start System . . . . . . . . . . . . . . 185
Storage Areas Cargo ManagementSystem . . . . . . . . . . . . . . . . . . . . . . 101
Center Console . . . . . . . . . . . . . . . 101
Glove Box . . . . . . . . . . . . . . . . . . . . 100
Instrument Panel . . . . . . . . . . . . . 100
Roof Rack System . . . . . . . . . . . . 103
Storage Compartments . . . . . . . . . 100
Struts Gas . . . . . . . . . . . . . . . . . . . . . . . . . . . 269
Stuck Vehicle . . . . . . . . . . . . . . . . . . . 177
Sun Visors . . . . . . . . . . . . . . . . . . . . . . . 37
Sunroof . . . . . . . . . . . . . . . . . . . . . . . . . . 37
Symbols . . . . . . . . . . . . . . . . . . . . . . . . . . 3
System Engine Air Filter Life . . . . . . . . . . 257 System (cont'd)
Forward Collision
Alert (FCA) . . . . . . . . . . . . . . . . . . 219
Infotainment . . . . . . . . . . . . . 156, 358
Roof Rack . . . . . . . . . . . . . . . . . . . . 103
Systems Driver Assistance . . . . . . . . . . . . . 213
T
Tachometer . . . . . . . . . . . . . . . . . . . . . 120
Text Telephone (TTY) Users . . . . 348
Theft-Deterrent Systems . . . . . . . . . 30Immobilizer . . . . . . . . . . . . . . . . . . . . . 30
Third-Row Seats . . . . . . . . . . . . . . . . . 53
Time . . . . . . . . . . . . . . . . . . . . . . . . . . . . 110
Tires . . . . . . . . . . . . . . . . . . . . . . . . . . . . 283
All-Season . . . . . . . . . . . . . . . . . . . . 284
Buying New Tires . . . . . . . . . . . . . 298
Chains . . . . . . . . . . . . . . . . . . . . . . . . 303
Changing . . . . . . . . . . . . . . . . . . . . . 305
Compact Spare . . . . . . . . . . . . . . . .311
Designations . . . . . . . . . . . . . . . . . 286
Different Size . . . . . . . . . . . . . . . . . 300
If a Tire Goes Flat . . . . . . . . . . . . 303
Inspection . . . . . . . . . . . . . . . . . . . . 296
Pressure . . . . . . . . . . . . . . . . . 290, 291
Pressure Light . . . . . . . . . . . . . . . . 130
Pressure Monitor Operation . . 292 Tires (cont'd)
Pressure Monitor System . . . . . 291
Rotation . . . . . . . . . . . . . . . . . . . . . . 297
Sidewall Labeling . . . . . . . . . . . . . 284
Terminology and Definitions . . 287
Uniform Tire Quality
Grading . . . . . . . . . . . . . . . . . . . . . 300
Wheel Alignment and Tire Balance . . . . . . . . . . . . . . . . . . . . . 302
Wheel Replacement . . . . . . . . . . 302
When It Is Time for New Tires . . . . . . . . . . . . . . . . . . . . . . . . 298
Winter . . . . . . . . . . . . . . . . . . . . . . . . 284
Top Tier Fuel . . . . . . . . . . . . . . . . . . . 229
Tow/Haul Mode . . . . . . . . . . . . . . . . . 194
Tow/Haul Mode Light . . . . . . . . . . . 128
Towing Driving Characteristics . . . . . . . . 233
Equipment . . . . . . . . . . . . . . . . . . . . 241
General Information . . . . . . . . . . 233
Recreational Vehicle . . . . . . . . . . 315
Trailer . . . . . . . . . . . . . . . . . . . . . . . . 237
Trailer Sway Control (TSC) . . . 244
Vehicle . . . . . . . . . . . . . . . . . . . . . . . 315
Traction Control System(TCS)/StabiliTrak Light . . . . . . 130
Off Light . . . . . . . . . . . . . . . . . . . . . . 129