check engine CHEVROLET TRAVERSE 2022 Owner's Manual
[x] Cancel search | Manufacturer: CHEVROLET, Model Year: 2022, Model line: TRAVERSE, Model: CHEVROLET TRAVERSE 2022Pages: 382, PDF Size: 5.87 MB
Page 245 of 382
Chevrolet Traverse Owner Manual (GMNA-Localizing-U.S./Canada/Mexico-
13527526) - 2020 - CRC - 9/5/19
244 Driving and Operating
Electric Trailer
BrakesBlue
Battery Feed Red/Green or
Red/Blue
Brake Apply
Signal White/Blue
Ground Black
Refer to the aftermarket electric
trailer brake controller owner's
manual to determine wire color
coding of the electric trailer brake
controller. The wire colors on the
brake controller may be different
from the vehicle. The electric trailer
brake controller should be installed
by your dealer or a qualified service
center.
If equipped, there are four blunt cut
wires inside the front driver side
instrument panel. It will be
necessary to have a technician
connect the 12-volt power to the
engine compartment fuse block.Trailer Lamps
Always check all trailer lamps are
working at the beginning of each
trip, and periodically on longer trips.
Turn Signals When Towing a
Trailer
When properly connected, the trailer
turn signals will illuminate to indicate
the vehicle is turning, changing
lanes, or stopping. When towing a
trailer, the arrows on the instrument
cluster will illuminate even if the
trailer is not properly connected or
the bulbs are burned out.
Tow/Haul Mode
For instructions on how to enter
Tow/Haul mode, see Driver Mode
Control 0200.
Tow/Haul assists when pulling a
heavy trailer or a large or heavy
load. See Tow/Haul Mode 0194.
Tow/Haul Mode is designed to be
most effective when the vehicle and
trailer combined weight is at least
75% of the vehicle's Gross Combined Weight Rating (GCWR).
See
“Weight of the Trailer” under
Trailer Towing 0237.
Tow/Haul Mode is most useful when
pulling a heavy trailer or a large or
heavy load:
. through rolling terrain
. in stop-and-go traffic
. in busy parking lots
Operating the vehicle in Tow/Haul
Mode when lightly loaded or not
towing will not cause damage;
however, it is not recommended and
may result in unpleasant engine and
transmission driving characteristics
and reduced fuel economy.
Trailer Sway
Control (TSC)
Vehicles with StabiliTrak/Electronic
Stability Control (ESC) have a
Trailer Sway Control (TSC) feature.
Trailer sway is unintended
side-to-side motion of a trailer while
towing. If the vehicle is towing a
trailer and the TSC detects that
sway is increasing, the vehicle
Page 246 of 382
Chevrolet Traverse Owner Manual (GMNA-Localizing-U.S./Canada/Mexico-
13527526) - 2020 - CRC - 9/5/19
Driving and Operating 245
brakes are selectively applied at
each wheel, to help reduce
excessive trailer sway. If equipped
with the Integrated Trailer Brake
Control (ITBC) system, and the
trailer has an electric brake system,
StabiliTrak/ESC may also apply the
trailer brakes.
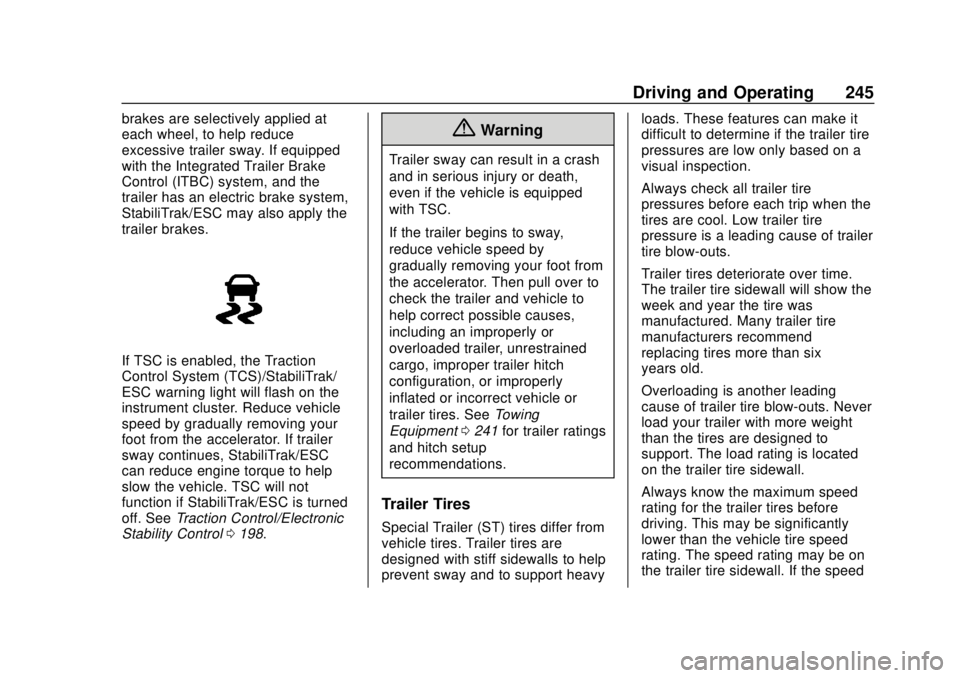
If TSC is enabled, the Traction
Control System (TCS)/StabiliTrak/
ESC warning light will flash on the
instrument cluster. Reduce vehicle
speed by gradually removing your
foot from the accelerator. If trailer
sway continues, StabiliTrak/ESC
can reduce engine torque to help
slow the vehicle. TSC will not
function if StabiliTrak/ESC is turned
off. SeeTraction Control/Electronic
Stability Control 0198.
{Warning
Trailer sway can result in a crash
and in serious injury or death,
even if the vehicle is equipped
with TSC.
If the trailer begins to sway,
reduce vehicle speed by
gradually removing your foot from
the accelerator. Then pull over to
check the trailer and vehicle to
help correct possible causes,
including an improperly or
overloaded trailer, unrestrained
cargo, improper trailer hitch
configuration, or improperly
inflated or incorrect vehicle or
trailer tires. See Towing
Equipment 0241 for trailer ratings
and hitch setup
recommendations.
Trailer Tires
Special Trailer (ST) tires differ from
vehicle tires. Trailer tires are
designed with stiff sidewalls to help
prevent sway and to support heavy loads. These features can make it
difficult to determine if the trailer tire
pressures are low only based on a
visual inspection.
Always check all trailer tire
pressures before each trip when the
tires are cool. Low trailer tire
pressure is a leading cause of trailer
tire blow-outs.
Trailer tires deteriorate over time.
The trailer tire sidewall will show the
week and year the tire was
manufactured. Many trailer tire
manufacturers recommend
replacing tires more than six
years old.
Overloading is another leading
cause of trailer tire blow-outs. Never
load your trailer with more weight
than the tires are designed to
support. The load rating is located
on the trailer tire sidewall.
Always know the maximum speed
rating for the trailer tires before
driving. This may be significantly
lower than the vehicle tire speed
rating. The speed rating may be on
the trailer tire sidewall. If the speed
Page 247 of 382
Chevrolet Traverse Owner Manual (GMNA-Localizing-U.S./Canada/Mexico-
13527526) - 2020 - CRC - 9/5/19
246 Driving and Operating
rating is not shown, the default
trailer tire speed rating is 105 km/h
(65 mph).Conversions and
Add-Ons
Add-On Electrical
Equipment
{Warning
The Data Link Connector (DLC) is
used for vehicle service and
Emission Inspection/Maintenance
testing. SeeMalfunction Indicator
Lamp (Check Engine Light) 0125
. A device connected to the DLC
— such as an aftermarket fleet or
driver-behavior tracking device —
may interfere with vehicle
systems. This could affect vehicle
operation and cause a crash.
Such devices may also access
information stored in the vehicle’s
systems.
Caution
Some electrical equipment can
damage the vehicle or cause
components to not work and
would not be covered by the
vehicle warranty. Always check
with your dealer before adding
electrical equipment.
Add-on equipment can drain the
vehicle's 12-volt battery, even if the
vehicle is not operating.
The vehicle has an airbag system.
Before attempting to add anything
electrical to the vehicle, see
Servicing the Airbag-Equipped
Vehicle 075 and
Adding Equipment to the
Airbag-Equipped Vehicle 076.
Page 248 of 382
Chevrolet Traverse Owner Manual (GMNA-Localizing-U.S./Canada/Mexico-
13527526) - 2020 - CRC - 9/5/19
Vehicle Care 247
Vehicle Care
General Information
General Information . . . . . . . . . . 248
California Proposition65 Warning . . . . . . . . . . . . . . . . . 248
California Perchlorate Materials Requirements . . . . . 249
Accessories and Modifications . . . . . . . . . . . . . . . . 249
Vehicle Checks
Doing Your OwnService Work . . . . . . . . . . . . . . . 249
Hood . . . . . . . . . . . . . . . . . . . . . . . . . 250
Engine Compartment Overview . . . . . . . . . . . . . . . . . . . . 252
Engine Oil . . . . . . . . . . . . . . . . . . . . 253
Engine Oil Life System . . . . . . . 255
Automatic Transmission Fluid . . . . . . . . . . . . . . . . . . . . . . . . 256
Engine Air Filter Life System . . . . . . . . . . . . . . . . . . . . . . 257
Engine Air Cleaner/Filter . . . . . . 257
Cooling System . . . . . . . . . . . . . . 258
Engine Overheating . . . . . . . . . . 262
Washer Fluid . . . . . . . . . . . . . . . . . 263
Brakes . . . . . . . . . . . . . . . . . . . . . . . 264
Brake Fluid . . . . . . . . . . . . . . . . . . . 265 Battery - North America . . . . . . 266
All-Wheel Drive . . . . . . . . . . . . . . . 267
Starter Switch Check . . . . . . . . . 267
Automatic Transmission Shift
Lock Control Function
Check . . . . . . . . . . . . . . . . . . . . . . . 267
Park Brake and P (Park) Mechanism Check . . . . . . . . . . 267
Wiper Blade Replacement . . . . 268
Windshield Replacement . . . . . 269
Gas Strut(s) . . . . . . . . . . . . . . . . . . 269
Headlamp Aiming
Front Headlamp Aiming . . . . . . 271
Bulb Replacement
Bulb Replacement . . . . . . . . . . . . 271
High Intensity Discharge (HID) Lighting . . . . . . . . . . . . . . . . . . . . . 271
LED Lighting . . . . . . . . . . . . . . . . . 271
Headlamps, Front Turn Signal, and Sidemarker . . . . . . . . . . . . . 271
License Plate Lamp . . . . . . . . . . 272
Electrical System
High Voltage Devices and Wiring . . . . . . . . . . . . . . . . . . . . . . . 273
Electrical System Overload . . . 273
Fuses and Circuit Breakers . . . 274
Engine Compartment Fuse Block . . . . . . . . . . . . . . . . . . . . . . . . 274 Instrument Panel Fuse
Block . . . . . . . . . . . . . . . . . . . . . . . . 278
Rear Compartment Fuse Block . . . . . . . . . . . . . . . . . . . . . . . . 280
Wheels and Tires
Tires . . . . . . . . . . . . . . . . . . . . . . . . . . 283
All-Season Tires . . . . . . . . . . . . . . 284
Winter Tires . . . . . . . . . . . . . . . . . . 284
Tire Sidewall Labeling . . . . . . . . 284
Tire Designations . . . . . . . . . . . . . 286
Tire Terminology andDefinitions . . . . . . . . . . . . . . . . . . 287
Tire Pressure . . . . . . . . . . . . . . . . . 290
Tire Pressure for High-Speed Operation . . . . . . . . . . . . . . . . . . . 291
Tire Pressure Monitor
System . . . . . . . . . . . . . . . . . . . . . . 291
Tire Pressure Monitor Operation . . . . . . . . . . . . . . . . . . . 292
Tire Inspection . . . . . . . . . . . . . . . . 296
Tire Rotation . . . . . . . . . . . . . . . . . 297
When It Is Time for New Tires . . . . . . . . . . . . . . . . . . . . . . . . 298
Buying New Tires . . . . . . . . . . . . . 298
Different Size Tires and Wheels . . . . . . . . . . . . . . . . . . . . . . 300
Uniform Tire Quality Grading . . . . . . . . . . . . . . . . . . . . . 300
Wheel Alignment and Tire Balance . . . . . . . . . . . . . . . . . . . . . 302
Page 254 of 382
Chevrolet Traverse Owner Manual (GMNA-Localizing-U.S./Canada/Mexico-
13527526) - 2020 - CRC - 9/5/19
Vehicle Care 253
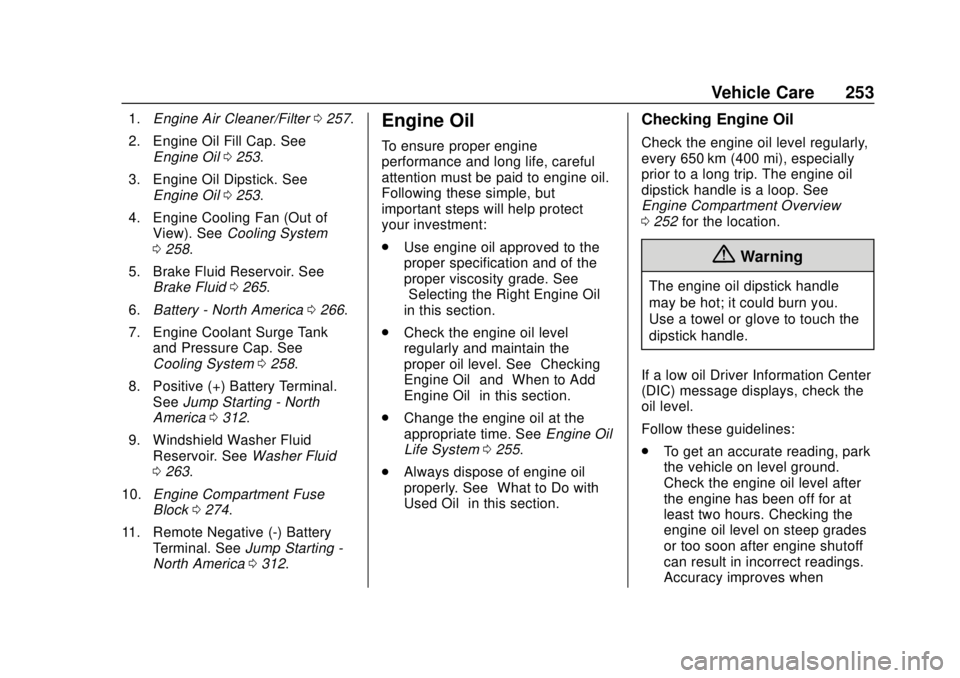
1.Engine Air Cleaner/Filter 0257.
2. Engine Oil Fill Cap. See Engine Oil 0253.
3. Engine Oil Dipstick. See Engine Oil 0253.
4. Engine Cooling Fan (Out of View). See Cooling System
0 258.
5. Brake Fluid Reservoir. See Brake Fluid 0265.
6. Battery - North America 0266.
7. Engine Coolant Surge Tank and Pressure Cap. See
Cooling System 0258.
8. Positive (+) Battery Terminal. See Jump Starting - North
America 0312.
9. Windshield Washer Fluid Reservoir. See Washer Fluid
0 263.
10. Engine Compartment Fuse
Block 0274.
11. Remote Negative (-) Battery Terminal. See Jump Starting -
North America 0312.Engine Oil
To ensure proper engine
performance and long life, careful
attention must be paid to engine oil.
Following these simple, but
important steps will help protect
your investment:
.
Use engine oil approved to the
proper specification and of the
proper viscosity grade. See
“Selecting the Right Engine Oil”
in this section.
. Check the engine oil level
regularly and maintain the
proper oil level. See “Checking
Engine Oil” and“When to Add
Engine Oil” in this section.
. Change the engine oil at the
appropriate time. See Engine Oil
Life System 0255.
. Always dispose of engine oil
properly. See “What to Do with
Used Oil” in this section.
Checking Engine Oil
Check the engine oil level regularly,
every 650 km (400 mi), especially
prior to a long trip. The engine oil
dipstick handle is a loop. See
Engine Compartment Overview
0252 for the location.
{Warning
The engine oil dipstick handle
may be hot; it could burn you.
Use a towel or glove to touch the
dipstick handle.
If a low oil Driver Information Center
(DIC) message displays, check the
oil level.
Follow these guidelines:
. To get an accurate reading, park
the vehicle on level ground.
Check the engine oil level after
the engine has been off for at
least two hours. Checking the
engine oil level on steep grades
or too soon after engine shutoff
can result in incorrect readings.
Accuracy improves when
Page 255 of 382
Chevrolet Traverse Owner Manual (GMNA-Localizing-U.S./Canada/Mexico-
13527526) - 2020 - CRC - 9/5/19
254 Vehicle Care
checking a cold engine prior to
starting. Remove the dipstick
and check the level.
. If unable to wait two hours, the
engine must be off for at least
15 minutes if the engine is
warm, or at least 30 minutes if
the engine is not warm. Pull out
the dipstick, wipe it with a clean
paper towel or cloth, then push it
back in all the way. Remove it
again, keeping the tip down, and
check the level.
When to Add Engine Oil
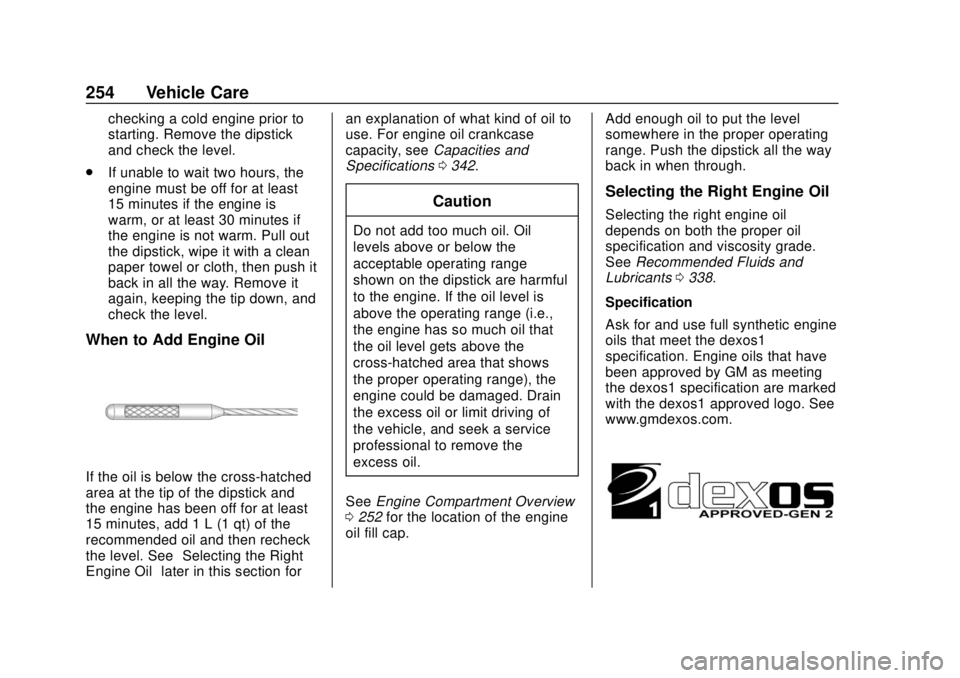
If the oil is below the cross-hatched
area at the tip of the dipstick and
the engine has been off for at least
15 minutes, add 1 L (1 qt) of the
recommended oil and then recheck
the level. See “Selecting the Right
Engine Oil” later in this section for an explanation of what kind of oil to
use. For engine oil crankcase
capacity, see
Capacities and
Specifications 0342.
Caution
Do not add too much oil. Oil
levels above or below the
acceptable operating range
shown on the dipstick are harmful
to the engine. If the oil level is
above the operating range (i.e.,
the engine has so much oil that
the oil level gets above the
cross-hatched area that shows
the proper operating range), the
engine could be damaged. Drain
the excess oil or limit driving of
the vehicle, and seek a service
professional to remove the
excess oil.
See Engine Compartment Overview
0 252 for the location of the engine
oil fill cap. Add enough oil to put the level
somewhere in the proper operating
range. Push the dipstick all the way
back in when through.
Selecting the Right Engine Oil
Selecting the right engine oil
depends on both the proper oil
specification and viscosity grade.
See
Recommended Fluids and
Lubricants 0338.
Specification
Ask for and use full synthetic engine
oils that meet the dexos1
specification. Engine oils that have
been approved by GM as meeting
the dexos1 specification are marked
with the dexos1 approved logo. See
www.gmdexos.com.
Page 257 of 382
Chevrolet Traverse Owner Manual (GMNA-Localizing-U.S./Canada/Mexico-
13527526) - 2020 - CRC - 9/5/19
256 Vehicle Care
under the best conditions, the oil life
system might indicate that an oil
change is not necessary for up to a
year. The engine oil and filter must
be changed at least once a year
and, at this time, the system must
be reset. For vehicles without the
CHANGE ENGINE OIL SOON
message, an oil change is needed
when the OIL LIFE REMAINING
percentage is near 0%. Your dealer
has trained service people who will
perform this work and reset the
system. It is also important to check
the oil regularly over the course of
an oil drain interval and keep it at
the proper level.
If the system is ever reset
accidentally, the oil must be
changed at 5 000 km (3,000 mi)
since the last oil change.
Remember to reset the oil life
system whenever the oil is changed.
How to Reset the Engine Oil
Life System
Reset the system whenever the
engine oil is changed so that the
system can calculate the nextengine oil change. Always reset the
engine oil life to 100% after every oil
change. It will not reset itself. To
reset the engine oil life system:
1. Display the OIL LIFE REMAINING on the DIC. See
Driver Information Center (DIC)
0134.
2. Press and hold
Vfor several
seconds. The oil life will
change to 100%.
The oil life system can also be reset
as follows:
1. Display the OIL LIFE REMAINING on the DIC. See
Driver Information Center (DIC)
0134.
2. Fully press the accelerator pedal slowly three times within
five seconds.
3. Display the OIL LIFE REMAINING on the DIC. If the
display shows 100%, the
system is reset.
If the vehicle has a CHANGE
ENGINE OIL SOON message and it
comes back on when the vehicle is started and/or the OIL LIFE
REMAINING is near 0%, the engine
oil life system has not been reset.
Repeat the procedure.
Automatic Transmission
Fluid
It is not necessary to check the
transmission fluid level.
A transmission fluid leak is the only
reason for fluid loss. If a leak
occurs, take the vehicle to the
dealer and have it repaired as soon
as possible.
Change the fluid at the intervals
listed in
Maintenance Schedule
0 329, and be sure to use the
transmission fluid listed in
Recommended Fluids and
Lubricants 0338.
Caution
Use of the incorrect automatic
transmission fluid may damage
the vehicle, and the damage may
not be covered by the vehicle
(Continued)
Page 258 of 382
Chevrolet Traverse Owner Manual (GMNA-Localizing-U.S./Canada/Mexico-
13527526) - 2020 - CRC - 9/5/19
Vehicle Care 257
Caution (Continued)
warranty. Always use the correct
automatic transmission fluid. See
Recommended Fluids and
Lubricants0338.
If you need to check the
transmission fluid level, take the
vehicle to your dealer.
Engine Air Filter Life
System
If equipped, this feature provides
the engine air filter ’s remaining life
and best timing for a change. The
timing to change an engine air filter
depends on driving and
environmental conditions.
When to Change Engine Air
Filter
When the REPLACE AT NEXT OIL
CHANGE message displays, the
engine air filter should be replaced
at the next engine oil change. When the REPLACE ENGINE AIR
FILTER SOON message displays,
the engine air filter should be
replaced at the earliest
convenience. The system must be
reset after the engine air filter is
changed.
If the CHECK AIR FILTER SYSTEM
message displays, see your dealer.
How to Reset Engine Air Filter
Life System
Reset the system whenever the
engine air filter is replaced so that
the system can calculate the next
engine air filter change.
To reset:
1. Place the vehicle in P (Park).
2. Display the Air Filter Life on the DIC. See Driver Information
Center (DIC) 0134.
3. Press
pto move to the Reset/
Disable display area. Select
Reset then press
Vfor several
seconds.
4. Press
Vto confirm the reset.
Engine Air Cleaner/Filter
The engine air cleaner/filter is in the
engine compartment on the
passenger side of the vehicle. See
Engine Compartment Overview
0 252.
When to Inspect the Engine Air
Cleaner/Filter
.
For intervals on changing and
inspecting the engine air filter,
see Maintenance Schedule
0 329.
. If equipped with Engine Air Filter
Life System, see Engine Air
Filter Life System 0257.
. If driving in very dusty areas,
follow the engine air filter
inspecting and changing
intervals, see Maintenance
Schedule 0329.
How to Inspect the Engine Air
Cleaner/Filter
Do not start the engine or have the
engine running with the engine air
cleaner/filter housing open. Before
removing the engine air cleaner/
Page 260 of 382
Chevrolet Traverse Owner Manual (GMNA-Localizing-U.S./Canada/Mexico-
13527526) - 2020 - CRC - 9/5/19
Vehicle Care 259
2. Engine Coolant Surge Tankand Pressure Cap
{Warning
An underhood electric fan can
start up even when the engine is
not running and can cause injury.
Keep hands, clothing, and tools
away from any underhood
electric fan.
{Warning
Do not touch heater or radiator
hoses, or other engine parts.
They can be very hot and can
burn you. Do not run the engine if
there is a leak; all coolant could
leak out. That could cause an
engine fire and can burn you. Fix
any leak before driving the
vehicle.
Engine Coolant
The cooling system in the vehicle is
filled with DEX-COOL engine
coolant. This coolant needs to be
checked and replaced at
appropriate intervals. See
Maintenance Schedule 0329.
The following explains the cooling
system and how to check and add
coolant when it is low. If there is a
problem with engine overheating,
see Engine Overheating 0262.
What to Use
{Warning
Plain water, or other liquids such
as alcohol, can boil before the
proper coolant mixture will. With
plain water or the wrong mixture,
the engine could get too hot but
there would not be an overheat
warning. The engine could catch
fire and you or others could be
burned. Use a 50/50 mixture of clean,
drinkable water and DEX-COOL
coolant. This mixture:
.
Gives freezing protection down
to−37 °C (−34 °F), outside
temperature.
. Gives boiling protection up to
129 °C (265 °F), engine
temperature.
. Protects against rust and
corrosion.
. Will not damage aluminum parts.
. Helps keep the proper engine
temperature.Caution
Do not use anything other than a
mix of DEX-COOL coolant that
meets GM Standard
GMW3420 and clean, drinkable
water. Anything else can cause
damage to the engine cooling
system and the vehicle, which
would not be covered by the
vehicle warranty.
Page 261 of 382
Chevrolet Traverse Owner Manual (GMNA-Localizing-U.S./Canada/Mexico-
13527526) - 2020 - CRC - 9/5/19
260 Vehicle Care
Never dispose of engine coolant by
putting it in the trash, pouring it on
the ground, or into sewers, streams,
or bodies of water. Have the coolant
changed by an authorized service
center, familiar with legal
requirements regarding used
coolant disposal. This will help
protect the environment and your
health.
Checking Coolant
The vehicle must be on a level
surface when checking the coolant
level.
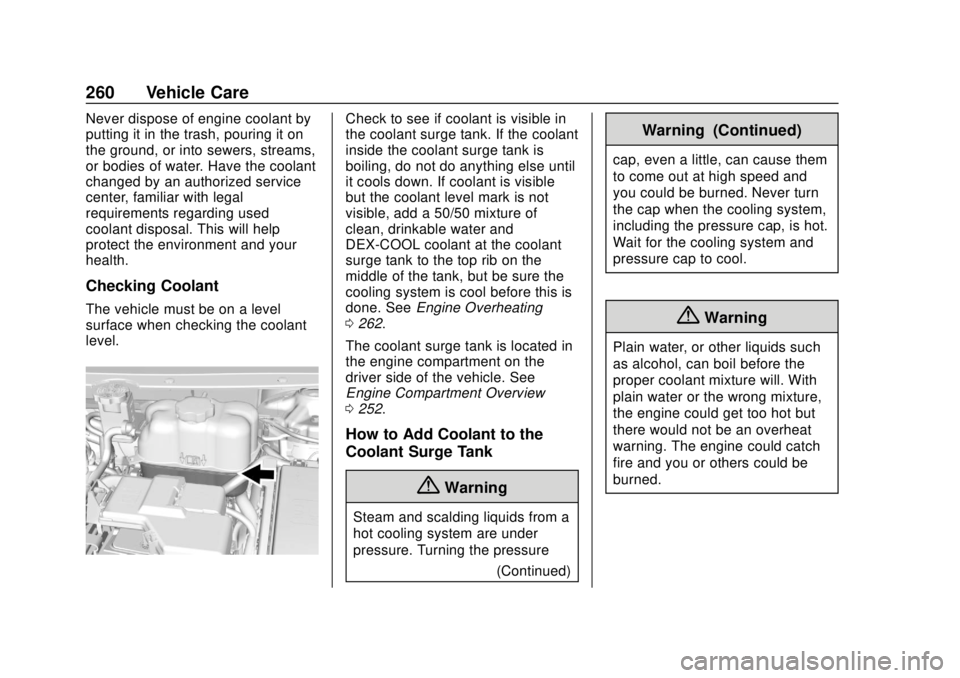
Check to see if coolant is visible in
the coolant surge tank. If the coolant
inside the coolant surge tank is
boiling, do not do anything else until
it cools down. If coolant is visible
but the coolant level mark is not
visible, add a 50/50 mixture of
clean, drinkable water and
DEX-COOL coolant at the coolant
surge tank to the top rib on the
middle of the tank, but be sure the
cooling system is cool before this is
done. SeeEngine Overheating
0 262.
The coolant surge tank is located in
the engine compartment on the
driver side of the vehicle. See
Engine Compartment Overview
0 252.
How to Add Coolant to the
Coolant Surge Tank
{Warning
Steam and scalding liquids from a
hot cooling system are under
pressure. Turning the pressure
(Continued)
Warning (Continued)
cap, even a little, can cause them
to come out at high speed and
you could be burned. Never turn
the cap when the cooling system,
including the pressure cap, is hot.
Wait for the cooling system and
pressure cap to cool.
{Warning
Plain water, or other liquids such
as alcohol, can boil before the
proper coolant mixture will. With
plain water or the wrong mixture,
the engine could get too hot but
there would not be an overheat
warning. The engine could catch
fire and you or others could be
burned.