lock nut CHEVROLET TRAVERSE 2022 Owners Manual
[x] Cancel search | Manufacturer: CHEVROLET, Model Year: 2022, Model line: TRAVERSE, Model: CHEVROLET TRAVERSE 2022Pages: 382, PDF Size: 5.87 MB
Page 14 of 382

Chevrolet Traverse Owner Manual (GMNA-Localizing-U.S./Canada/Mexico-
13527526) - 2020 - CRC - 9/5/19
Keys, Doors, and Windows 13
procedure will take approximately
30 minutes to complete. The vehicle
must be off and all of the
transmitters you wish to program
must be with you.1. Remove the key by pressing the button on the side of the
RKE transmitter near the
bottom and pull the key out.
Never pull the key out without
pressing the button.
2. Remove the key lock cylinder cap on the driver door handle.
See Door Locks 017. Insert
the vehicle key of the
transmitter into the key lock
cylinder on the driver door
handle and turn the key,
counterclockwise, to the unlock
position five times within
10 seconds.
The DIC displays REMOTE
LEARN PENDING,
PLEASE WAIT. 3. Wait for 10 minutes until the
DIC displays PRESS ENGINE
START BUTTON TO LEARN
and then press ENGINE
START/STOP.
The DIC will again display
REMOTE LEARN PENDING,
PLEASE WAIT.
4. Repeat Step 2 two additional times. After the third time all
previously known transmitters
will no longer work with the
vehicle. Remaining transmitters
can be relearned during the
next steps.
The DIC display should now
show READY FOR REMOTE
# 1.
5. Place the new transmitter intothe transmitter pocket. The
transmitter pocket is inside the
center console storage area
between the driver and front
passenger seats, underneath
the liner.
6. Press ENGINE START/STOP. When the transmitter is learned
the DIC display will show that it
is ready to program the next
transmitter.
7. Remove the transmitter from the transmitter pocket and
press the transmitter
KorQ
button.
Page 17 of 382

Chevrolet Traverse Owner Manual (GMNA-Localizing-U.S./Canada/Mexico-
13527526) - 2020 - CRC - 9/5/19
16 Keys, Doors, and Windows
Remote Vehicle Start
If equipped, this feature allows the
engine to be started from outside of
the vehicle.
/:This button will be on the RKE
transmitter if the vehicle has remote
start.
The climate control system will use
the previous settings during a
remote start. The rear defog may
come on during a remote start
based on cold ambient conditions.
The rear fog indicator light does not
come on during a remote start.
If the vehicle has auto heated or
ventilated seats, they may come on
during a remote start. See Heated
and Ventilated Front Seats 048.
If equipped with a remote start
heated steering wheel, it may come
on during a remote start when it is
cold outside, if enabled. See Heated
Steering Wheel 0106 and
Vehicle Personalization 0138.
Laws in some local communities
may restrict the use of remote
starters. For example, some laws may require a person using remote
start to have the vehicle in view.
Check local regulations for any
requirements.
Do not use the remote start feature
if the vehicle is low on fuel. The
vehicle could run out of fuel.
Other conditions can affect the
performance of the transmitter. See
Remote Keyless Entry (RKE)
System
08.
Starting the Engine Using Remote
Start
1. Press and release
Qon the
RKE transmitter.
2. Immediately press and hold
/
for at least four seconds or until
the turn signal lamps flash. The
turn signal lamps flashing
confirms the request to remote
start the vehicle has been
received.
During the remote start the
doors will be locked and the
parking lamps will remain on as
long as the engine is running. The engine will shut off after
15 minutes unless a time
extension is done or the
vehicle is started.
3. With the RKE transmitter in the vehicle, press the brake pedal
and start the vehicle to drive.
Extending Engine Run Time
The engine run time can also be
extended by another 15 minutes,
if during the first 15 minutes
Steps 1 and 2 are repeated while
the engine is still running. An
extension can be requested
30 seconds after starting. This
provides a total of 30 minutes.
The remote start can only be
extended once.
When the remote start is extended,
the second 15-minute period is
added on to the first 15 minutes for
a total of 30 minutes.
A maximum of two remote starts,
or a remote start with an extension,
are allowed between ignition cycles.
Page 54 of 382
Chevrolet Traverse Owner Manual (GMNA-Localizing-U.S./Canada/Mexico-
13527526) - 2020 - CRC - 9/5/19
Seats and Restraints 53
With the engine running, pressMor
Lto heat the left or right outboard
seat cushion. An indicator on the
climate control display appears
when this feature is on.
This feature turns on at the highest
setting. With each press of the
button, the heated seat changes to
the next lower setting, and then the
off setting. Three lights indicate the
highest setting, and one light
indicates the lowest. If the heated
seats are on high, the level may
automatically be lowered after
approximately 30 minutes.
Third Row Seats
{Warning
Using the third row seating
position while the second row is
folded, or pushed forward in the
entry position, could cause injury
in a sudden stop or crash. Be
sure to return the seat to the
(Continued)
Warning (Continued)
passenger seating position. Push
and pull on the seat to make sure
it is locked into place.
Folding the Seatback
Caution
Folding a rear seat with the seat
belts still fastened may cause
damage to the seat or the seat
belts. Always unbuckle the seat
belts and return them to their
normal stowed position before
folding a rear seat.
To fold the third row seatback: 1. Remove objects on the floor in front of or on the second row
seat, or in the seat tracks on
the floor.
2. If the second row seat is in the full rear position, adjust it
forward to allow the third row
seat to fold fully flat. 3. Remove anything on or under
the seat.
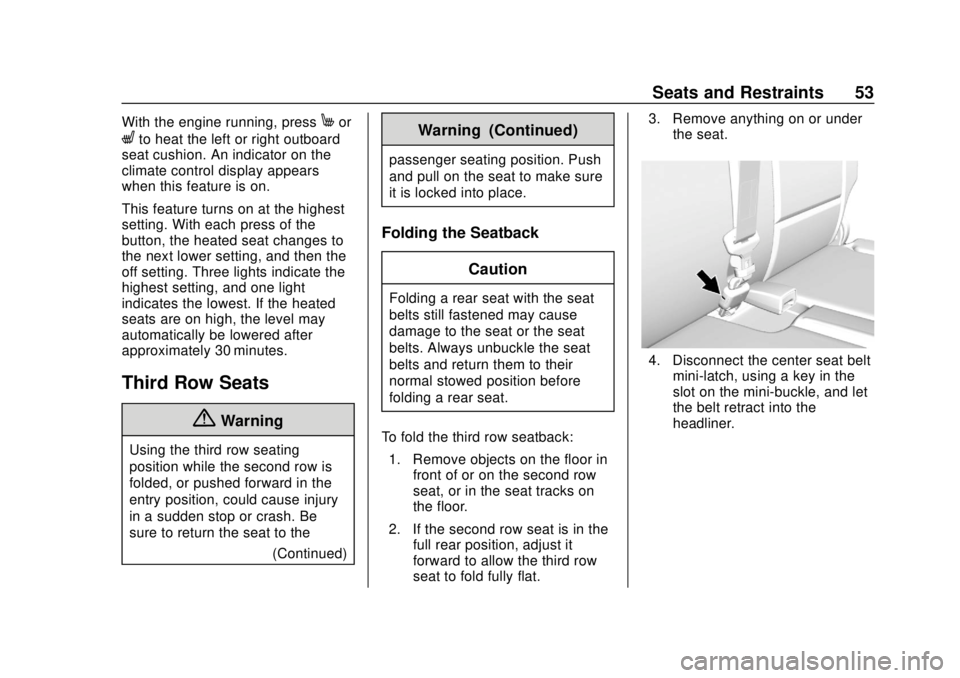
4. Disconnect the center seat beltmini-latch, using a key in the
slot on the mini-buckle, and let
the belt retract into the
headliner.
Page 71 of 382
Chevrolet Traverse Owner Manual (GMNA-Localizing-U.S./Canada/Mexico-
13527526) - 2020 - CRC - 9/5/19
70 Seats and Restraints
Airbags supplement the protection
provided by seat belts by
distributing the force of the impact
more evenly over the
occupant's body.
Rollover capable roof-rail airbags
are designed to help contain the
head and chest of occupants in the
outboard seating positions in the
first, second, and third rows. The
rollover capable roof-rail airbags are
designed to help reduce the risk of
full or partial ejection in rollover
events, although no system can
prevent all such ejections.
But airbags would not help in many
types of collisions, primarily
because the occupant's motion is
not toward those airbags. SeeWhen
Should an Airbag Inflate? 068.
Airbags should never be regarded
as anything more than a supplement
to seat belts.What Will You See after
an Airbag Inflates?
After frontal and seat-mounted side
impact airbags inflate, they quickly
deflate, so quickly that some people
may not even realize the airbags
inflated. The front center airbag and
roof-rail airbags may still be at least
partially inflated for some time after
they inflate. Some components of
the airbag module may be hot for
several minutes. For location of the
airbags, see Where Are the
Airbags? 067.
The parts of the airbag that come
into contact with you may be warm,
but not too hot to touch. There may
be some smoke and dust coming
from the vents in the deflated
airbags. Airbag inflation does not
prevent the driver from seeing out of
the windshield or being able to steer
the vehicle, nor does it prevent
people from leaving the vehicle.
{Warning
When an airbag inflates, there
may be dust in the air. This dust
could cause breathing problems
for people with a history of
asthma or other breathing trouble.
To avoid this, everyone in the
vehicle should get out as soon as
it is safe to do so. If you have
breathing problems but cannot
get out of the vehicle after an
airbag inflates, then get fresh air
by opening a window or a door.
If you experience breathing
problems following an airbag
deployment, you should seek
medical attention.
The vehicle has a feature that may
automatically unlock the doors, turn
on the interior lamps and hazard
warning flashers, and shut off the
fuel system after the airbags inflate.
The feature may also activate,
without airbag inflation, after an
event that exceeds a predetermined
threshold. After turning the ignition
Page 75 of 382

Chevrolet Traverse Owner Manual (GMNA-Localizing-U.S./Canada/Mexico-
13527526) - 2020 - CRC - 9/5/19
74 Seats and Restraints
slightly recline the vehicle
seatback and adjust the seat
cushion, if adjustable, to make
sure that the vehicle seatback
is not pushing the child
restraint into the seat cushion.
Also make sure the child
restraint is not trapped under
the vehicle head restraint.
If this happens, adjust the head
restraint. SeeHead Restraints
0 40.
6. Restart the vehicle.
The passenger sensing system may
or may not turn off the airbag for a
child in a child restraint depending
upon the child’s size. It is better to
secure the child restraint in a rear
seat. Never put a rear-facing child
restraint in the front seat, even if the
ON indicator is not lit.If the Off Indicator Is Lit for an
Adult-Sized Occupant
If a person of adult size is sitting in
the front outboard passenger seat,
but the OFF indicator is lit, it could
be because that person is not sitting
properly in the seat or that the child
restraint locking feature is engaged.
Use the following steps to allow the
system to detect that person and
enable the front outboard passenger
frontal airbag: 1. Turn the vehicle off. 2. Remove any additional material
from the seat, such as
blankets, cushions, seat
covers, seat heaters, or seat
massagers.
3. Place the seatback in the fully upright position.
4. Have the person sit upright in the seat, centered on the seat
cushion, with legs comfortably
extended.
5. If the shoulder portion of the belt is pulled out all the way,
the child restraint locking
feature will be engaged. This
may unintentionally cause the
passenger sensing system to
turn the airbag off for some
adult-sized occupants. If this
happens, unbuckle the belt, let
the belt go back all the way,
and then buckle the belt again
without pulling the belt out all
the way.
6. Restart the vehicle and have the person remain in this
position for two to three minutes
after the ON indicator is lit.
Page 109 of 382
Chevrolet Traverse Owner Manual (GMNA-Localizing-U.S./Canada/Mexico-
13527526) - 2020 - CRC - 9/5/19
108 Instruments and Controls
{Warning
In freezing weather, do not use
the washer until the windshield is
warmed. Otherwise the washer
fluid can form ice on the
windshield, blocking your vision.
{Warning
Before driving the vehicle, always
clear snow and ice from the hood,
windshield, roof, and rear of the
vehicle, including all lamps and
windows. Reduced visibility from
snow and ice buildup could lead
to a crash.
Clear snow and ice from the wiper
blades and windshield before using
them. If frozen to the windshield,
carefully loosen or thaw them.
Damaged blades should be
replaced. See Wiper Blade
Replacement 0268. Heavy snow or ice can overload the
wiper motor. See
Electrical System
Overload 0273.
Wiper Parking
If the ignition is turned off while the
wipers are on LO, HI, or INT, they
will immediately stop.
If the windshield wiper lever is then
moved to OFF before the driver
door is opened or within 10 minutes,
the wipers will restart and move to
the base of the windshield.
If the ignition is turned off while the
wipers are performing wipes due to
windshield washing, the wipers
continue to run until they reach the
base of the windshield.
Rear Window Wiper/
Washer
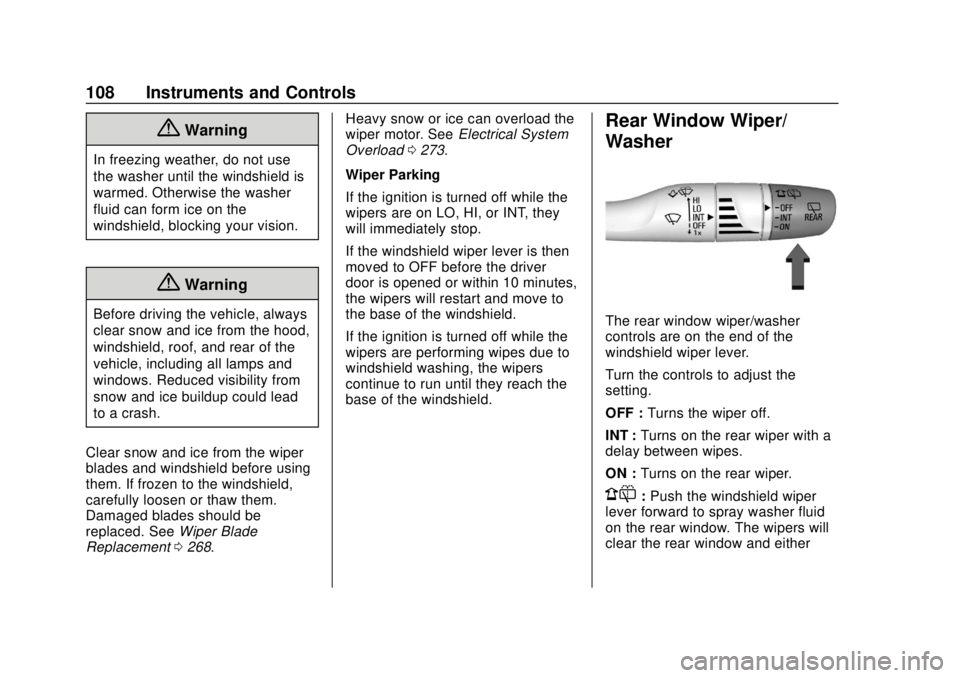
The rear window wiper/washer
controls are on the end of the
windshield wiper lever.
Turn the controls to adjust the
setting.
OFF : Turns the wiper off.
INT : Turns on the rear wiper with a
delay between wipes.
ON : Turns on the rear wiper.
1:Push the windshield wiper
lever forward to spray washer fluid
on the rear window. The wipers will
clear the rear window and either
Page 306 of 382

Chevrolet Traverse Owner Manual (GMNA-Localizing-U.S./Canada/Mexico-
13527526) - 2020 - CRC - 9/5/19
Vehicle Care 305
Warning (Continued)
5. Place wheel blocks,if equipped, on both sides of
the tire at the opposite
corner of the tire being
changed.
When the vehicle has a flat tire (2),
use the following example as a
guide to assist in the placement of
the wheel blocks (1), if equipped.
1. Wheel Block (If Equipped)
2. Flat Tire
The following information explains
how to repair or change a tire.
Tire Changing
Removing the Spare Tire and
Tools
To access the spare tire and tools: 1. Open the liftgate. See Liftgate
0 22.
2. Lift the load floor.
3. Remove the cargo
management system. See
Cargo Management System
0101.
4. Turn the wing nut (3)
counterclockwise to remove the
jack (1) and wheel wrench (2).
Place the tool container near
the tire being changed.
5. Remove the spare tire and place it next to the tire being
changed.
Removing the Flat Tire and
Installing the Spare Tire
1. Do a safety check beforeproceeding. See If a Tire Goes
Flat 0303.
Page 307 of 382

Chevrolet Traverse Owner Manual (GMNA-Localizing-U.S./Canada/Mexico-
13527526) - 2020 - CRC - 9/5/19
306 Vehicle Care
2. Turn the wheel wrenchcounterclockwise to loosen all
the wheel nuts, but do not
remove them yet.
3. Place the jack near the flat tire.
Caution
Make sure that the jack lift head
is in the correct position or you
may damage your vehicle. The
repairs would not be covered by
your warranty.
4. Position the jack lift head at the jack location nearest the
flat tire.
The jacking location is
indicated by a half circle notch
in the metal flange. The jack
must not be used in any other
position.
{Warning
Getting under a vehicle when it is
lifted on a jack is dangerous.
If the vehicle slips off the jack,
you could be badly injured or
(Continued)
Warning (Continued)
killed. Never get under a vehicle
when it is supported only by
a jack.
{Warning
Raising the vehicle with the jack
improperly positioned can
damage the vehicle and even
make the vehicle fall. To help
avoid personal injury and vehicle
damage, be sure to fit the jack lift
head into the proper location
before raising the vehicle.
{Warning
Lifting a vehicle and getting under
it to do maintenance or repairs is
dangerous without the
appropriate safety equipment and
training. If a jack is provided with(Continued)
Page 308 of 382

Chevrolet Traverse Owner Manual (GMNA-Localizing-U.S./Canada/Mexico-
13527526) - 2020 - CRC - 9/5/19
Vehicle Care 307
Warning (Continued)
the vehicle, it is designed only for
changing a flat tire. If it is used for
anything else, you or others could
be badly injured or killed if the
vehicle slips off the jack. If a jack
is provided with the vehicle, only
use it for changing a flat tire.
Caution
Using a jack to raise the vehicle
without positioning it correctly
could damage your vehicle. When
raising your vehicle on a jack, be
sure to position it correctly under
the frame and avoid contact with
the plastic molding.
5. Turn the wheel wrenchclockwise to raise the jack lift
head until the slots in the jack
head fit into the metal flange
behind the cut out on the
plastic molding. Do not raise
the vehicle yet.
6. Put the compact spare tire near you.
7. Turn the wrench clockwise in the jack to raise the vehicle.
Raise the vehicle far enough
off the ground so that there is
enough room for the spare tire
to fit under the wheel well.8. Remove all of the wheel nuts.
9. Remove the flat tire.
{Warning
Rust or dirt on a wheel, or on
the parts to which it is
fastened, can make wheel
nuts become loose after time.
The wheel could come off and
cause a crash. When
changing a wheel, remove any
rust or dirt from places where
the wheel attaches to the
(Continued)
Page 309 of 382

Chevrolet Traverse Owner Manual (GMNA-Localizing-U.S./Canada/Mexico-
13527526) - 2020 - CRC - 9/5/19
308 Vehicle Care
Warning (Continued)
vehicle. In an emergency, a
cloth or a paper towel can be
used; however, use a scraper
or wire brush later to remove
all rust or dirt.
10. Remove any rust or dirt from the wheel bolts, mounting
surfaces, and spare wheel.
11. Place the compact spare tire on the wheel-mounting surface.
{Warning
Never use oil or grease on bolts
or nuts because the nuts might
come loose. The vehicle's wheel
could fall off, causing a crash.
12. Reinstall the wheel nuts. Tighten each nut by hand until
the wheel is held against
the hub.
13. Lower the vehicle by turning the jack handle
counterclockwise.
{Warning
Wheel nuts that are improperly or
incorrectly tightened can cause
the wheels to become loose or
come off. The wheel nuts should
be tightened with a torque wrench
to the proper torque specification
after replacing. Follow the torque
specification supplied by the
aftermarket manufacturer when
(Continued)
Warning (Continued)
using accessory locking wheel
nuts. SeeCapacities and
Specifications 0342 for original
equipment wheel nut torque
specifications.
Caution
Improperly tightened wheel nuts
can lead to brake pulsation and
rotor damage. To avoid expensive
brake repairs, evenly tighten the
wheel nuts in the proper
sequence and to the proper
torque specification. See
Capacities and Specifications
0 342 for the wheel nut torque
specification.