tow CHEVROLET TRAVERSE 2022 Owners Manual
[x] Cancel search | Manufacturer: CHEVROLET, Model Year: 2022, Model line: TRAVERSE, Model: CHEVROLET TRAVERSE 2022Pages: 382, PDF Size: 5.87 MB
Page 16 of 382
Chevrolet Traverse Owner Manual (GMNA-Localizing-U.S./Canada/Mexico-
13527526) - 2020 - CRC - 9/5/19
Keys, Doors, and Windows 15
Caution
When replacing the battery, do
not touch any of the circuitry on
the transmitter. Static from your
body could damage the
transmitter.
Caution
Always replace the battery with
the correct type. Replacing the
battery with an incorrect type
could potentially create a risk of
battery explosion. Dispose of
used batteries according to
instructions and local laws. Do
not attempt to burn, crush, or cut
the used battery, and avoid
exposing the battery to
environments with extremely low
air pressures or high
temperatures.Replace the battery if the DIC
displays REPLACE BATTERY IN
REMOTE KEY.
The battery is not rechargeable. To
replace the battery:
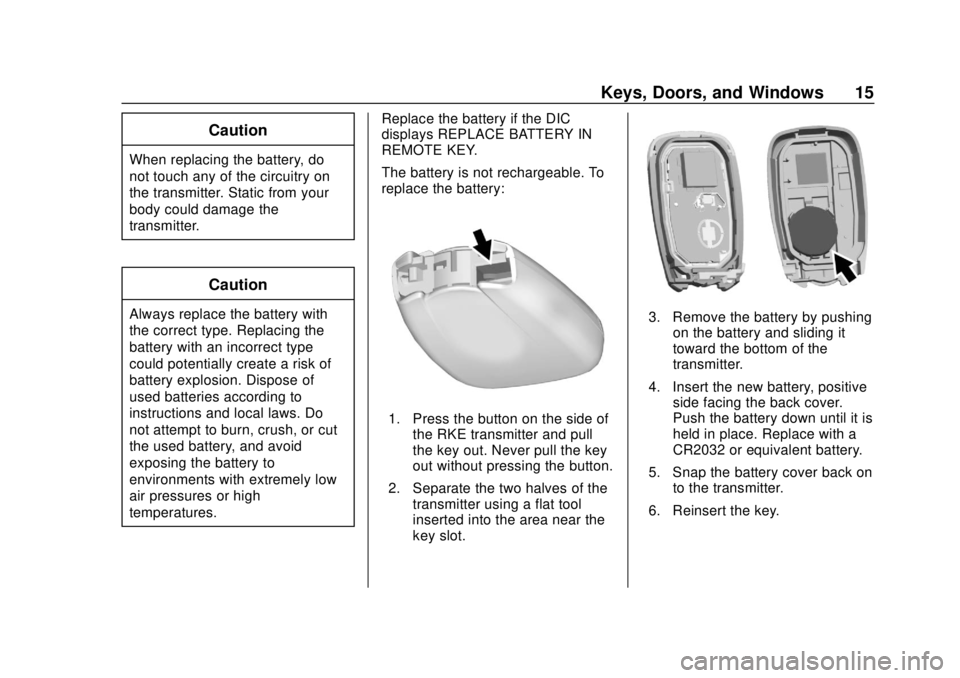
1. Press the button on the side of
the RKE transmitter and pull
the key out. Never pull the key
out without pressing the button.
2. Separate the two halves of the transmitter using a flat tool
inserted into the area near the
key slot.
3. Remove the battery by pushingon the battery and sliding it
toward the bottom of the
transmitter.
4. Insert the new battery, positive side facing the back cover.
Push the battery down until it is
held in place. Replace with a
CR2032 or equivalent battery.
5. Snap the battery cover back on to the transmitter.
6. Reinsert the key.
Page 32 of 382
Chevrolet Traverse Owner Manual (GMNA-Localizing-U.S./Canada/Mexico-
13527526) - 2020 - CRC - 9/5/19
Keys, Doors, and Windows 31
be undamaged, try another
transmitter. Or, you may try placing
the transmitter in the transmitter
pocket in the center console. See
Remote Keyless Entry (RKE)
System Operation08.
If the ignition mode will not change
with the other transmitter, or with the
transmitter in the transmitter pocket,
your vehicle needs service. If the
ignition does change modes, the
first transmitter may be faulty. See
your dealer who can service the
theft-deterrent system and have a
new RKE transmitter programmed to
the vehicle.
It is possible for the immobilizer
system to learn new or replacement
RKE transmitters. Up to eight
transmitters can be programmed to
the vehicle. To program additional
transmitters, see “Programming
Transmitters to the Vehicle” under
Remote Keyless Entry (RKE)
System Operation 08.
Do not leave the key or device that
disarms or deactivates the
theft-deterrent system in the vehicle.Exterior Mirrors
Convex Mirrors
{Warning
A convex mirror can make things,
like other vehicles, look farther
away than they really are. If you
cut too sharply into the right lane,
you could hit a vehicle on the
right. Check the inside mirror or
glance over your shoulder before
changing lanes.
The passenger side mirror is convex
shaped. A convex mirror's surface is
curved so more can be seen from
the driver seat.
Power Mirrors
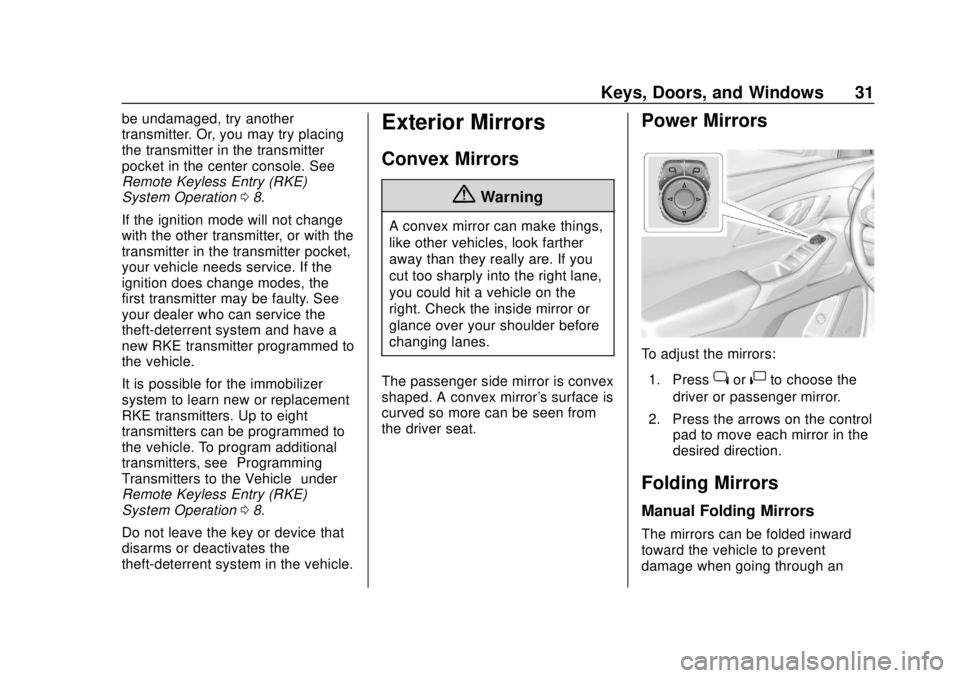
To adjust the mirrors: 1. Press
jor|to choose the
driver or passenger mirror.
2. Press the arrows on the control pad to move each mirror in the
desired direction.
Folding Mirrors
Manual Folding Mirrors
The mirrors can be folded inward
toward the vehicle to prevent
damage when going through an
Page 33 of 382
Chevrolet Traverse Owner Manual (GMNA-Localizing-U.S./Canada/Mexico-
13527526) - 2020 - CRC - 9/5/19
32 Keys, Doors, and Windows
automatic car wash. Push the mirror
outward to return it to the original
position.
Memory Mirrors
The vehicle may have memory
mirrors. SeeMemory Seats 045.
Lane Change Alert (LCA)
The vehicle may have LCA. See
Lane Change Alert (LCA) 0225.
Side Blind Zone Alert
The vehicle may have Side Blind
Zone Alert. See Side Blind Zone
Alert (SBZA) 0225.
Heated Mirrors
If equipped, the heated outside
mirrors turn on when the rear
window defogger is on and help to
clear fog or frost from the surface of
the mirrors.
K:This button is on the climate
control panel.
See “Rear Window Defogger” under
Dual Automatic Climate Control
System 0157.
Automatic Dimming
Mirror
The vehicle has an automatic
dimming outside mirror on the driver
side. The mirror will adjust for the
glare of headlamps behind you.
Reverse Tilt Mirrors
If equipped with memory seats, the
passenger and/or driver mirror tilts
to a preselected position when the
vehicle is in R (Reverse). This
allows the curb to be seen when
parallel parking.
The mirror(s) return to the original
position when:
.
The vehicle is shifted out of
R (Reverse), or remains in
R (Reverse) for about
30 seconds.
. The ignition is turned off.
. The vehicle is driven in
R (Reverse) above a set speed.
To turn this feature on or off, see
Vehicle Personalization 0138.
Interior Mirrors
Interior Rearview Mirrors
Adjust the rearview mirror for a clear
view of the area behind your
vehicle.
Do not spray glass cleaner directly
on the mirror. Use a soft towel
dampened with water.
Manual Rearview Mirror
If equipped, push the tab forward for
daytime use and pull it rearward for
nighttime use to avoid glare of the
headlamps from behind.
Automatic Dimming
Rearview Mirror
If equipped, automatic dimming
reduces the glare of headlamps
from behind. The dimming feature
comes on when the vehicle is
started.
Page 51 of 382
Chevrolet Traverse Owner Manual (GMNA-Localizing-U.S./Canada/Mexico-
13527526) - 2020 - CRC - 9/5/19
50 Seats and Restraints
the vehicle through the rear door
and left the vehicle without the
vehicle being shut off.
The feature can be turned on or off.
SeeVehicle Personalization 0138.
Rear Seat Adjustment
The second row seats slide forward
for more room.
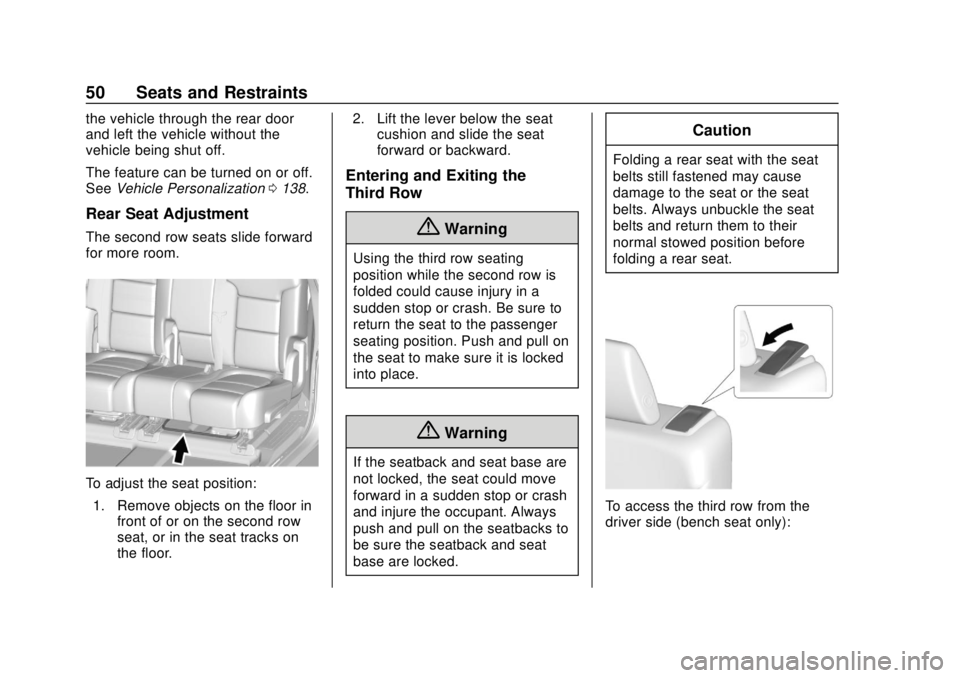
To adjust the seat position:
1. Remove objects on the floor in front of or on the second row
seat, or in the seat tracks on
the floor. 2. Lift the lever below the seat
cushion and slide the seat
forward or backward.
Entering and Exiting the
Third Row
{Warning
Using the third row seating
position while the second row is
folded could cause injury in a
sudden stop or crash. Be sure to
return the seat to the passenger
seating position. Push and pull on
the seat to make sure it is locked
into place.
{Warning
If the seatback and seat base are
not locked, the seat could move
forward in a sudden stop or crash
and injure the occupant. Always
push and pull on the seatbacks to
be sure the seatback and seat
base are locked.
Caution
Folding a rear seat with the seat
belts still fastened may cause
damage to the seat or the seat
belts. Always unbuckle the seat
belts and return them to their
normal stowed position before
folding a rear seat.
To access the third row from the
driver side (bench seat only):
Page 52 of 382
Chevrolet Traverse Owner Manual (GMNA-Localizing-U.S./Canada/Mexico-
13527526) - 2020 - CRC - 9/5/19
Seats and Restraints 51
1. Remove objects on the floor infront of or on the second row
seat, or in the seat tracks on
the floor.
2. Make sure that the seat belt is unfastened and in the stowed
position.
3. Pull the handle on top of the seat forward and pull the seat
forward.
To access the third row from the
passenger side:
The second row passenger side
seat can be easily moved for third
row entry or exit with a
forward-facing child restraint
installed using the LATCH system.
Remove a rear-facing child restraint
before moving the seat for third row
entry or exit.{Warning
Remove the child from the child
restraint before moving the seat
forward for third row entry or exit.
Failure to do so may result in
injury to the child.
1. Remove objects on the floor in front of the second row seat,
or in the seat tracks on the
floor.
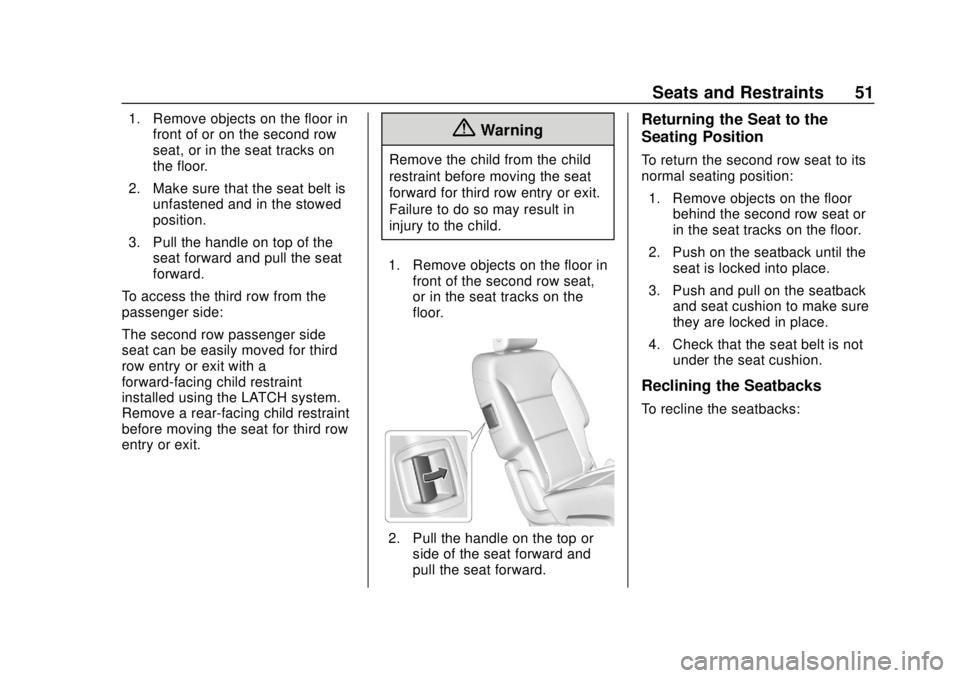
2. Pull the handle on the top or
side of the seat forward and
pull the seat forward.
Returning the Seat to the
Seating Position
To return the second row seat to its
normal seating position:
1. Remove objects on the floor behind the second row seat or
in the seat tracks on the floor.
2. Push on the seatback until the seat is locked into place.
3. Push and pull on the seatback and seat cushion to make sure
they are locked in place.
4. Check that the seat belt is not under the seat cushion.
Reclining the Seatbacks
To recline the seatbacks:
Page 54 of 382
Chevrolet Traverse Owner Manual (GMNA-Localizing-U.S./Canada/Mexico-
13527526) - 2020 - CRC - 9/5/19
Seats and Restraints 53
With the engine running, pressMor
Lto heat the left or right outboard
seat cushion. An indicator on the
climate control display appears
when this feature is on.
This feature turns on at the highest
setting. With each press of the
button, the heated seat changes to
the next lower setting, and then the
off setting. Three lights indicate the
highest setting, and one light
indicates the lowest. If the heated
seats are on high, the level may
automatically be lowered after
approximately 30 minutes.
Third Row Seats
{Warning
Using the third row seating
position while the second row is
folded, or pushed forward in the
entry position, could cause injury
in a sudden stop or crash. Be
sure to return the seat to the
(Continued)
Warning (Continued)
passenger seating position. Push
and pull on the seat to make sure
it is locked into place.
Folding the Seatback
Caution
Folding a rear seat with the seat
belts still fastened may cause
damage to the seat or the seat
belts. Always unbuckle the seat
belts and return them to their
normal stowed position before
folding a rear seat.
To fold the third row seatback: 1. Remove objects on the floor in front of or on the second row
seat, or in the seat tracks on
the floor.
2. If the second row seat is in the full rear position, adjust it
forward to allow the third row
seat to fold fully flat. 3. Remove anything on or under
the seat.
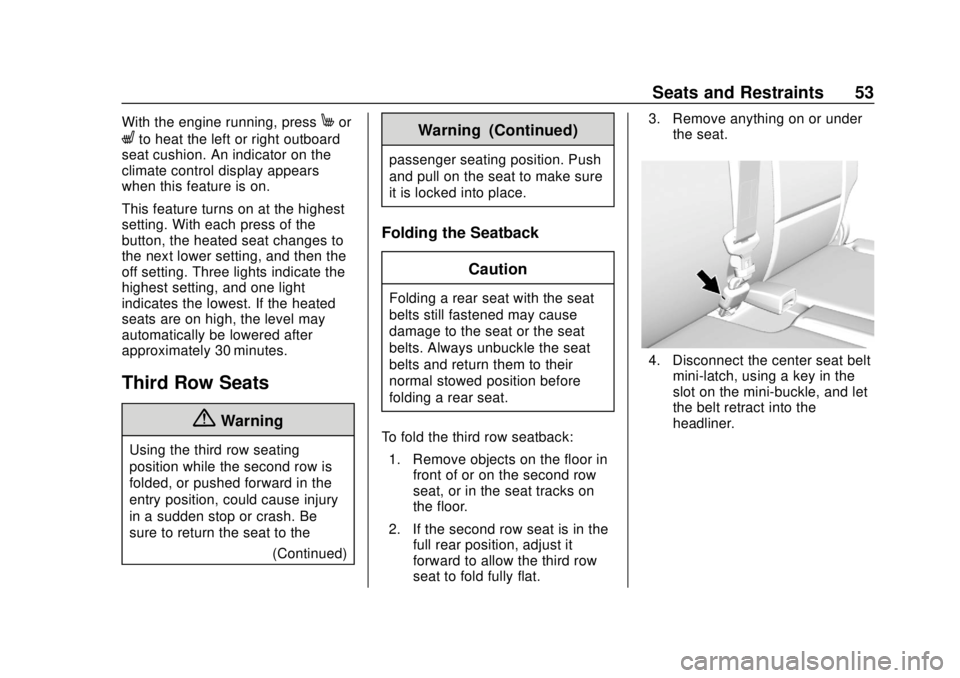
4. Disconnect the center seat beltmini-latch, using a key in the
slot on the mini-buckle, and let
the belt retract into the
headliner.
Page 55 of 382
Chevrolet Traverse Owner Manual (GMNA-Localizing-U.S./Canada/Mexico-
13527526) - 2020 - CRC - 9/5/19
54 Seats and Restraints
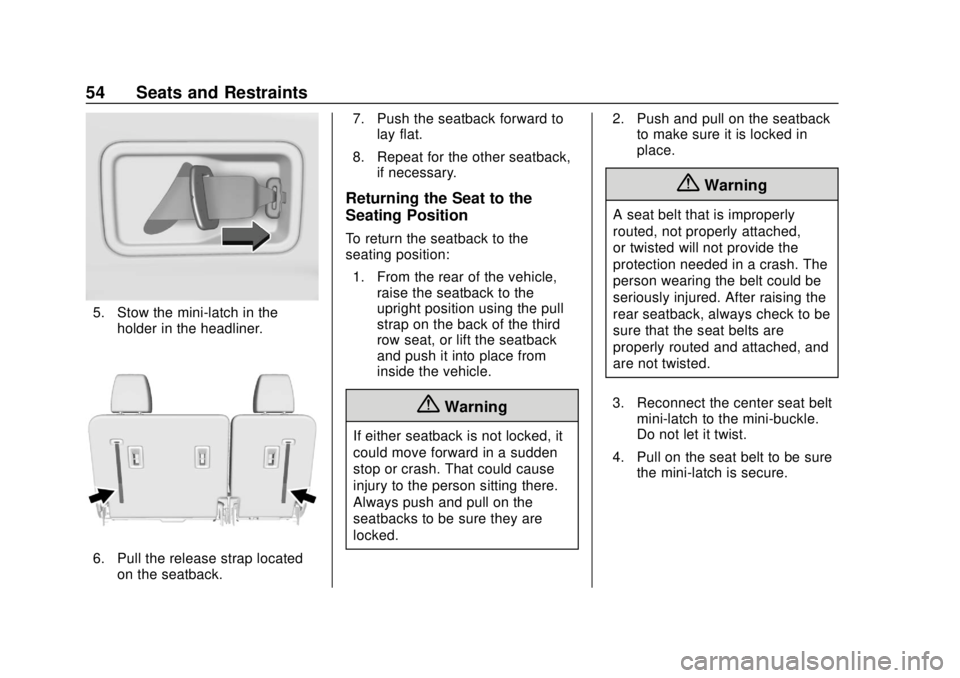
5. Stow the mini-latch in theholder in the headliner.
6. Pull the release strap locatedon the seatback. 7. Push the seatback forward to
lay flat.
8. Repeat for the other seatback, if necessary.
Returning the Seat to the
Seating Position
To return the seatback to the
seating position:
1. From the rear of the vehicle, raise the seatback to the
upright position using the pull
strap on the back of the third
row seat, or lift the seatback
and push it into place from
inside the vehicle.
{Warning
If either seatback is not locked, it
could move forward in a sudden
stop or crash. That could cause
injury to the person sitting there.
Always push and pull on the
seatbacks to be sure they are
locked. 2. Push and pull on the seatback
to make sure it is locked in
place.
{Warning
A seat belt that is improperly
routed, not properly attached,
or twisted will not provide the
protection needed in a crash. The
person wearing the belt could be
seriously injured. After raising the
rear seatback, always check to be
sure that the seat belts are
properly routed and attached, and
are not twisted.
3. Reconnect the center seat belt mini-latch to the mini-buckle.
Do not let it twist.
4. Pull on the seat belt to be sure the mini-latch is secure.
Page 60 of 382

Chevrolet Traverse Owner Manual (GMNA-Localizing-U.S./Canada/Mexico-
13527526) - 2020 - CRC - 9/5/19
Seats and Restraints 59
Lap-Shoulder Belt
All seating positions in the vehicle
have a lap-shoulder belt.
If you are using a rear seating
position with a detachable seat belt
and the seat belt is not attached,
seeThird Row Seats 053 for
instructions on reconnecting the
seat belt to the mini-buckle.
The following instructions explain
how to wear a lap-shoulder belt
properly.
1. Adjust the seat, if the seat is adjustable, so you can sit up
straight. To see how, see
“Seats” in the Index.
2. Pick up the latch plate and pull
the belt across you. Do not let
it get twisted.
The lap-shoulder belt may lock
if you pull the belt across you
very quickly. If this happens, let
the belt go back slightly to
unlock it. Then pull the belt
across you more slowly.
If the shoulder portion of a
passenger belt is pulled out all
the way, the child restraint
locking feature may be
engaged. See Child Restraint
Systems 081. If this occurs, let
the belt go back all the way
and start again. If the locking feature stays engaged after
letting the belt go back to
stowed position on the seat,
move the seat rearward or
recline the seat until the
shoulder belt retractor lock
releases.
Engaging the child restraint
locking feature in the front
outboard seating position may
affect the passenger sensing
system. See
Passenger
Sensing System 071.
Page 61 of 382

Chevrolet Traverse Owner Manual (GMNA-Localizing-U.S./Canada/Mexico-
13527526) - 2020 - CRC - 9/5/19
60 Seats and Restraints
If the webbing locks in the latch
plate before it reaches the
buckle, tilt the latch plate flat to
unlock.
3. Push the latch plate into thebuckle until it clicks.
Pull up on the latch plate to
make sure it is secure. If the
belt is not long enough, see
Seat Belt Extender 063.
Position the release button on
the buckle so that the seat belt
could be quickly unbuckled if
necessary.
4. To make the lap part tight, pull up on the shoulder belt.
To unlatch the belt, push the button
on the buckle. The belt should
return to its stowed position.
Always stow the seat belt slowly.
If the seat belt webbing returns
quickly to the stowed position, the
retractor may lock and cannot be
pulled out. If this happens, pull the
seat belt straight out firmly to unlock
the webbing, and then release it.
If the webbing is still locked in the
retractor, see your dealer.
Before a door is closed, be sure the
seat belt is out of the way. If a door
is slammed against a seat belt,
damage can occur to both the seat
belt and the vehicle.
Seat Belt Pretensioners
This vehicle has seat belt
pretensioners for the front outboard
occupants. Although the seat belt
pretensioners cannot be seen, they
are part of the seat belt assembly.
They can help tighten the seat belts
during the early stages of a
moderate to severe frontal, near
frontal, or rear crash if the threshold
conditions for pretensioner
Page 71 of 382
Chevrolet Traverse Owner Manual (GMNA-Localizing-U.S./Canada/Mexico-
13527526) - 2020 - CRC - 9/5/19
70 Seats and Restraints
Airbags supplement the protection
provided by seat belts by
distributing the force of the impact
more evenly over the
occupant's body.
Rollover capable roof-rail airbags
are designed to help contain the
head and chest of occupants in the
outboard seating positions in the
first, second, and third rows. The
rollover capable roof-rail airbags are
designed to help reduce the risk of
full or partial ejection in rollover
events, although no system can
prevent all such ejections.
But airbags would not help in many
types of collisions, primarily
because the occupant's motion is
not toward those airbags. SeeWhen
Should an Airbag Inflate? 068.
Airbags should never be regarded
as anything more than a supplement
to seat belts.What Will You See after
an Airbag Inflates?
After frontal and seat-mounted side
impact airbags inflate, they quickly
deflate, so quickly that some people
may not even realize the airbags
inflated. The front center airbag and
roof-rail airbags may still be at least
partially inflated for some time after
they inflate. Some components of
the airbag module may be hot for
several minutes. For location of the
airbags, see Where Are the
Airbags? 067.
The parts of the airbag that come
into contact with you may be warm,
but not too hot to touch. There may
be some smoke and dust coming
from the vents in the deflated
airbags. Airbag inflation does not
prevent the driver from seeing out of
the windshield or being able to steer
the vehicle, nor does it prevent
people from leaving the vehicle.
{Warning
When an airbag inflates, there
may be dust in the air. This dust
could cause breathing problems
for people with a history of
asthma or other breathing trouble.
To avoid this, everyone in the
vehicle should get out as soon as
it is safe to do so. If you have
breathing problems but cannot
get out of the vehicle after an
airbag inflates, then get fresh air
by opening a window or a door.
If you experience breathing
problems following an airbag
deployment, you should seek
medical attention.
The vehicle has a feature that may
automatically unlock the doors, turn
on the interior lamps and hazard
warning flashers, and shut off the
fuel system after the airbags inflate.
The feature may also activate,
without airbag inflation, after an
event that exceeds a predetermined
threshold. After turning the ignition