air condition CHEVROLET TRAVERSE 2023 User Guide
[x] Cancel search | Manufacturer: CHEVROLET, Model Year: 2023, Model line: TRAVERSE, Model: CHEVROLET TRAVERSE 2023Pages: 369, PDF Size: 16.89 MB
Page 145 of 369
Chevrolet Traverse Owner Manual (GMNA-Localizing-U.S./Canada/Mexico-
16411537) - 2023 - CRC - 3/28/22
144 Infotainment System
Volume and song selection may be
controlled by using the infotainment
controls or the mobile device. If Bluetooth is
selected and no volume is present, check the
volume setting on the infotainment system.
Music can be launched by touching
Bluetooth from the recent sources list on
the left of the display or by touching the
More option and then touching the
Bluetooth device.
To play music via Bluetooth:1. Power on the device, and pair to connect the device.
2. Once paired, touch Audio from the Home Page, then touch Bluetooth from the
recent sources list on the left of the
display.
Bluetooth Sound Menu
See “Infotainment System Sound Menu”
under AM-FM Radio 0138.
Manage Bluetooth Devices
From the Home Page: 1. Touch Audio.
2. Touch Devices to add or delete devices. When touching Bluetooth, the radio may
not be able to launch the audio player on
the connected device to start playing. When
the vehicle is not moving, use the mobile
device to begin playback.
All devices launch audio differently. When
selecting Bluetooth as a source, the radio
may show as paused on the display. Press
play on the device or touch
pon the
vehicle display to begin playback.
Browse functionality will be provided where
supported by the Bluetooth device. This
media content will not be part of the
MyMedia source mode.
Some smartphones support sending
Bluetooth music information to display on
the radio. When the radio receives this
information, it will check to see if any is
available and display it. For more
information about supported Bluetooth
features, visit your brand website. See
Online Account 0340 for details.
See Radio Frequency Statement 0346.
Navigation
Using the Navigation System
If equipped, launch the Nav application by
touching the Nav icon on the Home Page or
on the shortcut tray near the bottom of the
infotainment display.
When the Nav application is launched for
the first time, a product walkthrough is
available. Use of the feature requires the
Terms and Conditions and the Privacy
statement to be confirmed. If available and
signed into a profile, it is also suggested to
enable and confirm Predictive Navigation.
Predictive Navigation (If Equipped)
If Predictive Navigation is available and
confirmed, this feature learns preferences by
remembering where the vehicle has been.
It uses the locations and navigation history
to personalize routes and results.
Predictive Navigation may learn elements
such as:
.Personalized routes based on preferred
streets.
.Search results that provide best matches
at the top of the list.
.Predictive traffic.
Page 148 of 369
Chevrolet Traverse Owner Manual (GMNA-Localizing-U.S./Canada/Mexico-
16411537) - 2023 - CRC - 3/28/22
Infotainment System 147
.Auto Reroute to Better Route–The
system will automatically reroute if the
system detects there is a traffic issue
ahead.
.Ask Before Rerouting (Default) –If the
system detects there is a traffic issue
ahead, it will display a pop-up with
details about the issue. Choose to reroute
or cancel the alert.
.Never Search for Better Route –The
system will not check for a better route
until one of the above options is selected.
Alert Preferences
Set alerts on or off during both inactive and
active guidance views. The following alerts
may be available:
.Road Safety Alerts –Touch to display
upcoming School Zones.
.Traffic Camera Alerts
Manage History
Touch Manage History to access the History
options:
.Clear Recent Destinations –Touch\to
clear the recent destinations.
.Clear Search History –Touch\to clear
the search history. About
Touch to display software information,
such as:
.Telenav Terms and Conditions
.Telenav Privacy Statement
.Navigation Version
Maps
The Navigation application requires a map
database to run. It is stored on an SD card
that is connected to the infotainment
system. If the map database is not available,
a missing SD card error message will be
displayed.
SD Card Error Messages
The SD card only works for one unique
vehicle. The SD card must pass
authentication verification to be used for
that specific vehicle. If the SD card has a
switch that can be set to read-only mode,
ensure that it is in the upward position and
not in read-only.
Potential error scenarios and messages
include:
.The SD card has initialized for the first
time:
“Once initialized, this SD card can
only be used for navigation in this
vehicle.”
.The SD card is not working properly: “SD
card is not functioning properly.
(Error Code).”
See your dealer if this message appears.
.The SD card is not paired with the
existing system: “This SD card is not valid
in this vehicle for navigation. See Owner’s
Manual for more detail or visit your
dealer. (Error Code).”
.The SD card has been removed from the
slot: “SD card has been removed.
(Error Code).”
Make sure the SD card is in the slot. If it
was removed and inserted and you still
receive an error code, see your dealer.
Touch Confirm to resume after the
initialization error message. For the other
messages, touch OK to return to the
Home Page.
Navigation Symbols
Following are the most common symbols
that may appear in the Nav application.
Page 155 of 369

Chevrolet Traverse Owner Manual (GMNA-Localizing-U.S./Canada/Mexico-
16411537) - 2023 - CRC - 3/28/22
154 Infotainment System
Navigation capabilities. The system will
show an alert when the subscription is
expiring and will ask to renew the plan.
Global Positioning System (GPS)
If equipped, the position of the vehicle is
determined by using satellite signals, various
vehicle signals, and map data.
At times, other interference such as the
satellite condition, road configuration,
condition of the vehicle, and/or other
circumstances can affect the navigation
system's ability to determine the accurate
position of the vehicle.
The GPS shows the current position of the
vehicle using signals sent by GPS satellites.
When the vehicle is not receiving signals
from the satellites, a symbol appears in the
status bar.
This system might not be available or
interference can occur if any of the
following are true:
.Signals are obstructed by tall buildings,
trees, large trucks, or a tunnel.
.Satellites are being repaired or improved.For more information if the GPS is not
functioning properly, see
Problems with
Route Guidance 0154 and
If the System Needs Service 0155.
Vehicle Positioning
At times, the position of the vehicle on the
map could be inaccurate due to one or more
of the following reasons:
.The road system has changed.
.The vehicle is driving on slippery road
surfaces such as sand, gravel, or snow.
.The vehicle is traveling on winding roads
or long, straight roads.
.The vehicle is approaching a tall building
or a large vehicle.
.The surface streets run parallel to a
freeway.
.The vehicle has been transferred by a
vehicle carrier or a ferry.
.The current position calibration is set
incorrectly.
.The vehicle is traveling at high speed.
.The vehicle changes directions more than
once, or the vehicle is turning on a turn
table in a parking lot.
.The vehicle is entering and/or exiting a
parking lot, garage, or a lot with a roof.
.The GPS signal is not received.
.A roof carrier is installed on the vehicle.
.Tire chains are installed on the vehicle.
.The tires are replaced or worn.
.The tire pressure for the tires is incorrect.
.This is the first navigation use after the
map data is updated.
.The 12-volt battery has been disconnected
for several days.
.The vehicle is driving in heavy traffic
where driving is at low speeds, and the
vehicle is stopped and started repeatedly.
Problems with Route Guidance
Inappropriate route guidance can occur
under one or more of the following
conditions:
.The turn was not made on the road
indicated.
.Route guidance might not be available
when using automatic rerouting for the
next right or left turn.
.The route might not be changed when
using automatic rerouting.
.There is no route guidance when turning
at an intersection.
.Plural names of places might be
announced occasionally.
Page 166 of 369
Chevrolet Traverse Owner Manual (GMNA-Localizing-U.S./Canada/Mexico-
16411537) - 2023 - CRC - 3/28/22
Infotainment System 165
2. Initiate the second call by selecting fromRecents, Contacts, or Keypad.
3. When the second call is active, touch the merge icon to conference the three-way
call together.
Ending a Call
.Pression the steering wheel controls.
.Touch#on the infotainment display,
next to a call, to end only that call.
Dual Tone Multi-Frequency (DTMF) Tones
The in-vehicle Bluetooth system can send
numbers during a call. This is used when
calling a menu-driven phone system. Use the
Keypad to enter the number.
Apple CarPlay and Android Auto
If equipped, Android Auto and/or Apple
CarPlay capability may be available through
a compatible smartphone. If available, the
Android Auto and Apple CarPlay icons will
change from gray to color on the Home
Page of the infotainment display.
To use Android Auto and/or Apple CarPlay: For Wired Phone Projection
1. Download the Android Auto app to your smartphone from the Google Play store.
There is no app required for Apple
CarPlay.
2. Connect your Android phone or Apple iPhone by using the factory-provided
phone USB cable and plugging into a
USB data port. For best performance, it is
highly recommended to use the device’s
factory-provided USB cable, which should
be replaced after significant wear to
maintain connection quality. Aftermarket
or third-party cables may not work.
3. When the phone is first connected to activate Apple CarPlay or Android Auto,
accept the terms and conditions on both
the infotainment system and the phone.
4. Follow the instructions on the phone.
The Android Auto and Apple CarPlay icons
on the Home Page will illuminate depending
on the smartphone. Android Auto and/or
Apple CarPlay may automatically launch
upon USB connection. If not, touch the
Android Auto or Apple CarPlay icon on the
Home Page to launch.
Press
{on the center stack to return to the
Home Page. For Wireless Phone Projection
If equipped, verify your phone is wireless
compatible by visiting the Google Android
Auto or Apple CarPlay support page.
1. Download the Android Auto app to your smartphone from the Google Play store.
There is no app required for Apple
CarPlay.
2. For first time connection, there are two ways to set up wireless projection:
.Connect your Android phone or Apple
iPhone by using the factory-provided
phone USB cable and plugging into a
USB data port. For best performance,
it is highly recommended to use the
device’s factory-provided USB cable,
which should be replaced after
significant wear to maintain
connection quality. Aftermarket or
third-party cables may not work.
.Connecting the phone over Bluetooth.
See Bluetooth (Pairing and Using a
Phone) 0161 or
Bluetooth (Overview) 0160.
3. Make sure wireless is turned on the phone for wireless projection to work.
Page 181 of 369
Chevrolet Traverse Owner Manual (GMNA-Localizing-U.S./Canada/Mexico-
16411537) - 2023 - CRC - 3/28/22
180 Climate Controls
Climate Controls
Climate Control Systems
Dual Automatic Climate ControlSystem . . . . . . . . . . . . . . . . . . . . . . . . . . . . . . 180
Rear Climate Control System . . . . . . . . . . 184
Air Vents
Air Vents . . . . . . . . . . . . . . . . . . . . . . . . . . . . . . 185
Maintenance
Passenger Compartment Air Filter . . . . . 185
Service . . . . . . . . . . . . . . . . . . . . . . . . . . . . . . . . . 185
Climate Control Systems
Dual Automatic Climate Control System
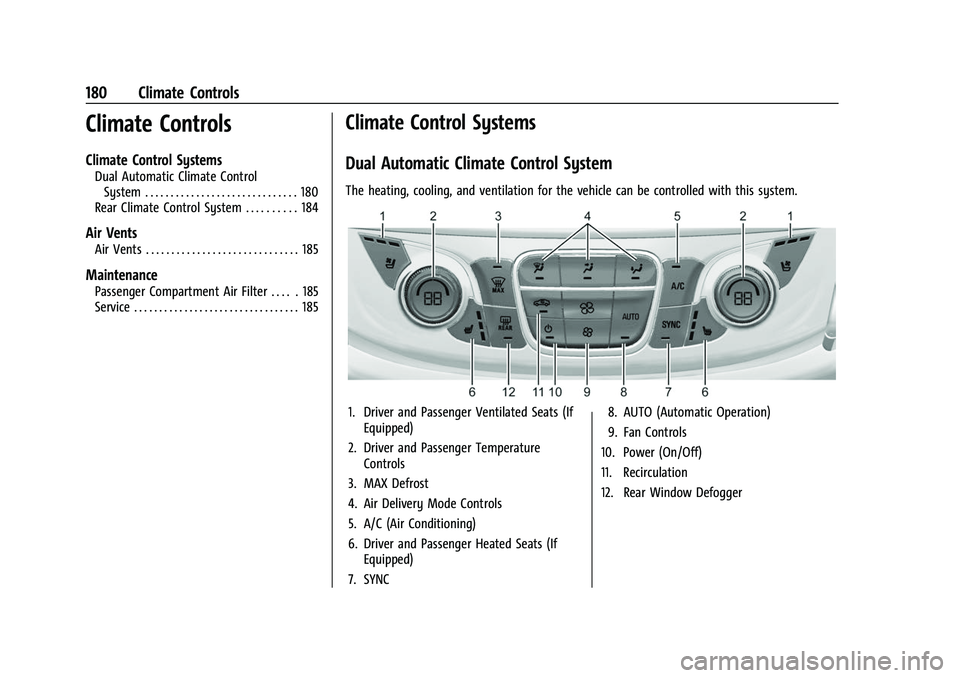
The heating, cooling, and ventilation for the vehicle can be controlled with this system.
1. Driver and Passenger Ventilated Seats (If Equipped)
2. Driver and Passenger Temperature Controls
3. MAX Defrost
4. Air Delivery Mode Controls
5. A/C (Air Conditioning)
6. Driver and Passenger Heated Seats (If Equipped)
7. SYNC 8. AUTO (Automatic Operation)
9. Fan Controls
10. Power (On/Off)
11. Recirculation
12. Rear Window Defogger
Page 182 of 369
Chevrolet Traverse Owner Manual (GMNA-Localizing-U.S./Canada/Mexico-
16411537) - 2023 - CRC - 3/28/22
Climate Controls 181
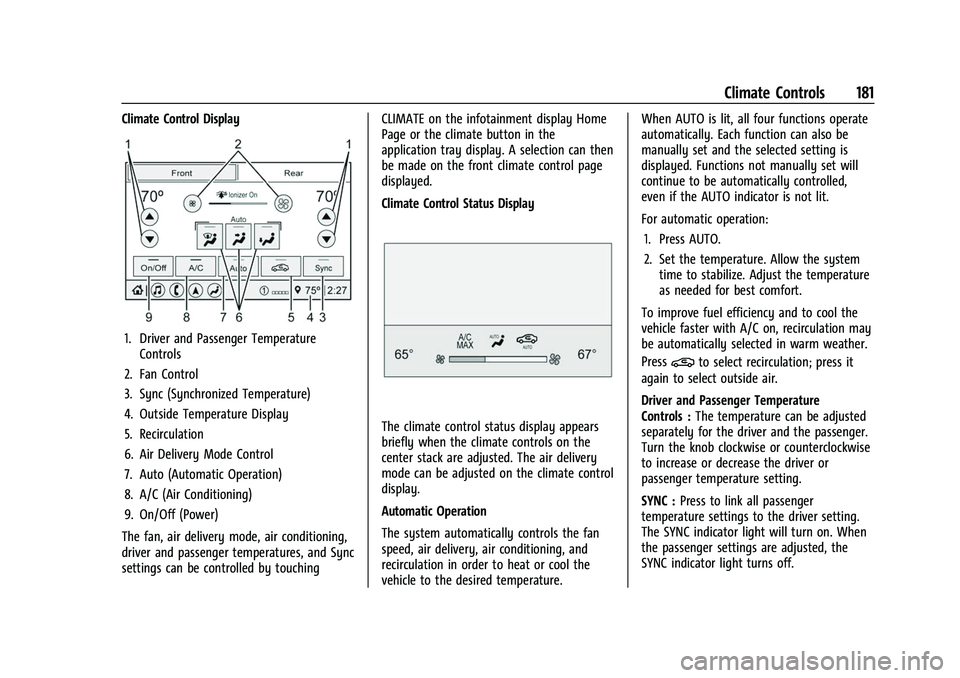
Climate Control Display
1. Driver and Passenger TemperatureControls
2. Fan Control
3. Sync (Synchronized Temperature)
4. Outside Temperature Display
5. Recirculation
6. Air Delivery Mode Control
7. Auto (Automatic Operation)
8. A/C (Air Conditioning)
9. On/Off (Power)
The fan, air delivery mode, air conditioning,
driver and passenger temperatures, and Sync
settings can be controlled by touching CLIMATE on the infotainment display Home
Page or the climate button in the
application tray display. A selection can then
be made on the front climate control page
displayed.
Climate Control Status Display
The climate control status display appears
briefly when the climate controls on the
center stack are adjusted. The air delivery
mode can be adjusted on the climate control
display.
Automatic Operation
The system automatically controls the fan
speed, air delivery, air conditioning, and
recirculation in order to heat or cool the
vehicle to the desired temperature.When AUTO is lit, all four functions operate
automatically. Each function can also be
manually set and the selected setting is
displayed. Functions not manually set will
continue to be automatically controlled,
even if the AUTO indicator is not lit.
For automatic operation:
1. Press AUTO.
2. Set the temperature. Allow the system time to stabilize. Adjust the temperature
as needed for best comfort.
To improve fuel efficiency and to cool the
vehicle faster with A/C on, recirculation may
be automatically selected in warm weather.
Press
@to select recirculation; press it
again to select outside air.
Driver and Passenger Temperature
Controls : The temperature can be adjusted
separately for the driver and the passenger.
Turn the knob clockwise or counterclockwise
to increase or decrease the driver or
passenger temperature setting.
SYNC : Press to link all passenger
temperature settings to the driver setting.
The SYNC indicator light will turn on. When
the passenger settings are adjusted, the
SYNC indicator light turns off.
Page 183 of 369
Chevrolet Traverse Owner Manual (GMNA-Localizing-U.S./Canada/Mexico-
16411537) - 2023 - CRC - 3/28/22
182 Climate Controls
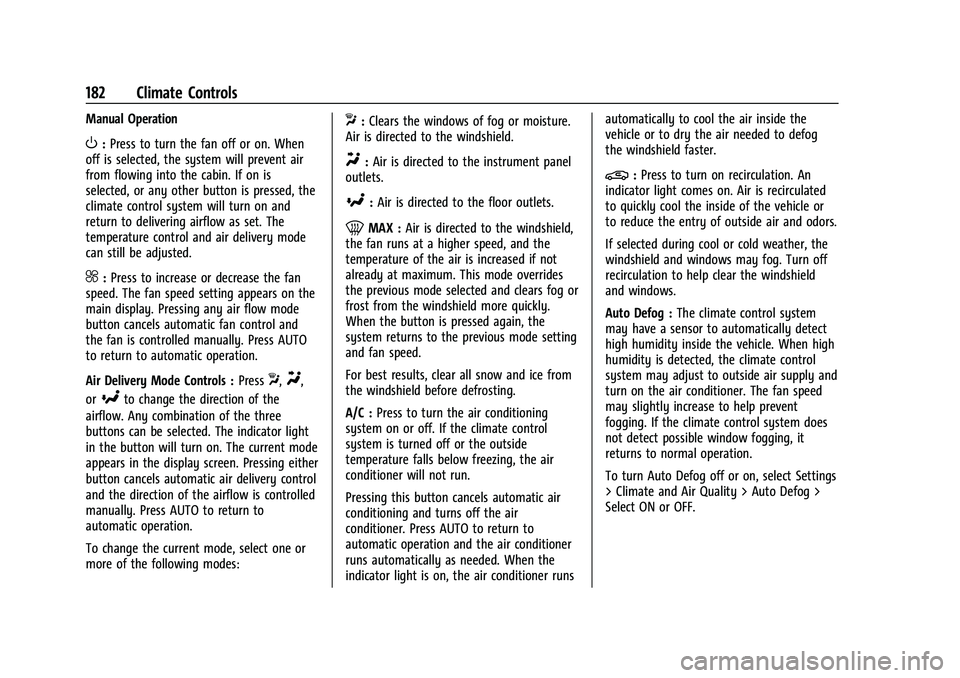
Manual Operation
O:Press to turn the fan off or on. When
off is selected, the system will prevent air
from flowing into the cabin. If on is
selected, or any other button is pressed, the
climate control system will turn on and
return to delivering airflow as set. The
temperature control and air delivery mode
can still be adjusted.
^: Press to increase or decrease the fan
speed. The fan speed setting appears on the
main display. Pressing any air flow mode
button cancels automatic fan control and
the fan is controlled manually. Press AUTO
to return to automatic operation.
Air Delivery Mode Controls : Press
X,Y,
or
[to change the direction of the
airflow. Any combination of the three
buttons can be selected. The indicator light
in the button will turn on. The current mode
appears in the display screen. Pressing either
button cancels automatic air delivery control
and the direction of the airflow is controlled
manually. Press AUTO to return to
automatic operation.
To change the current mode, select one or
more of the following modes:
X: Clears the windows of fog or moisture.
Air is directed to the windshield.
Y: Air is directed to the instrument panel
outlets.
[: Air is directed to the floor outlets.
0MAX : Air is directed to the windshield,
the fan runs at a higher speed, and the
temperature of the air is increased if not
already at maximum. This mode overrides
the previous mode selected and clears fog or
frost from the windshield more quickly.
When the button is pressed again, the
system returns to the previous mode setting
and fan speed.
For best results, clear all snow and ice from
the windshield before defrosting.
A/C : Press to turn the air conditioning
system on or off. If the climate control
system is turned off or the outside
temperature falls below freezing, the air
conditioner will not run.
Pressing this button cancels automatic air
conditioning and turns off the air
conditioner. Press AUTO to return to
automatic operation and the air conditioner
runs automatically as needed. When the
indicator light is on, the air conditioner runs automatically to cool the air inside the
vehicle or to dry the air needed to defog
the windshield faster.
@:
Press to turn on recirculation. An
indicator light comes on. Air is recirculated
to quickly cool the inside of the vehicle or
to reduce the entry of outside air and odors.
If selected during cool or cold weather, the
windshield and windows may fog. Turn off
recirculation to help clear the windshield
and windows.
Auto Defog : The climate control system
may have a sensor to automatically detect
high humidity inside the vehicle. When high
humidity is detected, the climate control
system may adjust to outside air supply and
turn on the air conditioner. The fan speed
may slightly increase to help prevent
fogging. If the climate control system does
not detect possible window fogging, it
returns to normal operation.
To turn Auto Defog off or on, select Settings
> Climate and Air Quality > Auto Defog >
Select ON or OFF.
Page 184 of 369
Chevrolet Traverse Owner Manual (GMNA-Localizing-U.S./Canada/Mexico-
16411537) - 2023 - CRC - 3/28/22
Climate Controls 183
Rear Window Defogger
K:Press to turn the rear window defogger
on or off. An indicator light on the button
comes on to show that the rear window
defogger is on. The rear window defogger
only works when the vehicle is on. The
defogger turns off when the vehicle is off or
in accessory mode.
To turn Auto Defog off or on, select Settings
> Climate and Air Quality > Auto Rear Defog
> Select ON or OFF. When Auto Rear Defog
is selected, the rear window defogger turns
on automatically when the interior
temperature is cold and the outside
temperature is about 7 °C (44 °F) and below.
The auto rear defogger turns off
automatically.
If the vehicle is equipped with heated
outside mirrors, they turn on when the rear
window defogger button is on and help to
clear fog or frost from the surface of the
mirror. See Heated Mirrors 028.
Caution
Do not try to clear frost or other material
from the inside of the front windshield
and rear window with a razor blade or
(Continued)
Caution (Continued)
anything else that is sharp. This may
damage the rear window defogger grid
and affect the radio's ability to pick up
stations clearly. The repairs would not be
covered by the vehicle warranty.
LorM:If equipped, pressLorMto
heat the driver or passenger seat. See
Heated and Ventilated Front Seats 042.
{orC:If equipped, press{orCto
ventilate the driver or passenger seat. See
Heated and Ventilated Front Seats 042.
Remote Start Climate Control Operation :
If equipped with remote start, the climate
control system may run when the vehicle is
started remotely. The system will use the
defrost setting if it is cold outside or turn
on using the coldest settings if it is hot
outside. The rear defog may come on during
remote start based on cold ambient
conditions. The rear defog indicator light
does not come on during a remote start.
If equipped, the heated seats will turn on if
it is cold outside or the ventilated seats will
turn on if it is hot outside. The heated and
ventilated seat indicator lights may not
come on during a remote start. If equipped, the heated steering wheel will come on in a
remote start if it is cold outside. The heated
steering wheel indicator light may not come
on. See
Remote Vehicle Start 014 and
Heated and Ventilated Front Seats 042.
Sensor
The solar sensor, on top of the instrument
panel near the windshield, monitors the
solar heat.
The climate control system uses the sensor
information to adjust the temperature, fan
speed, recirculation, and air delivery mode
for best comfort.
Do not cover the sensor; otherwise the
automatic climate control system may not
work properly.
Afterblow Feature
If equipped, under certain conditions, the
fan may stay on or may turn on and off
several times after you turn off and lock the
vehicle. This is normal.
Page 186 of 369
Chevrolet Traverse Owner Manual (GMNA-Localizing-U.S./Canada/Mexico-
16411537) - 2023 - CRC - 3/28/22
Climate Controls 185
TEMP :Turn the knob clockwise or
counterclockwise or press and hold the rear
climate display temperature controls to
adjust the rear passenger temperature. If
SYNC is lit, the rear climate temperature is
linked to the driver temperature setting.
2/\/Yor MODE : Touch the desired
mode on the rear climate display or press
MODE on the rear climate controls to
change the direction of the airflow in the
rear seating area. Repeatedly press MODE
until the desired mode appears on the
display.
MorL: If equipped, pressMorLto
heat the left or right rear outboard seat. See
Heated Rear Seats 046.
Air Vents
Use the slider switch on the air outlets to
change the direction of the airflow, or to
open and close off the airflow.
There are also outlets overhead in the rear
passenger area; adjust as needed.
Keep all outlets open whenever possible for
best system performance.
Operation Tips
.Clear away any ice, snow, or leaves from
the air inlets at the base of the
windshield that can block the flow of air
into the vehicle.
.Clear snow off the hood to improve
visibility and help decrease moisture
drawn into the vehicle.
.Use of non-GM approved hood deflectors
can adversely affect the performance of
the system.
.Keep the path under all seats clear of
objects to help circulate the air inside the
vehicle more effectively.
.If fogging reoccurs while in vent or
bi-level modes with mild temperature
throughout the vehicle, turn on the air
conditioner to reduce windshield fogging.
Maintenance
Passenger Compartment Air Filter
The filter reduces dust, pollen, and other
airborne irritants from outside air that is
pulled into the vehicle. The filter should be
replaced as part of routine scheduled
maintenance. See Maintenance Schedule
0 327. See your dealer regarding replacement of
the filter.
Service
All vehicles have a label underhood that
identifies the refrigerant used in the vehicle.
The refrigerant system should only be
serviced by trained and certified technicians.
The air conditioning evaporator should never
be repaired or replaced by one from a
salvage vehicle. It should only be replaced
by a new evaporator to ensure proper and
safe operation.
During service, all refrigerants should be
reclaimed with proper equipment. Venting
refrigerants directly to the atmosphere is
harmful to the environment and may also
create unsafe conditions based on
inhalation, combustion, frostbite, or other
health-based concerns.
The air conditioning system requires periodic
maintenance. See
Maintenance Schedule
0 327.
Page 196 of 369
Chevrolet Traverse Owner Manual (GMNA-Localizing-U.S./Canada/Mexico-
16411537) - 2023 - CRC - 3/28/22
Driving and Operating 195
.Select All-Wheel Drive (AWD) Mode. See
Driver Mode Control0214 and
All-Wheel Drive 0209.
Winter Driving
Driving on Snow or Ice
Caution
To avoid damage to the wheels and
brake components, always clear snow and
ice from inside the wheels and
underneath the vehicle before driving.
Snow or ice between the tires and the road
creates less traction or grip, so drive
carefully. Wet ice can occur at about 0 °C
(32 °F) when freezing rain begins to fall.
Avoid driving on wet ice or in freezing rain
until roads can be treated.
For Slippery Road Driving:
.Accelerate gently. Accelerating too quickly
causes the wheels to spin and makes the
surface under the tires slick.
.Turn on Traction Control. See Traction
Control/Electronic Stability Control 0212.
.The Antilock Brake System (ABS) improves
vehicle stability during hard stops, but
the brakes should be applied sooner than
when on dry pavement. See Antilock
Brake System (ABS) 0210.
.Allow greater following distance and
watch for slippery spots. Icy patches can
occur on otherwise clear roads in shaded
areas. The surface of a curve or an
overpass can remain icy when the
surrounding roads are clear. Avoid sudden
steering maneuvers and braking while
on ice.
.Turn off cruise control.
Cold Weather Mode
In very low temperatures, a cold weather
message may display on the Driver
Information Center (DIC). The engine speed,
transmission shift patterns, and cabin fan
speed may operate differently to enable the
vehicle to warm up quicker. You can
manually override the cabin fan speed in
cold weather mode.
Blizzard Conditions
Stop the vehicle in a safe place and signal
for help. Stay with the vehicle unless there
is help nearby. If possible, use Roadside Assistance. See
Roadside Assistance Program
0 341. To get help and keep everyone in the
vehicle safe:
.Turn on the hazard warning flashers.
.Tie a red cloth to an outside mirror.
{Warning
Snow can trap engine exhaust under the
vehicle. This may cause exhaust gases to
get inside. Engine exhaust contains
carbon monoxide (CO), which cannot be
seen or smelled. It can cause
unconsciousness and even death.
If the vehicle is stuck in snow:
.Clear snow from the base of the
vehicle, especially any blocking the
exhaust pipe.
.Open a window about 5 cm (2 in) on
the vehicle side that is away from the
wind, to bring in fresh air.
.Fully open the air outlets on or under
the instrument panel.
.Adjust the climate control system to
circulate the air inside the vehicle and
set the fan speed to the highest
setting. See “Climate Control Systems.”
(Continued)