key CHEVROLET TRAVERSE 2023 Owner's Guide
[x] Cancel search | Manufacturer: CHEVROLET, Model Year: 2023, Model line: TRAVERSE, Model: CHEVROLET TRAVERSE 2023Pages: 369, PDF Size: 16.89 MB
Page 40 of 369
Chevrolet Traverse Owner Manual (GMNA-Localizing-U.S./Canada/Mexico-
16411537) - 2023 - CRC - 3/28/22
Seats and Restraints 39
To return the seatback to the upright
position:1. Lift the lever fully without applying pressure to the seatback, and the
seatback will return to the upright
position.
2. Push and pull on the seatback to make sure it is locked.
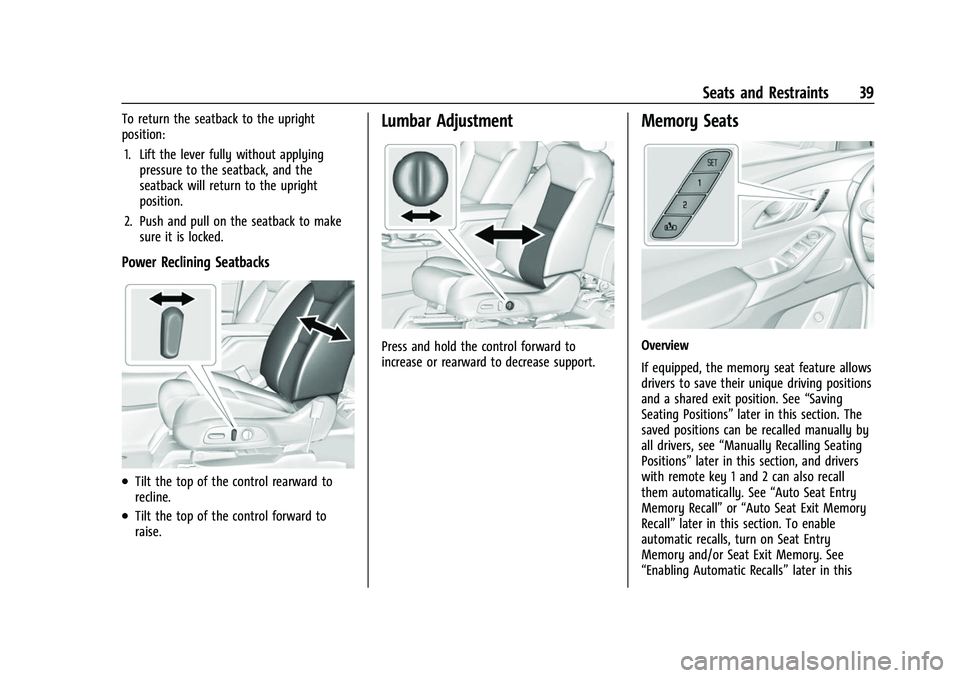
Power Reclining Seatbacks
.Tilt the top of the control rearward to
recline.
.Tilt the top of the control forward to
raise.
Lumbar Adjustment
Press and hold the control forward to
increase or rearward to decrease support.
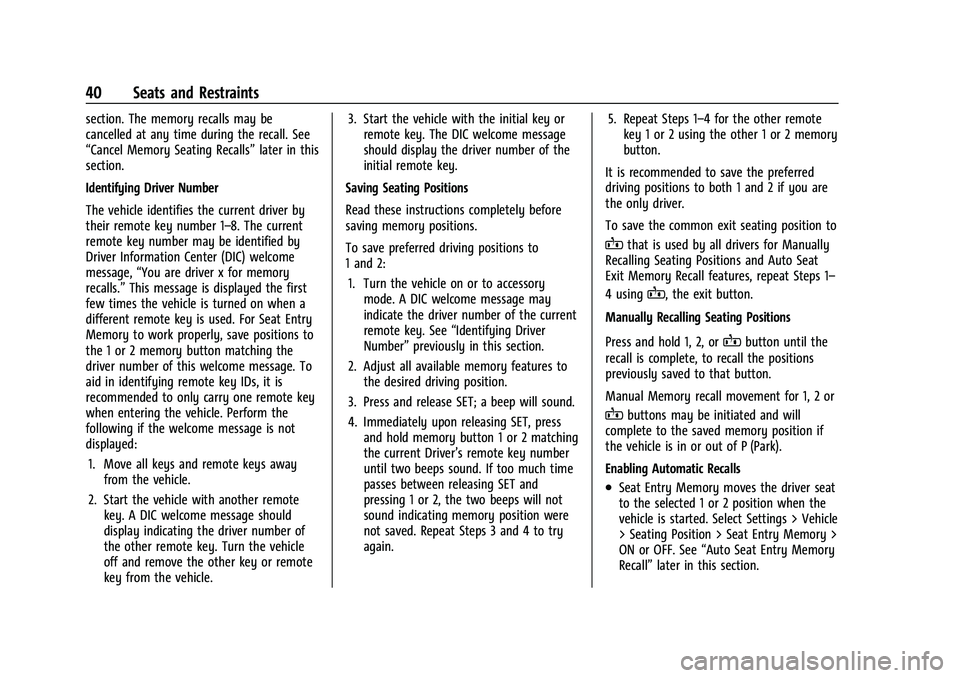
Memory Seats
Overview
If equipped, the memory seat feature allows
drivers to save their unique driving positions
and a shared exit position. See “Saving
Seating Positions” later in this section. The
saved positions can be recalled manually by
all drivers, see “Manually Recalling Seating
Positions” later in this section, and drivers
with remote key 1 and 2 can also recall
them automatically. See “Auto Seat Entry
Memory Recall” or“Auto Seat Exit Memory
Recall” later in this section. To enable
automatic recalls, turn on Seat Entry
Memory and/or Seat Exit Memory. See
“Enabling Automatic Recalls” later in this
Page 41 of 369
Chevrolet Traverse Owner Manual (GMNA-Localizing-U.S./Canada/Mexico-
16411537) - 2023 - CRC - 3/28/22
40 Seats and Restraints
section. The memory recalls may be
cancelled at any time during the recall. See
“Cancel Memory Seating Recalls”later in this
section.
Identifying Driver Number
The vehicle identifies the current driver by
their remote key number 1–8. The current
remote key number may be identified by
Driver Information Center (DIC) welcome
message, “You are driver x for memory
recalls.” This message is displayed the first
few times the vehicle is turned on when a
different remote key is used. For Seat Entry
Memory to work properly, save positions to
the 1 or 2 memory button matching the
driver number of this welcome message. To
aid in identifying remote key IDs, it is
recommended to only carry one remote key
when entering the vehicle. Perform the
following if the welcome message is not
displayed:
1. Move all keys and remote keys away from the vehicle.
2. Start the vehicle with another remote key. A DIC welcome message should
display indicating the driver number of
the other remote key. Turn the vehicle
off and remove the other key or remote
key from the vehicle. 3. Start the vehicle with the initial key or
remote key. The DIC welcome message
should display the driver number of the
initial remote key.
Saving Seating Positions
Read these instructions completely before
saving memory positions.
To save preferred driving positions to
1 and 2: 1. Turn the vehicle on or to accessory mode. A DIC welcome message may
indicate the driver number of the current
remote key. See “Identifying Driver
Number” previously in this section.
2. Adjust all available memory features to the desired driving position.
3. Press and release SET; a beep will sound.
4. Immediately upon releasing SET, press and hold memory button 1 or 2 matching
the current Driver’s remote key number
until two beeps sound. If too much time
passes between releasing SET and
pressing 1 or 2, the two beeps will not
sound indicating memory position were
not saved. Repeat Steps 3 and 4 to try
again. 5. Repeat Steps 1–4 for the other remote
key 1 or 2 using the other 1 or 2 memory
button.
It is recommended to save the preferred
driving positions to both 1 and 2 if you are
the only driver.
To save the common exit seating position to
Bthat is used by all drivers for Manually
Recalling Seating Positions and Auto Seat
Exit Memory Recall features, repeat Steps 1–
4 using
B, the exit button.
Manually Recalling Seating Positions
Press and hold 1, 2, or
Bbutton until the
recall is complete, to recall the positions
previously saved to that button.
Manual Memory recall movement for 1, 2 or
Bbuttons may be initiated and will
complete to the saved memory position if
the vehicle is in or out of P (Park).
Enabling Automatic Recalls
.Seat Entry Memory moves the driver seat
to the selected 1 or 2 position when the
vehicle is started. Select Settings > Vehicle
> Seating Position > Seat Entry Memory >
ON or OFF. See “Auto Seat Entry Memory
Recall” later in this section.
Page 42 of 369
Chevrolet Traverse Owner Manual (GMNA-Localizing-U.S./Canada/Mexico-
16411537) - 2023 - CRC - 3/28/22
Seats and Restraints 41
.Seat Exit Memory moves the driver seat
to the preferred exit position of the
B
button when the vehicle is turned off and
the door is opened. Select Settings >
Vehicle > Seating Position > Seat Exit
Memory > ON or OFF. See“Auto Seat Exit
Memory Recall” later in this section.
Auto Seat Entry Memory Recall
Seat Entry Memory will automatically begin
movement to the seating positions of the 1
or 2 button corresponding to the driver’s
remote key number 1 or 2 detected by the
vehicle when:
.The vehicle is turned ON.
.Seating positions have been previously
saved to the same 1 or 2 button. See
“Saving Seating Positions” previously in
this section.
.Seat Entry Memory is enabled. See
“Enabling Automatic Recalls” previously in
this section.
.The vehicle is in P (Park).
Seat Entry Memory Recall will continue if
the vehicle is shifted out of P (Park) prior to
reaching the saved memory position. If the saved memory seat position does not
automatically recall, verify the recall is
enabled. See
“Enabling Automatic Recalls”
previously in this section.
If the memory seat recalls to the wrong
position, the driver’s remote key number 1
or 2 may not match the memory button
number positions they were saved to. Try
the other remote key or try saving the
positions to the other 1 or 2 memory
button. See “Saving Seating Positions”
previously in this section.
Automatic Seat Entry Memory recalls are
only available for driver’s remote key
numbers 1 and 2. Remote keys 3–8 will not
provide Seat Entry Memory recalls.
Auto Seat Exit Memory Recall
Seat Exit Memory will begin movement to
the seating position of the
B
button when:
.The vehicle is turned off and the driver
door is open or opened within a
short time.
.A seating position has been previously
been saved to the
Bmemory button.
See “Saving Seating Positions” previously
in this section.
.Seat Exit Memory is enabled. See
“Enabling Automatic Recalls” previously in
this section.
.The vehicle is in P (Park).
Seat Exit Memory recall will continue if the
vehicle is shifted out of P (Park) prior to
reaching the saved memory position.
Seat Exit Memory is not linked to the
driver’s remote key. The seating position
saved to
Bis used for all drivers.
Cancel Memory Seating Recalls
.During any memory recall:
Press a power seat control
Press SET memory button
.During Manual memory recall:
Release 1, 2, or
Bmemory button
.During Auto Seat Entry Memory Recall:
Turn vehicle off
Press SET, 1, 2, or
Bmemory buttons
.During Auto Seat Exit Memory Recall:
Press SET, 1, 2, or
Bmemory buttons
Page 48 of 369
Chevrolet Traverse Owner Manual (GMNA-Localizing-U.S./Canada/Mexico-
16411537) - 2023 - CRC - 3/28/22
Seats and Restraints 47
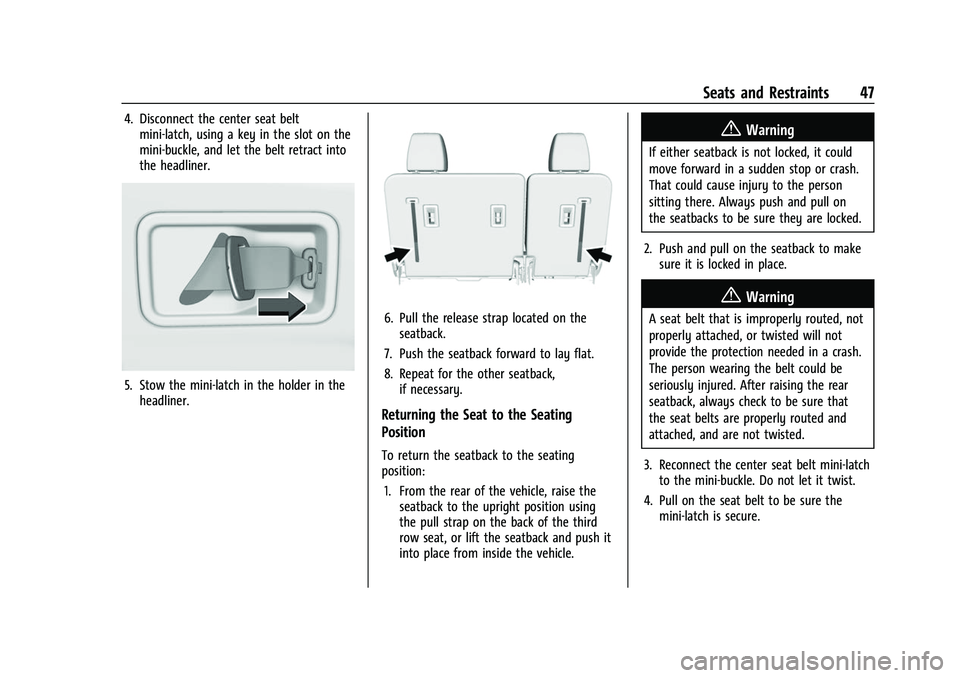
4. Disconnect the center seat beltmini-latch, using a key in the slot on the
mini-buckle, and let the belt retract into
the headliner.
5. Stow the mini-latch in the holder in theheadliner.
6. Pull the release strap located on theseatback.
7. Push the seatback forward to lay flat.
8. Repeat for the other seatback, if necessary.
Returning the Seat to the Seating
Position
To return the seatback to the seating
position:
1. From the rear of the vehicle, raise the seatback to the upright position using
the pull strap on the back of the third
row seat, or lift the seatback and push it
into place from inside the vehicle.
{Warning
If either seatback is not locked, it could
move forward in a sudden stop or crash.
That could cause injury to the person
sitting there. Always push and pull on
the seatbacks to be sure they are locked.
2. Push and pull on the seatback to make sure it is locked in place.
{Warning
A seat belt that is improperly routed, not
properly attached, or twisted will not
provide the protection needed in a crash.
The person wearing the belt could be
seriously injured. After raising the rear
seatback, always check to be sure that
the seat belts are properly routed and
attached, and are not twisted.
3. Reconnect the center seat belt mini-latch to the mini-buckle. Do not let it twist.
4. Pull on the seat belt to be sure the mini-latch is secure.
Page 55 of 369
Chevrolet Traverse Owner Manual (GMNA-Localizing-U.S./Canada/Mexico-
16411537) - 2023 - CRC - 3/28/22
54 Seats and Restraints
met. Seat belt pretensioners can also help
tighten the seat belts in a side crash or a
rollover event.
Pretensioners work only once. If the
pretensioners activate in a crash, the
pretensioners and probably other parts of
the vehicle’s seat belt system will need to
be replaced. SeeReplacing Seat Belt System
Parts after a Crash 055.
Do not sit on the outboard seat belt while
entering or exiting the vehicle or at any
time while sitting in the seat. Sitting on the
seat belt can damage the webbing and
hardware.
Rear Seat Belt Comfort Guides
Rear seat belt comfort guides may provide
added seat belt comfort for older children
who have outgrown booster seats and for
some adults. When installed on a shoulder
belt, the comfort guide positions the
shoulder belt away from the neck and head.
Comfort guides are available through your
dealer for the rear outboard seating
positions. Instructions are included with the
guides.
Seat Belt Use During Pregnancy
Seat belts work for everyone, including
pregnant women. Like all occupants, they
are more likely to be seriously injured if
they do not wear seat belts.
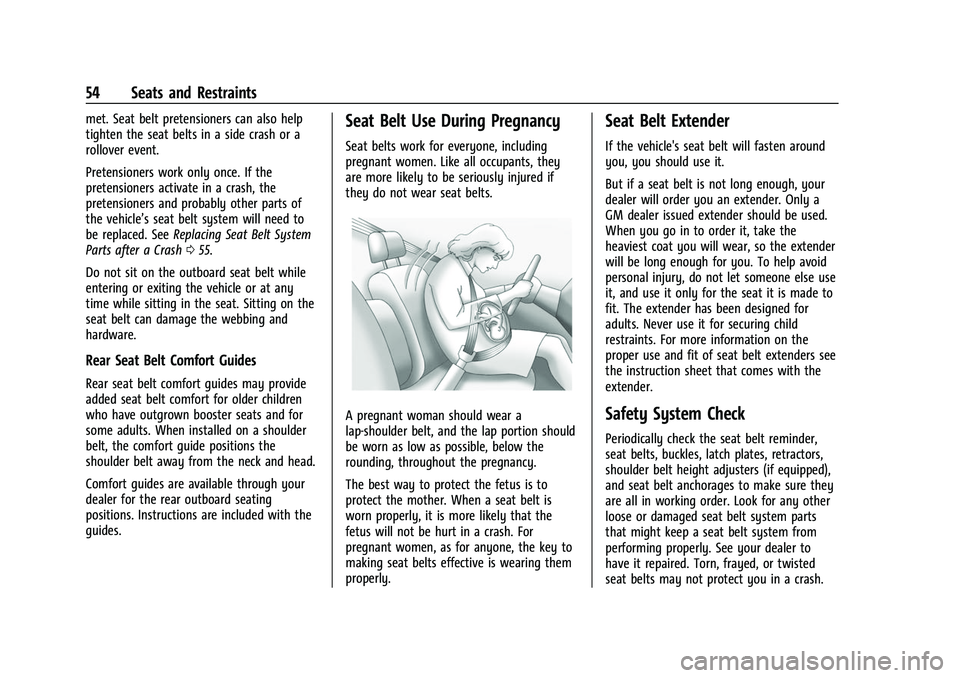
A pregnant woman should wear a
lap-shoulder belt, and the lap portion should
be worn as low as possible, below the
rounding, throughout the pregnancy.
The best way to protect the fetus is to
protect the mother. When a seat belt is
worn properly, it is more likely that the
fetus will not be hurt in a crash. For
pregnant women, as for anyone, the key to
making seat belts effective is wearing them
properly.
Seat Belt Extender
If the vehicle's seat belt will fasten around
you, you should use it.
But if a seat belt is not long enough, your
dealer will order you an extender. Only a
GM dealer issued extender should be used.
When you go in to order it, take the
heaviest coat you will wear, so the extender
will be long enough for you. To help avoid
personal injury, do not let someone else use
it, and use it only for the seat it is made to
fit. The extender has been designed for
adults. Never use it for securing child
restraints. For more information on the
proper use and fit of seat belt extenders see
the instruction sheet that comes with the
extender.
Safety System Check
Periodically check the seat belt reminder,
seat belts, buckles, latch plates, retractors,
shoulder belt height adjusters (if equipped),
and seat belt anchorages to make sure they
are all in working order. Look for any other
loose or damaged seat belt system parts
that might keep a seat belt system from
performing properly. See your dealer to
have it repaired. Torn, frayed, or twisted
seat belts may not protect you in a crash.
Page 96 of 369
Chevrolet Traverse Owner Manual (GMNA-Localizing-U.S./Canada/Mexico-
16411537) - 2023 - CRC - 3/28/22
Instruments and Controls 95
{Warning
Wireless charging may affect the
operation of an implanted pacemaker or
other medical devices. If you have one, it
is recommended to consult with your
doctor before using the wireless charging
system.
The vehicle must be on, in accessory mode,
or Retained Accessory Power (RAP) must be
active. The wireless charging feature may
not correctly indicate charging when the
vehicle is in RAP, during a Bluetooth phone
call, or when phone projection (e.g. Apple
CarPlay / Android Auto) is active. See
Retained Accessory Power (RAP) 0204.
The operating temperature is −40 °C (−40 °F)
to 85 °C (185 °F) for the charging system and
0 °C (32 °F) to 35 °C (95 °F) for the phone.
A charging stopped alert may be displayed
on the infotainment screen, if the wireless
charger or smartphone are outside of
normal operating temperature. Charging will
automatically resume when a normal
operating temperature is reached.
{Warning
Remove all objects from the charger
before charging your compatible
smartphone. Objects, such as coins, keys,
rings, paper clips, or cards, between the
smartphone and charger may become
very hot.
On the rare occasion that the charging
system does not detect an object, and
the object gets wedged between the
smartphone and charger, remove the
smartphone and allow the object to cool
before removing it from the charger, to
prevent burns.
To charge a compatible smartphone:
1. Confirm the smartphone is capable of wireless charging.
2. Remove all objects from the charging pad. The system may not charge if there
are any objects between the smartphone
and charger.
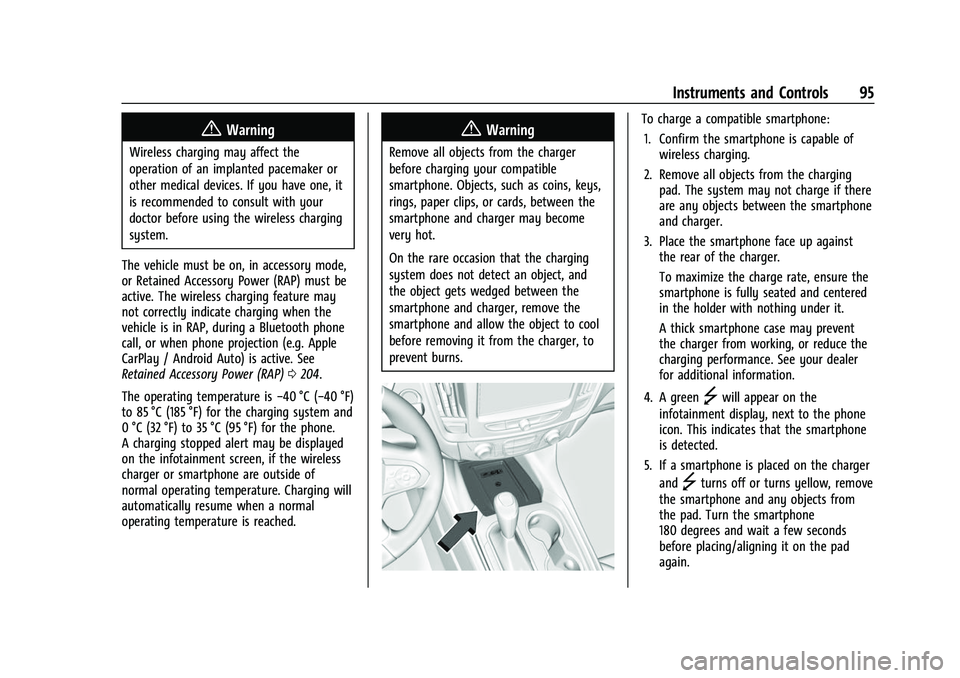
3. Place the smartphone face up against the rear of the charger.
To maximize the charge rate, ensure the
smartphone is fully seated and centered
in the holder with nothing under it.
A thick smartphone case may prevent
the charger from working, or reduce the
charging performance. See your dealer
for additional information.
4. A green
]will appear on the
infotainment display, next to the phone
icon. This indicates that the smartphone
is detected.
5. If a smartphone is placed on the charger and
]turns off or turns yellow, remove
the smartphone and any objects from
the pad. Turn the smartphone
180 degrees and wait a few seconds
before placing/aligning it on the pad
again.
Page 130 of 369
Chevrolet Traverse Owner Manual (GMNA-Localizing-U.S./Canada/Mexico-
16411537) - 2023 - CRC - 3/28/22
Lighting 129
The knob is functional at night, or when the
headlamps or parking lamps are on.
Courtesy Lamps
The courtesy lamps come on when any door
is opened,
Kon the remote key is pressed,
or when the vehicle is turned off. See Dome
Lamps 0129.
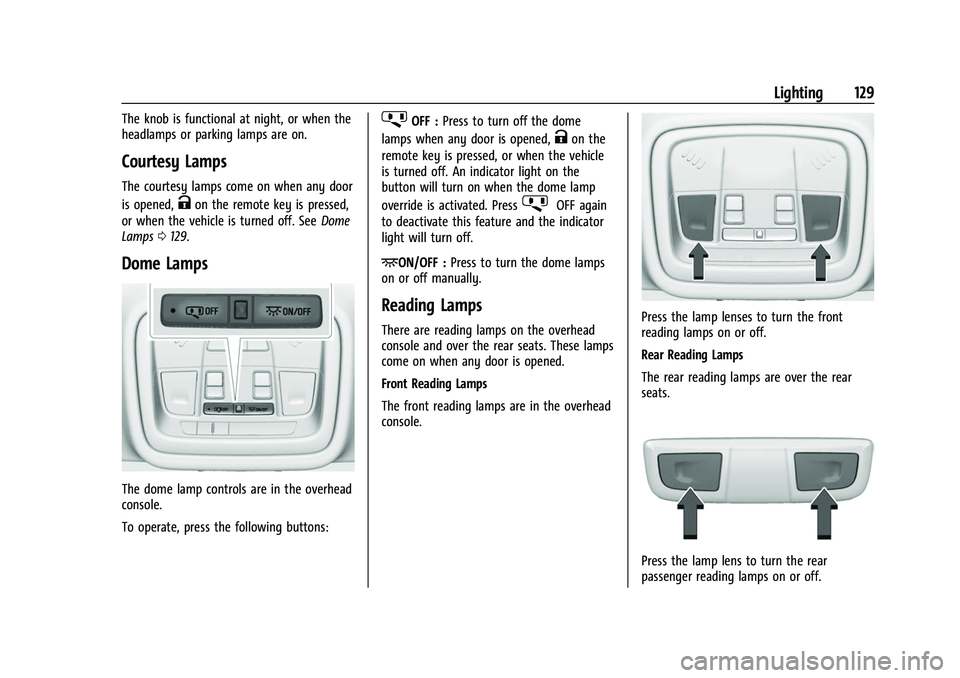
Dome Lamps
The dome lamp controls are in the overhead
console.
To operate, press the following buttons:
jOFF : Press to turn off the dome
lamps when any door is opened,
Kon the
remote key is pressed, or when the vehicle
is turned off. An indicator light on the
button will turn on when the dome lamp
override is activated. Press
jOFF again
to deactivate this feature and the indicator
light will turn off.
+ON/OFF : Press to turn the dome lamps
on or off manually.
Reading Lamps
There are reading lamps on the overhead
console and over the rear seats. These lamps
come on when any door is opened.
Front Reading Lamps
The front reading lamps are in the overhead
console.Press the lamp lenses to turn the front
reading lamps on or off.
Rear Reading Lamps
The rear reading lamps are over the rear
seats.
Press the lamp lens to turn the rear
passenger reading lamps on or off.
Page 131 of 369
Chevrolet Traverse Owner Manual (GMNA-Localizing-U.S./Canada/Mexico-
16411537) - 2023 - CRC - 3/28/22
130 Lighting
Lighting Features
Entry Lighting
The interior lamps turn on when pressingK
on the remote key or opening any doors,
and the dome lamp control is in the door
position.
Some exterior lamps also turn on when
pressing
Kon the remote key or opening
any doors. Low-Beam lamps will only turn
on briefly at night, or in areas with limited
lighting.
All lamps will gradually fade out after about
30 seconds.
Entry lighting can be disabled manually by
closing all doors, pressing
Qon the remote
key, or starting the vehicle.
This feature can be changed. On the
infotainment home page, select the Settings
icon
TVehicleTVehicle Locator Lights.
Exit Lighting
Some exterior lamps and interior lamps turn
on when the driver door is opened after the
vehicle is turned off. The exterior and interior lamps remain on
for a set amount of time, then automatically
turn off.
The interior lights turn on when the vehicle
is turned off.
The exterior lamps turn off immediately by
turning the exterior lamp control off.
This feature can be changed. On the
infotainment home screen, select the
Settings icon
TVehicleTExit Lighting.
Battery Load Management
The vehicle has Electric Power Management
(EPM) that estimates the battery's
temperature and state of charge. It then
adjusts the voltage for best performance
and extended life of the battery.
When the battery's state of charge is low,
the voltage is raised slightly to quickly bring
the charge back up. When the state of
charge is high, the voltage is lowered
slightly to prevent overcharging. If the
vehicle has a voltmeter gauge or a voltage
display on the Driver Information Center
(DIC), you may see the voltage move up or
down. This is normal. If there is a problem,
an alert will be displayed.The battery can be discharged at idle if the
electrical loads are very high. This is true for
all vehicles. This is because the generator
(alternator) may not be spinning fast
enough at idle to produce all of the power
needed for very high electrical loads.
A high electrical load occurs when several of
the following are on, such as: headlamps,
high beams, rear window defogger, climate
control fan at high speed, heated seats,
engine cooling fans, trailer loads, and loads
plugged into accessory power outlets.
EPM works to prevent excessive discharge of
the battery. It does this by balancing the
generator's output and the vehicle's
electrical needs. It can increase engine idle
speed to generate more power whenever
needed. It can temporarily reduce the power
demands of some accessories.
Normally, these actions occur in steps or
levels, without being noticeable. In rare
cases at the highest levels of corrective
action, this action may be noticeable to the
driver. If so, a DIC battery voltage and
charging message displays. It is
recommended that the driver reduce the
electrical loads as much as possible.
Page 139 of 369
Chevrolet Traverse Owner Manual (GMNA-Localizing-U.S./Canada/Mexico-
16411537) - 2023 - CRC - 3/28/22
138 Infotainment System
Software Updates
Over-the-Air Software Updates
If equipped, see“Updates”underSettings
0 166 for details on software updates.
Radio
AM-FM Radio
Playing the Radio
From the Home Page, touch the Audio icon
to display the active audio source page.
Choose from the three most recently used
sources listed at the left side of the display
or touch the More icon to display a list of
available sources. Examples of available
sources are AM, FM, SXM (if equipped),
MyMedia (if available), USB, AUX (if
equipped), and Bluetooth.
Infotainment System Sound Menu
From any of the audio source main pages,
touch Sound to display the following:
Equalizer : Touch to adjust Bass, Midrange,
Treble, and Surround (if equipped) using the
options on the infotainment display. Fade/Balance :
Touch to adjust by using the
controls on the infotainment display or by
tapping/dragging the crosshair.
Finding a Station
Seeking a Station
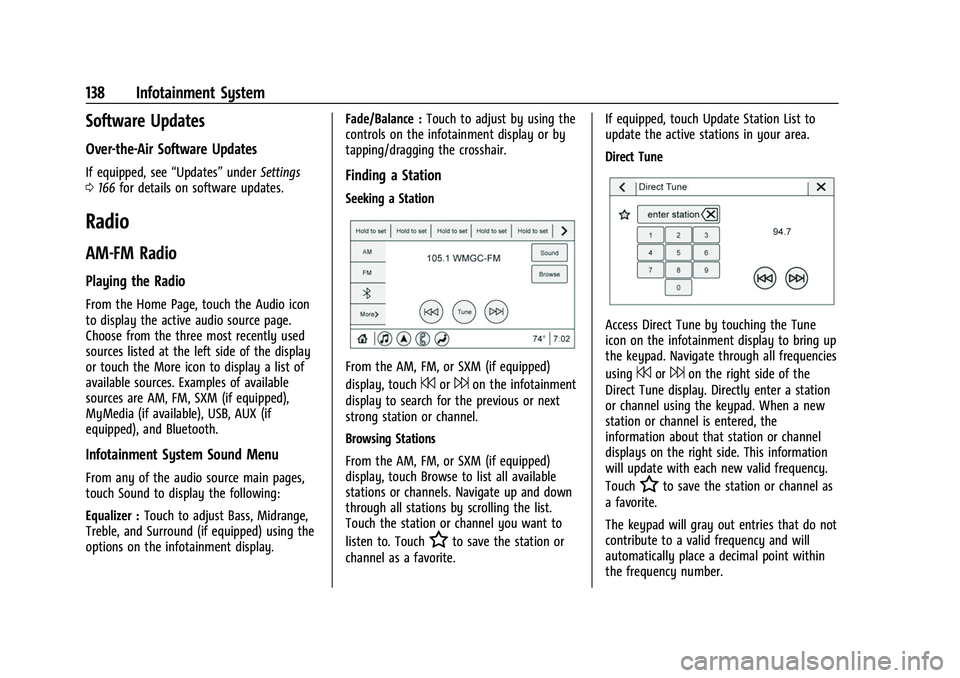
From the AM, FM, or SXM (if equipped)
display, touch
7or6on the infotainment
display to search for the previous or next
strong station or channel.
Browsing Stations
From the AM, FM, or SXM (if equipped)
display, touch Browse to list all available
stations or channels. Navigate up and down
through all stations by scrolling the list.
Touch the station or channel you want to
listen to. Touch
Hto save the station or
channel as a favorite. If equipped, touch Update Station List to
update the active stations in your area.
Direct Tune
Access Direct Tune by touching the Tune
icon on the infotainment display to bring up
the keypad. Navigate through all frequencies
using
7or6on the right side of the
Direct Tune display. Directly enter a station
or channel using the keypad. When a new
station or channel is entered, the
information about that station or channel
displays on the right side. This information
will update with each new valid frequency.
Touch
Hto save the station or channel as
a favorite.
The keypad will gray out entries that do not
contribute to a valid frequency and will
automatically place a decimal point within
the frequency number.
Page 154 of 369
Chevrolet Traverse Owner Manual (GMNA-Localizing-U.S./Canada/Mexico-
16411537) - 2023 - CRC - 3/28/22
Infotainment System 153
Show POI Icons
To see the POI categories, touch Options,
then touch Show on Map. Up to eight
categories of icons can be selected.
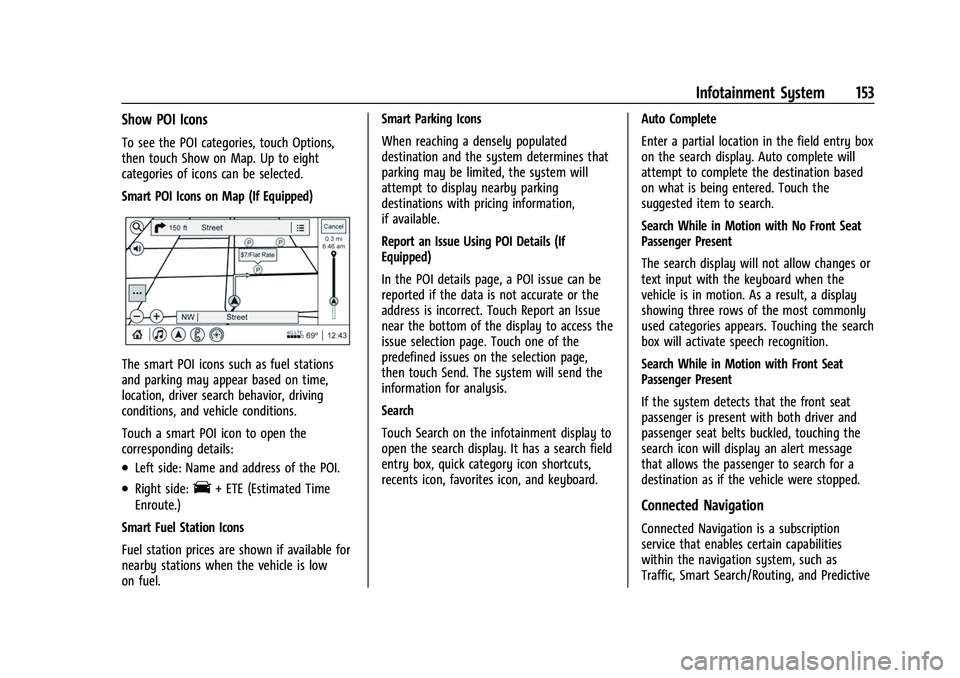
Smart POI Icons on Map (If Equipped)
The smart POI icons such as fuel stations
and parking may appear based on time,
location, driver search behavior, driving
conditions, and vehicle conditions.
Touch a smart POI icon to open the
corresponding details:
.Left side: Name and address of the POI.
.Right side:E+ ETE (Estimated Time
Enroute.)
Smart Fuel Station Icons
Fuel station prices are shown if available for
nearby stations when the vehicle is low
on fuel. Smart Parking Icons
When reaching a densely populated
destination and the system determines that
parking may be limited, the system will
attempt to display nearby parking
destinations with pricing information,
if available.
Report an Issue Using POI Details (If
Equipped)
In the POI details page, a POI issue can be
reported if the data is not accurate or the
address is incorrect. Touch Report an Issue
near the bottom of the display to access the
issue selection page. Touch one of the
predefined issues on the selection page,
then touch Send. The system will send the
information for analysis.
Search
Touch Search on the infotainment display to
open the search display. It has a search field
entry box, quick category icon shortcuts,
recents icon, favorites icon, and keyboard.
Auto Complete
Enter a partial location in the field entry box
on the search display. Auto complete will
attempt to complete the destination based
on what is being entered. Touch the
suggested item to search.
Search While in Motion with No Front Seat
Passenger Present
The search display will not allow changes or
text input with the keyboard when the
vehicle is in motion. As a result, a display
showing three rows of the most commonly
used categories appears. Touching the search
box will activate speech recognition.
Search While in Motion with Front Seat
Passenger Present
If the system detects that the front seat
passenger is present with both driver and
passenger seat belts buckled, touching the
search icon will display an alert message
that allows the passenger to search for a
destination as if the vehicle were stopped.
Connected Navigation
Connected Navigation is a subscription
service that enables certain capabilities
within the navigation system, such as
Traffic, Smart Search/Routing, and Predictive