Body CHEVROLET TRAVERSE 2023 Owners Manual
[x] Cancel search | Manufacturer: CHEVROLET, Model Year: 2023, Model line: TRAVERSE, Model: CHEVROLET TRAVERSE 2023Pages: 369, PDF Size: 16.89 MB
Page 3 of 369
Chevrolet Traverse Owner Manual (GMNA-Localizing-U.S./Canada/Mexico-
16411537) - 2023 - CRC - 3/28/22
2 Introduction
Introduction
The names, logos, emblems, slogans, vehicle
model names, and vehicle body designs
appearing in this manual including, but not
limited to, GM, the GM logo, CHEVROLET,
the CHEVROLET Emblem, and TRAVERSE are
trademarks and/or service marks of General
Motors LLC, its subsidiaries, affiliates,
or licensors.
For vehicles first sold in Canada, substitute
the name“General Motors of Canada
Company” for Chevrolet Motor Division
wherever it appears in this manual.
This manual describes features that may or
may not be on the vehicle because of
optional equipment that was not purchased
on the vehicle, model variants, country
specifications, features/applications that may
not be available in your region, or changes
subsequent to the printing of this owner’s
manual, including changes in standard or
optional content. Refer to the purchase documentation
relating to your specific vehicle to confirm
the features.
Keep this manual in the vehicle for quick
reference.
Canadian Vehicle Owners
A French language manual can be obtained
from your dealer, at www.helminc.com,
or from:
Propriétaires Canadiens
On peut obtenir un exemplaire de ce guide
en français auprès du concessionnaire ou à
l'adresse suivante:
Helm, Incorporated
Attention: Customer Service
47911 Halyard Drive
Plymouth, MI 48170
USA
Using this Manual
To quickly locate information about the
vehicle, use the Index in the back of the
manual. It is an alphabetical list of what is
in the manual and the page number where
it can be found.
Danger, Warning, and Caution
Warning messages found on vehicle labels
and in this manual describe hazards and
what to do to avoid or reduce them.
{Danger
Danger indicates a hazard with a high
level of risk which will result in serious
injury or death.
{Warning
Warning indicates a hazard that could
result in injury or death.
Caution
Caution indicates a hazard that could
result in property or vehicle damage.
Page 14 of 369
Chevrolet Traverse Owner Manual (GMNA-Localizing-U.S./Canada/Mexico-
16411537) - 2023 - CRC - 3/28/22
Keys, Doors, and Windows 13
Caution
When replacing the battery, do not touch
any of the circuitry on the remote key.
Static from your body could damage the
remote key.
Caution
Always replace the battery with the
correct type. Replacing the battery with
an incorrect type could potentially create
a risk of battery explosion. Dispose of
used batteries according to instructions
and local laws. Do not attempt to burn,
crush, or cut the used battery, and avoid
exposing the battery to environments
with extremely low air pressures or high
temperatures.
Caution
If the remote key is not reassembled
properly, liquids could enter the housing
and damage the circuitry, resulting in a
remote key malfunction and/or failure. To
prevent damage, always follow the steps
for remote key reassembly in this manual
(Continued)
Caution (Continued)
to ensure the remote key is sealed
properly whenever the remote key is
opened.
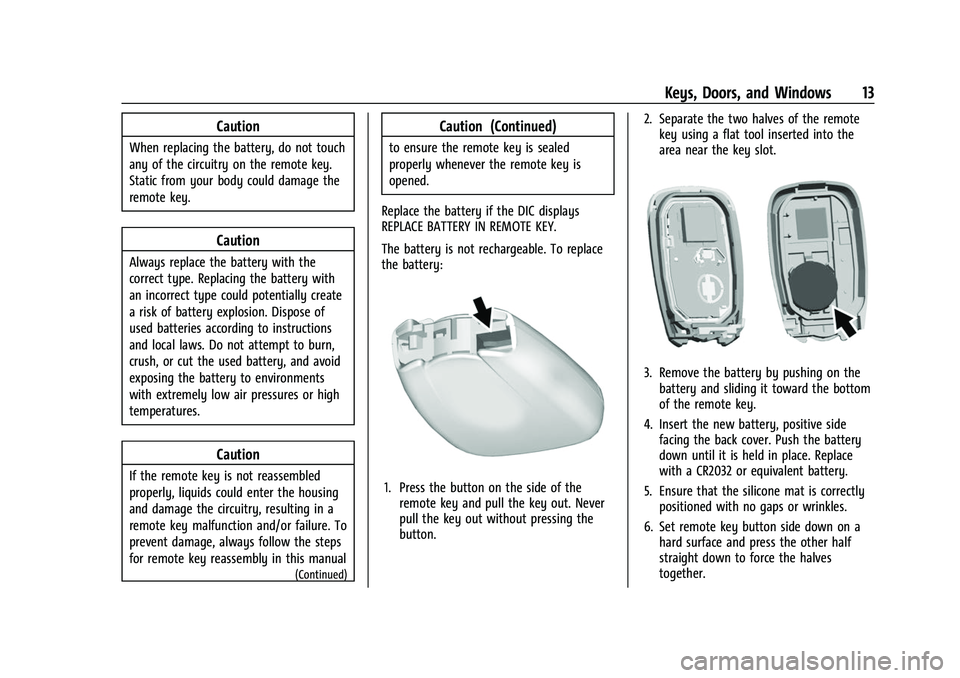
Replace the battery if the DIC displays
REPLACE BATTERY IN REMOTE KEY.
The battery is not rechargeable. To replace
the battery:
1. Press the button on the side of the remote key and pull the key out. Never
pull the key out without pressing the
button. 2. Separate the two halves of the remote
key using a flat tool inserted into the
area near the key slot.
3. Remove the battery by pushing on thebattery and sliding it toward the bottom
of the remote key.
4. Insert the new battery, positive side facing the back cover. Push the battery
down until it is held in place. Replace
with a CR2032 or equivalent battery.
5. Ensure that the silicone mat is correctly positioned with no gaps or wrinkles.
6. Set remote key button side down on a hard surface and press the other half
straight down to force the halves
together.
Page 19 of 369
Chevrolet Traverse Owner Manual (GMNA-Localizing-U.S./Canada/Mexico-
16411537) - 2023 - CRC - 3/28/22
18 Keys, Doors, and Windows
lock and the driver door will unlock. The
Open Door Anti-Lockout feature can be
turned on or off. To view available settings
from the infotainment screen, touch Settings
> Vehicle > Power Door Locks > Open Door
Anti Lockout.
Safety Locks
The rear door safety locks prevent
passengers from opening the rear doors
from inside the vehicle.
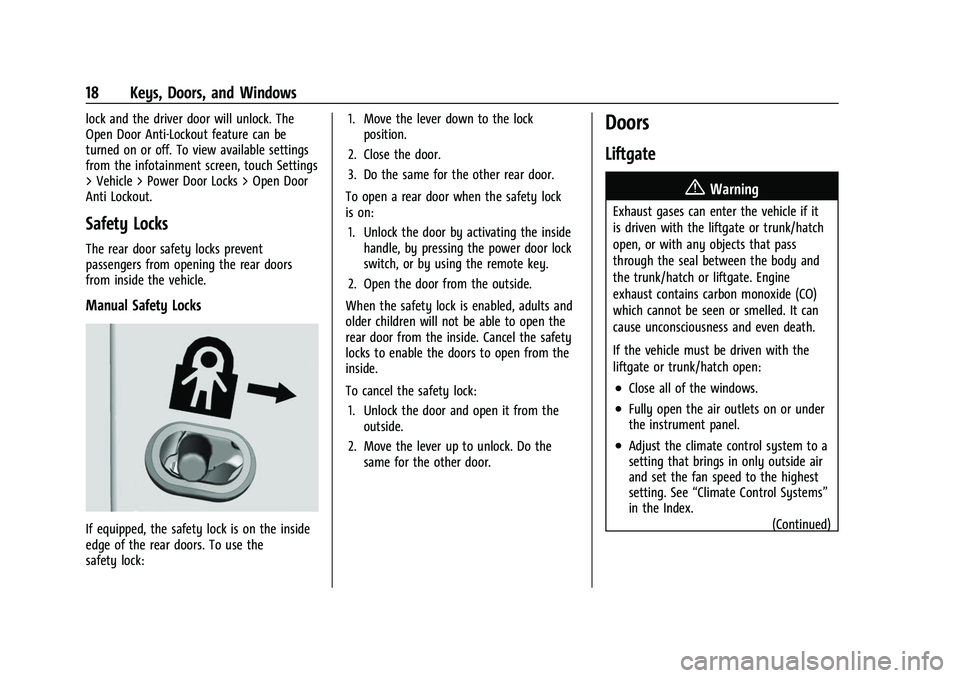
Manual Safety Locks
If equipped, the safety lock is on the inside
edge of the rear doors. To use the
safety lock:1. Move the lever down to the lock
position.
2. Close the door.
3. Do the same for the other rear door.
To open a rear door when the safety lock
is on: 1. Unlock the door by activating the inside handle, by pressing the power door lock
switch, or by using the remote key.
2. Open the door from the outside.
When the safety lock is enabled, adults and
older children will not be able to open the
rear door from the inside. Cancel the safety
locks to enable the doors to open from the
inside.
To cancel the safety lock: 1. Unlock the door and open it from the outside.
2. Move the lever up to unlock. Do the same for the other door.
Doors
Liftgate
{Warning
Exhaust gases can enter the vehicle if it
is driven with the liftgate or trunk/hatch
open, or with any objects that pass
through the seal between the body and
the trunk/hatch or liftgate. Engine
exhaust contains carbon monoxide (CO)
which cannot be seen or smelled. It can
cause unconsciousness and even death.
If the vehicle must be driven with the
liftgate or trunk/hatch open:
.Close all of the windows.
.Fully open the air outlets on or under
the instrument panel.
.Adjust the climate control system to a
setting that brings in only outside air
and set the fan speed to the highest
setting. See “Climate Control Systems”
in the Index.
(Continued)
Page 39 of 369
Chevrolet Traverse Owner Manual (GMNA-Localizing-U.S./Canada/Mexico-
16411537) - 2023 - CRC - 3/28/22
38 Seats and Restraints
To adjust the seat:
.Move the seat forward or rearward by
sliding the control forward or rearward.
.Raise or lower the front part of the seat
cushion by moving the front of the
control up or down.
.Raise or lower the entire seat by moving
the rear of the control up or down.
To adjust the seatback, see Reclining
Seatbacks 038.
To adjust the lumbar support, see Lumbar
Adjustment 039.
Reclining Seatbacks
{Warning
Sitting in a reclined position when the
vehicle is in motion can be dangerous.
Even when buckled up, the seat belts
cannot do their job.
The shoulder belt will not be against
your body. Instead, it will be in front of
you. In a crash, you could go into it,
receiving neck or other injuries.
(Continued)
Warning (Continued)
The lap belt could go up over your
abdomen. The belt forces would be there,
not at your pelvic bones. This could cause
serious internal injuries.
For proper protection when the vehicle is
in motion, have the seatback upright.
Then sit well back in the seat and wear
the seat belt properly.
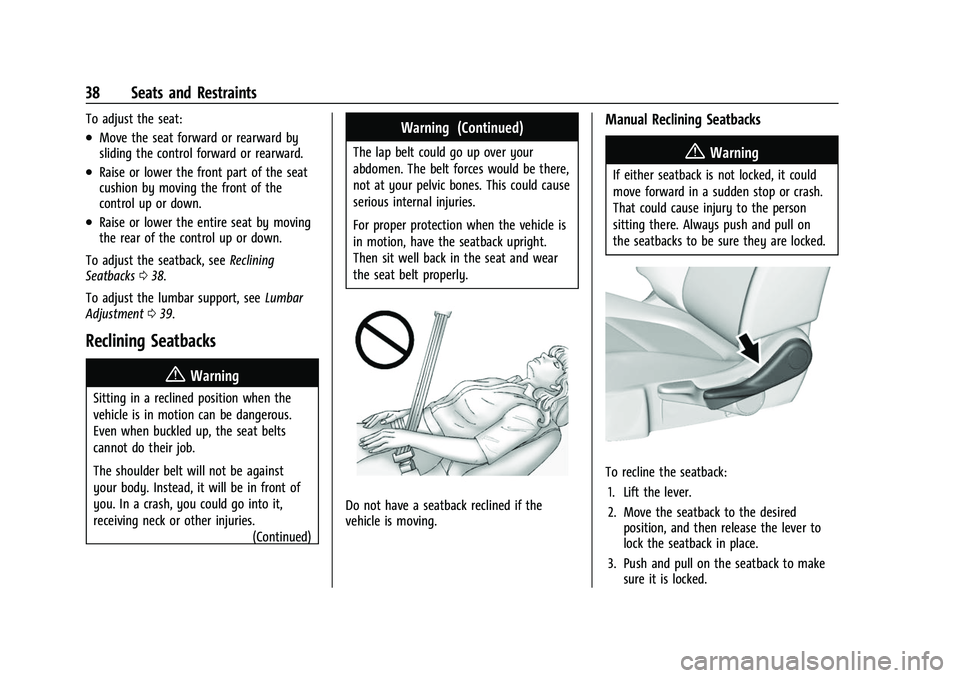
Do not have a seatback reclined if the
vehicle is moving.
Manual Reclining Seatbacks
{Warning
If either seatback is not locked, it could
move forward in a sudden stop or crash.
That could cause injury to the person
sitting there. Always push and pull on
the seatbacks to be sure they are locked.
To recline the seatback:
1. Lift the lever.
2. Move the seatback to the desired position, and then release the lever to
lock the seatback in place.
3. Push and pull on the seatback to make sure it is locked.
Page 51 of 369
Chevrolet Traverse Owner Manual (GMNA-Localizing-U.S./Canada/Mexico-
16411537) - 2023 - CRC - 3/28/22
50 Seats and Restraints
It is very important for all occupants to
buckle up. Statistics show that unbelted
people are hurt more often in crashes than
those who are wearing seat belts.
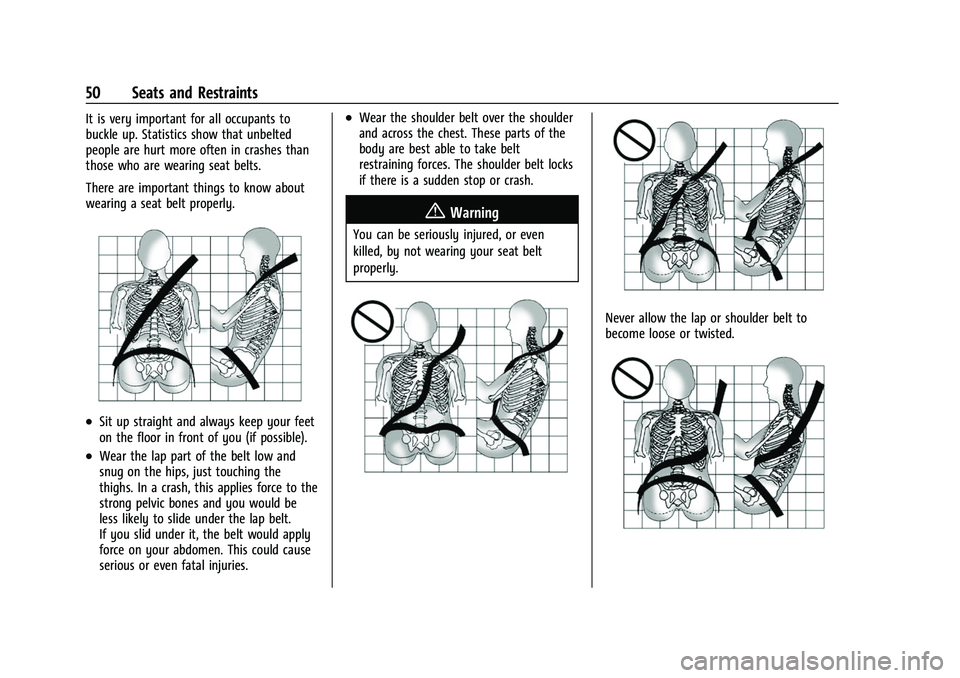
There are important things to know about
wearing a seat belt properly.
.Sit up straight and always keep your feet
on the floor in front of you (if possible).
.Wear the lap part of the belt low and
snug on the hips, just touching the
thighs. In a crash, this applies force to the
strong pelvic bones and you would be
less likely to slide under the lap belt.
If you slid under it, the belt would apply
force on your abdomen. This could cause
serious or even fatal injuries.
.Wear the shoulder belt over the shoulder
and across the chest. These parts of the
body are best able to take belt
restraining forces. The shoulder belt locks
if there is a sudden stop or crash.
{Warning
You can be seriously injured, or even
killed, by not wearing your seat belt
properly.
Never allow the lap or shoulder belt to
become loose or twisted.
Page 60 of 369
Chevrolet Traverse Owner Manual (GMNA-Localizing-U.S./Canada/Mexico-
16411537) - 2023 - CRC - 3/28/22
Seats and Restraints 59
when either side of the vehicle is struck. In
addition, the front center airbag is designed
to inflate when the sensing system predicts
that the vehicle is about to roll over on its
side. The front center airbag is not designed
to inflate in frontal impacts, near frontal
impacts, or rear impacts.
Seat-mounted side impact airbags are
designed to inflate in moderate to severe
side crashes depending on the location of
the impact. These airbags may also inflate
in some moderate to severe frontal impacts.
Seat-mounted side impact airbags are not
designed to inflate in rollovers or rear
impacts. A seat-mounted side impact airbag
is designed to inflate on the side of the
vehicle that is struck.
Roof-rail airbags are designed to inflate in
moderate to severe side crashes depending
on the location of the impact. In addition,
these roof-rail airbags may inflate during a
rollover or in a severe frontal impact.
Roof-rail airbags are not designed to inflate
in rear impacts. Both roof-rail airbags may
inflate when either side of the vehicle is
struck or if the sensing system predicts that
the vehicle is about to roll over on its side,
or in a severe frontal impact.In any particular crash, no one can say
whether an airbag should have inflated
simply because of the vehicle damage or
repair costs.
What Makes an Airbag Inflate?
In a deployment event, the sensing system
sends an electrical signal triggering a release
of gas from the inflator. Gas from the
inflator fills the airbag causing the bag to
break out of the cover. The inflator, the
airbag, and related hardware are all part of
the airbag module.
For airbag locations, see
Where Are the
Airbags? 057.
How Does an Airbag Restrain?
In moderate to severe frontal or near frontal
collisions, even belted occupants can contact
the steering wheel or the instrument panel.
In moderate to severe side collisions, even
belted occupants can contact the inside of
the vehicle.
Airbags supplement the protection provided
by seat belts by distributing the force of the
impact more evenly over the
occupant's body. Rollover capable roof-rail airbags are
designed to help contain the head and chest
of occupants in the outboard seating
positions in the first, second, and third rows.
The rollover capable roof-rail airbags are
designed to help reduce the risk of full or
partial ejection in rollover events, although
no system can prevent all such ejections.
But airbags would not help in many types
of collisions, primarily because the
occupant's motion is not toward those
airbags. See
When Should an Airbag Inflate?
0 58.
Airbags should never be regarded as
anything more than a supplement to seat
belts.What Will You See after an
Airbag Inflates?
After frontal and seat-mounted side impact
airbags inflate, they quickly deflate, so
quickly that some people may not even
realize the airbags inflated. The front center
airbag and roof-rail airbags may still be at
least partially inflated for some time after
they inflate. Some components of the airbag
module may be hot for several minutes. For
location of the airbags, see Where Are the
Airbags? 057.
Page 63 of 369
Chevrolet Traverse Owner Manual (GMNA-Localizing-U.S./Canada/Mexico-
16411537) - 2023 - CRC - 3/28/22
62 Seats and Restraints
.There is a critical problem with the airbag
system or the passenger sensing system.
When the passenger sensing system has
turned off the front outboard passenger
frontal airbag, the OFF indicator will light
and stay lit as a reminder that the airbag is
off. See Passenger Airbag Status Indicator
0 108.
The passenger sensing system is designed to
turn on the front outboard passenger frontal
airbag anytime the system senses that a
person of adult size is sitting properly in the
front outboard passenger seat.
When the passenger sensing system has
allowed the airbag to be enabled, the ON
indicator will light and stay lit as a reminder
that the airbag is active.
For some children, including children in child
restraints, and for very small adults, the
passenger sensing system may or may not
turn off the front outboard passenger
frontal airbag, depending upon the person's
seating posture and body build. Everyone in
the vehicle who has outgrown child
restraints should wear a seat belt
properly —whether or not there is an
airbag for that person.{Warning
If the airbag readiness light ever comes
on and stays on, it means that
something may be wrong with the airbag
system. To help avoid injury to yourself
or others, have the vehicle serviced right
away. See Airbag Readiness Light 0107
for more information, including important
safety information.
If the On Indicator Is Lit for a Child
Restraint
The passenger sensing system is designed to
turn off the front outboard passenger
frontal airbag if the system determines that
an infant is present in a child restraint. If a
child restraint has been installed and the ON
indicator is lit:
1. Turn the vehicle off.
2. Remove the child restraint from the vehicle.
3. Remove any additional items from the seat such as blankets, cushions, seat
covers, seat heaters, or seat massagers. 4. Reinstall the child restraint following the
directions provided by the child restraint
manufacturer and refer to Securing Child
Restraints (With the Seat Belt in the Rear
Seat) 079 or
Securing Child Restraints (With the Seat
Belt in the Front Seat) 081.
Make sure the seat belt retractor is
locked by pulling the shoulder belt all
the way out of the retractor when
installing the child restraint, even if the
child restraint is equipped with a seat
belt lock off. When the retractor lock is
set, the belt can be tightened but not
pulled out of the retractor.
5. If, after reinstalling the child restraint and restarting the vehicle, the ON
indicator is still lit, turn the vehicle off.
Then slightly recline the vehicle seatback
and adjust the seat cushion,
if adjustable, to make sure that the
vehicle seatback is not pushing the child
restraint into the seat cushion.
Also make sure the child restraint is not
trapped under the vehicle head restraint.
If this happens, adjust the head restraint.
See Head Restraints 035.
6. Restart the vehicle.
Page 70 of 369
Chevrolet Traverse Owner Manual (GMNA-Localizing-U.S./Canada/Mexico-
16411537) - 2023 - CRC - 3/28/22
Seats and Restraints 69
Warning (Continued)
would apply force on a body area that is
unprotected by any bony structure. This
alone could cause serious or fatal injuries.
To reduce the risk of serious or fatal
injuries during a crash, young children
should always be secured in an
appropriate child restraint.
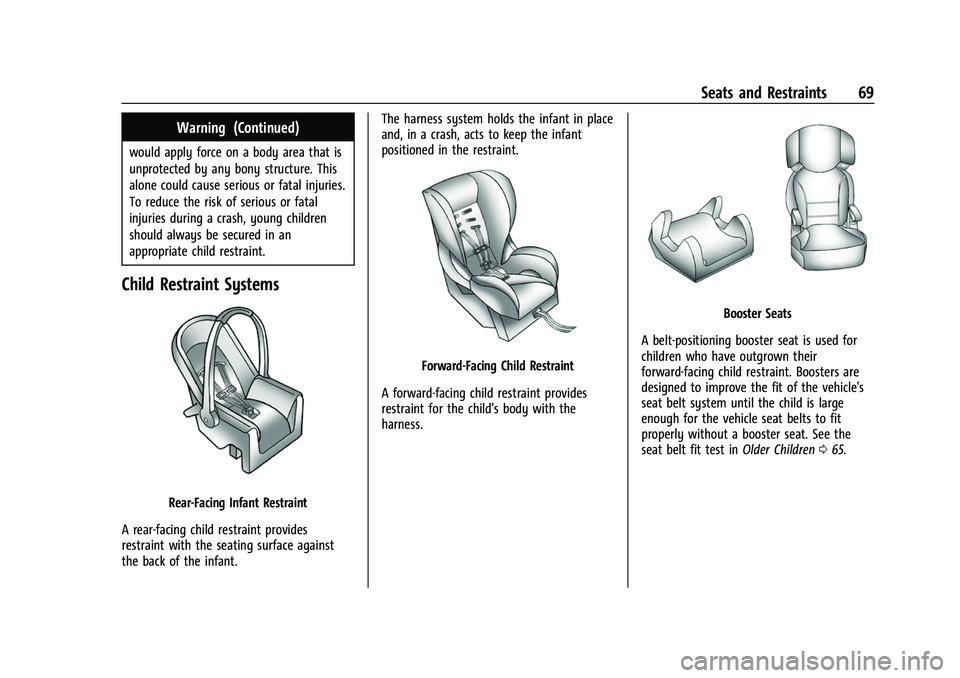
Child Restraint Systems
Rear-Facing Infant Restraint
A rear-facing child restraint provides
restraint with the seating surface against
the back of the infant. The harness system holds the infant in place
and, in a crash, acts to keep the infant
positioned in the restraint.
Forward-Facing Child Restraint
A forward-facing child restraint provides
restraint for the child's body with the
harness.
Booster Seats
A belt-positioning booster seat is used for
children who have outgrown their
forward-facing child restraint. Boosters are
designed to improve the fit of the vehicle's
seat belt system until the child is large
enough for the vehicle seat belts to fit
properly without a booster seat. See the
seat belt fit test in Older Children065.
Page 191 of 369
Chevrolet Traverse Owner Manual (GMNA-Localizing-U.S./Canada/Mexico-
16411537) - 2023 - CRC - 3/28/22
190 Driving and Operating
2. Turn the steering wheel aboutone-eighth of a turn, until the right front
tire contacts the pavement edge.
3. Turn the steering wheel to go straight down the roadway.
Loss of Control
Skidding
There are three types of skids that
correspond to the vehicle's three control
systems:
.Braking Skid —wheels are not rolling.
.Steering or Cornering Skid —too much
speed or steering in a curve causes tires
to slip and lose cornering force.
.Acceleration Skid —too much throttle
causes the driving wheels to spin.
Defensive drivers avoid most skids by taking
reasonable care suited to existing conditions,
and by not overdriving those conditions. But
skids are always possible.
If the vehicle starts to slide, follow these
suggestions:
.Ease your foot off the accelerator pedal
and steer the way you want the vehicle
to go. The vehicle may straighten out. Be
ready for a second skid if it occurs.
.Slow down and adjust your driving
according to weather conditions. Stopping
distance can be longer and vehicle control
can be affected when traction is reduced
by water, snow, ice, gravel, or other
material on the road. Learn to recognize
warning clues —such as enough water,
ice, or packed snow on the road to make
a mirrored surface —and slow down
when you have any doubt.
.Try to avoid sudden steering, acceleration,
or braking, including reducing vehicle
speed by shifting to a lower gear. Any
sudden changes could cause the tires to
slide.
Remember: Antilock brakes help avoid only
the braking skid.
Off-Road Driving
All-Wheel Drive (AWD) vehicles can be used
for off-road driving. Vehicles without AWD
and vehicles not equipped with All Terrain
(AT) or On-Off Road (OOR) tires must not be
driven off-road except on a level, solid
surface. To contact the tire manufacturer for
more information about the original
equipment tires, see the warranty manual. Controlling the vehicle is the key to
successful off-road driving. One of the best
ways to control the vehicle is to control the
speed.
{Warning
When driving off-road, bouncing and
quick changes in direction can easily
throw you out of position. This could
cause you to lose control and crash. You
and your passengers should always wear
seat belts.
Before Driving Off-Road
.Have all necessary maintenance and
service work completed.
.Fuel the vehicle, fill fluid levels, and check
inflation pressure in all tires, including the
spare, if equipped.
.Read all the information about AWD
vehicles in this manual.
.Make sure all underbody shields,
if equipped, are properly attached.
.Know the local laws that apply to off-road
driving.
Page 194 of 369
Chevrolet Traverse Owner Manual (GMNA-Localizing-U.S./Canada/Mexico-
16411537) - 2023 - CRC - 3/28/22
Driving and Operating 193
Driving in Mud, Sand, Snow, or Ice
Use a low gear when driving in mud—the
deeper the mud, the lower the gear. Keep
the vehicle moving to avoid getting stuck.
Traction changes when driving on sand. On
loose sand, such as on beaches or sand
dunes, the tires tend to sink into the sand.
This affects steering, accelerating, and
braking. Drive at a reduced speed and avoid
sharp turns or abrupt maneuvers.
Traction is reduced on hard packed snow
and ice and it is easy to lose control. Reduce
vehicle speed when driving on hard packed
snow and ice.
{Warning
Driving on frozen lakes, ponds, or rivers
can be dangerous. Ice conditions vary
greatly and the vehicle could fall through
the ice; you and your passengers could
drown. Drive your vehicle on safe
surfaces only.
Driving in Water
{Warning
Driving through rushing water can be
dangerous. Deep water can sweep your
vehicle downstream and you and your
passengers could drown. If it is only
shallow water, it can still wash away the
ground from under your tires. Traction
could be lost, and the vehicle could roll
over. Do not drive through rushing water.
Caution
Do not drive through standing water if it
is deep enough to cover the wheel hubs,
axles, or exhaust pipe. Deep water can
damage the axle and other vehicle parts.
If the standing water is not too deep, drive
through it slowly. At faster speeds, water
can get into the engine and cause it to stall.
Stalling can occur if the exhaust pipe is
under water. Do not turn off the ignition
when driving through water. If the exhaust
pipe is under water, the engine will not
start. When going through water, the brakes
get wet, and it might take longer to stop.
See Driving on Wet Roads 0193.
After Off-Road Driving
Remove any brush or debris that has
collected on the underbody or chassis,
or under the hood. These accumulations can
be a fire hazard.
After operation in mud or sand, have the
brake linings cleaned and checked. These
substances can cause glazing and uneven
braking. Check the body structure, steering,
suspension, wheels, tires, and exhaust
system for damage and check the fuel lines
and cooling system for any leakage.
More frequent maintenance service is
required. See Maintenance Schedule 0327.
Driving on Wet Roads
Rain and wet roads can reduce vehicle
traction and affect your ability to stop and
accelerate. Always drive slower in these
types of driving conditions and avoid driving
through large puddles and deep-standing or
flowing water.