flat tire CHEVROLET TRAVERSE 2023 Owners Manual
[x] Cancel search | Manufacturer: CHEVROLET, Model Year: 2023, Model line: TRAVERSE, Model: CHEVROLET TRAVERSE 2023Pages: 369, PDF Size: 16.89 MB
Page 66 of 369
Chevrolet Traverse Owner Manual (GMNA-Localizing-U.S./Canada/Mexico-
16411537) - 2023 - CRC - 3/28/22
Seats and Restraints 65
system from properly turning off the
passenger airbag(s). SeePassenger Sensing
System 061.
If the vehicle has rollover roof-rail airbags,
see Different Size Tires and Wheels 0301 for
additional important information.
If the vehicle must be modified because you
have a disability and you have questions
about whether the modifications will affect
the vehicle's airbag system, or if you have
questions about whether the airbag system
will be affected if the vehicle is modified for
any other reason, call Customer Assistance.
See Customer Assistance Offices 0340.
Airbag System Check
The airbag system does not need regularly
scheduled maintenance or replacement.
Make sure the airbag readiness light is
working. See Airbag Readiness Light 0107.
Caution
If an airbag covering is damaged, opened,
or broken, the airbag may not work
properly. Do not open or break the airbag
coverings. If there are any opened or
broken airbag coverings, have the airbag
(Continued)
Caution (Continued)
covering and/or airbag module replaced.
For the location of the airbags, see Where
Are the Airbags? 057. See your dealer for
service.
Replacing Airbag System Parts
after a Crash
{Warning
A crash can damage the airbag systems
in the vehicle. A damaged airbag system
may not properly protect you and your
passenger(s) in a crash, resulting in
serious injury or even death. To help
make sure the airbag systems are
working properly after a crash, have
them inspected and any necessary
replacements made as soon as possible.
If an airbag inflates, you will need to
replace airbag system parts. See your dealer
for service. If the airbag readiness light stays on after
the vehicle is started or comes on when you
are driving, the airbag system may not work
properly. Have the vehicle serviced right
away. See
Airbag Readiness Light 0107.
Child Restraints
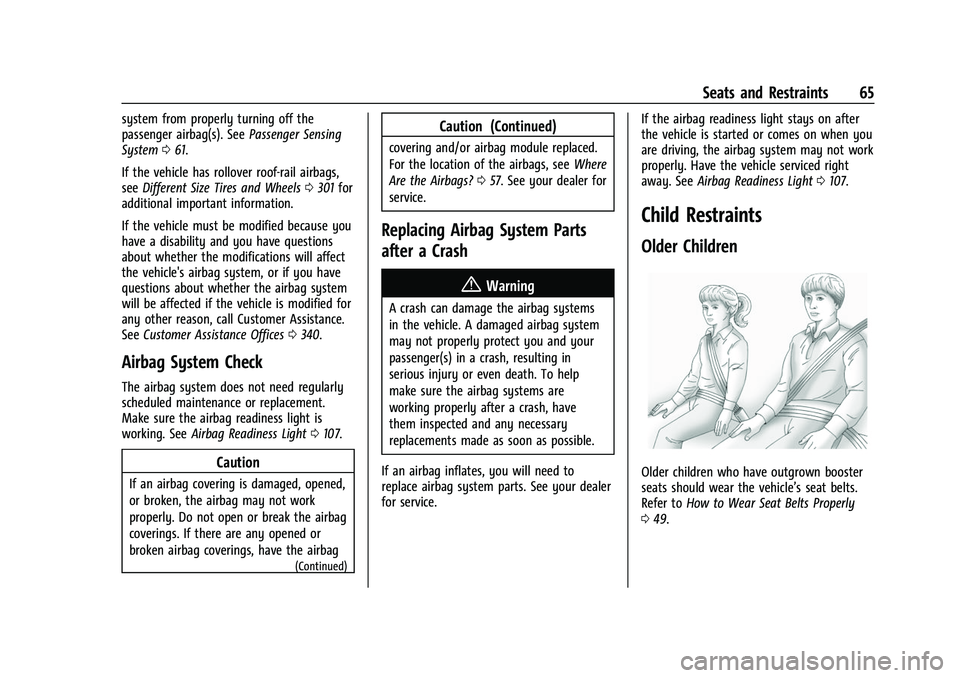
Older Children
Older children who have outgrown booster
seats should wear the vehicle’s seat belts.
Refer to How to Wear Seat Belts Properly
0 49.
Page 115 of 369
Chevrolet Traverse Owner Manual (GMNA-Localizing-U.S./Canada/Mexico-
16411537) - 2023 - CRC - 3/28/22
114 Instruments and Controls
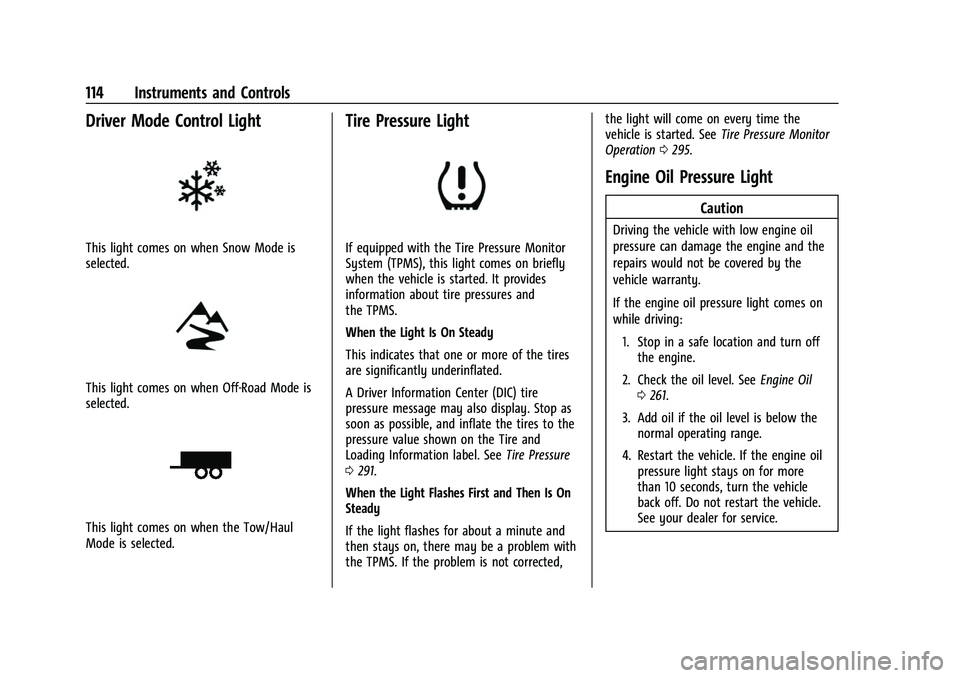
Driver Mode Control Light
This light comes on when Snow Mode is
selected.
This light comes on when Off-Road Mode is
selected.
This light comes on when the Tow/Haul
Mode is selected.
Tire Pressure Light
If equipped with the Tire Pressure Monitor
System (TPMS), this light comes on briefly
when the vehicle is started. It provides
information about tire pressures and
the TPMS.
When the Light Is On Steady
This indicates that one or more of the tires
are significantly underinflated.
A Driver Information Center (DIC) tire
pressure message may also display. Stop as
soon as possible, and inflate the tires to the
pressure value shown on the Tire and
Loading Information label. SeeTire Pressure
0 291.
When the Light Flashes First and Then Is On
Steady
If the light flashes for about a minute and
then stays on, there may be a problem with
the TPMS. If the problem is not corrected, the light will come on every time the
vehicle is started. See
Tire Pressure Monitor
Operation 0295.
Engine Oil Pressure Light
Caution
Driving the vehicle with low engine oil
pressure can damage the engine and the
repairs would not be covered by the
vehicle warranty.
If the engine oil pressure light comes on
while driving:
1. Stop in a safe location and turn off the engine.
2. Check the oil level. See Engine Oil
0 261.
3. Add oil if the oil level is below the normal operating range.
4. Restart the vehicle. If the engine oil pressure light stays on for more
than 10 seconds, turn the vehicle
back off. Do not restart the vehicle.
See your dealer for service.
Page 188 of 369
Chevrolet Traverse Owner Manual (GMNA-Localizing-U.S./Canada/Mexico-
16411537) - 2023 - CRC - 3/28/22
Driving and Operating 187
Trailer Towing
General Towing Information . . . . . . . . . . . 245
Driving Characteristics andTowing Tips . . . . . . . . . . . . . . . . . . . . . . . . . 245
Trailer Towing . . . . . . . . . . . . . . . . . . . . . . . . . 248
Towing Equipment . . . . . . . . . . . . . . . . . . . . 252
Trailer Sway Control (TSC) . . . . . . . . . . . . . 255
Conversions and Add-Ons
Add-On Electrical Equipment . . . . . . . . . . . 256
Driving Information
Driving for Better Fuel Economy
Driving habits can affect fuel mileage. Here
are some driving tips to get the best fuel
economy possible.
.Set the climate controls to the desired
temperature after the engine is started,
or turn them off when not required.
.On AWD vehicles, see Driver Mode Control
0 214.
.Avoid fast starts and accelerate smoothly.
.Brake gradually and avoid abrupt stops.
.Avoid idling the engine for long periods
of time.
.When road and weather conditions are
appropriate, use cruise control.
.Always follow posted speed limits or
drive more slowly when conditions
require.
.Keep vehicle tires properly inflated.
.Combine several trips into a single trip.
.Replace the vehicle's tires with the same
TPC Spec number molded into the tire's
sidewall near the size.
.Follow recommended scheduled
maintenance.
Distracted Driving
Distraction comes in many forms and can
take your focus from the task of driving.
Exercise good judgment and do not let other
activities divert your attention away from
the road. Many local governments have
enacted laws regarding driver distraction.
Become familiar with the local laws in
your area.
To avoid distracted driving, keep your eyes
on the road, keep your hands on the
steering wheel, and focus your attention on
driving.
.Do not use a phone in demanding driving
situations. Use a hands-free method to
place or receive necessary phone calls.
.Watch the road. Do not read, take notes,
or look up information on phones or
other electronic devices.
.Designate a front seat passenger to
handle potential distractions.
.Become familiar with vehicle features
before driving, such as programming
favorite radio stations and adjusting
climate control and seat settings. Program
all trip information into any navigation
device prior to driving.
Page 191 of 369
Chevrolet Traverse Owner Manual (GMNA-Localizing-U.S./Canada/Mexico-
16411537) - 2023 - CRC - 3/28/22
190 Driving and Operating
2. Turn the steering wheel aboutone-eighth of a turn, until the right front
tire contacts the pavement edge.
3. Turn the steering wheel to go straight down the roadway.
Loss of Control
Skidding
There are three types of skids that
correspond to the vehicle's three control
systems:
.Braking Skid —wheels are not rolling.
.Steering or Cornering Skid —too much
speed or steering in a curve causes tires
to slip and lose cornering force.
.Acceleration Skid —too much throttle
causes the driving wheels to spin.
Defensive drivers avoid most skids by taking
reasonable care suited to existing conditions,
and by not overdriving those conditions. But
skids are always possible.
If the vehicle starts to slide, follow these
suggestions:
.Ease your foot off the accelerator pedal
and steer the way you want the vehicle
to go. The vehicle may straighten out. Be
ready for a second skid if it occurs.
.Slow down and adjust your driving
according to weather conditions. Stopping
distance can be longer and vehicle control
can be affected when traction is reduced
by water, snow, ice, gravel, or other
material on the road. Learn to recognize
warning clues —such as enough water,
ice, or packed snow on the road to make
a mirrored surface —and slow down
when you have any doubt.
.Try to avoid sudden steering, acceleration,
or braking, including reducing vehicle
speed by shifting to a lower gear. Any
sudden changes could cause the tires to
slide.
Remember: Antilock brakes help avoid only
the braking skid.
Off-Road Driving
All-Wheel Drive (AWD) vehicles can be used
for off-road driving. Vehicles without AWD
and vehicles not equipped with All Terrain
(AT) or On-Off Road (OOR) tires must not be
driven off-road except on a level, solid
surface. To contact the tire manufacturer for
more information about the original
equipment tires, see the warranty manual. Controlling the vehicle is the key to
successful off-road driving. One of the best
ways to control the vehicle is to control the
speed.
{Warning
When driving off-road, bouncing and
quick changes in direction can easily
throw you out of position. This could
cause you to lose control and crash. You
and your passengers should always wear
seat belts.
Before Driving Off-Road
.Have all necessary maintenance and
service work completed.
.Fuel the vehicle, fill fluid levels, and check
inflation pressure in all tires, including the
spare, if equipped.
.Read all the information about AWD
vehicles in this manual.
.Make sure all underbody shields,
if equipped, are properly attached.
.Know the local laws that apply to off-road
driving.
Page 195 of 369
Chevrolet Traverse Owner Manual (GMNA-Localizing-U.S./Canada/Mexico-
16411537) - 2023 - CRC - 3/28/22
194 Driving and Operating
{Warning
Wet brakes can cause crashes. They
might not work as well in a quick stop
and could cause pulling to one side. You
could lose control of the vehicle.
After driving through a large puddle of
water or a car/vehicle wash, lightly apply
the brake pedal until the brakes work
normally.
Flowing or rushing water creates strong
forces. Driving through flowing water
could cause the vehicle to be carried
away. If this happens, you and other
vehicle occupants could drown. Do not
ignore police warnings and be very
cautious about trying to drive through
flowing water.
Hydroplaning
Hydroplaning is dangerous. Water can build
up under the vehicle's tires so they actually
ride on the water. This can happen if the
road is wet enough and you are going fast
enough. When the vehicle is hydroplaning, it
has little or no contact with the road.There is no hard and fast rule about
hydroplaning. The best advice is to slow
down when the road is wet.
Other Rainy Weather Tips
Besides slowing down, other wet weather
driving tips include:
.Allow extra following distance.
.Pass with caution.
.Keep windshield wiping equipment in
good shape.
.Keep the windshield washer fluid reservoir
filled.
.Have good tires with proper tread depth.
See
Tires 0286.
.Turn off cruise control.
.Activate All-Wheel Drive (AWD) mode. See
Driver Mode Control 0214.
Hill and Mountain Roads
Driving on steep hills or through mountains
is different than driving on flat or rolling
terrain. Tips include:
.Keep the vehicle serviced and in good
shape.
.Check all fluid levels and brakes, tires,
cooling system, and transmission.
.Shift to a lower gear when going down
steep or long hills.
{Warning
Using the brakes to slow the vehicle on a
long downhill slope can cause brake
overheating, can reduce brake
performance, and could result in a loss of
braking. Shift the transmission to a lower
gear to let the engine assist the brakes
on a steep downhill slope.
{Warning
Coasting downhill in N (Neutral) or with
the ignition off is dangerous. This can
cause overheating of the brakes and loss
of steering assist. Always have the engine
running and the vehicle in gear.
.Drive at speeds that keep the vehicle in
its own lane. Do not swing wide or cross
the center line.
.Be alert on top of hills; something could
be in your lane (e.g., stalled car, crash).
.Pay attention to special road signs (e.g.,
falling rocks area, winding roads, long
grades, passing or no-passing zones) and
take appropriate action.
Page 198 of 369
Chevrolet Traverse Owner Manual (GMNA-Localizing-U.S./Canada/Mexico-
16411537) - 2023 - CRC - 3/28/22
Driving and Operating 197
Warning (Continued)
Overloading can also reduce stopping
performance, damage the tires, and
shorten the life of the vehicle.
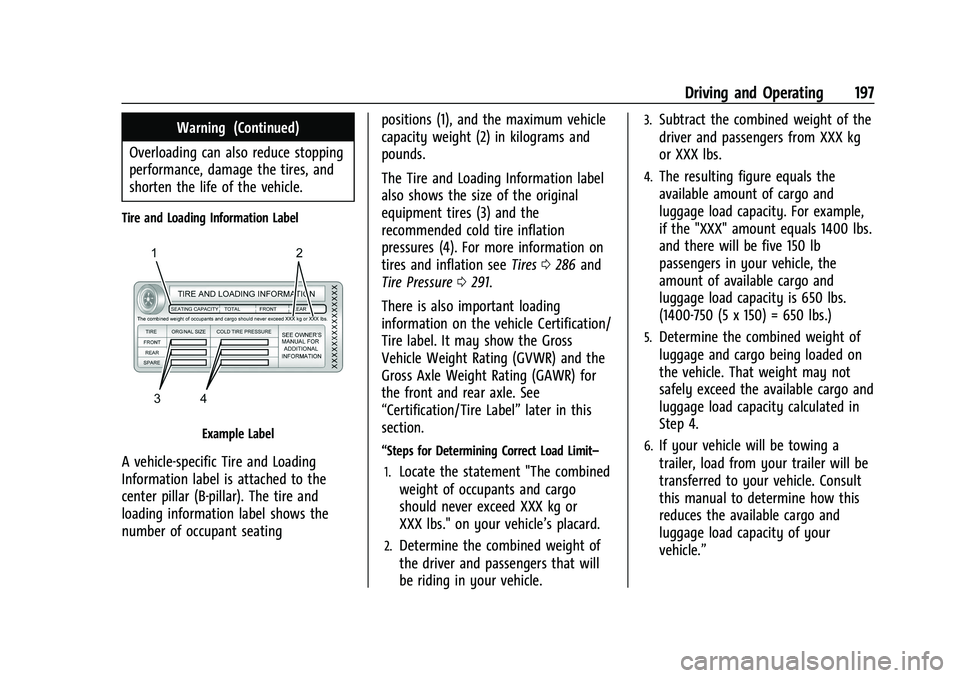
Tire and Loading Information Label
Example Label
A vehicle-specific Tire and Loading
Information label is attached to the
center pillar (B-pillar). The tire and
loading information label shows the
number of occupant seating positions (1), and the maximum vehicle
capacity weight (2) in kilograms and
pounds.
The Tire and Loading Information label
also shows the size of the original
equipment tires (3) and the
recommended cold tire inflation
pressures (4). For more information on
tires and inflation see
Tires0286 and
Tire Pressure 0291.
There is also important loading
information on the vehicle Certification/
Tire label. It may show the Gross
Vehicle Weight Rating (GVWR) and the
Gross Axle Weight Rating (GAWR) for
the front and rear axle. See
“Certification/Tire Label” later in this
section.“Steps for Determining Correct Load Limit–
1.
Locate the statement "The combined
weight of occupants and cargo
should never exceed XXX kg or
XXX lbs." on your vehicle’s placard.
2.Determine the combined weight of
the driver and passengers that will
be riding in your vehicle.
3.Subtract the combined weight of the
driver and passengers from XXX kg
or XXX lbs.
4.The resulting figure equals the
available amount of cargo and
luggage load capacity. For example,
if the "XXX" amount equals 1400 lbs.
and there will be five 150 lb
passengers in your vehicle, the
amount of available cargo and
luggage load capacity is 650 lbs.
(1400-750 (5 x 150) = 650 lbs.)
5.Determine the combined weight of
luggage and cargo being loaded on
the vehicle. That weight may not
safely exceed the available cargo and
luggage load capacity calculated in
Step 4.
6.If your vehicle will be towing a
trailer, load from your trailer will be
transferred to your vehicle. Consult
this manual to determine how this
reduces the available cargo and
luggage load capacity of your
vehicle.”
Page 200 of 369
Chevrolet Traverse Owner Manual (GMNA-Localizing-U.S./Canada/Mexico-
16411537) - 2023 - CRC - 3/28/22
Driving and Operating 199
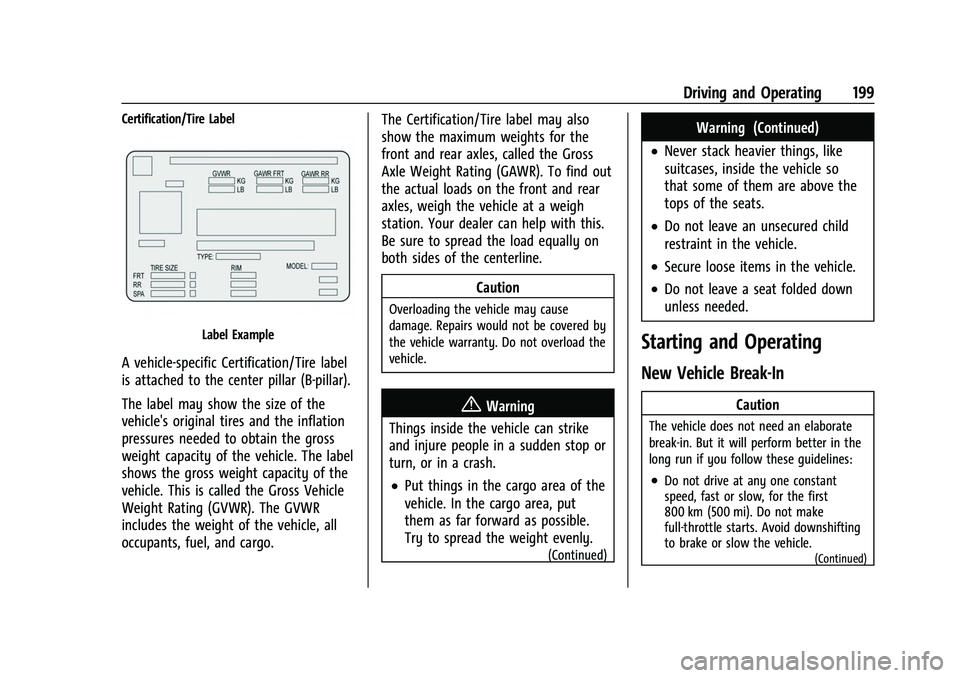
Certification/Tire Label
Label Example
A vehicle-specific Certification/Tire label
is attached to the center pillar (B-pillar).
The label may show the size of the
vehicle's original tires and the inflation
pressures needed to obtain the gross
weight capacity of the vehicle. The label
shows the gross weight capacity of the
vehicle. This is called the Gross Vehicle
Weight Rating (GVWR). The GVWR
includes the weight of the vehicle, all
occupants, fuel, and cargo.The Certification/Tire label may also
show the maximum weights for the
front and rear axles, called the Gross
Axle Weight Rating (GAWR). To find out
the actual loads on the front and rear
axles, weigh the vehicle at a weigh
station. Your dealer can help with this.
Be sure to spread the load equally on
both sides of the centerline.
Caution
Overloading the vehicle may cause
damage. Repairs would not be covered by
the vehicle warranty. Do not overload the
vehicle.
{Warning
Things inside the vehicle can strike
and injure people in a sudden stop or
turn, or in a crash.
.Put things in the cargo area of the
vehicle. In the cargo area, put
them as far forward as possible.
Try to spread the weight evenly.
(Continued)
Warning (Continued)
.Never stack heavier things, like
suitcases, inside the vehicle so
that some of them are above the
tops of the seats.
.Do not leave an unsecured child
restraint in the vehicle.
.Secure loose items in the vehicle.
.Do not leave a seat folded down
unless needed.
Starting and Operating
New Vehicle Break-In
Caution
The vehicle does not need an elaborate
break-in. But it will perform better in the
long run if you follow these guidelines:
.Do not drive at any one constant
speed, fast or slow, for the first
800 km (500 mi). Do not make
full-throttle starts. Avoid downshifting
to brake or slow the vehicle.
(Continued)
Page 254 of 369
Chevrolet Traverse Owner Manual (GMNA-Localizing-U.S./Canada/Mexico-
16411537) - 2023 - CRC - 3/28/22
Driving and Operating 253
To remove hitch cover, if equipped:1. Remove the two fasteners on the lower tabs.
2. Pull the lower edge of the cover to about a 45 degree angle.
3. Pull the cover downward to disengage the upper attachments.
To reinstall hitch cover: 1. Hold cover at a 45 degree angle to the vehicle and push the upper tabs into the
slots in the bumper.
2. Push the bottom of the cover forward until the lower tabs line up with the
lower slots.
3. Snap the hitch cover into place by pushing the upper corners forward.
4. Reinstall the two fasteners on the lower tabs.
Consider using mechanical sway controls
with any trailer. Ask a trailering professional
about sway controls or refer to the trailer
manufacturer's recommendations and
instructions.
Weight-Distributing Hitch Adjustment
A weight-distributing hitch may be useful
with some trailers.
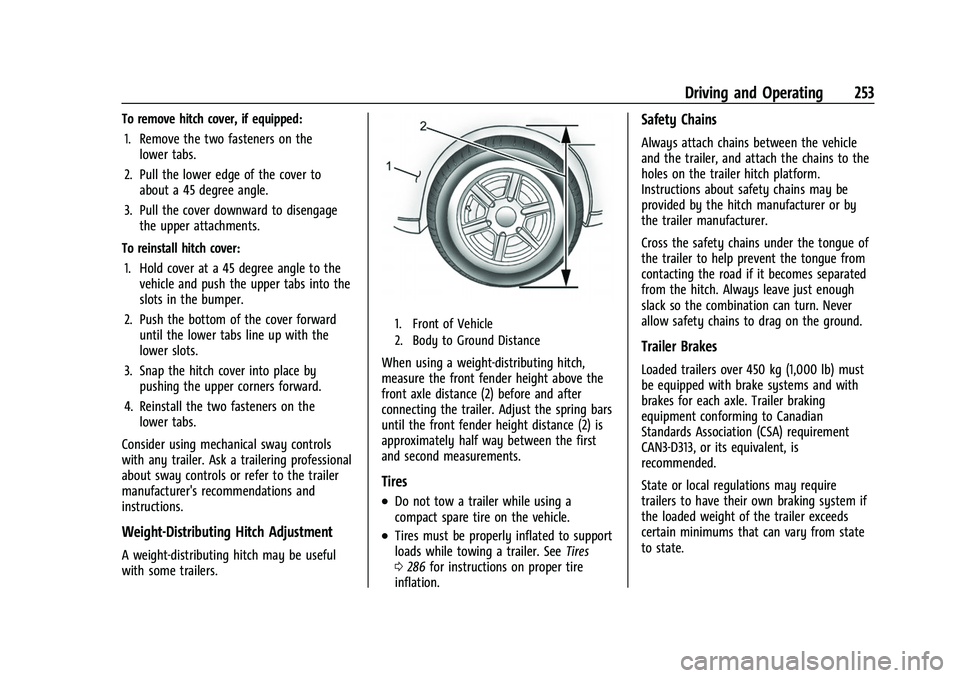
1. Front of Vehicle
2. Body to Ground Distance
When using a weight-distributing hitch,
measure the front fender height above the
front axle distance (2) before and after
connecting the trailer. Adjust the spring bars
until the front fender height distance (2) is
approximately half way between the first
and second measurements.
Tires
.Do not tow a trailer while using a
compact spare tire on the vehicle.
.Tires must be properly inflated to support
loads while towing a trailer. See Tires
0 286 for instructions on proper tire
inflation.
Safety Chains
Always attach chains between the vehicle
and the trailer, and attach the chains to the
holes on the trailer hitch platform.
Instructions about safety chains may be
provided by the hitch manufacturer or by
the trailer manufacturer.
Cross the safety chains under the tongue of
the trailer to help prevent the tongue from
contacting the road if it becomes separated
from the hitch. Always leave just enough
slack so the combination can turn. Never
allow safety chains to drag on the ground.
Trailer Brakes
Loaded trailers over 450 kg (1,000 lb) must
be equipped with brake systems and with
brakes for each axle. Trailer braking
equipment conforming to Canadian
Standards Association (CSA) requirement
CAN3-D313, or its equivalent, is
recommended.
State or local regulations may require
trailers to have their own braking system if
the loaded weight of the trailer exceeds
certain minimums that can vary from state
to state.
Page 257 of 369
Chevrolet Traverse Owner Manual (GMNA-Localizing-U.S./Canada/Mexico-
16411537) - 2023 - CRC - 3/28/22
256 Driving and Operating
Warning (Continued)
If the trailer begins to sway, reduce
vehicle speed by gradually removing your
foot from the accelerator. Then pull over
to check the trailer and vehicle to help
correct possible causes, including an
improperly or overloaded trailer,
unrestrained cargo, improper trailer hitch
configuration, or improperly inflated or
incorrect vehicle or trailer tires. See
Towing Equipment0252 for trailer
ratings and hitch setup recommendations.
Trailer Tires
Special Trailer (ST) tires differ from vehicle
tires. Trailer tires are designed with stiff
sidewalls to help prevent sway and to
support heavy loads. These features can
make it difficult to determine if the trailer
tire pressures are low only based on a visual
inspection.
Always check all trailer tire pressures before
each trip when the tires are cool. Low trailer
tire pressure is a leading cause of trailer tire
blow-outs. Trailer tires deteriorate over time. The trailer
tire sidewall will show the week and year
the tire was manufactured. Many trailer tire
manufacturers recommend replacing tires
more than six years old.
Overloading is another leading cause of
trailer tire blow-outs. Never load your trailer
with more weight than the tires are
designed to support. The load rating is
located on the trailer tire sidewall.
Always know the maximum speed rating for
the trailer tires before driving. This may be
significantly lower than the vehicle tire
speed rating. The speed rating may be on
the trailer tire sidewall. If the speed rating is
not shown, the default trailer tire speed
rating is 105 km/h (65 mph).
Conversions and Add-Ons
Add-On Electrical Equipment
{Warning
The Data Link Connector (DLC) is used for
vehicle service and Emission Inspection/
Maintenance testing.
(Continued)
Warning (Continued)
SeeMalfunction Indicator Lamp (Check
Engine Light) 0109. A device connected
to the DLC —such as an aftermarket
fleet or driver-behavior tracking device —
may interfere with vehicle systems. This
could affect vehicle operation and cause a
crash. Such devices may also access
information stored in the vehicle’s
systems.
Caution
Some electrical equipment can damage
the vehicle or cause components to not
work and would not be covered by the
vehicle warranty. Always check with your
dealer before adding electrical equipment.
Add-on equipment can drain the vehicle's
12-volt battery, even if the vehicle is not
operating.
The vehicle has an airbag system. Before
attempting to add anything electrical to the
vehicle, see Servicing the Airbag-Equipped
Vehicle 064 and Adding Equipment to the
Airbag-Equipped Vehicle 064.
Page 258 of 369
Chevrolet Traverse Owner Manual (GMNA-Localizing-U.S./Canada/Mexico-
16411537) - 2023 - CRC - 3/28/22
Vehicle Care 257
Vehicle Care
General Information
General Information . . . . . . . . . . . . . . . . . . . 258
California Perchlorate MaterialsRequirements . . . . . . . . . . . . . . . . . . . . . . . . 258
Accessories and Modifications . . . . . . . . . 258
Vehicle Checks
Doing Your Own Service Work . . . . . . . . 258
Hood . . . . . . . . . . . . . . . . . . . . . . . . . . . . . . . . . . 259
Engine Compartment Overview . . . . . . . 260
Engine Oil . . . . . . . . . . . . . . . . . . . . . . . . . . . . . 261
Engine Oil Life System . . . . . . . . . . . . . . . . 263
Automatic Transmission Fluid . . . . . . . . . 264
Engine Air Filter Life System . . . . . . . . . . 264
Engine Air Cleaner/Filter . . . . . . . . . . . . . . 264
Cooling System . . . . . . . . . . . . . . . . . . . . . . . 265
Engine Overheating . . . . . . . . . . . . . . . . . . . 268
Washer Fluid . . . . . . . . . . . . . . . . . . . . . . . . . . 269
Brakes . . . . . . . . . . . . . . . . . . . . . . . . . . . . . . . . . 270
Brake Fluid . . . . . . . . . . . . . . . . . . . . . . . . . . . . 270
Battery - North America . . . . . . . . . . . . . . . 271
All-Wheel Drive . . . . . . . . . . . . . . . . . . . . . . . . 272
Park Brake and P (Park) Mechanism Check . . . . . . . . . . . . . . . . . . . . . . . . . . . . . . . . 272
Wiper Blade Replacement . . . . . . . . . . . . . 273
Windshield Replacement . . . . . . . . . . . . . . 274
Gas Strut(s) . . . . . . . . . . . . . . . . . . . . . . . . . . . 274
Headlamp Aiming
Front Headlamp Aiming . . . . . . . . . . . . . . . 275
Bulb Replacement
Bulb Replacement . . . . . . . . . . . . . . . . . . . . . 275
LED Lighting . . . . . . . . . . . . . . . . . . . . . . . . . . . 275
Headlamps, Front Turn Signal, and Sidemarker . . . . . . . . . . . . . . . . . . . . . . . . . . 275
License Plate Lamp . . . . . . . . . . . . . . . . . . . . 276
Electrical System
High Voltage Devices and Wiring . . . . . . 276
Electrical System Overload . . . . . . . . . . . . . 277
Fuses and Circuit Breakers . . . . . . . . . . . . . 278
Engine Compartment Fuse Block . . . . . . 279
Instrument Panel Fuse Block . . . . . . . . . . . 282
Rear Compartment Fuse Block . . . . . . . . . 284
Wheels and Tires
Tires . . . . . . . . . . . . . . . . . . . . . . . . . . . . . . . . . . 286
All-Season Tires . . . . . . . . . . . . . . . . . . . . . . . 286
Winter Tires . . . . . . . . . . . . . . . . . . . . . . . . . . . 287
Tire Sidewall Labeling . . . . . . . . . . . . . . . . . 287
Tire Designations . . . . . . . . . . . . . . . . . . . . . . 289
Tire Terminology and Definitions . . . . . . 289
Tire Pressure . . . . . . . . . . . . . . . . . . . . . . . . . . 291
Tire Pressure for High-Speed Operation . . . . . . . . . . . . . . . . . . . . . . . . . . . 293
Tire Pressure Monitor System . . . . . . . . . 294
Tire Pressure Monitor Operation . . . . . . 295
Tire Inspection . . . . . . . . . . . . . . . . . . . . . . . . 298 Tire Rotation . . . . . . . . . . . . . . . . . . . . . . . . . . 298
When It Is Time for New Tires . . . . . . . . 299
Buying New Tires . . . . . . . . . . . . . . . . . . . . . 300
Different Size Tires and Wheels . . . . . . . 301
Uniform Tire Quality Grading . . . . . . . . . . 301
Wheel Alignment and Tire Balance . . . . 302
Wheel Replacement . . . . . . . . . . . . . . . . . . . 302
Tire Chains . . . . . . . . . . . . . . . . . . . . . . . . . . . . 303
If a Tire Goes Flat . . . . . . . . . . . . . . . . . . . . . 304
Tire Changing . . . . . . . . . . . . . . . . . . . . . . . . . 305
Compact Spare Tire . . . . . . . . . . . . . . . . . . . . 310
Jump Starting
Jump Starting - North America . . . . . . . . . 311
Towing the Vehicle
Transporting a Disabled Vehicle . . . . . . . . 313
Recreational Vehicle Towing . . . . . . . . . . . 315
Appearance Care
Exterior Care . . . . . . . . . . . . . . . . . . . . . . . . . . . 317
Interior Care . . . . . . . . . . . . . . . . . . . . . . . . . . . 321
Floor Mats . . . . . . . . . . . . . . . . . . . . . . . . . . . . 324