flat tire CHEVROLET TRAX 2016 1.G Owner's Manual
[x] Cancel search | Manufacturer: CHEVROLET, Model Year: 2016, Model line: TRAX, Model: CHEVROLET TRAX 2016 1.GPages: 358, PDF Size: 5.07 MB
Page 285 of 358
Chevrolet TRAX Owner Manual (GMNA-Localizing-U.S./Canada/Mexico-
9159371) - 2016 - crc - 5/21/15
284 Vehicle Care
to the generation of heat and its
ability to dissipate heat when
tested under controlled
conditions on a specified indoor
laboratory test wheel. Sustained
high temperature can cause the
material of the tire to degenerate
and reduce tire life, and
excessive temperature can lead
to sudden tire failure. The grade
C corresponds to a level of
performance which all
passenger car tires must meet
under the Federal Motor Safety
Standard No. 109. Grades B and
A represent higher levels of
performance on the laboratory
test wheel than the minimum
required by law. Warning: The
temperature grade for this tire is
established for a tire that is
properly inflated and not
overloaded. Excessive speed,
underinflation, or excessive
loading, either separately or in
combination, can cause heat
buildup and possible tire failure.Wheel Alignment and Tire
Balance
The tires and wheels were aligned
and balanced at the factory to
provide the longest tire life and best
overall performance. Adjustments to
wheel alignment and tire balancing
are not necessary on a regular
basis. Consider an alignment check
if there is unusual tire wear or the
vehicle is significantly pulling to one
side or the other. Some slight pull to
the left or right, depending on the
crown of the road and/or other road
surface variations such as troughs
or ruts, is normal. If the vehicle is
vibrating when driving on a smooth
road, the tires and wheels may need
to be rebalanced. See your dealer
for proper diagnosis.
Wheel Replacement
Replace any wheel that is bent,
cracked, or badly rusted or
corroded. If wheel nuts keep coming
loose, the wheel, wheel bolts, and
wheel nuts should be replaced.
If the wheel leaks air, replace it.Some aluminum wheels can be
repaired. See your dealer if any of
these conditions exist.
Your dealer will know the kind of
wheel that is needed.
Each new wheel should have the
same load-carrying capacity,
diameter, width, offset, and be
mounted the same way as the one it
replaces.
Replace wheels, wheel bolts, wheel
nuts, or Tire Pressure Monitor
System (TPMS) sensors with new
GM original equipment parts.
{Warning
Using the wrong replacement
wheels, wheel bolts, or wheel
nuts can be dangerous. It could
affect the braking and handling of
the vehicle. Tires can lose air,
and cause loss of control, causing
a crash. Always use the correct
wheel, wheel bolts, and wheel
nuts for replacement.
Page 286 of 358
Chevrolet TRAX Owner Manual (GMNA-Localizing-U.S./Canada/Mexico-
9159371) - 2016 - crc - 5/21/15
Vehicle Care 285
Caution
The wrong wheel can also cause
problems with bearing life, brake
cooling, speedometer or
odometer calibration, headlamp
aim, bumper height, vehicle
ground clearance, and tire or tire
chain clearance to the body and
chassis.
Used Replacement Wheels
{Warning
Replacing a wheel with a used
one is dangerous. How it has
been used or how far it has been
driven may be unknown. It could
fail suddenly and cause a crash.
When replacing wheels, use a
new GM original equipment
wheel.
Tire Chains
{Warning
Do not use tire chains. There is
not enough clearance. Tire chains
used on a vehicle without the
proper amount of clearance can
cause damage to the brakes,
suspension, or other vehicle
parts. The area damaged by the
tire chains could cause loss of
control and a crash.
Use another type of traction
device only if its manufacturer
recommends it for the vehicle's
tire size combination and road
conditions. Follow that
manufacturer's instructions. To
avoid vehicle damage, drive slow
and readjust or remove the
traction device if it contacts the
vehicle. Do not spin the wheels.
If traction devices are used, install
them on the front tires.
If a Tire Goes Flat
It is unusual for a tire to blow out
while driving, especially if the tires
are maintained properly. SeeTires
0 267. If air goes out of a tire, it is
much more likely to leak out slowly.
But if there ever is a blowout, here
are a few tips about what to expect
and what to do:
If a front tire fails, the flat tire
creates a drag that pulls the vehicle
toward that side. Take your foot off
the accelerator pedal and grip the
steering wheel firmly. Steer to
maintain lane position, and then
gently brake to a stop, well off the
road, if possible.
A rear blowout, particularly on a
curve, acts much like a skid and
may require the same correction as
used in a skid. Stop pressing the
accelerator pedal and steer to
straighten the vehicle. It may be
very bumpy and noisy. Gently brake
to a stop, well off the road,
if possible.
Page 287 of 358
Chevrolet TRAX Owner Manual (GMNA-Localizing-U.S./Canada/Mexico-
9159371) - 2016 - crc - 5/21/15
286 Vehicle Care
{Warning
Driving on a flat tire will cause
permanent damage to the tire.
Re-inflating a tire after it has been
driven on while severely
underinflated or flat may cause a
blowout and a serious crash.
Never attempt to re-inflate a tire
that has been driven on while
severely underinflated or flat.
Have your dealer or an authorized
tire service center repair or
replace the flat tire as soon as
possible.
{Warning
Lifting a vehicle and getting under
it to do maintenance or repairs is
dangerous without the
appropriate safety equipment and
training. If a jack is provided with
the vehicle, it is designed only for
changing a flat tire. If it is used for
anything else, you or others could(Continued)
Warning (Continued)
be badly injured or killed if the
vehicle slips off the jack. If a jack
is provided with the vehicle, only
use it for changing a flat tire.
If a tire goes flat, avoid further tire
and wheel damage by driving slowly
to a level place, well off the road,
if possible. Turn on the hazard
warning flashers. See Hazard
Warning Flashers 0124.
{Warning
Changing a tire can be
dangerous. The vehicle can slip
off the jack and roll over or fall
causing injury or death. Find a
level place to change the tire. To
help prevent the vehicle from
moving:
1. Set the parking brake firmly. (Continued)
Warning (Continued)
2. Put an automatictransmission in P (Park) or a
manual transmission in
1 (First) or R (Reverse).
3. Turn off the engine and do not restart while the vehicle
is raised.
4. Do not allow passengers to remain in the vehicle.
5. Place wheel blocks, if equipped, on both sides of
the tire at the opposite
corner of the tire being
changed.
When the vehicle has a flat tire (2),
use the following example as a
guide to assist in the placement of
the wheel blocks (1), if equipped.
Page 288 of 358
Chevrolet TRAX Owner Manual (GMNA-Localizing-U.S./Canada/Mexico-
9159371) - 2016 - crc - 5/21/15
Vehicle Care 287
1. Wheel Block (If Equipped)
2. Flat Tire
The following information explains
how to repair or change a tire.
Tire Changing
Removing the Spare Tire and
Tools
The spare tire and tools are located
in the storage compartment in the
rear of the vehicle.
Without Subwoofer
1. Wrench
2. Jack
3. Strap
With Subwoofer
To access the spare tire and tools: 1. Open the liftgate. See Liftgate
0 32.
2. Lift the trim cover.
3. If the vehicle has a subwoofer assembly on top of the spare
tire, remove it by turning the
center retainer
counterclockwise.
4. If the vehicle does not have a subwoofer, turn the retainer
counterclockwise to remove the
spare tire.
Page 289 of 358
Chevrolet TRAX Owner Manual (GMNA-Localizing-U.S./Canada/Mexico-
9159371) - 2016 - crc - 5/21/15
288 Vehicle Care
5. Remove the spare tire, jack,and tools and place them near
the tire being changed.
Removing the Flat Tire and
Installing the Spare Tire
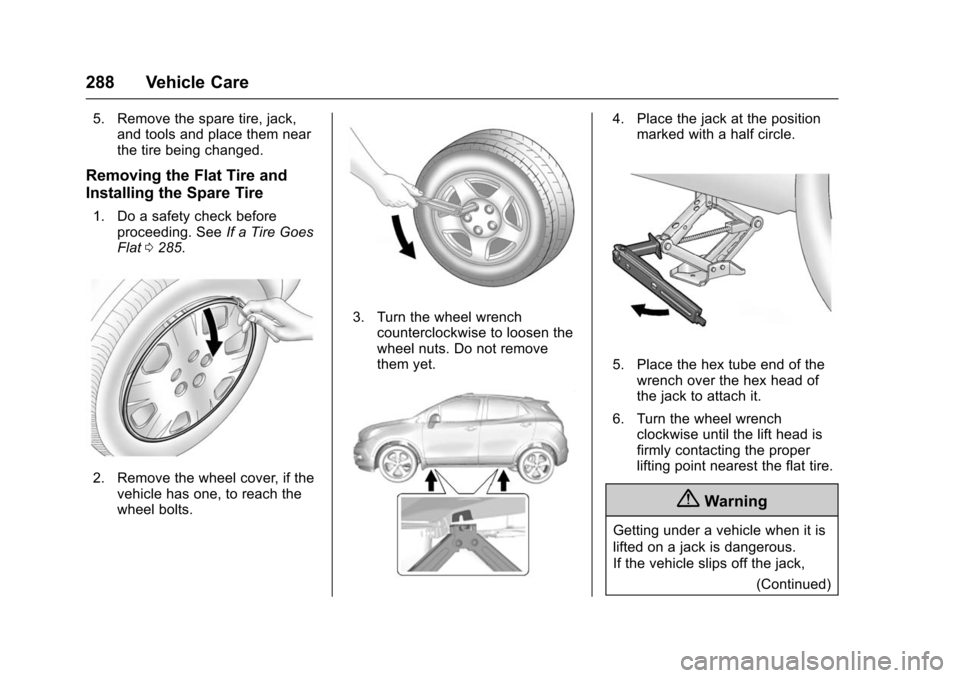
1. Do a safety check before
proceeding. See If a Tire Goes
Flat 0285.
2. Remove the wheel cover, if the
vehicle has one, to reach the
wheel bolts.
3. Turn the wheel wrenchcounterclockwise to loosen the
wheel nuts. Do not remove
them yet.
4. Place the jack at the positionmarked with a half circle.
5. Place the hex tube end of thewrench over the hex head of
the jack to attach it.
6. Turn the wheel wrench clockwise until the lift head is
firmly contacting the proper
lifting point nearest the flat tire.
{Warning
Getting under a vehicle when it is
lifted on a jack is dangerous.
If the vehicle slips off the jack,
(Continued)
Page 290 of 358
Chevrolet TRAX Owner Manual (GMNA-Localizing-U.S./Canada/Mexico-
9159371) - 2016 - crc - 5/21/15
Vehicle Care 289
Warning (Continued)
you could be badly injured or
killed. Never get under a vehicle
when it is supported only by
a jack.
{Warning
Raising the vehicle with the jack
improperly positioned can
damage the vehicle and even
make the vehicle fall. To help
avoid personal injury and vehicle
damage, be sure to fit the jack lift
head into the proper location
before raising the vehicle.
{Warning
Lifting a vehicle and getting under
it to do maintenance or repairs is
dangerous without the
appropriate safety equipment and(Continued)
Warning (Continued)
training. If a jack is provided with
the vehicle, it is designed only for
changing a flat tire. If it is used for
anything else, you or others could
be badly injured or killed if the
vehicle slips off the jack. If a jack
is provided with the vehicle, only
use it for changing a flat tire.
7. Turn the wheel wrench clockwise to raise the vehicle
far enough off the ground so
there is enough room for the
spare tire to fit underneath the
wheel well.
8. Turn the wheel nuts counterclockwise to
remove them.
9. Remove the flat tire.
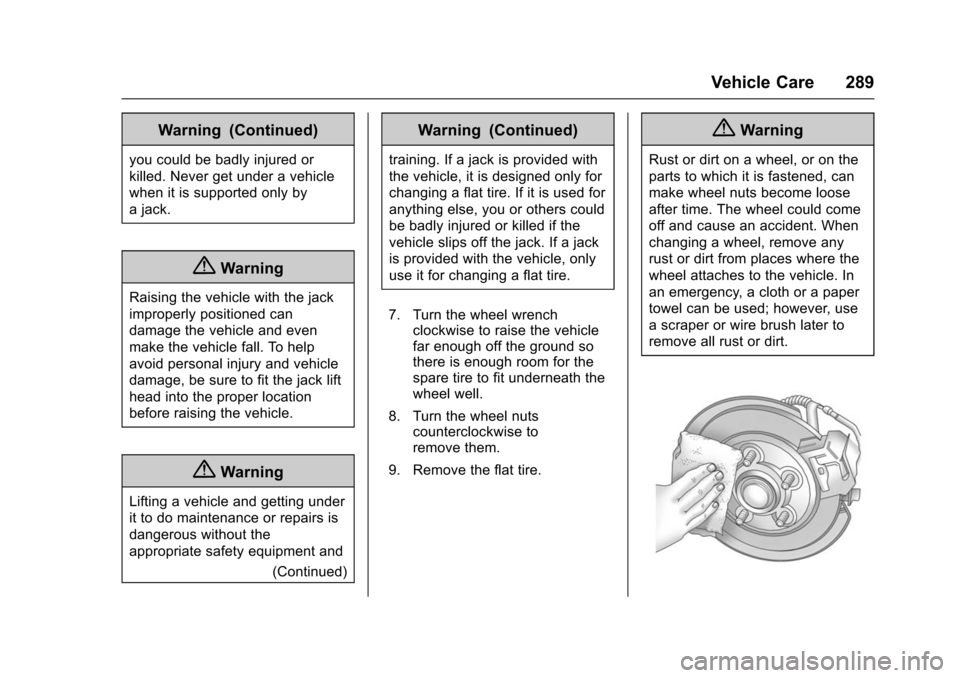
{Warning
Rust or dirt on a wheel, or on the
parts to which it is fastened, can
make wheel nuts become loose
after time. The wheel could come
off and cause an accident. When
changing a wheel, remove any
rust or dirt from places where the
wheel attaches to the vehicle. In
an emergency, a cloth or a paper
towel can be used; however, use
a scraper or wire brush later to
remove all rust or dirt.
Page 292 of 358
Chevrolet TRAX Owner Manual (GMNA-Localizing-U.S./Canada/Mexico-
9159371) - 2016 - crc - 5/21/15
Vehicle Care 291
Storing a Flat or Spare Tire
and Tools
{Warning
Storing a jack, a tire, or other
equipment in the passenger
compartment of the vehicle could
cause injury. In a sudden stop or
collision, loose equipment could
strike someone. Store all these in
the proper place.
Storing the Flat Tire and Tools 1. Return the jack and tools to their original storage location.
2. Replace the trim cover.
3. Place the flat tire, lying flat, in the rear storage compartment.
4. Attach one end of the strap to a cargo tie-down in the rear of
the vehicle.
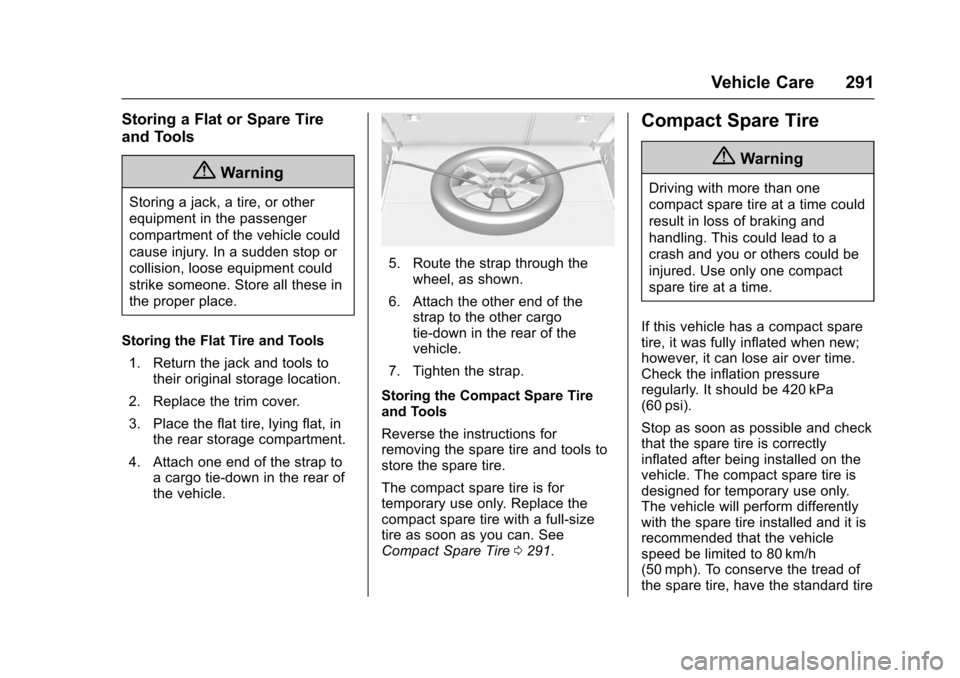
5. Route the strap through thewheel, as shown.
6. Attach the other end of the strap to the other cargo
tie-down in the rear of the
vehicle.
7. Tighten the strap.
Storing the Compact Spare Tire
and Tools
Reverse the instructions for
removing the spare tire and tools to
store the spare tire.
The compact spare tire is for
temporary use only. Replace the
compact spare tire with a full-size
tire as soon as you can. See
Compact Spare Tire 0291.
Compact Spare Tire
{Warning
Driving with more than one
compact spare tire at a time could
result in loss of braking and
handling. This could lead to a
crash and you or others could be
injured. Use only one compact
spare tire at a time.
If this vehicle has a compact spare
tire, it was fully inflated when new;
however, it can lose air over time.
Check the inflation pressure
regularly. It should be 420 kPa
(60 psi).
Stop as soon as possible and check
that the spare tire is correctly
inflated after being installed on the
vehicle. The compact spare tire is
designed for temporary use only.
The vehicle will perform differently
with the spare tire installed and it is
recommended that the vehicle
speed be limited to 80 km/h
(50 mph). To conserve the tread of
the spare tire, have the standard tire
Page 293 of 358
Chevrolet TRAX Owner Manual (GMNA-Localizing-U.S./Canada/Mexico-
9159371) - 2016 - crc - 5/21/15
292 Vehicle Care
repaired or replaced as soon as
convenient and return the spare tire
to the storage area.
When using a compact spare tire,
the ABS and Traction Control
systems may engage until the spare
tire is recognized by the vehicle,
especially on slippery roads. Adjust
driving to reduce possible
wheel slip.
Caution
When the compact spare is
installed, do not take the vehicle
through an automatic car wash
with guide rails. The compact
spare can get caught on the rails
which can damage the tire, wheel,
and other parts of the vehicle.
Do not use the compact spare on
other vehicles.
Do not mix the compact spare tire or
wheel with other wheels or tires.
They will not fit. Keep the spare tire
and its wheel together.
Caution
Tire chains will not fit the compact
spare. Using them can damage
the vehicle and the chains. Do not
use tire chains on the compact
spare.
Full-Size Spare Tire
If this vehicle came with a full-size
spare tire, it was fully inflated when
new, however, it can lose air over
time. Check the inflation pressure
regularly. See Tire Pressure0273
and Vehicle Load Limits 0199 for
information regarding proper tire
inflation and loading the vehicle. For
instructions on how to remove,
install, or store a spare tire, see Tire
Changing 0287.
After installing the spare tire on the
vehicle, stop as soon as possible
and check that the spare is correctly
inflated. The spare tire is made to
perform well at speeds up to
112 km/h (70 mph) at the
recommended inflation pressure, so
you can finish your trip. Have the damaged or flat road tire
repaired or replaced and installed
back onto the vehicle as soon as
possible so the spare tire will be
available in case it is needed again.
Do not mix tires and wheels of
different sizes, because they will not
fit. Keep the spare tire and its wheel
together.
Page 296 of 358
Chevrolet TRAX Owner Manual (GMNA-Localizing-U.S./Canada/Mexico-
9159371) - 2016 - crc - 5/21/15
Vehicle Care 295
{Warning
Fans or other moving engine
parts can injure you badly. Keep
your hands away from moving
parts once the engine is running.
5. Connect one end of the red positive (+) cable to the
positive (+) terminal on the
discharged battery.
6. Connect the other end of the red positive (+) cable to the
positive (+) terminal of the good
battery.
7. Connect one end of the black negative (–) cable to the
negative (–) terminal of the
good battery.
8. Connect the other end of the black negative (–) cable to the
negative (–) grounding point for
the discharged battery.
9. Start the engine in the vehicle with the good battery and run
the engine at idle speed for at
least four minutes. 10. Try to start the vehicle that had
the dead battery. If it will not
start after a few tries, it
probably needs service.
Caution
If the jumper cables are
connected or removed in the
wrong order, electrical shorting
may occur and damage the
vehicle. The repairs would not be
covered by the vehicle warranty.
Always connect and remove the
jumper cables in the correct order,
making sure that the cables do
not touch each other or other
metal.
Jumper Cable Removal
Reverse the sequence exactly when
removing the jumper cables.
After starting the disabled vehicle
and removing the jumper cables,
allow it to idle for several minutes.
Towing
Towing the Vehicle
Caution
Incorrectly towing a disabled
vehicle may cause damage. The
damage would not be covered by
the vehicle warranty.
Do not lash or hook to
suspension components. Use the
proper straps around the tires to
secure the vehicle.
Have the vehicle towed on a flatbed
car carrier or a wheel lift tow truck. If
a wheel lift tow truck is used, the
drive wheels cannot contact the
road while the vehicle is being
towed. A wheel dolly must be used
to lift all drive wheels off the ground.
Page 309 of 358
Chevrolet TRAX Owner Manual (GMNA-Localizing-U.S./Canada/Mexico-
9159371) - 2016 - crc - 5/21/15
308 Service and Maintenance
frequent checks and services. The
Additional Required Services -
Normal are for vehicles that:
.Carry passengers and cargo
within recommended limits on
the Tire and Loading Information
label. See Vehicle Load Limits
0 199.
. Are driven on reasonable road
surfaces within legal driving
limits.
. Use the recommended fuel. See
Fuel 0226.
Refer to the information in the
Maintenance Schedule Additional
Required Services - Normal chart.
The Additional Required Services -
Severe are for vehicles that are:
. Mainly driven in heavy city traffic
in hot weather.
. Mainly driven in hilly or
mountainous terrain.
. Frequently towing a trailer.
. Used for high speed or
competitive driving. .
Used for taxi, police, or delivery
service.
Refer to the information in the
Maintenance Schedule Additional
Required Services - Severe chart.
{Warning
Performing maintenance work can
be dangerous and can cause
serious injury. Perform
maintenance work only if the
required information, proper tools,
and equipment are available.
If they are not, see your dealer to
have a trained technician do the
work. See Doing Your Own
Service Work 0233.
Maintenance
Schedule
Owner Checks and Services
At Each Fuel Stop
.
Check the engine oil level. See
Engine Oil 0238.
Once a Month
. Check the tire inflation
pressures. See Tire Pressure
0 273.
. Inspect the tires for wear. See
Tire Inspection 0279.
. Check the windshield washer
fluid level. See Washer Fluid
0 249.
Engine Oil Change
When the:% CHANGE
(Change Engine Oil Soon) DIC
message displays, have the engine
oil and filter changed within the next
1 000 km/600 mi. If driven under the
best conditions, the engine oil life
system may not indicate the need
for vehicle service for up to a year.
The engine oil and filter must be