air CHEVROLET TRAX 2016 1.G Owners Manual
[x] Cancel search | Manufacturer: CHEVROLET, Model Year: 2016, Model line: TRAX, Model: CHEVROLET TRAX 2016 1.GPages: 358, PDF Size: 5.07 MB
Page 3 of 358
Chevrolet TRAX Owner Manual (GMNA-Localizing-U.S./Canada/Mexico-
9159371) - 2016 - crc - 5/21/15
2 Introduction
Introduction
The names, logos, emblems,
slogans, vehicle model names, and
vehicle body designs appearing in
this manual including, but not limited
to, GM, the GM logo, CHEVROLET,
the CHEVROLET Emblem, and
TRAX are trademarks and/or
service marks of General Motors
LLC, its subsidiaries, affiliates,
or licensors.For vehicles first sold in Canada,
substitute the name
“General
Motors of Canada Limited” for
Chevrolet Motor Division wherever it
appears in this manual.
This manual describes features that
may or may not be on the vehicle
because of optional equipment that
was not purchased on the vehicle,
model variants, country
specifications, features/applications
that may not be available in your
region, or changes subsequent to
the printing of this owner manual.
Refer to the purchase
documentation relating to your
specific vehicle to confirm the
features.
Keep this manual in the vehicle for
quick reference.
Canadian Vehicle Owners
Propriétaires Canadiens
A French language manual can be
obtained from your dealer, at
www.helminc.com, or from:
On peut obtenir un exemplaire de
ce guide en français auprès du
concessionnaire ou à l'adresse
savant:
Helm, Incorporated
Attention: Customer Service
47911 Halyard Drive
Plymouth, MI 48170
Using this Manual
To quickly locate information about
the vehicle, use the Index in the
back of the manual. It is an
alphabetical list of what is in the
manual and the page number where
it can be found.
Litho in U.S.A.
Part No. 23427377 A First Printing©2015 General Motors LLC. All Rights Reserved.
Page 4 of 358
Chevrolet TRAX Owner Manual (GMNA-Localizing-U.S./Canada/Mexico-
9159371) - 2016 - crc - 5/21/15
Introduction 3
About Driving the Vehicle
As with other vehicles of this type,
failure to operate this vehicle
correctly may result in loss of
control or an accident. Be sure to
read the driving guidelines in this
manual in the section called“Driving
and Operating” and specifically
Driver Behavior 0192, Driving
Environment 0192, and Vehicle
Design 0192.
Danger, Warning, and
Caution
Warning messages found on vehicle
labels and in this manual describe
hazards and what to do to avoid or
reduce them.
{Danger
Danger indicates a hazard with a
high level of risk which will result
in serious injury or death.
{Warning
Warning indicates a hazard that
could result in injury or death.
Caution
Caution indicates a hazard that
could result in property or vehicle
damage.
A circle with a slash through it is a
safety symbol which means “Do
Not,” “Do not do this,” or“Do not let
this happen.”
Symbols
The vehicle has components and
labels that use symbols instead of
text. Symbols are shown along with the text describing the operation or
information relating to a specific
component, control, message,
gauge, or indicator.
M:
Shown when the owner
manual has additional instructions
or information.
*: Shown when the service
manual has additional instructions
or information.
0: Shown when there is more
information on another page —
“see page.”
Vehicle Symbol Chart
Here are some additional symbols
that may be found on the vehicle
and what they mean. For more
information on the symbol, refer to
the Index.
9: Airbag Readiness Light
#:Air Conditioning
!:Antilock Brake System (ABS)
%:Audio Steering Wheel Controls
or OnStar®(if equipped)
$: Brake System Warning Light
":Charging System
Page 8 of 358
Chevrolet TRAX Owner Manual (GMNA-Localizing-U.S./Canada/Mexico-
9159371) - 2016 - crc - 5/21/15
In Brief 7
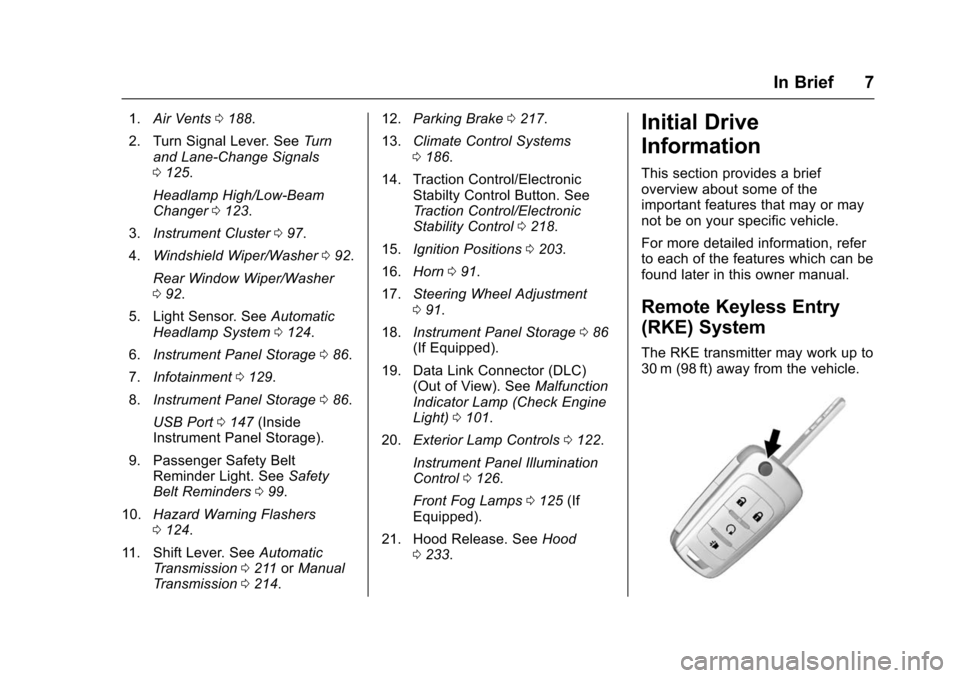
1.Air Vents 0188.
2. Turn Signal Lever. See Turn
and Lane-Change Signals
0 125.
Headlamp High/Low-Beam
Changer 0123.
3. Instrument Cluster 097.
4. Windshield Wiper/Washer 092.
Rear Window Wiper/Washer
0 92.
5. Light Sensor. See Automatic
Headlamp System 0124.
6. Instrument Panel Storage 086.
7. Infotainment 0129.
8. Instrument Panel Storage 086.
USB Port 0147 (Inside
Instrument Panel Storage).
9. Passenger Safety Belt Reminder Light. See Safety
Belt Reminders 099.
10. Hazard Warning Flashers
0124.
11. Shift Lever. See Automatic
Transmission 0211 orManual
Transmission 0214. 12.
Parking Brake 0217.
13. Climate Control Systems
0186.
14. Traction Control/Electronic Stabilty Control Button. See
Traction Control/Electronic
Stability Control 0218.
15. Ignition Positions 0203.
16. Horn 091.
17. Steering Wheel Adjustment
091.
18. Instrument Panel Storage 086
(If Equipped).
19. Data Link Connector (DLC) (Out of View). See Malfunction
Indicator Lamp (Check Engine
Light) 0101.
20. Exterior Lamp Controls 0122.
Instrument Panel Illumination
Control 0126.
Front Fog Lamps 0125 (If
Equipped).
21. Hood Release. See Hood
0 233.Initial Drive
Information
This section provides a brief
overview about some of the
important features that may or may
not be on your specific vehicle.
For more detailed information, refer
to each of the features which can be
found later in this owner manual.
Remote Keyless Entry
(RKE) System
The RKE transmitter may work up to
30 m (98 ft) away from the vehicle.
Page 13 of 358
Chevrolet TRAX Owner Manual (GMNA-Localizing-U.S./Canada/Mexico-
9159371) - 2016 - crc - 5/21/15
12 In Brief
To achieve a comfortable seating
position, change the seatback
recline angle as little as necessary
while keeping the seat and the head
restraint height in the proper
position.
SeeHead Restraints 041 and Seat
Adjustment 042.
Safety Belts
Refer to the following sections for
important information on how to use
safety belts properly:
.
Safety Belts 050. .
How to Wear Safety Belts
Properly 051.
. Lap-Shoulder Belt 052.
. Lower Anchors and Tethers for
Children (LATCH System) 075.
Passenger Sensing
System
United States
Canada
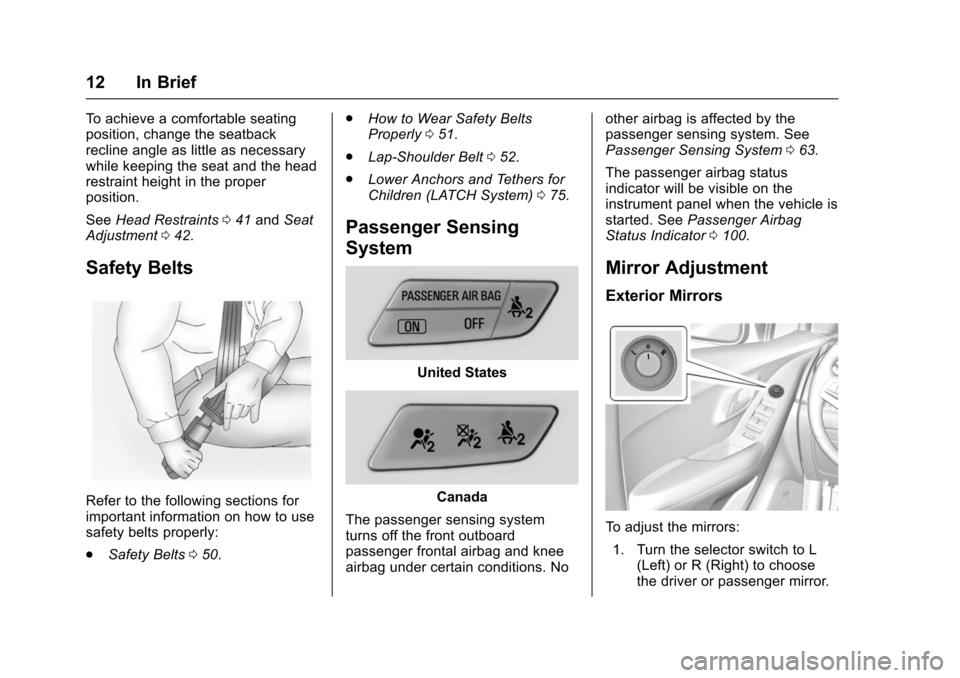
The passenger sensing system
turns off the front outboard
passenger frontal airbag and knee
airbag under certain conditions. No other airbag is affected by the
passenger sensing system. See
Passenger Sensing System
063.
The passenger airbag status
indicator will be visible on the
instrument panel when the vehicle is
started. See Passenger Airbag
Status Indicator 0100.
Mirror Adjustment
Exterior Mirrors
To adjust the mirrors:
1. Turn the selector switch to L (Left) or R (Right) to choose
the driver or passenger mirror.
Page 17 of 358
Chevrolet TRAX Owner Manual (GMNA-Localizing-U.S./Canada/Mexico-
9159371) - 2016 - crc - 5/21/15
16 In Brief
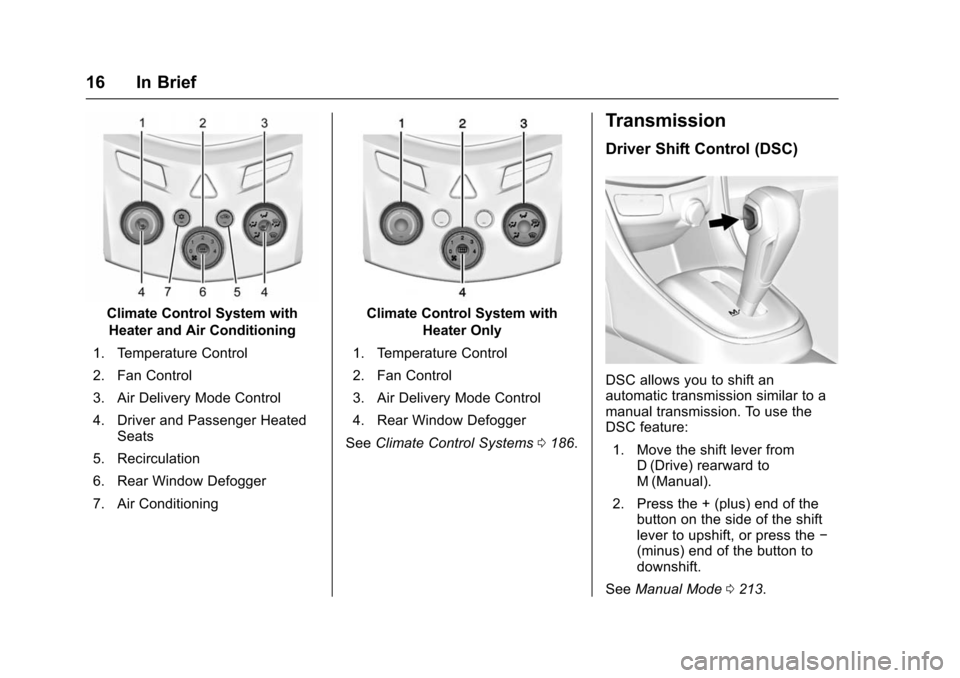
Climate Control System withHeater and Air Conditioning
1. Temperature Control
2. Fan Control
3. Air Delivery Mode Control
4. Driver and Passenger Heated Seats
5. Recirculation
6. Rear Window Defogger
7. Air ConditioningClimate Control System with Heater Only
1. Temperature Control
2. Fan Control
3. Air Delivery Mode Control
4. Rear Window Defogger
See Climate Control Systems 0186.
Transmission
Driver Shift Control (DSC)
DSC allows you to shift an
automatic transmission similar to a
manual transmission. To use the
DSC feature:
1. Move the shift lever from D (Drive) rearward to
M (Manual).
2. Press the + (plus) end of the button on the side of the shift
lever to upshift, or press the −
(minus) end of the button to
downshift.
See Manual Mode 0213.
Page 20 of 358
Chevrolet TRAX Owner Manual (GMNA-Localizing-U.S./Canada/Mexico-
9159371) - 2016 - crc - 5/21/15
In Brief 19
.www.xmradio.ca or call
1-877-209-0079 (Canada).
See Satellite Radio 0143.
Portable Audio Devices
There is a USB port in the storage
area to the right of the infotainment
system. If equipped, there is a
3.5 mm (1/8 in) AUX input jack on
the front of the infotainment system.
External devices such as iPods
®,
laptop computers, MP3 players, CD
changers, and USB storage devices
may be connected, depending on
the audio system.
See USB Port 0147 andAuxiliary
Devices 0151.
Bluetooth®
The Bluetooth®system allows users
with a Bluetooth-enabled mobile
phone to make and receive
hands-free calls using the vehicle
audio system and controls. The Bluetooth-enabled mobile
phone must be paired with the
in-vehicle Bluetooth system before it
can be used in the vehicle. Not all
phones will support all functions.
See
Bluetooth (Voice Recognition)
0 162 orBluetooth (Overview) 0153
or Bluetooth (Infotainment Controls)
0 154 andHands-Free Phone
0 168.
Steering Wheel Controls
Some audio steering wheel controls
could differ depending on the
vehicle's options. Some audio
steering wheel controls can be
adjusted at the steering wheel.
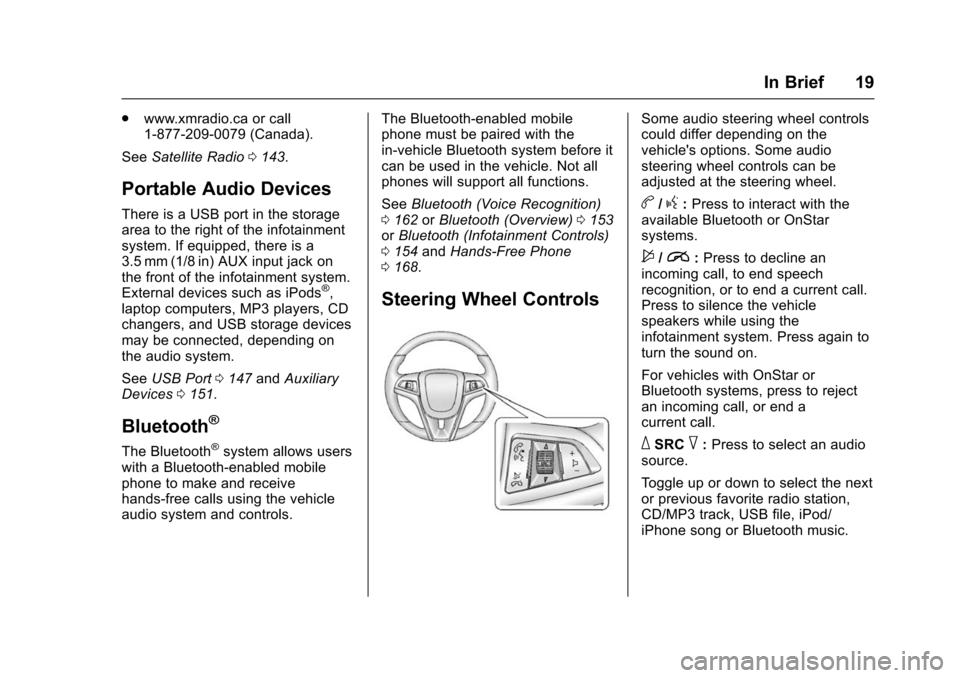
b/g:Press to interact with the
available Bluetooth or OnStar
systems.
$/i: Press to decline an
incoming call, to end speech
recognition, or to end a current call.
Press to silence the vehicle
speakers while using the
infotainment system. Press again to
turn the sound on.
For vehicles with OnStar or
Bluetooth systems, press to reject
an incoming call, or end a
current call.
_SRC^: Press to select an audio
source.
Toggle up or down to select the next
or previous favorite radio station,
CD/MP3 track, USB file, iPod/
iPhone song or Bluetooth music.
Page 26 of 358
Chevrolet TRAX Owner Manual (GMNA-Localizing-U.S./Canada/Mexico-
9159371) - 2016 - crc - 5/21/15
Keys, Doors, and Windows 25
{Warning
If the key is unintentionally
rotated while the vehicle is
running, the ignition could be
moved out of the RUN position.
This could be caused by heavy
items hanging from the key ring,
or by large or long items attached
to the key ring that could be
contacted by the driver or
steering wheel. If the ignition
moves out of the RUN position,
the engine will shut off, braking
and steering power assist may be(Continued)
Warning (Continued)
impacted, and airbags may not
deploy. To reduce the risk of
unintentional rotation of the
ignition key, do not change the
way the ignition key and Remote
Keyless Entry (RKE) transmitter,
if equipped, are connected to the
provided key rings.
The ignition key, key rings, and RKE
transmitter, if equipped, are
designed to work together. As a
system, it reduces the risk of
unintentionally moving the key out
of the RUN position. If replacements
or additions are required, see your
dealer. Limit added items to a few
essential keys or small, light items
no larger than an RKE transmitter.
The key that is part of the Remote
Keyless Entry (RKE) transmitter can
be used for the ignition and all
locks.
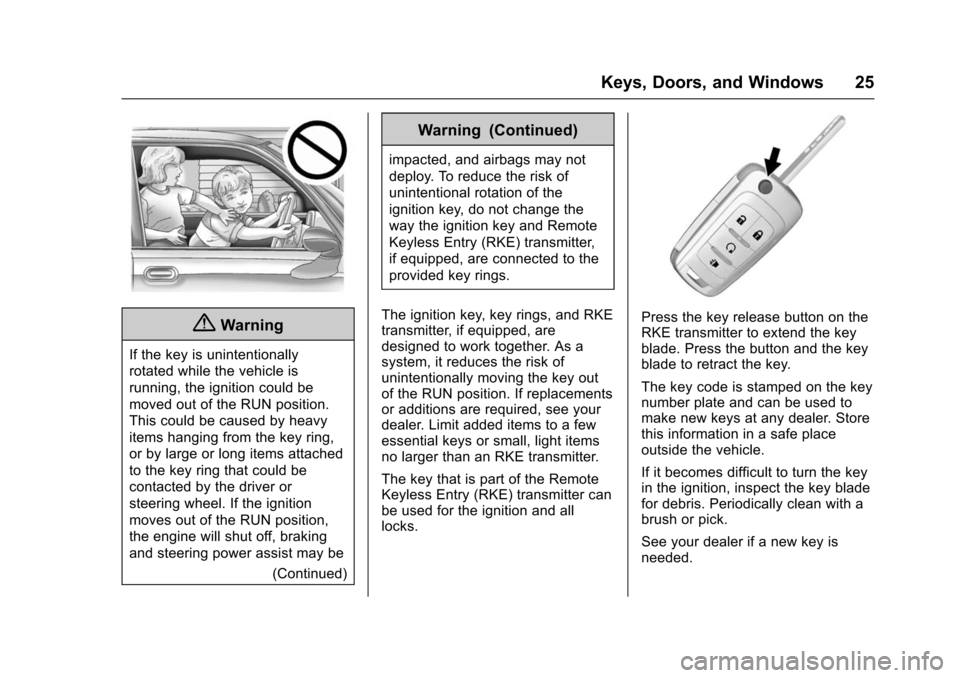
Press the key release button on the
RKE transmitter to extend the key
blade. Press the button and the key
blade to retract the key.
The key code is stamped on the key
number plate and can be used to
make new keys at any dealer. Store
this information in a safe place
outside the vehicle.
If it becomes difficult to turn the key
in the ignition, inspect the key blade
for debris. Periodically clean with a
brush or pick.
See your dealer if a new key is
needed.
Page 33 of 358
Chevrolet TRAX Owner Manual (GMNA-Localizing-U.S./Canada/Mexico-
9159371) - 2016 - crc - 5/21/15
32 Keys, Doors, and Windows
Doors
Liftgate
{Warning
Exhaust gases can enter the
vehicle if it is driven with the
liftgate, hatch/trunk open, or with
any objects that pass through the
seal between the body and the
hatch/trunk or liftgate. Engine
exhaust contains carbon
monoxide (CO) which cannot be
seen or smelled. It can cause
unconsciousness and even death.
If the vehicle must be driven with
the liftgate or hatch/trunk open:. Close all of the windows.
. Fully open the air outlets on
or under the instrument
panel.
. Adjust the climate control
system to a setting that
brings in only outside air
and set the fan speed to the
(Continued)
Warning (Continued)
highest setting. See
“Climate Control Systems”
in the Index.
. If the vehicle is equipped
with a power liftgate, disable
the power liftgate function.
For more information about
carbon monoxide, see Engine
Exhaust 0210.
Caution
To avoid damage to the liftgate or
liftgate glass, make sure the area
above and behind the liftgate is
clear before opening it.
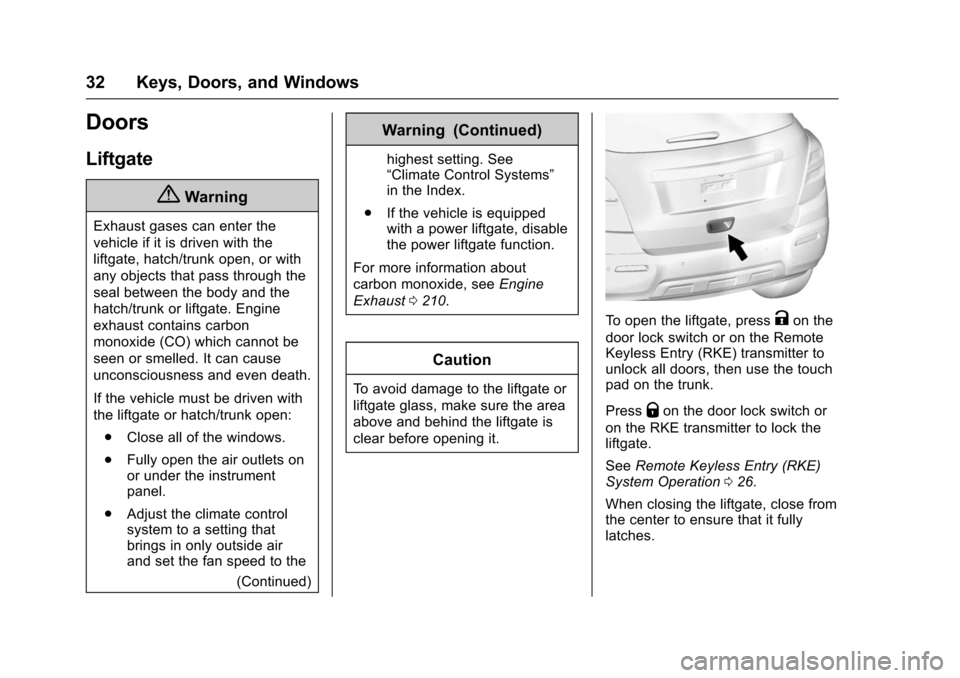
To open the liftgate, pressKon the
door lock switch or on the Remote
Keyless Entry (RKE) transmitter to
unlock all doors, then use the touch
pad on the trunk.
Press
Qon the door lock switch or
on the RKE transmitter to lock the
liftgate.
See Remote Keyless Entry (RKE)
System Operation 026.
When closing the liftgate, close from
the center to ensure that it fully
latches.
Page 41 of 358
Chevrolet TRAX Owner Manual (GMNA-Localizing-U.S./Canada/Mexico-
9159371) - 2016 - crc - 5/21/15
40 Seats and Restraints
Seats and
Restraints
Head Restraints
Head Restraints . . . . . . . . . . . . . . . 41
Front Seats
Seat Adjustment . . . . . . . . . . . . . . . 42
Power Seat Adjustment . . . . . . . . 43
Lumbar Adjustment . . . . . . . . . . . . 43
Reclining Seatbacks . . . . . . . . . . . 44
Front Seat Armrest . . . . . . . . . . . . 45
Heated Front Seats . . . . . . . . . . . . 45
Folding Seatback . . . . . . . . . . . . . . 46
Rear Seats
Rear Seats . . . . . . . . . . . . . . . . . . . . 47
Rear Seat Armrest . . . . . . . . . . . . . 50
Safety Belts
Safety Belts . . . . . . . . . . . . . . . . . . . . 50
How to Wear Safety BeltsProperly . . . . . . . . . . . . . . . . . . . . . . 51
Lap-Shoulder Belt . . . . . . . . . . . . . 52
Safety Belt Use During Pregnancy . . . . . . . . . . . . . . . . . . . . 55
Safety Belt Extender . . . . . . . . . . . 55
Safety System Check . . . . . . . . . . 55
Safety Belt Care . . . . . . . . . . . . . . . 56 Replacing Safety Belt System
Parts after a Crash . . . . . . . . . . . 56
Airbag System
Airbag System . . . . . . . . . . . . . . . . . 57
Where Are the Airbags? . . . . . . . 58
When Should an AirbagInflate? . . . . . . . . . . . . . . . . . . . . . . . 60
What Makes an Airbag Inflate? . . . . . . . . . . . . . . . . . . . . . . . 61
How Does an Airbag Restrain? . . . . . . . . . . . . . . . . . . . . . 61
What Will You See after an Airbag Inflates? . . . . . . . . . . . . . . 61
Passenger Sensing System . . . 63
Servicing the Airbag-Equipped Vehicle . . . . . . . . . . . . . . . . . . . . . . . 66
Adding Equipment to the Airbag-Equipped Vehicle . . . . . 67
Airbag System Check . . . . . . . . . . 67
Replacing Airbag System Parts after a Crash . . . . . . . . . . . . . . . . . 68
Child Restraints
Older Children . . . . . . . . . . . . . . . . . 68
Infants and Young Children . . . . 70
Child Restraint Systems . . . . . . . 72
Where to Put the Restraint . . . . . 74
Lower Anchors and Tethers forChildren (LATCH System) . . . . 75 Replacing LATCH System Parts
After a Crash . . . . . . . . . . . . . . . . . 80
Securing Child Restraints (Rear Seat) . . . . . . . . . . . . . . . . . . . 81
Securing Child Restraints (Front
Passenger Seat) . . . . . . . . . . . . . 83
Page 47 of 358
Chevrolet TRAX Owner Manual (GMNA-Localizing-U.S./Canada/Mexico-
9159371) - 2016 - crc - 5/21/15
46 Seats and Restraints
when the ignition is turned on. Press
the control to use the heated seats
after the vehicle is started.
The heated seat indicator lights do
not turn on during a remote start.
The temperature performance of an
unoccupied seat may be reduced.
This is normal.
The heated seats will not turn on
during a remote start unless the
heated seat feature is enabled in
the vehicle personalization menu.
SeeRemote Vehicle Start 028 and
Vehicle Personalization 0114.
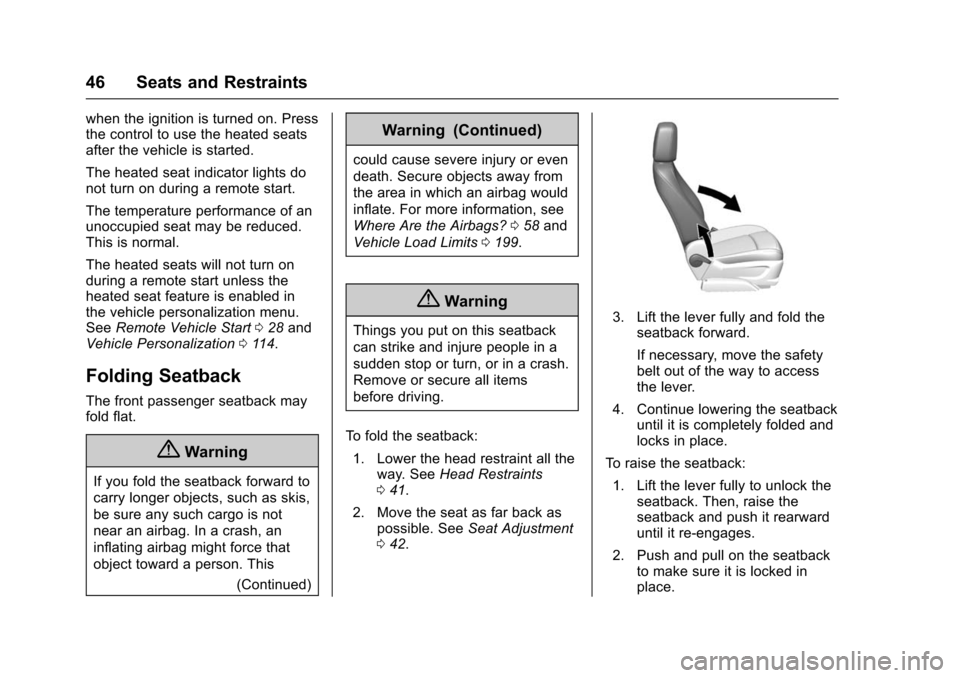
Folding Seatback
The front passenger seatback may
fold flat.
{Warning
If you fold the seatback forward to
carry longer objects, such as skis,
be sure any such cargo is not
near an airbag. In a crash, an
inflating airbag might force that
object toward a person. This
(Continued)
Warning (Continued)
could cause severe injury or even
death. Secure objects away from
the area in which an airbag would
inflate. For more information, see
Where Are the Airbags? 058 and
Vehicle Load Limits 0199.
{Warning
Things you put on this seatback
can strike and injure people in a
sudden stop or turn, or in a crash.
Remove or secure all items
before driving.
To fold the seatback: 1. Lower the head restraint all the way. See Head Restraints
0 41.
2. Move the seat as far back as possible. See Seat Adjustment
0 42.3. Lift the lever fully and fold the
seatback forward.
If necessary, move the safety
belt out of the way to access
the lever.
4. Continue lowering the seatback until it is completely folded and
locks in place.
To raise the seatback: 1. Lift the lever fully to unlock the seatback. Then, raise the
seatback and push it rearward
until it re-engages.
2. Push and pull on the seatback to make sure it is locked in
place.