ignition CHEVROLET TRAX 2017 1.G Owner's Guide
[x] Cancel search | Manufacturer: CHEVROLET, Model Year: 2017, Model line: TRAX, Model: CHEVROLET TRAX 2017 1.GPages: 373, PDF Size: 6.53 MB
Page 149 of 373
Chevrolet TRAX Owner Manual (GMNA-Localizing-U.S./Canada/Mexico-
10122735) - 2017 - crc - 7/12/16
148 Lighting
Lights On with Wipers
If the windshield wipers are
activated in daylight with the engine
on, and the exterior lamp control is
in AUTO, the headlamps, parking
lamps, and other exterior lamps
come on. The transition time for the
lamps coming on varies based on
wiper speed. When the wipers are
not operating, these lamps turn off.
Move the exterior lamp control to
P
or;to disable this feature.
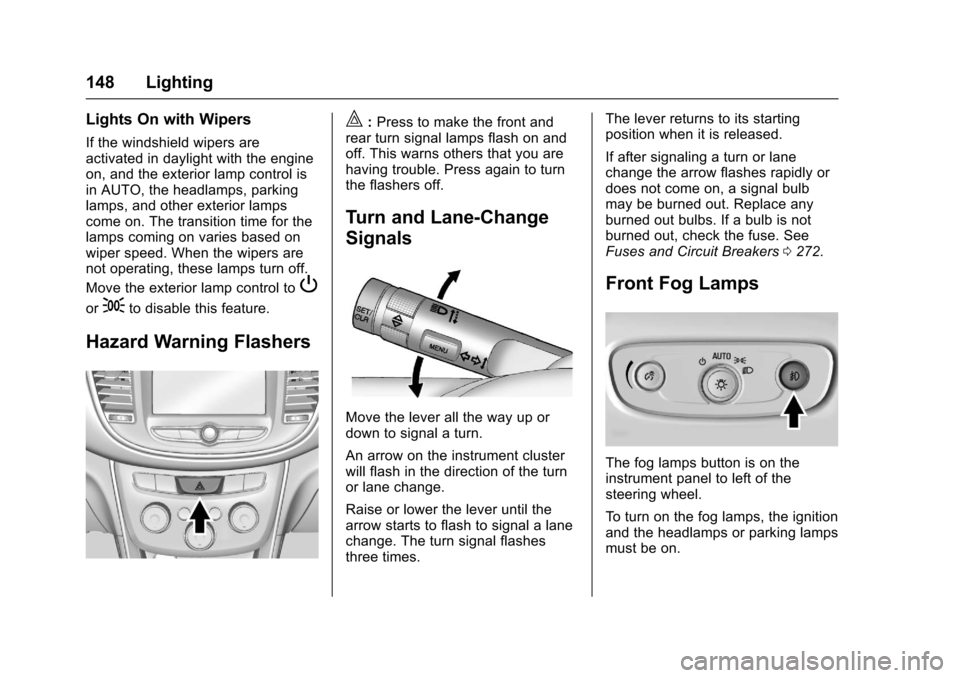
Hazard Warning Flashers
|:Press to make the front and
rear turn signal lamps flash on and
off. This warns others that you are
having trouble. Press again to turn
the flashers off.
Turn and Lane-Change
Signals
Move the lever all the way up or
down to signal a turn.
An arrow on the instrument cluster
will flash in the direction of the turn
or lane change.
Raise or lower the lever until the
arrow starts to flash to signal a lane
change. The turn signal flashes
three times. The lever returns to its starting
position when it is released.
If after signaling a turn or lane
change the arrow flashes rapidly or
does not come on, a signal bulb
may be burned out. Replace any
burned out bulbs. If a bulb is not
burned out, check the fuse. See
Fuses and Circuit Breakers
0272.
Front Fog Lamps
The fog lamps button is on the
instrument panel to left of the
steering wheel.
To turn on the fog lamps, the ignition
and the headlamps or parking lamps
must be on.
Page 151 of 373
Chevrolet TRAX Owner Manual (GMNA-Localizing-U.S./Canada/Mexico-
10122735) - 2017 - crc - 7/12/16
150 Lighting
H:When the button is returned to
the middle position, the lamps turn
on automatically when a door is
opened.
': Press to turn on the dome
lamps.
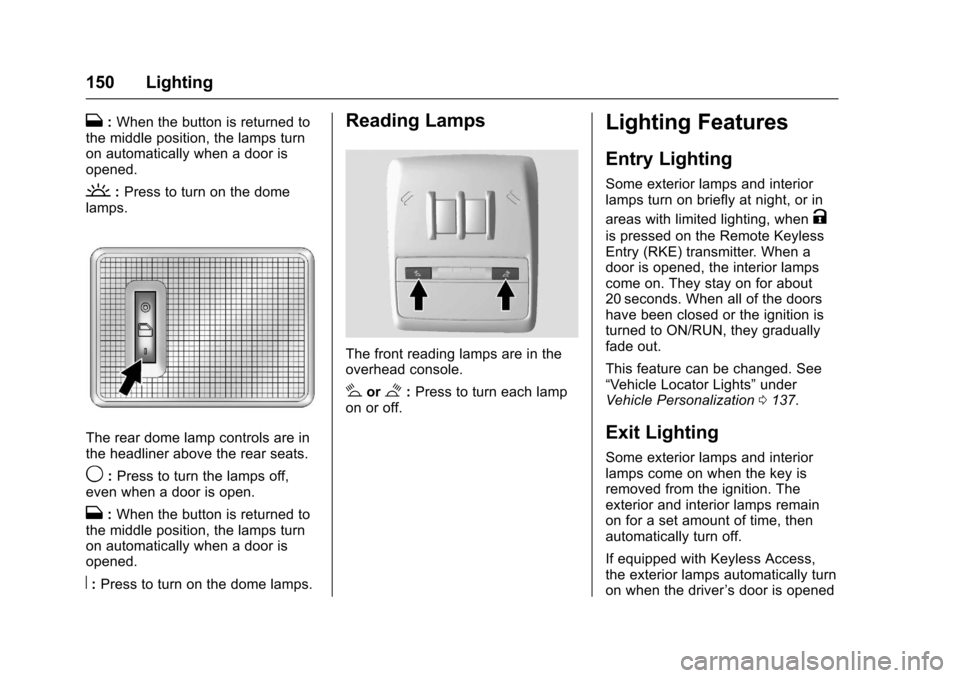
The rear dome lamp controls are in
the headliner above the rear seats.
9: Press to turn the lamps off,
even when a door is open.
H: When the button is returned to
the middle position, the lamps turn
on automatically when a door is
opened.
R: Press to turn on the dome lamps.
Reading Lamps
The front reading lamps are in the
overhead console.
#or$:Press to turn each lamp
on or off.
Lighting Features
Entry Lighting
Some exterior lamps and interior
lamps turn on briefly at night, or in
areas with limited lighting, when
K
is pressed on the Remote Keyless
Entry (RKE) transmitter. When a
door is opened, the interior lamps
come on. They stay on for about
20 seconds. When all of the doors
have been closed or the ignition is
turned to ON/RUN, they gradually
fade out.
This feature can be changed. See
“Vehicle Locator Lights” under
Vehicle Personalization 0137.
Exit Lighting
Some exterior lamps and interior
lamps come on when the key is
removed from the ignition. The
exterior and interior lamps remain
on for a set amount of time, then
automatically turn off.
If equipped with Keyless Access,
the exterior lamps automatically turn
on when the driver ’s door is opened
Page 152 of 373
Chevrolet TRAX Owner Manual (GMNA-Localizing-U.S./Canada/Mexico-
10122735) - 2017 - crc - 7/12/16
Lighting 151
after the ignition is turned to OFF.
The interior lights turn on when the
ignition is turned to OFF.
The exterior lamps turn off
immediately by turning the exterior
lamp control off.
This feature can be changed. See
Vehicle Personalization0137.
Battery Load
Management
The vehicle has Electric Power
Management (EPM) that estimates
the battery's temperature and state
of charge. It then adjusts the voltage
for best performance and extended
life of the battery.
When the battery's state of charge
is low, the voltage is raised slightly
to quickly bring the charge back up.
When the state of charge is high,
the voltage is lowered slightly to
prevent overcharging. If the vehicle
has a voltmeter gauge or a voltage
display on the Driver Information
Center (DIC), you may see the voltage move up or down. This is
normal. If there is a problem, an
alert will be displayed.
The battery can be discharged at
idle if the electrical loads are very
high. This is true for all vehicles.
This is because the generator
(alternator) may not be spinning fast
enough at idle to produce all the
power needed for very high
electrical loads.
A high electrical load occurs when
several of the following are on, such
as: headlamps, high beams, fog
lamps, rear window defogger,
climate control fan at high speed,
heated seats, engine cooling fans,
trailer loads, and loads plugged into
accessory power outlets.
EPM works to prevent excessive
discharge of the battery. It does this
by balancing the generator's output
and the vehicle's electrical needs.
It can increase engine idle speed to
generate more power, whenever
needed. It can temporarily reduce
the power demands of some
accessories.Normally, these actions occur in
steps or levels, without being
noticeable. In rare cases at the
highest levels of corrective action,
this action may be noticeable to the
driver.
Battery Power Protection
The battery saver feature protects
against draining the vehicle's
battery.
If some interior lamps or the manual
parking lamps or headlamps are left
on and the ignition is turned off, the
battery rundown protection system
automatically turns the lamp off after
some time.
To restart the 10 minute timer, turn
the exterior lamp control to the
O
position and then back to the;
or5position. To keep the lamps
on for more than 10 minutes, the
ignition must be in the ACC/
ACCESSORY or ON/RUN position.
Page 154 of 373
Chevrolet TRAX Owner Manual (GMNA-Localizing-U.S./Canada/Mexico-
10122735) - 2017 - crc - 7/12/16
Infotainment System 153
features are also available through
the instrument cluster and steering
wheel controls.
Before driving:
.Become familiar with the
operation, faceplate buttons, and
screen buttons.
. Set up the audio by presetting
favorite stations, setting the
tone, and adjusting the
speakers.
. Set up phone numbers in
advance so they can be called
easily by pressing a single
button or by using a single voice
command if equipped with
Bluetooth phone capability.
See Defensive Driving 0193.
To play the infotainment system with
the ignition off, see Retained
Accessory Power (RAP) 0210.Theft-Deterrent Feature
The infotainment system has an
electronic security system installed
to prevent theft.
The infotainment system only works
in the vehicle in which it was first
installed, and cannot be used in
another vehicle.
Page 158 of 373
Chevrolet TRAX Owner Manual (GMNA-Localizing-U.S./Canada/Mexico-
10122735) - 2017 - crc - 7/12/16
Infotainment System 157
4.d
.Radio: Press and release to
go to the next station or
channel. Press and hold to
fast seek the next strongest
station or channel.
. USB/Bluetooth Music/
Pictures: Press and release
to go to the next track.
Press and hold to fast
forward.
5.
5
. Press and release to
access the phone screen,
answer an incoming call,
or access the device home
screen.
Home Page (Radio with
Touchscreen)
Touchscreen Buttons
If equipped, touchscreen buttons
show on the screen when available.
When a function is unavailable, the
button may gray out. When a
function is selected, the button may
highlight.
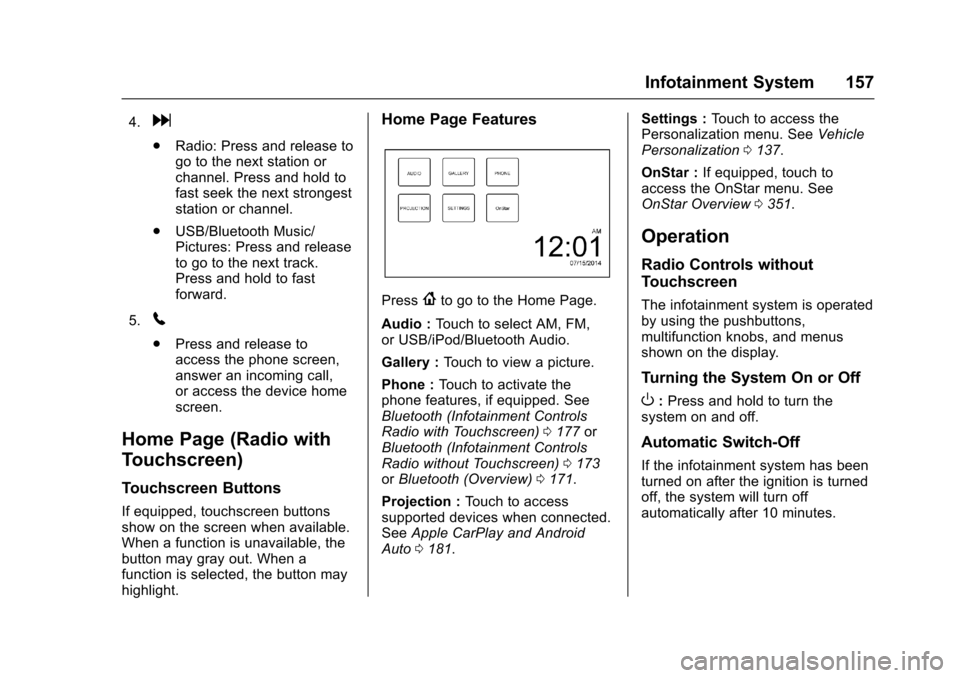
Home Page Features
Press{to go to the Home Page.
Audio : Touch to select AM, FM,
or USB/iPod/Bluetooth Audio.
Gallery : Touch to view a picture.
Phone : Touch to activate the
phone features, if equipped. See
Bluetooth (Infotainment Controls
Radio with Touchscreen) 0177 or
Bluetooth (Infotainment Controls
Radio without Touchscreen) 0173
or Bluetooth (Overview) 0171.
Projection : Touch to access
supported devices when connected.
See Apple CarPlay and Android
Auto 0181. Settings :
Touch to access the
Personalization menu. See Vehicle
Personalization 0137.
OnStar : If equipped, touch to
access the OnStar menu. See
OnStar Overview 0351.
Operation
Radio Controls without
Touchscreen
The infotainment system is operated
by using the pushbuttons,
multifunction knobs, and menus
shown on the display.
Turning the System On or Off
O:Press and hold to turn the
system on and off.
Automatic Switch-Off
If the infotainment system has been
turned on after the ignition is turned
off, the system will turn off
automatically after 10 minutes.
Page 160 of 373
Chevrolet TRAX Owner Manual (GMNA-Localizing-U.S./Canada/Mexico-
10122735) - 2017 - crc - 7/12/16
Infotainment System 159
9. Continue pressing BACK to goback to the Tone
Settings menu.
System Settings
Configuring the Number of
Favorite Pages
Up to six favorite pages can be
saved, and each page can store up
to four radio stations.
To configure the number of available
favorite pages:
1. Press MENU.
2. Turn MENU to Set Number of Favorites Pages.
3. Press MENU.
4. Turn MENU to the desired number of pages.
5. Press MENU to select the desired number of pages.
6. Press BACK to exit.
Auto Volume Control
This feature automatically adjusts
the radio volume to compensate for
road and wind noise. The level of volume compensation
can be selected, or the feature can
be turned off.
1. Press MENU.
2. Turn MENU to Settings.
3. Press MENU.
4. Turn MENU to Auto Volume Control.
5. Press MENU.
6. Select the desired setting.
7. Press BACK to exit.
Radio Controls with
Touchscreen
The infotainment system is operated
by using the pushbuttons, menus
shown on the display, and steering
wheel controls.
Turning the System On or Off
O: Press to turn the radio on.
Press and hold to turn the radio off. Automatic Switch-Off
If the infotainment system has been
turned on after the ignition is turned
off, the system will turn off
automatically after 10 minutes.
Volume Control
O:
Turn to increase or decrease.
O:Press when the system is on to
mute and unmute the system.
System Settings
Auto Volume
This feature automatically adjusts
the radio volume to compensate for
road and wind noise.
The level of volume compensation
can be selected, or the feature can
be turned off.
1. Touch MENU from a source screen.
2. Select Auto Volume.
3. Select the desired setting.
4. Touch
3to go back to the
source screen.
Page 167 of 373
Chevrolet TRAX Owner Manual (GMNA-Localizing-U.S./Canada/Mexico-
10122735) - 2017 - crc - 7/12/16
166 Infotainment System
Connecting a USB Storage
Device or iPod/iPhone
To connect a USB storage device,
connect the device to the USB port.
To connect an iPod/iPhone, connect
one end of the device’s cable to the
iPod/iPhone and the other end to
the USB port.
The iPod/iPhone charges while it is
connected to the vehicle if the
vehicle is in ACC/ACCESSORY or
ON/RUN. See Ignition Positions
(Key Access) 0203 orIgnition
Positions (Keyless Access) 0205.
When the vehicle is turned off, the
iPod/iPhone automatically powers
off and will not charge or draw
power from the vehicle's battery.
For more information on USB
usage, see “Audio System
Information” following.
Audio System Information
The infotainment system can play
the music files contained in the USB
storage device or iPod/iPhone
products. Using MP3/WMA/OGG/WAV Files
.
Music files with .mp3, .wma,
.ogg, and .wav file name
extensions can be played.
. MP3 files that can be played: Bit
rate: 8 kbps to 320 kbps.
Sampling frequency: 48 kHz,
44.1 kHz, 32 kHz, 24 kHz, 22.05
kHz, and 16 kHz.
. Files with a bit rate above
128 kbps will result in higher
quality sound.
. ID3 Tag information for MP3
files, such as the album name
and the artist, can be played.
. To display album title, track title,
and artist information, the file
should be compatible with the
ID3 Tag V1 and V2 formats.
Using USB Storage Devices and
iPod/iPhone
. Use a USB or flash memory type
storage device. Do not connect
using a USB adaptor. .
Do not connect and reconnect
the USB device repeatedly in a
short time, as this may cause
static electricity and problems
using the device.
. Use a USB device with a metal
connecting terminal.
. Connection with i-Stick Type
USB storage devices may be
faulty due to vehicle vibration.
. Do not touch the USB
connecting terminal.
. Only USB storage devices
formatted in FAT16/32 or exFAT
file systems are recognized.
NTFS and other file systems are
not recognized.
. The time it takes to process files
will depend on the USB storage
device type and capacity, and
the type of files stored.
. Some USB storage device files
may not be compatible.
. Up to two USB devices and one
iPod can be played through a
USB hub. All devices may not be
supported, depending on the
performance of the USB hub.
Page 168 of 373
Chevrolet TRAX Owner Manual (GMNA-Localizing-U.S./Canada/Mexico-
10122735) - 2017 - crc - 7/12/16
Infotainment System 167
If there is not enough power
supply, it may not operate
normally.
. Do not disconnect the USB
storage device while it is playing.
This may cause damage to the
product or affect the
performance of the USB device.
. Disconnect the USB storage
device when the ignition is
turned off. If the ignition is turned
on while the USB device is
connected, the USB device may
be damaged or may not operate
normally.
. USB storage devices can only
be connected for playing music,
viewing photo files,
or upgrading.
. Do not use the USB terminal to
charge USB accessory
equipment. The heat generated
may cause performance issues
or damage.
. Music files to which Digital Right
Management (DRM) is applied
cannot be played. .
USB storage device that are in
capacity with a limit of 5,000
files, such as music, photo,
video, 15 stages of folder
structure. Normal usage cannot
be guaranteed for a storage
device that exceeds this limit.
The iPod/iPhone can play all
music files that are supported.
The music file lists will only
display up to 5,000 files on the
screen. These files are sorted in
alphabetical order.
. Some iPod/iPhone product
models may not support the
connectivity or functionality of
this product.
. Only connect the iPod/iPhone
with connection cables
supported by iPod/iPhone
products. Other connection
cables cannot be used.
. The iPod/iPhone may be
damaged if it is connected to the
vehicle with the ignition on.
When not in use, disconnect the
iPod/iPhone. .
When the iPod/iPhone is
connected to the USB port by
using the iPod/iPhone cable, the
Bluetooth music is not
supported.
. The iPod/iPhone playback
functions and the information
displayed may be different when
played on the infotainment
system.
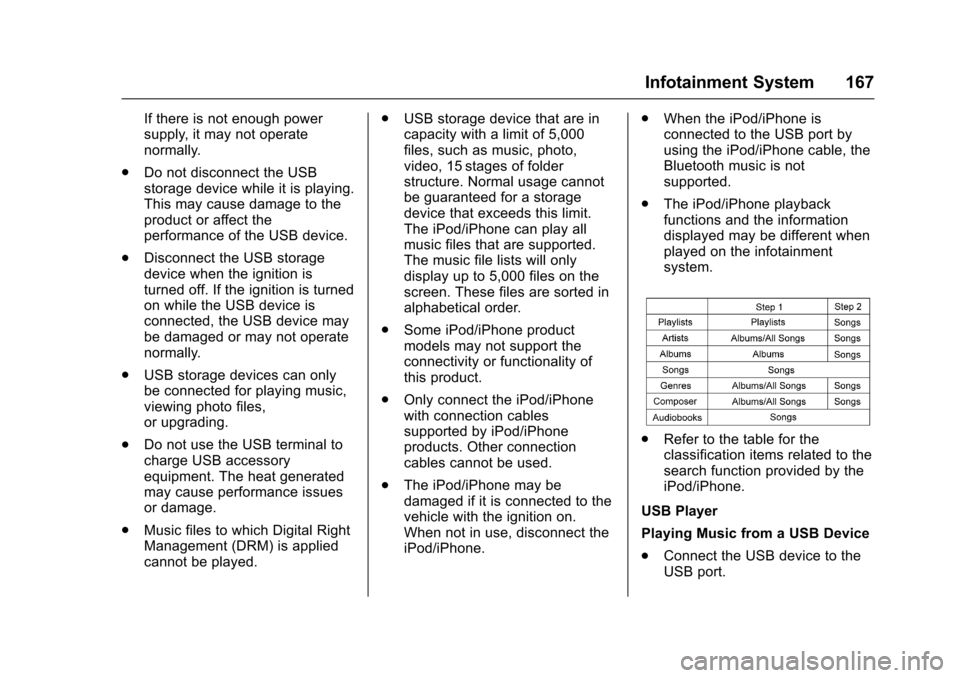
.Refer to the table for the
classification items related to the
search function provided by the
iPod/iPhone.
USB Player
Playing Music from a USB Device
. Connect the USB device to the
USB port.
Page 189 of 373

Chevrolet TRAX Owner Manual (GMNA-Localizing-U.S./Canada/Mexico-
10122735) - 2017 - crc - 7/12/16
188 Climate Controls
To allow outside air to enter in these
conditions, press the recirculation
button twice. The recirculation
indicator will not be lit.
M/L:If equipped, press to heat
the driver or passenger seat. See
Heated Front Seats 056.
Rear Window and Outside
Mirror Defogger
1:Press to turn the rear window
and outside mirror defogger on or
off. An indicator light comes on to
show that the feature is on.
The rear window defogger turns off
after about 10 minutes. It can also
be turned off by pressing
1again
or by turning the ignition to ACC/
ACCESSORY or LOCK/OFF.
If turned on again it runs for about
five minutes before turning off.
If equipped with heated outside
mirrors, they turn on with the rear
window defogger and help to clear
fog or frost from the surface of the
mirror. See Heated Mirrors 045.
Caution
Using a razor blade or sharp
object on the inside rear window
can damage the antenna or
defogger. Repairs would not be
covered by the vehicle warranty.
Do not stick anything to the rear
window.
Air Vents
Use the air vents in the center and
on the side of the instrument panel
to direct the airflow. Move the slats
on the center air vents to direct
airflow.
Operation Tips
.
Clear away any ice, snow,
or leaves from the air inlets at
the base of the windshield that
may block the flow of air into the
vehicle.
. Use of non-GM approved hood
deflectors may adversely affect
the performance of the system.
Page 192 of 373
Chevrolet TRAX Owner Manual (GMNA-Localizing-U.S./Canada/Mexico-
10122735) - 2017 - crc - 7/12/16
Driving and Operating 191
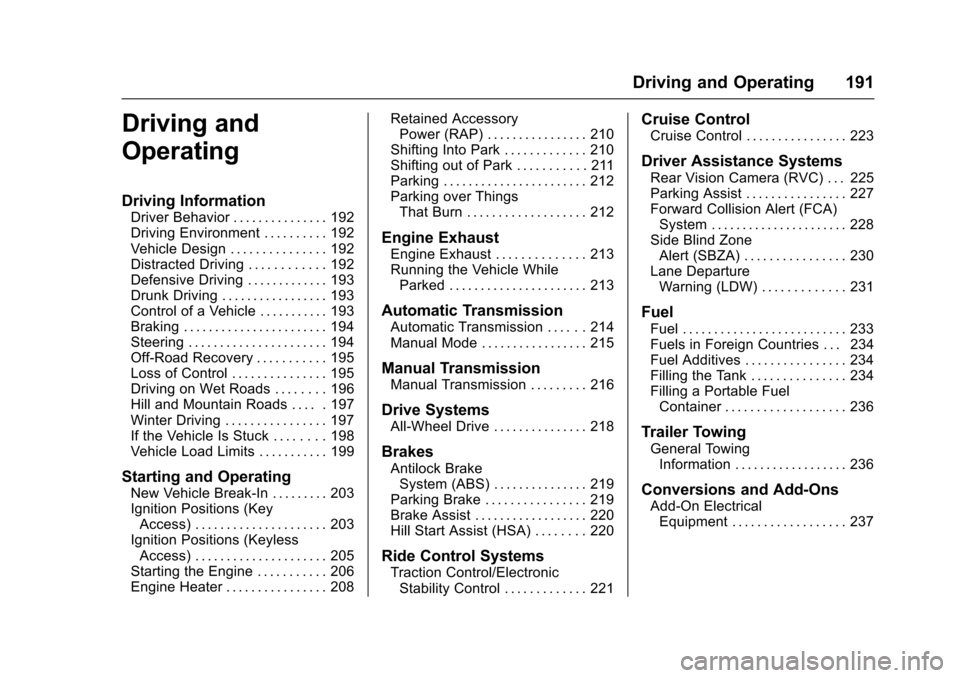
Driving and
Operating
Driving Information
Driver Behavior . . . . . . . . . . . . . . . 192
Driving Environment . . . . . . . . . . 192
Vehicle Design . . . . . . . . . . . . . . . 192
Distracted Driving . . . . . . . . . . . . 192
Defensive Driving . . . . . . . . . . . . . 193
Drunk Driving . . . . . . . . . . . . . . . . . 193
Control of a Vehicle . . . . . . . . . . . 193
Braking . . . . . . . . . . . . . . . . . . . . . . . 194
Steering . . . . . . . . . . . . . . . . . . . . . . 194
Off-Road Recovery . . . . . . . . . . . 195
Loss of Control . . . . . . . . . . . . . . . 195
Driving on Wet Roads . . . . . . . . 196
Hill and Mountain Roads . . . . . 197
Winter Driving . . . . . . . . . . . . . . . . 197
If the Vehicle Is Stuck . . . . . . . . 198
Vehicle Load Limits . . . . . . . . . . . 199
Starting and Operating
New Vehicle Break-In . . . . . . . . . 203
Ignition Positions (KeyAccess) . . . . . . . . . . . . . . . . . . . . . 203
Ignition Positions (Keyless Access) . . . . . . . . . . . . . . . . . . . . . 205
Starting the Engine . . . . . . . . . . . 206
Engine Heater . . . . . . . . . . . . . . . . 208 Retained Accessory
Power (RAP) . . . . . . . . . . . . . . . . 210
Shifting Into Park . . . . . . . . . . . . . 210
Shifting out of Park . . . . . . . . . . . 211
Parking . . . . . . . . . . . . . . . . . . . . . . . 212
Parking over Things That Burn . . . . . . . . . . . . . . . . . . . 212
Engine Exhaust
Engine Exhaust . . . . . . . . . . . . . . 213
Running the Vehicle WhileParked . . . . . . . . . . . . . . . . . . . . . . 213
Automatic Transmission
Automatic Transmission . . . . . . 214
Manual Mode . . . . . . . . . . . . . . . . . 215
Manual Transmission
Manual Transmission . . . . . . . . . 216
Drive Systems
All-Wheel Drive . . . . . . . . . . . . . . . 218
Brakes
Antilock BrakeSystem (ABS) . . . . . . . . . . . . . . . 219
Parking Brake . . . . . . . . . . . . . . . . 219
Brake Assist . . . . . . . . . . . . . . . . . . 220
Hill Start Assist (HSA) . . . . . . . . 220
Ride Control Systems
Traction Control/Electronic Stability Control . . . . . . . . . . . . . 221
Cruise Control
Cruise Control . . . . . . . . . . . . . . . . 223
Driver Assistance Systems
Rear Vision Camera (RVC) . . . 225
Parking Assist . . . . . . . . . . . . . . . . 227
Forward Collision Alert (FCA)System . . . . . . . . . . . . . . . . . . . . . . 228
Side Blind Zone Alert (SBZA) . . . . . . . . . . . . . . . . 230
Lane Departure Warning (LDW) . . . . . . . . . . . . . 231
Fuel
Fuel . . . . . . . . . . . . . . . . . . . . . . . . . . 233
Fuels in Foreign Countries . . . 234
Fuel Additives . . . . . . . . . . . . . . . . 234
Filling the Tank . . . . . . . . . . . . . . . 234
Filling a Portable FuelContainer . . . . . . . . . . . . . . . . . . . 236
Trailer Towing
General TowingInformation . . . . . . . . . . . . . . . . . . 236
Conversions and Add-Ons
Add-On ElectricalEquipment . . . . . . . . . . . . . . . . . . 237