brake CHEVROLET TRAX 2017 1.G Workshop Manual
[x] Cancel search | Manufacturer: CHEVROLET, Model Year: 2017, Model line: TRAX, Model: CHEVROLET TRAX 2017 1.GPages: 373, PDF Size: 6.53 MB
Page 296 of 373
Chevrolet TRAX Owner Manual (GMNA-Localizing-U.S./Canada/Mexico-
10122735) - 2017 - crc - 7/12/16
Vehicle Care 295
The Tire and Loading
Information label indicates the
original equipment tires on the
vehicle. SeeVehicle Load
Limits 0199.
Different Size Tires and
Wheels
If wheels or tires are installed that
are a different size than the original
equipment wheels and tires, vehicle
performance, including its braking,
ride and handling characteristics,
stability, and resistance to rollover
may be affected. If the vehicle has
electronic systems such as antilock
brakes, rollover airbags, traction
control, electronic stability control,
or All-Wheel Drive, the performance
of these systems can also be
affected.
{Warning
If different sized wheels are used,
there may not be an acceptable
level of performance and safety if
(Continued)
Warning (Continued)
tires not recommended for those
wheels are selected. This
increases the chance of a crash
and serious injury. Only use GM
specific wheel and tire systems
developed for the vehicle, and
have them properly installed by a
GM certified technician.
See Buying New Tires 0293 and
Accessories and
Modifications 0240.
Uniform Tire Quality
Grading
The following information relates
to the system developed by the
United States National Highway
Traffic Safety Administration
(NHTSA), which grades tires by
treadwear, traction, and
temperature performance. This
applies only to vehicles sold in
the United States. The grades
are molded on the sidewalls of most passenger car tires. The
Uniform Tire Quality Grading
(UTQG) system does not apply
to deep tread, winter tires,
compact spare tires, tires with
nominal rim diameters of
10 to 12 inches (25 to 30 cm),
or to some limited-production
tires.
While the tires available on
General Motors passenger cars
and light trucks may vary with
respect to these grades, they
must also conform to federal
safety requirements and
additional General Motors Tire
Performance Criteria (TPC)
standards.
Quality grades can be found
where applicable on the tire
sidewall between tread shoulder
and maximum section width. For
example:
Page 298 of 373
Chevrolet TRAX Owner Manual (GMNA-Localizing-U.S./Canada/Mexico-
10122735) - 2017 - crc - 7/12/16
Vehicle Care 297
Wheel Alignment and Tire
Balance
The tires and wheels were aligned
and balanced at the factory to
provide the longest tire life and best
overall performance. Adjustments to
wheel alignment and tire balancing
are not necessary on a regular
basis. Consider an alignment check
if there is unusual tire wear or the
vehicle is significantly pulling to one
side or the other. Some slight pull to
the left or right, depending on the
crown of the road and/or other road
surface variations such as troughs
or ruts, is normal. If the vehicle is
vibrating when driving on a smooth
road, the tires and wheels may need
to be rebalanced. See your dealer
for proper diagnosis.
Wheel Replacement
Replace any wheel that is bent,
cracked, or badly rusted or
corroded. If wheel nuts keep coming
loose, the wheel, wheel bolts, and
wheel nuts should be replaced.
If the wheel leaks air, replace it.Some aluminum wheels can be
repaired. See your dealer if any of
these conditions exist.
Your dealer will know the kind of
wheel that is needed.
Each new wheel should have the
same load-carrying capacity,
diameter, width, offset, and be
mounted the same way as the one it
replaces.
Replace wheels, wheel bolts, wheel
nuts, or Tire Pressure Monitor
System (TPMS) sensors with new
GM original equipment parts.
{Warning
Using the wrong replacement
wheels, wheel bolts, or wheel
nuts can be dangerous. It could
affect the braking and handling of
the vehicle. Tires can lose air,
and cause loss of control, causing
a crash. Always use the correct
wheel, wheel bolts, and wheel
nuts for replacement.
Caution
The wrong wheel can also cause
problems with bearing life, brake
cooling, speedometer or
odometer calibration, headlamp
aim, bumper height, vehicle
ground clearance, and tire or tire
chain clearance to the body and
chassis.
Used Replacement Wheels
{Warning
Replacing a wheel with a used
one is dangerous. How it has
been used or how far it has been
driven may be unknown. It could
fail suddenly and cause a crash.
When replacing wheels, use a
new GM original equipment
wheel.
Page 299 of 373
Chevrolet TRAX Owner Manual (GMNA-Localizing-U.S./Canada/Mexico-
10122735) - 2017 - crc - 7/12/16
298 Vehicle Care
Tire Chains
{Warning
Do not use tire chains. There is
not enough clearance. Tire chains
used on a vehicle without the
proper amount of clearance can
cause damage to the brakes,
suspension, or other vehicle
parts. The area damaged by the
tire chains could cause loss of
control and a crash.
Use another type of traction
device only if its manufacturer
recommends it for the vehicle's
tire size combination and road
conditions. Follow that
manufacturer's instructions. To
avoid vehicle damage, drive slow
and readjust or remove the
traction device if it contacts the
vehicle. Do not spin the wheels.
If traction devices are used, install
them on the front tires.
If a Tire Goes Flat
It is unusual for a tire to blow out
while driving, especially if the tires
are maintained properly. SeeTires
0 279. If air goes out of a tire, it is
much more likely to leak out slowly.
But if there ever is a blowout, here
are a few tips about what to expect
and what to do:
If a front tire fails, the flat tire
creates a drag that pulls the vehicle
toward that side. Take your foot off
the accelerator pedal and grip the
steering wheel firmly. Steer to
maintain lane position, and then
gently brake to a stop, well off the
road, if possible.
A rear blowout, particularly on a
curve, acts much like a skid and
may require the same correction as
used in a skid. Stop pressing the
accelerator pedal and steer to
straighten the vehicle. It may be
very bumpy and noisy. Gently brake
to a stop, well off the road,
if possible.{Warning
Driving on a flat tire will cause
permanent damage to the tire.
Re-inflating a tire after it has been
driven on while severely
underinflated or flat may cause a
blowout and a serious crash.
Never attempt to re-inflate a tire
that has been driven on while
severely underinflated or flat.
Have your dealer or an authorized
tire service center repair or
replace the flat tire as soon as
possible.
{Warning
Lifting a vehicle and getting under
it to do maintenance or repairs is
dangerous without the
appropriate safety equipment and
training. If a jack is provided with
the vehicle, it is designed only for
changing a flat tire. If it is used for
anything else, you or others could
(Continued)
Page 300 of 373
Chevrolet TRAX Owner Manual (GMNA-Localizing-U.S./Canada/Mexico-
10122735) - 2017 - crc - 7/12/16
Vehicle Care 299
Warning (Continued)
be badly injured or killed if the
vehicle slips off the jack. If a jack
is provided with the vehicle, only
use it for changing a flat tire.
If a tire goes flat, avoid further tire
and wheel damage by driving slowly
to a level place, well off the road,
if possible. Turn on the hazard
warning flashers. See Hazard
Warning Flashers 0148.
{Warning
Changing a tire can be
dangerous. The vehicle can slip
off the jack and roll over or fall
causing injury or death. Find a
level place to change the tire. To
help prevent the vehicle from
moving:
1. Set the parking brake firmly. (Continued)
Warning (Continued)
2. Put an automatictransmission in P (Park) or a
manual transmission in
1 (First) or R (Reverse).
3. Turn off the engine and do not restart while the vehicle
is raised.
4. Do not allow passengers to remain in the vehicle.
5. Place wheel blocks, if equipped, on both sides of
the tire at the opposite
corner of the tire being
changed.
When the vehicle has a flat tire (2),
use the following example as a
guide to assist in the placement of
the wheel blocks (1), if equipped.
1. Wheel Block (If Equipped)
2. Flat Tire
The following information explains
how to repair or change a tire.
Tire Changing
Removing the Spare Tire and
Tools
The spare tire and tools are located
in the storage compartment in the
rear of the vehicle.
Page 304 of 373
Chevrolet TRAX Owner Manual (GMNA-Localizing-U.S./Canada/Mexico-
10122735) - 2017 - crc - 7/12/16
Vehicle Care 303
13. Lower the vehicle by turningthe wheel wrench
counterclockwise. Lower the
jack completely.
{Warning
Wheel nuts that are improperly or
incorrectly tightened can cause
the wheels to become loose or
come off. The wheel nuts should
be tightened with a torque wrench
to the proper torque specification
after replacing. Follow the torque
specification supplied by the
aftermarket manufacturer when
using accessory locking wheel
nuts. See Capacities and
Specifications 0334 for original
equipment wheel nut torque
specifications.
Caution
Improperly tightened wheel nuts
can lead to brake pulsation and
rotor damage. To avoid expensive
brake repairs, evenly tighten the
wheel nuts in the proper
sequence and to the proper
torque specification. See
Capacities and Specifications
0 334 for the wheel nut torque
specification.
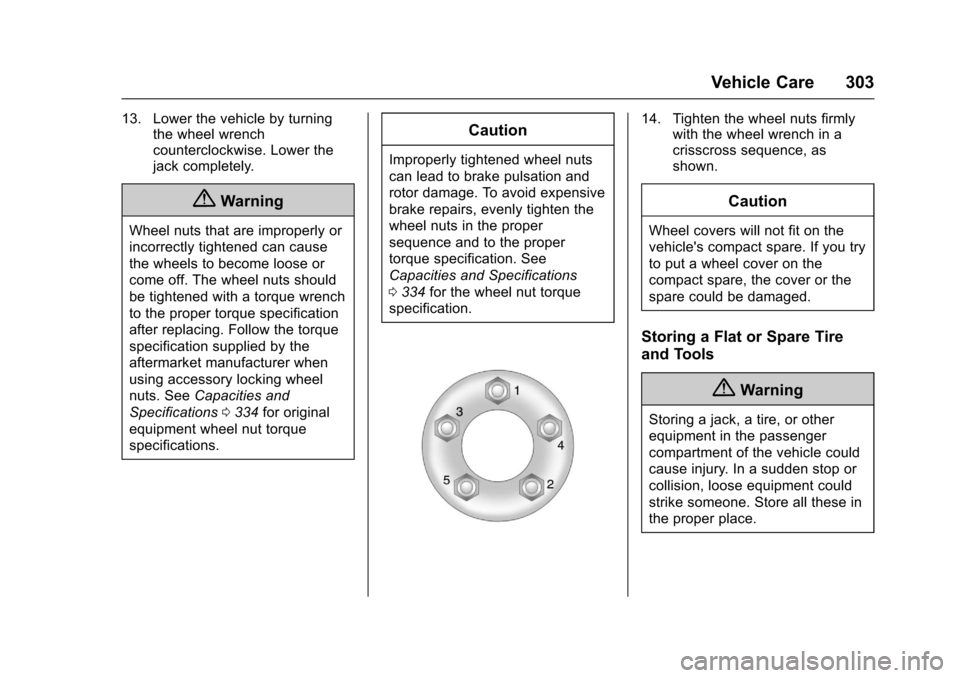
14. Tighten the wheel nuts firmly with the wheel wrench in a
crisscross sequence, as
shown.
Caution
Wheel covers will not fit on the
vehicle's compact spare. If you try
to put a wheel cover on the
compact spare, the cover or the
spare could be damaged.
Storing a Flat or Spare Tire
and Tools
{Warning
Storing a jack, a tire, or other
equipment in the passenger
compartment of the vehicle could
cause injury. In a sudden stop or
collision, loose equipment could
strike someone. Store all these in
the proper place.
Page 307 of 373
Chevrolet TRAX Owner Manual (GMNA-Localizing-U.S./Canada/Mexico-
10122735) - 2017 - crc - 7/12/16
306 Vehicle Care
Caution
Ignoring these steps could result
in costly damage to the vehicle
that would not be covered by the
vehicle warranty. Trying to start
the vehicle by pushing or pulling it
will not work, and it could damage
the vehicle.
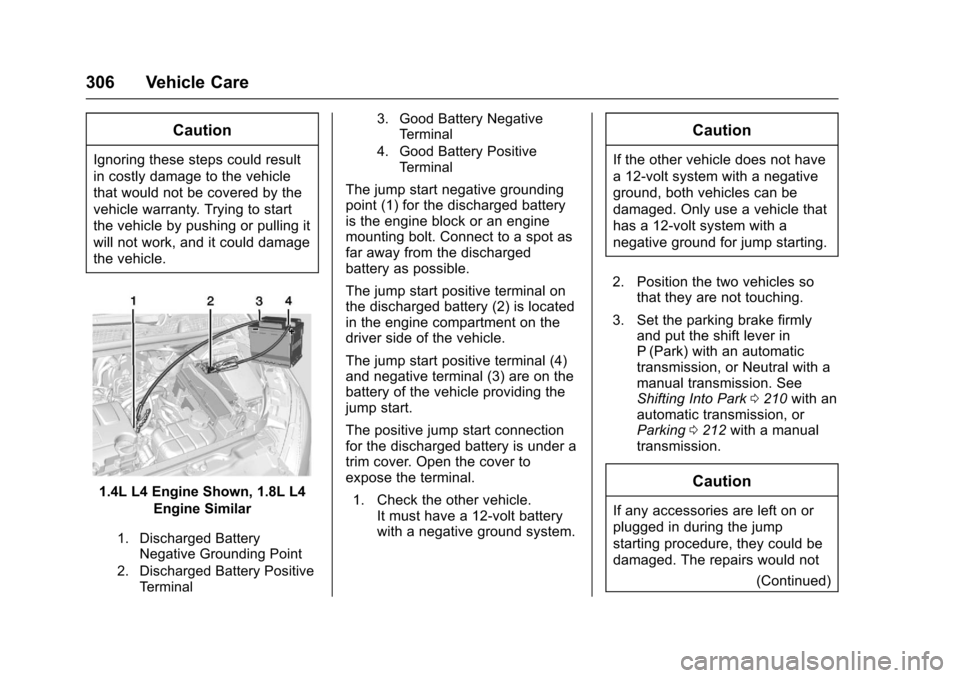
1.4L L4 Engine Shown, 1.8L L4Engine Similar
1. Discharged BatteryNegative Grounding Point
2. Discharged Battery Positive Terminal 3. Good Battery Negative
Terminal
4. Good Battery Positive Terminal
The jump start negative grounding
point (1) for the discharged battery
is the engine block or an engine
mounting bolt. Connect to a spot as
far away from the discharged
battery as possible.
The jump start positive terminal on
the discharged battery (2) is located
in the engine compartment on the
driver side of the vehicle.
The jump start positive terminal (4)
and negative terminal (3) are on the
battery of the vehicle providing the
jump start.
The positive jump start connection
for the discharged battery is under a
trim cover. Open the cover to
expose the terminal.
1. Check the other vehicle. It must have a 12-volt battery
with a negative ground system.
Caution
If the other vehicle does not have
a 12-volt system with a negative
ground, both vehicles can be
damaged. Only use a vehicle that
has a 12-volt system with a
negative ground for jump starting.
2. Position the two vehicles so that they are not touching.
3. Set the parking brake firmly and put the shift lever in
P (Park) with an automatic
transmission, or Neutral with a
manual transmission. See
Shifting Into Park 0210 with an
automatic transmission, or
Parking 0212 with a manual
transmission.
Caution
If any accessories are left on or
plugged in during the jump
starting procedure, they could be
damaged. The repairs would not
(Continued)
Page 311 of 373

Chevrolet TRAX Owner Manual (GMNA-Localizing-U.S./Canada/Mexico-
10122735) - 2017 - crc - 7/12/16
310 Vehicle Care
Dolly Towing (All-Wheel-Drive
Vehicles)
All-wheel-drive vehicles must not be
towed with two wheels on the
ground. To properly tow these
vehicles, they should be placed on
a platform trailer with all four wheels
off of the ground.
Dolly Towing
(Front-Wheel-Drive
Vehicles Only)
To tow a front-wheel-drive vehicle
from the front with two wheels on
the ground:1. Put the front wheels on a dolly.
2. Move the shift lever to P (Park).
3. Set the parking brake.
4. Clamp the steering wheel in a straight-ahead position with a
clamping device designed for
towing. 5. Turn the vehicle off.
6. Secure the vehicle to the dolly.
7. Release the parking brake.
Towing the Vehicle from
the Rear
Page 315 of 373

Chevrolet TRAX Owner Manual (GMNA-Localizing-U.S./Canada/Mexico-
10122735) - 2017 - crc - 7/12/16
314 Vehicle Care
Replace the wiper blades if they are
worn or damaged. Damage can be
caused by extreme dusty
conditions, sand, salt, heat, sun,
snow, and ice.
Weatherstrips
Apply Dielectric silicone grease on
weatherstrips to make them last
longer, seal better, and not stick or
squeak. Lubricate weatherstrips at
least once a year. Hot, dry climates
may require more frequent
application. Black marks from
rubber material on painted surfaces
can be removed by rubbing with a
clean cloth. SeeRecommended
Fluids and Lubricants 0330.
Tires
Use a stiff brush with tire cleaner to
clean the tires.
Caution
Using petroleum-based tire
dressing products on the vehicle
may damage the paint finish and/
(Continued)
Caution (Continued)
or tires. When applying a tire
dressing, always wipe off any
overspray from all painted
surfaces on the vehicle.
Wheels and Trim—Aluminum
or Chrome
Use a soft, clean cloth with mild
soap and water to clean the wheels.
After rinsing thoroughly with clean
water, dry with a soft, clean towel.
A wax may then be applied.
Caution
Chrome wheels and other chrome
trim may be damaged if the
vehicle is not washed after driving
on roads that have been sprayed
with magnesium, calcium,
or sodium chloride. These
chlorides are used on roads for
conditions such as ice and dust.
Always wash the chrome with
soap and water after exposure.
Caution
To avoid surface damage, do not
use strong soaps, chemicals,
abrasive polishes, cleaners,
brushes, or cleaners that contain
acid on aluminum or
chrome-plated wheels. Use only
approved cleaners. Also, never
drive a vehicle with aluminum or
chrome-plated wheels through an
automatic car wash that uses
silicone carbide tire cleaning
brushes. Damage could occur
and the repairs would not be
covered by the vehicle warranty.
Brake System
Visually inspect brake lines and
hoses for proper hook-up, binding,
leaks, cracks, chafing, etc. Inspect
disc brake pads for wear and rotors
for surface condition. Inspect drum
brake linings/shoes for wear or
cracks. Inspect all other brake parts.
Page 320 of 373

Chevrolet TRAX Owner Manual (GMNA-Localizing-U.S./Canada/Mexico-
10122735) - 2017 - crc - 7/12/16
Vehicle Care 319
purchased. Non-GM floor mats
may not fit properly and may
interfere with the accelerator or
brake pedal. Always check that
the floor mats do not interfere
with the pedals.
. Do not use a floor mat if the
vehicle is not equipped with a
floor mat retainer on the driver
side floor.
. Use the floor mat with the
correct side up. Do not turn
it over.
. Do not place anything on top of
the driver side floor mat.
. Use only a single floor mat on
the driver side.
. Do not place one floor mat on
top of another.
The driver side floor mat is held in
place by a button-type retainer.
Removing and Replacing the
Floor Mats
1. Pull up on the rear of the floor mat to unlock the retainers and
remove.
2. Reinstall by lining up the floor mat retainer openings over the
carpet retainers and snap into
position.
3. Make sure the floor mat is properly secured in place.
Verify the floor mat does not
interfere with the pedals.
Page 321 of 373

Chevrolet TRAX Owner Manual (GMNA-Localizing-U.S./Canada/Mexico-
10122735) - 2017 - crc - 7/12/16
320 Service and Maintenance
Service and
Maintenance
General Information
General Information . . . . . . . . . . 320
Maintenance Schedule
Maintenance Schedule . . . . . . . 322
Special Application Services
Special ApplicationServices . . . . . . . . . . . . . . . . . . . . 327
Additional Maintenance
and Care
Additional Maintenanceand Care . . . . . . . . . . . . . . . . . . . . 327
Recommended Fluids,
Lubricants, and Parts
Recommended Fluids andLubricants . . . . . . . . . . . . . . . . . . . 330
Maintenance Replacement Parts . . . . . . . . . . . . . . . . . . . . . . . . 331
Maintenance Records
Maintenance Records . . . . . . . . 332
General Information
Your vehicle is an important
investment. This section describes
the required maintenance for the
vehicle. Follow this schedule to help
protect against major repair
expenses resulting from neglect or
inadequate maintenance. It may
also help to maintain the value of
the vehicle if it is sold. It is the
responsibility of the owner to have
all required maintenance performed.
Your dealer has trained technicians
who can perform required
maintenance using genuine
replacement parts. They have
up-to-date tools and equipment for
fast and accurate diagnostics. Many
dealers have extended evening and
Saturday hours, courtesy
transportation, and online
scheduling to assist with service
needs. Your dealer recognizes the
importance of providing
competitively priced maintenance
and repair services. With trained
technicians, the dealer is the place
for routine maintenance such as oil
changes and tire rotations and
additional maintenance items like
tires, brakes, batteries, and wiper
blades.
Caution
Damage caused by improper
maintenance can lead to costly
repairs and may not be covered
by the vehicle warranty.
Maintenance intervals, checks,
inspections, recommended fluids,
and lubricants are important to
keep the vehicle in good working
condition.