wheel CHEVROLET TRAX 2017 1.G Workshop Manual
[x] Cancel search | Manufacturer: CHEVROLET, Model Year: 2017, Model line: TRAX, Model: CHEVROLET TRAX 2017 1.GPages: 373, PDF Size: 6.53 MB
Page 230 of 373
Chevrolet TRAX Owner Manual (GMNA-Localizing-U.S./Canada/Mexico-
10122735) - 2017 - crc - 7/12/16
Driving and Operating 229
Detecting the Vehicle Ahead
FCA warnings will not occur unless
the FCA system detects a vehicle
ahead. When a vehicle is detected,
the vehicle ahead indicator will
display green. Vehicles may not be
detected on curves, highway exit
ramps, or hills, due to poor visibility;
or if a vehicle ahead is partially
blocked by pedestrians or other
objects. FCA will not detect another
vehicle ahead until it is completely
in the driving lane.
{Warning
FCA does not provide a warning
to help avoid a crash, unless it
detects a vehicle. FCA may not
detect a vehicle ahead if the FCA
sensor is blocked by dirt, snow,(Continued)
Warning (Continued)
or ice, or if the windshield is
damaged. It may also not detect a
vehicle on winding or hilly roads,
or in conditions that can limit
visibility such as fog, rain,
or snow, or if the headlamps or
windshield are not cleaned or in
proper condition. Keep the
windshield, headlamps, and FCA
sensors clean and in good repair.
Collision Alert
When your vehicle approaches
another detected vehicle too rapidly,
the red FCA display will flash on the
windshield. Also, eight rapid
high-pitched beeps will sound from
the front. When this Collision Alert
occurs, the brake system may
prepare for driver braking to occur more rapidly which can cause a
brief, mild deceleration. Continue to
apply the brake pedal as the driving
situation dictates. Cruise control
may be disengaged when the
Collision Alert occurs.
Tailgating Alert
The vehicle ahead indicator will
display amber when you are
following a detected vehicle ahead
much too closely.
Selecting the Alert Timing
The Collision Alert control is on the
steering wheel. Press
[to set the
FCA timing to far, medium, near,
or off. The first button press shows
the current control setting on the
DIC. Additional button presses will
change this setting. The chosen
setting will remain until it is changed
and will affect the timing of both the
Collision Alert and the Tailgating
Page 239 of 373
Chevrolet TRAX Owner Manual (GMNA-Localizing-U.S./Canada/Mexico-
10122735) - 2017 - crc - 7/12/16
238 Vehicle Care
Vehicle Care
General Information
General Information . . . . . . . . . . 239
California Proposition65 Warning . . . . . . . . . . . . . . . . . 239
California Perchlorate Materials Requirements . . . . . 239
Accessories and Modifications . . . . . . . . . . . . . . . . 240
Vehicle Checks
Doing Your OwnService Work . . . . . . . . . . . . . . . 240
Hood . . . . . . . . . . . . . . . . . . . . . . . . . 241
Engine Compartment Overview . . . . . . . . . . . . . . . . . . . . 243
Engine Oil . . . . . . . . . . . . . . . . . . . . 246
Engine Oil Life System . . . . . . . 248
Automatic Transmission Fluid . . . . . . . . . . . . . . . . . . . . . . . . 249
Manual Transmission Fluid . . . 250
Hydraulic Clutch . . . . . . . . . . . . . . 250
Engine Air Cleaner/Filter . . . . . . 250
Cooling System . . . . . . . . . . . . . . 251
Engine Coolant . . . . . . . . . . . . . . . 253
Engine Overheating . . . . . . . . . . 255
Power Steering Fluid (1.4L L4 Engine) . . . . . . . . . . . . . . . . . . . . . 257 Power Steering Fluid (1.8L L4
Engine) . . . . . . . . . . . . . . . . . . . . . 257
Washer Fluid . . . . . . . . . . . . . . . . . 257
Brakes . . . . . . . . . . . . . . . . . . . . . . . 258
Brake Fluid . . . . . . . . . . . . . . . . . . . 259
Battery - North America . . . . . . 260
All-Wheel Drive . . . . . . . . . . . . . . . 261
Starter Switch Check . . . . . . . . . 261
Automatic Transmission Shift Lock Control Function
Check . . . . . . . . . . . . . . . . . . . . . . . 262
Ignition Transmission Lock Check . . . . . . . . . . . . . . . . . . . . . . . 262
Park Brake and P (Park) Mechanism Check . . . . . . . . . . 262
Wiper Blade Replacement . . . . 263
Headlamp Aiming
Headlamp Aiming . . . . . . . . . . . . 264
Bulb Replacement
Bulb Replacement . . . . . . . . . . . . 264
Halogen Bulbs . . . . . . . . . . . . . . . . 264
LED Lighting . . . . . . . . . . . . . . . . . 264
Headlamps, Front Turn Signal and Parking Lamps . . . . . . . . . 265
Fog Lamps . . . . . . . . . . . . . . . . . . . 268 Taillamps, Turn Signal,
Sidemarker, Stoplamps, and
Back-Up Lamps . . . . . . . . . . . . . 268
License Plate Lamp . . . . . . . . . . 270
Replacement Bulbs . . . . . . . . . . . 271
Electrical System
Electrical System Overload . . . 272
Fuses and Circuit Breakers . . . 272
Engine Compartment Fuse Block . . . . . . . . . . . . . . . . . . . . . . . . 273
Instrument Panel Fuse Block . . . . . . . . . . . . . . . . . . . . . . . . 276
Rear Compartment Fuse Block . . . . . . . . . . . . . . . . . . . . . . . . 278
Wheels and Tires
Tires . . . . . . . . . . . . . . . . . . . . . . . . . . 279
All-Season Tires . . . . . . . . . . . . . . 280
Winter Tires . . . . . . . . . . . . . . . . . . 280
Tire Sidewall Labeling . . . . . . . . 281
Tire Designations . . . . . . . . . . . . . 283
Tire Terminology andDefinitions . . . . . . . . . . . . . . . . . . 283
Tire Pressure . . . . . . . . . . . . . . . . . 286
Tire Pressure Monitor System . . . . . . . . . . . . . . . . . . . . . . 287
Tire Pressure Monitor Operation . . . . . . . . . . . . . . . . . . . 288
Tire Inspection . . . . . . . . . . . . . . . . 291
Tire Rotation . . . . . . . . . . . . . . . . . 291
Page 240 of 373
Chevrolet TRAX Owner Manual (GMNA-Localizing-U.S./Canada/Mexico-
10122735) - 2017 - crc - 7/12/16
Vehicle Care 239
When It Is Time for NewTires . . . . . . . . . . . . . . . . . . . . . . . . 292
Buying New Tires . . . . . . . . . . . . . 293
Different Size Tires and Wheels . . . . . . . . . . . . . . . . . . . . . . 295
Uniform Tire Quality Grading . . . . . . . . . . . . . . . . . . . . . 295
Wheel Alignment and Tire Balance . . . . . . . . . . . . . . . . . . . . . 297
Wheel Replacement . . . . . . . . . . 297
Tire Chains . . . . . . . . . . . . . . . . . . . 298
If a Tire Goes Flat . . . . . . . . . . . . 298
Tire Changing . . . . . . . . . . . . . . . . 299
Compact Spare Tire . . . . . . . . . . 304
Jump Starting
Jump Starting - North America . . . . . . . . . . . . . . . . . . . . . 305
Towing the Vehicle
Towing the Vehicle . . . . . . . . . . . 308
Recreational VehicleTowing . . . . . . . . . . . . . . . . . . . . . . 308
Appearance Care
Exterior Care . . . . . . . . . . . . . . . . . 311
Interior Care . . . . . . . . . . . . . . . . . . 315
Floor Mats . . . . . . . . . . . . . . . . . . . . 318
General Information
For service and parts needs, visit
your dealer. You will receive
genuine GM parts and GM-trained
and supported service people.
Genuine GM parts have one of
these marks:
California Proposition
65 Warning
WARNING: Most motor vehicles,
including this one, as well as many
of its service parts and fluids,
contain and/or emit chemicals
known to the State of California to cause cancer and birth defects or
other reproductive harm. Engine
exhaust, many parts and systems,
many fluids, and some component
wear by-products contain and/or
emit these chemicals.
See
Battery - North America 0260
and Jump Starting - North
America 0305.
California Perchlorate
Materials Requirements
Certain types of automotive
applications, such as airbag
initiators, safety belt pretensioners,
and lithium batteries contained in
Remote Keyless Entry transmitters,
may contain perchlorate materials.
Special handling may be necessary.
For additional information, see
www.dtsc.ca.gov/hazardouswaste/
perchlorate.
Page 250 of 373
Chevrolet TRAX Owner Manual (GMNA-Localizing-U.S./Canada/Mexico-
10122735) - 2017 - crc - 7/12/16
Vehicle Care 249
the oil regularly over the course of
an oil drain interval and keep it at
the proper level.
If the system is ever reset
accidentally, the oil must be
changed at 5 000 km (3,000 mi)
since the last oil change.
Remember to reset the oil life
system whenever the oil is changed.
How to Reset the Engine Oil
Life System
Reset the system whenever the
engine oil is changed so that the
system can calculate the next
engine oil change. Always reset the
engine oil life to 100% after each oil
change. It will not reset itself. To
reset the system:
Base Level Cluster1. Press the MENU button to show Remaining Oil Life on the
display. This display shows an
estimate of the oil’s remaining
useful life. If 99% is displayed,
that means that 99% of the
current oil life remains. 2. To reset the engine oil life
system, press the SET/CLR
button while the oil life display
is active. After a few seconds,
the oil life will be reset to
100%. Be careful not to reset
the oil life display accidentally
at any time other than after the
oil is changed. It cannot be
reset accurately.
If the
:% CHANGE message in
the DIC comes back on when the
vehicle is started, the engine oil life
system has not reset. Repeat the
procedure.
Uplevel Cluster
1. Turn the ignition to ON/RUN with the engine off.
2. Press the DIC MENU button on the turn signal lever to enter
the Vehicle Information Menu.
Use the thumbwheel to scroll
through the menu items until
you reach REMAINING
OIL LIFE.
3. Press the SET/CLR button to reset the oil life at 100%.
4. Turn the ignition to LOCK/OFF. The system is reset when the
CHANGE ENGINE OIL SOON
message is off and the REMAINING
OIL LIFE 100% message is
displayed. If the CHANGE ENGINE
OIL SOON message comes back on
when the vehicle is started, the
engine oil life system has not been
reset. Repeat the procedure.Automatic Transmission
Fluid
How to Check Automatic
Transmission Fluid
It is not necessary to check the
transmission fluid level.
A transmission fluid leak is the only
reason for fluid loss. If a leak
occurs, take the vehicle to your
dealer and have it repaired as soon
as possible.
There is a special procedure for
checking and changing the
transmission fluid. Because this
procedure is difficult, you should
have this done at your dealer.
Page 260 of 373
Chevrolet TRAX Owner Manual (GMNA-Localizing-U.S./Canada/Mexico-
10122735) - 2017 - crc - 7/12/16
Vehicle Care 259
Some driving conditions or climates
can cause a brake squeal when the
brakes are first applied or lightly
applied. This does not mean
something is wrong with the brakes.
Properly torqued wheel nuts are
necessary to help prevent brake
pulsation. When tires are rotated,
inspect brake pads for wear and
evenly tighten wheel nuts in the
proper sequence to torque
specifications. SeeCapacities and
Specifications 0334.
Brake pads should be replaced as
complete sets.
Brake Pedal Travel
See your dealer if the brake pedal
does not return to normal height,
or if there is a rapid increase in
pedal travel. This could be a sign
that brake service may be required.
Replacing Brake System Parts
Always replace brake system parts
with new, approved replacement
parts. If this is not done, the brakes
may not work properly. The braking
performance expected can change
in many other ways if the wrong replacement brake parts are
installed or if parts are improperly
installed.
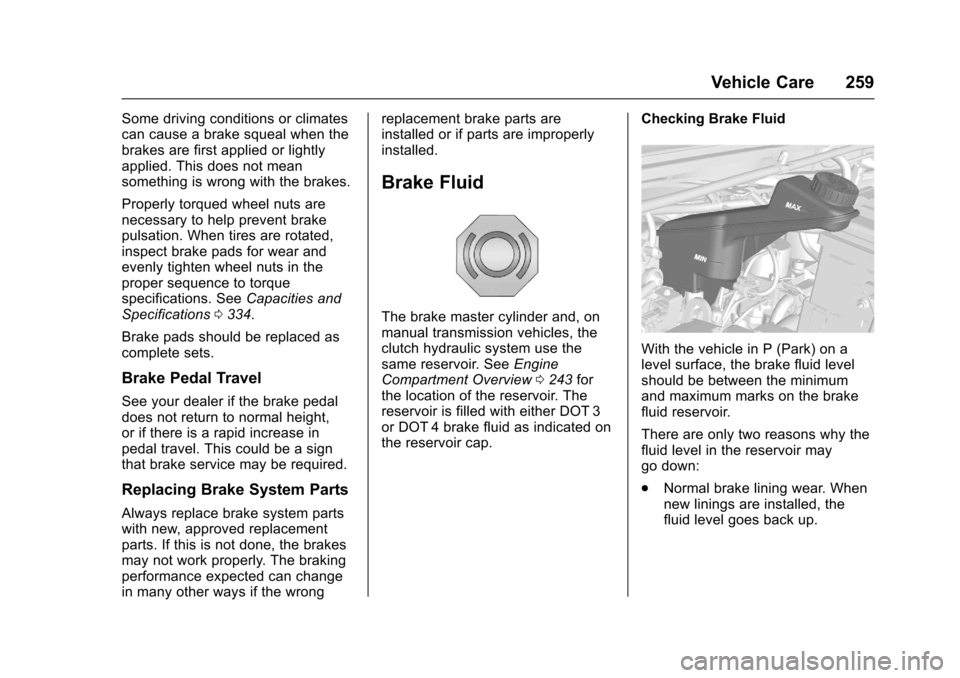
Brake Fluid
The brake master cylinder and, on
manual transmission vehicles, the
clutch hydraulic system use the
same reservoir. See
Engine
Compartment Overview 0243 for
the location of the reservoir. The
reservoir is filled with either DOT 3
or DOT 4 brake fluid as indicated on
the reservoir cap. Checking Brake Fluid
With the vehicle in P (Park) on a
level surface, the brake fluid level
should be between the minimum
and maximum marks on the brake
fluid reservoir.
There are only two reasons why the
fluid level in the reservoir may
go down:
.
Normal brake lining wear. When
new linings are installed, the
fluid level goes back up.
Page 262 of 373
Chevrolet TRAX Owner Manual (GMNA-Localizing-U.S./Canada/Mexico-
10122735) - 2017 - crc - 7/12/16
Vehicle Care 261
{Warning
WARNING:Battery posts,
terminals, and related
accessories contain lead and lead
compounds, chemicals known to
the State of California to cause
cancer and birth defects or other
reproductive harm. Batteries also
contain other chemicals known to
the State of California to cause
cancer. WASH HANDS AFTER
HANDLING.
See California Proposition
65 Warning 0239.
Vehicle Storage
{Warning
Batteries have acid that can burn
you and gas that can explode.
You can be badly hurt if you are
not careful. See Jump Starting -
North America 0305 for tips on
working around a battery without
getting hurt. Infrequent Usage: Remove the
black, negative (−) cable from the
battery to keep the battery from
running down.
Extended Storage: Remove the
black, negative (−) cable from the
battery or use a battery trickle
charger.
All-Wheel Drive
Transfer Case
Under normal driving conditions,
transfer case fluid does not require
maintenance unless there is a fluid
leak or unusual noise. If required,
have the transfer case serviced by
your dealer.
Starter Switch Check
{Warning
When you are doing this
inspection, the vehicle could
move suddenly. If the vehicle
moves, you or others could be
injured.
1. Before starting this check, be
sure there is enough room
around the vehicle.
2. Apply both the parking brake and the regular brake.
Do not use the accelerator
pedal, and be ready to turn off
the engine immediately if it
starts.
3. For automatic transmission vehicles, try to start the engine
in each gear. The vehicle
should start only in P (Park) or
N (Neutral). If the vehicle starts
in any other position, contact
your dealer for service.
For manual transmission
vehicles, put the shift lever in
Neutral, push the clutch pedal
down halfway, and try to start
the engine. The vehicle should
start only when the clutch
pedal is pushed down all the
way to the floor. If the vehicle
starts when the clutch pedal is
not pushed all the way down,
contact your dealer for service.
Page 269 of 373
Chevrolet TRAX Owner Manual (GMNA-Localizing-U.S./Canada/Mexico-
10122735) - 2017 - crc - 7/12/16
268 Vehicle Care
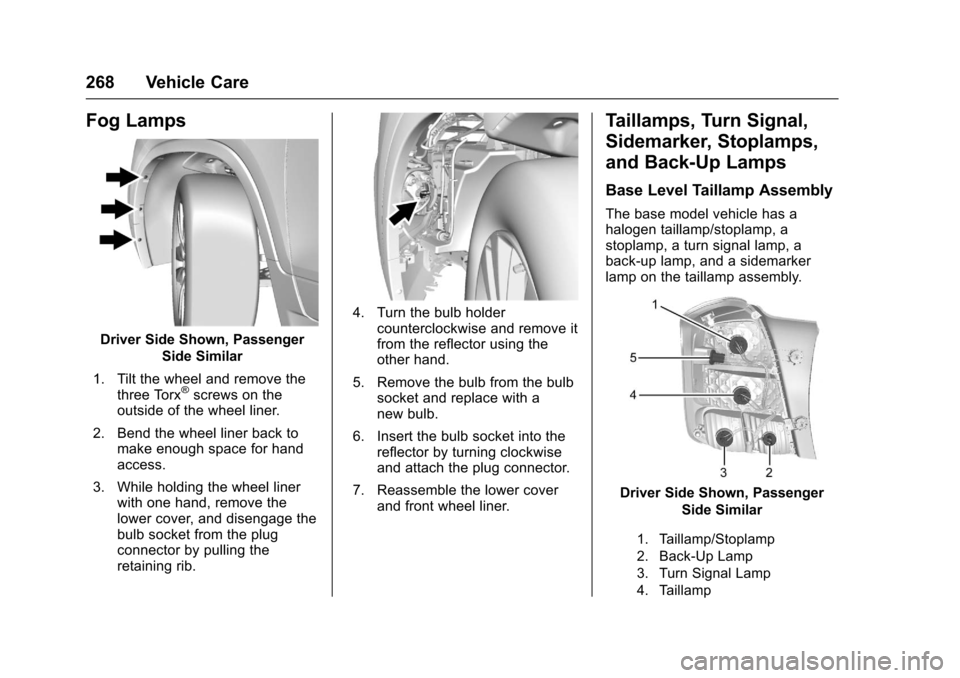
Fog Lamps
Driver Side Shown, PassengerSide Similar
1. Tilt the wheel and remove the three Torx
®screws on the
outside of the wheel liner.
2. Bend the wheel liner back to make enough space for hand
access.
3. While holding the wheel liner with one hand, remove the
lower cover, and disengage the
bulb socket from the plug
connector by pulling the
retaining rib.
4. Turn the bulb holdercounterclockwise and remove it
from the reflector using the
other hand.
5. Remove the bulb from the bulb socket and replace with a
new bulb.
6. Insert the bulb socket into the reflector by turning clockwise
and attach the plug connector.
7. Reassemble the lower cover and front wheel liner.
Taillamps, Turn Signal,
Sidemarker, Stoplamps,
and Back-Up Lamps
Base Level Taillamp Assembly
The base model vehicle has a
halogen taillamp/stoplamp, a
stoplamp, a turn signal lamp, a
back-up lamp, and a sidemarker
lamp on the taillamp assembly.
Driver Side Shown, Passenger
Side Similar
1. Taillamp/Stoplamp
2. Back-Up Lamp
3. Turn Signal Lamp
4. Taillamp
Page 278 of 373
Chevrolet TRAX Owner Manual (GMNA-Localizing-U.S./Canada/Mexico-
10122735) - 2017 - crc - 7/12/16
Vehicle Care 277
FusesUsage
F14 Central gate module
F15 Lane departure warning/GENTEX
F16 –
F17 Electrical steering column lock
F18 Parking assist module/Side blind
zone alert
F19 Body control module/Regulated
voltage control
F20 Clock spring
F21 A/C/Accessory power outlet/
PRNDM
F22 Auxiliary power outlet/DC front
F23 HVAC/MDL/ICS
F24 –
F25 OnStar module/ Eraglonass Fuses
Usage
F26 Heated steering wheel
F27 Instrument cluster/ Auxiliary heater/
Auxiliary virtual
image display
F28 Trailer feed 2
F29 Faceplate
F30 DC DC 400W
F31 Instrument cluster module battery
F32 Silver box audio module/Navigation
F33 Trailer feed 1
F34 Passive entry/ Passive start
Midi Fuses Usage M01 Positive temperature coefficient
S/B Fuses Usage S/B01 Passenger power seat 1 S/B Fuses Usage
S/B02 –
S/B03 Front power windows
S/B04 Rear power windows
S/B05 Logistic mode relay/ DC DC 400W
S/B06 Driver power seat
S/B07 –
S/B08 Trailer interface module
Circuit
Breaker Usage
CB1 –
Relays Usage
RLY01 Accessory/Retained accessory power
RLY02 Liftgate
RLY03 –
RLY04 Blower
RLY05 Logistic mode
Page 280 of 373

Chevrolet TRAX Owner Manual (GMNA-Localizing-U.S./Canada/Mexico-
10122735) - 2017 - crc - 7/12/16
Vehicle Care 279
S/B Fuses UsageS/B03 –
S/B04 DC/AC inverter module
S/B05 –
S/B06 –
S/B07 DC-DC transformer 400W
S/B08 DC-DC transformer 400W
S/B09 –
Relays Usage RLY01 Right cornering lamp
RLY02 Left cornering lampWheels and Tires
Tires
Every new GM vehicle has
high-quality tires made by a
leading tire manufacturer. See
the warranty manual for
information regarding the tire
warranty and where to get
service. For additional
information refer to the tire
manufacturer.
{Warning
.Poorly maintained and
improperly used tires are
dangerous.
.Overloading the tires can
cause overheating as a
result of too much
flexing. There could be a
blowout and a serious
crash. See Vehicle Load
Limits 0199.
(Continued)
Warning (Continued)
.Underinflated tires pose
the same danger as
overloaded tires. The
resulting crash could
cause serious injury.
Check all tires frequently
to maintain the
recommended pressure.
Tire pressure should be
checked when the tires
are cold.
.Overinflated tires are
more likely to be cut,
punctured, or broken by
a sudden impact —such
as when hitting a pothole.
Keep tires at the
recommended pressure.
.Worn or old tires can
cause a crash. If the
tread is badly worn,
replace them.
(Continued)
Page 281 of 373

Chevrolet TRAX Owner Manual (GMNA-Localizing-U.S./Canada/Mexico-
10122735) - 2017 - crc - 7/12/16
280 Vehicle Care
Warning (Continued)
.Replace any tires that
have been damaged by
impacts with potholes,
curbs, etc.
.Improperly repaired tires
can cause a crash. Only
the dealer or an
authorized tire service
center should repair,
replace, dismount, and
mount the tires.
.Do not spin the tires in
excess of 56 km/h
(35 mph) on slippery
surfaces such as snow,
mud, ice, etc. Excessive
spinning may cause the
tires to explode.
All-Season Tires
This vehicle may come with
all-season tires. These tires are
designed to provide good overall
performance on most road surfacesand weather conditions. Original
equipment tires designed to GM's
specific tire performance criteria
have a TPC specification code
molded onto the sidewall. Original
equipment all-season tires can be
identified by the last two characters
of this TPC code, which will
be
“MS.”
Consider installing winter tires on
the vehicle if frequent driving on
snow or ice-covered roads is
expected. All-season tires provide
adequate performance for most
winter driving conditions, but they
may not offer the same level of
traction or performance as winter
tires on snow or ice-covered roads.
See Winter Tires 0280.
Winter Tires
This vehicle was not originally
equipped with winter tires. Winter
tires are designed for increased
traction on snow and ice-covered
roads. Consider installing winter
tires on the vehicle if frequent
driving on ice or snow covered
roads is expected. See your dealer for details regarding winter tire
availability and proper tire selection.
Also, see
Buying New Tires 0293.
With winter tires, there may be
decreased dry road traction,
increased road noise, and shorter
tread life. After changing to winter
tires, be alert for changes in vehicle
handling and braking.
If using winter tires:
. Use tires of the same brand and
tread type on all four wheel
positions.
. Use only radial ply tires of the
same size, load range, and
speed rating as the original
equipment tires.
Winter tires with the same speed
rating as the original equipment tires
may not be available for H, V, W, Y,
and ZR speed rated tires. If winter
tires with a lower speed rating are
chosen, never exceed the tire's
maximum speed capability.