check engine CHEVROLET TRAX 2020 User Guide
[x] Cancel search | Manufacturer: CHEVROLET, Model Year: 2020, Model line: TRAX, Model: CHEVROLET TRAX 2020Pages: 355, PDF Size: 5.75 MB
Page 168 of 355

Chevrolet TRAX Owner Manual (GMNA-Localizing-U.S./Canada/Mexico-
13556235) - 2020 - CRC - 9/19/19
Driving and Operating 167
Warning (Continued)
occupants could drown. Do not
ignore police warnings and be
very cautious about trying to drive
through flowing water.
Hydroplaning
Hydroplaning is dangerous. Water
can build up under the vehicle's
tires so they actually ride on the
water. This can happen if the road is
wet enough and you are going fast
enough. When the vehicle is
hydroplaning, it has little or no
contact with the road.
There is no hard and fast rule about
hydroplaning. The best advice is to
slow down when the road is wet.
Other Rainy Weather Tips
Besides slowing down, other wet
weather driving tips include:
.Allow extra following distance.
. Pass with caution.
. Keep windshield wiping
equipment in good shape. .
Keep the windshield washer fluid
reservoir filled.
. Have good tires with proper
tread depth. See Tires0255.
. Turn off cruise control.
Hill and Mountain Roads
Driving on steep hills or through
mountains is different than driving
on flat or rolling terrain. Tips include:
.
Keep the vehicle serviced and in
good shape.
. Check all fluid levels and brakes,
tires, cooling system, and
transmission.
. Shift to a lower gear when going
down steep or long hills.
{Warning
Using the brakes to slow the
vehicle on a long downhill slope
can cause brake overheating, can
reduce brake performance, and
could result in a loss of braking.
(Continued)
Warning (Continued)
Shift the transmission to a lower
gear to let the engine assist the
brakes on a steep downhill slope.
{Warning
Coasting downhill in N (Neutral)
or with the ignition off is
dangerous. This can cause
overheating of the brakes and
loss of steering assist. Always
have the engine running and the
vehicle in gear.
. Drive at speeds that keep the
vehicle in its own lane. Do not
swing wide or cross the
center line.
. Be alert on top of hills;
something could be in your lane
(e.g., stalled car, crash).
Page 181 of 355
Chevrolet TRAX Owner Manual (GMNA-Localizing-U.S./Canada/Mexico-
13556235) - 2020 - CRC - 9/19/19
180 Driving and Operating
the floor and holding it there as
you hold ENGINE START/
STOP, for up to a maximum of
15 seconds. Wait at least
15 seconds between each try,
to allow the cranking motor to
cool down.
When the engine starts, let go
of the button and the
accelerator. If the vehicle starts
briefly but then stops again,
follow the same steps. This
clears the extra gasoline from
the engine.
Do not race the engine
immediately after starting it.
Operate the engine and
transmission gently until the oil
warms up and lubricates all
moving parts.
Engine Heater
Vehicles may have an engine
heater. The engine heater can help
in cold weather conditions at or
below−18 °C (0 °F) for easier
starting and better fuel economy
during engine warm-up. Plug in the
heater at least four hours before starting the vehicle. An internal
thermostat in the plug end of the
cord will prevent engine heater
operation at temperatures above
−18 °C (0 °F).
{Warning
Do not plug in the engine block
heater while the vehicle is parked
in a garage or under a carport.
Property damage or personal
injury may result. Always park the
vehicle in a clear open area away
from buildings or structures.
To Use the Engine Heater
1. Turn off the engine.
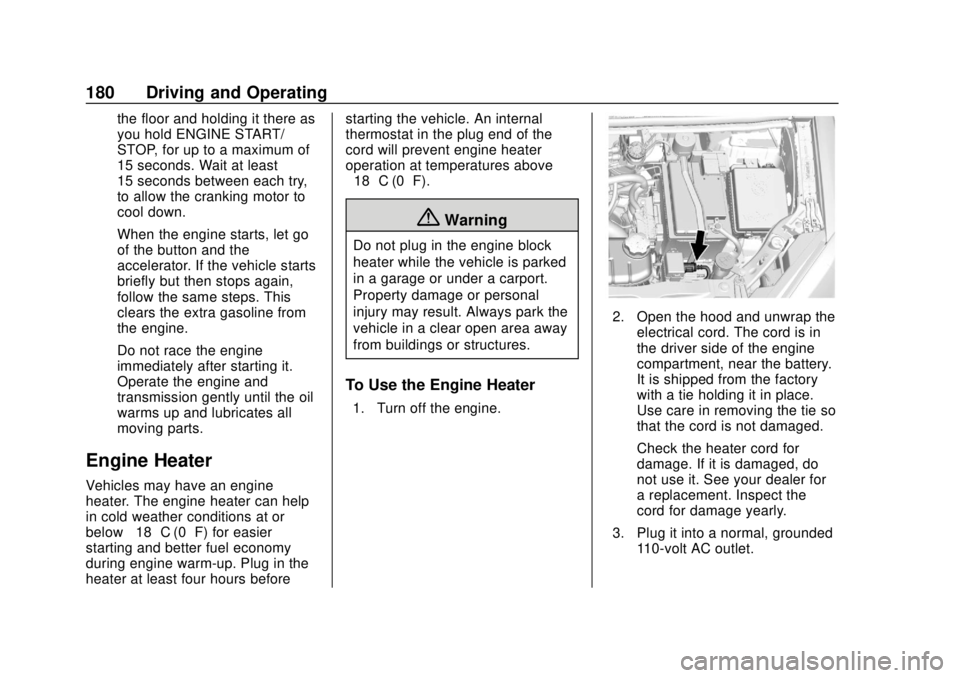
2. Open the hood and unwrap the
electrical cord. The cord is in
the driver side of the engine
compartment, near the battery.
It is shipped from the factory
with a tie holding it in place.
Use care in removing the tie so
that the cord is not damaged.
Check the heater cord for
damage. If it is damaged, do
not use it. See your dealer for
a replacement. Inspect the
cord for damage yearly.
3. Plug it into a normal, grounded 110-volt AC outlet.
Page 195 of 355

Chevrolet TRAX Owner Manual (GMNA-Localizing-U.S./Canada/Mexico-
13556235) - 2020 - CRC - 9/19/19
194 Driving and Operating
Ride Control Systems
Traction Control/
Electronic Stability
Control
System Operation
The vehicle may have a Traction
Control System (TCS) and
StabiliTrak/Electronic Stability
Control (ESC), an electronic stability
control system. These systems help
limit wheel slip and assist the driver
in maintaining control, especially on
slippery road conditions.
TCS activates if it senses that any
of the drive wheels are spinning or
beginning to lose traction. When this
happens, TCS applies the brakes to
the spinning wheels and reduces
engine power to limit wheel spin.
StabiliTrak/ESC activates when the
vehicle senses a difference between
the intended path and the direction
the vehicle is actually traveling.
StabiliTrak/ESC selectively applies
braking pressure to any one of thevehicle wheel brakes to assist the
driver in keeping the vehicle on the
intended path.
If cruise control is being used and
traction control or StabiliTrak/ESC
begins to limit wheel spin, cruise
control will disengage. Cruise
control may be turned back on when
road conditions allow.
Both systems come on
automatically when the vehicle is
started and begins to move. The
systems may be heard or felt while
they are operating or while
performing diagnostic checks. This
is normal and does not mean there
is a problem with the vehicle.
It is recommended to leave both
systems on for normal driving
conditions, but it may be necessary
to turn TCS off if the vehicle gets
stuck in sand, mud, ice, or snow.
See
If the Vehicle Is Stuck 0169
and “Turning the Systems Off and
On” later in this section.
The indicator light for both systems
is in the instrument cluster. This
light will:
.
Flash when TCS is limiting
wheel spin.
. Flash when StabiliTrak/ESC is
activated.
. Turn on and stay on when either
system is not working.
If either system fails to turn on or to
activate, a message displays in the
Driver Information Center (DIC), and
dcomes on and stays on to
indicate that the system is inactive
and is not assisting the driver in
maintaining control. The vehicle is
safe to drive, but driving should be
adjusted accordingly.
If
dcomes on and stays on:
1. Stop the vehicle.
Page 211 of 355

Chevrolet TRAX Owner Manual (GMNA-Localizing-U.S./Canada/Mexico-
13556235) - 2020 - CRC - 9/19/19
210 Driving and Operating
If equipped, the fuel door unlocks
when the vehicle doors are
unlocked. SeeRemote Keyless
Entry (RKE) System Operation
(Keyless Access) 010 or
Remote Keyless Entry (RKE)
System Operation (Key Access)
0 17.
To open the fuel door, push and
release the rearward center edge of
the door.
Turn the fuel cap counterclockwise
to remove. When refueling, hang the
fuel cap from the hook on the fuel
door. Fully insert and latch the fill
nozzle, begin fueling.
{Warning
Overfilling the fuel tank by more
than three clicks of a standard fill
nozzle may cause:
. Vehicle performance issues,
including engine stalling and
damage to the fuel system.
. Fuel spills.
. Under certain conditions,
fuel fires.
Be careful not to spill fuel. Wait
five seconds after you have finished
pumping before removing the fill
nozzle. Clean fuel from painted
surfaces as soon as possible. See
Exterior Care 0288. Reinstall the
cap by turning it clockwise until it
clicks. Push the fuel door closed
until it latches.
{Warning
If a fire starts while you are
refueling, do not remove the fill
nozzle. Shut off the flow of fuel by
shutting off the pump or by
notifying the station attendant.
Leave the area immediately.
Caution
If a new fuel cap is needed, get
the right type of cap from your
dealer. The wrong type of fuel cap
may not fit properly, may turn on
the malfunction indicator lamp,
and could damage the fuel
system and emissions system.
See Malfunction Indicator Lamp
(Check Engine Light) 0102.
Page 213 of 355

Chevrolet TRAX Owner Manual (GMNA-Localizing-U.S./Canada/Mexico-
13556235) - 2020 - CRC - 9/19/19
212 Driving and Operating
Conversions and
Add-Ons
Add-On Electrical
Equipment
{Warning
The Data Link Connector (DLC)
is used for vehicle service
and Emission Inspection/
Maintenance testing. See
Malfunction Indicator Lamp
(Check Engine Light)0102.
A device connected to the DLC —
such as an aftermarket fleet or
driver-behavior tracking device —
may interfere with vehicle
systems. This could affect vehicle
operation and cause a crash.
Such devices may also access
information stored in the vehicle’s
systems.
Caution
Some electrical equipment can
damage the vehicle or cause
components to not work and
would not be covered by the
vehicle warranty. Always check
with your dealer before adding
electrical equipment.
Add-on equipment can drain the
vehicle's 12-volt battery, even if the
vehicle is not operating.
The vehicle has an airbag system.
Before attempting to add anything
electrical to the vehicle, see
Servicing the Airbag-Equipped
Vehicle 064 and
Adding Equipment to the
Airbag-Equipped Vehicle 065.
Page 214 of 355
Chevrolet TRAX Owner Manual (GMNA-Localizing-U.S./Canada/Mexico-
13556235) - 2020 - CRC - 9/19/19
Vehicle Care 213
Vehicle Care
General Information
General Information . . . . . . . . . . 214
California Proposition65 Warning . . . . . . . . . . . . . . . . . 214
California Perchlorate Materials Requirements . . . . . 215
Accessories and Modifications . . . . . . . . . . . . . . . . 215
Vehicle Checks
Doing Your OwnService Work . . . . . . . . . . . . . . . 215
Hood . . . . . . . . . . . . . . . . . . . . . . . . . 216
Engine Compartment Overview . . . . . . . . . . . . . . . . . . . . 218
Engine Oil . . . . . . . . . . . . . . . . . . . . 221
Engine Oil Life System . . . . . . . 223
Automatic Transmission Fluid . . . . . . . . . . . . . . . . . . . . . . . . 224
Manual Transmission Fluid . . . 225
Hydraulic Clutch . . . . . . . . . . . . . . 225
Engine Air Cleaner/Filter . . . . . . 225
Cooling System . . . . . . . . . . . . . . 227
Engine Overheating . . . . . . . . . . 231
Power Steering Fluid (1.4L L4 Engine (LUV)) . . . . . . . . . . . . . . . 232 Power Steering Fluid (1.8L L4
Engine) . . . . . . . . . . . . . . . . . . . . . 232
Washer Fluid . . . . . . . . . . . . . . . . . 233
Brakes . . . . . . . . . . . . . . . . . . . . . . . 234
Brake Fluid . . . . . . . . . . . . . . . . . . . 234
Battery - North America . . . . . . 236
All-Wheel Drive . . . . . . . . . . . . . . . 236
Starter Switch Check . . . . . . . . . 237
Automatic Transmission Shift Lock Control Function
Check . . . . . . . . . . . . . . . . . . . . . . . 237
Ignition Transmission Lock Check . . . . . . . . . . . . . . . . . . . . . . . 237
Park Brake and P (Park) Mechanism Check . . . . . . . . . . 238
Wiper Blade Replacement . . . . 238
Windshield Replacement . . . . . 239
Gas Strut(s) . . . . . . . . . . . . . . . . . . 240
Headlamp Aiming
Front Headlamp Aiming . . . . . . 241
Bulb Replacement
Bulb Replacement . . . . . . . . . . . . 241
Halogen Bulbs . . . . . . . . . . . . . . . . 241
LED Lighting . . . . . . . . . . . . . . . . . 242
Headlamps, Front Turn Signal and Parking Lamps . . . . . . . . . 242
Taillamps, Turn Signal,
Sidemarker, Stoplamps, and
Back-Up Lamps . . . . . . . . . . . . . 245 License Plate Lamp . . . . . . . . . . 247
Electrical System
Electrical System Overload . . . 248
Fuses and Circuit Breakers . . . 248
Engine Compartment Fuse
Block . . . . . . . . . . . . . . . . . . . . . . . . 249
Instrument Panel Fuse Block . . . . . . . . . . . . . . . . . . . . . . . . 252
Rear Compartment Fuse Block . . . . . . . . . . . . . . . . . . . . . . . . 254
Wheels and Tires
Tires . . . . . . . . . . . . . . . . . . . . . . . . . . 255
All-Season Tires . . . . . . . . . . . . . . 256
Winter Tires . . . . . . . . . . . . . . . . . . 256
Tire Sidewall Labeling . . . . . . . . 257
Tire Designations . . . . . . . . . . . . . 259
Tire Terminology andDefinitions . . . . . . . . . . . . . . . . . . 260
Tire Pressure . . . . . . . . . . . . . . . . . 262
Tire Pressure Monitor System . . . . . . . . . . . . . . . . . . . . . . 263
Tire Pressure Monitor Operation . . . . . . . . . . . . . . . . . . . 264
Tire Inspection . . . . . . . . . . . . . . . . 267
Tire Rotation . . . . . . . . . . . . . . . . . 268
When It Is Time for New Tires . . . . . . . . . . . . . . . . . . . . . . . . 269
Buying New Tires . . . . . . . . . . . . . 270
Page 218 of 355

Chevrolet TRAX Owner Manual (GMNA-Localizing-U.S./Canada/Mexico-
13556235) - 2020 - CRC - 9/19/19
Vehicle Care 217
3. Lift the hood and release thehood prop rod from its retainer,
in the front of the engine
compartment. Securely insert
the rod end into the slot
marked with an arrow, on the
underside of the hood.
To close the hood: 1. Before closing the hood, be sure all filler caps are on
properly, and all tools are
removed.
2. Lift the hood and remove the hood prop rod from the
underside of the hood. Return
the prop rod to its retainer. The prop rod must click into place
when returning it to the retainer
to prevent hood damage.
3. Lower the hood 20 cm (8 in) above the vehicle and release
it. Check to make sure the
hood is latched completely.
Repeat this process with
additional force if necessary.
{Warning
Do not drive the vehicle if the
hood is not latched completely.
The hood could open fully, block
your vision, and cause a crash.
You or others could be injured.
Always close the hood completely
before driving.
Page 222 of 355
Chevrolet TRAX Owner Manual (GMNA-Localizing-U.S./Canada/Mexico-
13556235) - 2020 - CRC - 9/19/19
Vehicle Care 221
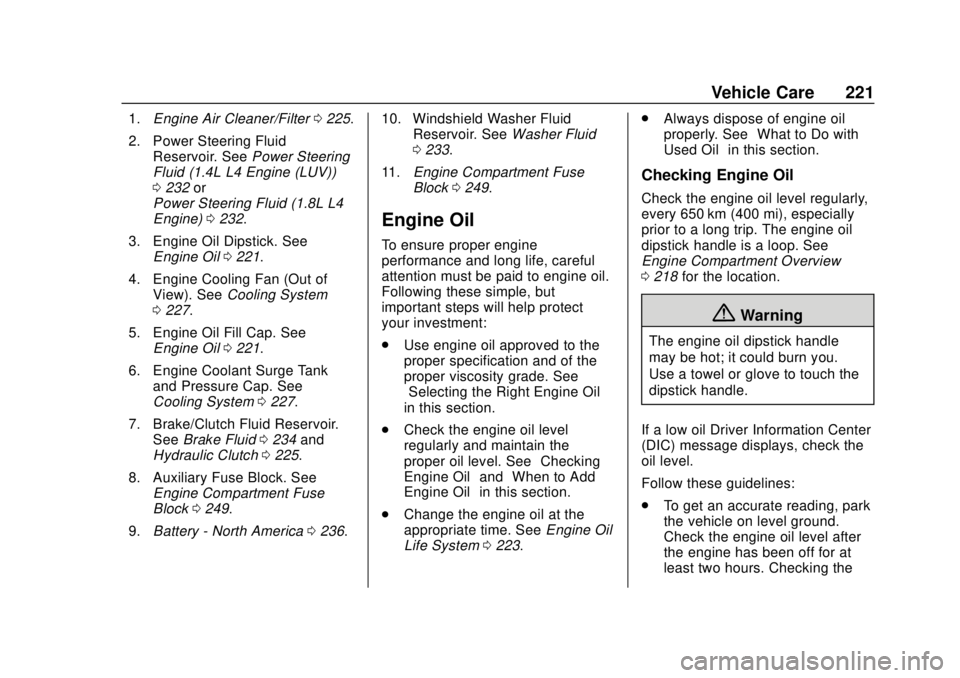
1.Engine Air Cleaner/Filter 0225.
2. Power Steering Fluid Reservoir. See Power Steering
Fluid (1.4L L4 Engine (LUV))
0 232 or
Power Steering Fluid (1.8L L4
Engine) 0232.
3. Engine Oil Dipstick. See Engine Oil 0221.
4. Engine Cooling Fan (Out of View). See Cooling System
0 227.
5. Engine Oil Fill Cap. See Engine Oil 0221.
6. Engine Coolant Surge Tank and Pressure Cap. See
Cooling System 0227.
7. Brake/Clutch Fluid Reservoir. See Brake Fluid 0234 and
Hydraulic Clutch 0225.
8. Auxiliary Fuse Block. See Engine Compartment Fuse
Block 0249.
9. Battery - North America 0236. 10. Windshield Washer Fluid
Reservoir. See Washer Fluid
0 233.
11. Engine Compartment Fuse
Block 0249.
Engine Oil
To ensure proper engine
performance and long life, careful
attention must be paid to engine oil.
Following these simple, but
important steps will help protect
your investment:
.
Use engine oil approved to the
proper specification and of the
proper viscosity grade. See
“Selecting the Right Engine Oil”
in this section.
. Check the engine oil level
regularly and maintain the
proper oil level. See “Checking
Engine Oil” and“When to Add
Engine Oil” in this section.
. Change the engine oil at the
appropriate time. See Engine Oil
Life System 0223. .
Always dispose of engine oil
properly. See “What to Do with
Used Oil” in this section.
Checking Engine Oil
Check the engine oil level regularly,
every 650 km (400 mi), especially
prior to a long trip. The engine oil
dipstick handle is a loop. See
Engine Compartment Overview
0218 for the location.
{Warning
The engine oil dipstick handle
may be hot; it could burn you.
Use a towel or glove to touch the
dipstick handle.
If a low oil Driver Information Center
(DIC) message displays, check the
oil level.
Follow these guidelines:
. To get an accurate reading, park
the vehicle on level ground.
Check the engine oil level after
the engine has been off for at
least two hours. Checking the
Page 223 of 355
Chevrolet TRAX Owner Manual (GMNA-Localizing-U.S./Canada/Mexico-
13556235) - 2020 - CRC - 9/19/19
222 Vehicle Care
engine oil level on steep grades
or too soon after engine shutoff
can result in incorrect readings.
Accuracy improves when
checking a cold engine prior to
starting. Remove the dipstick
and check the level.
. If unable to wait two hours, the
engine must be off for at least
15 minutes if the engine is
warm, or at least 30 minutes if
the engine is not warm. Pull out
the dipstick, wipe it with a clean
paper towel or cloth, then push it
back in all the way. Remove it
again, keeping the tip down, and
check the level.
When to Add Engine Oil
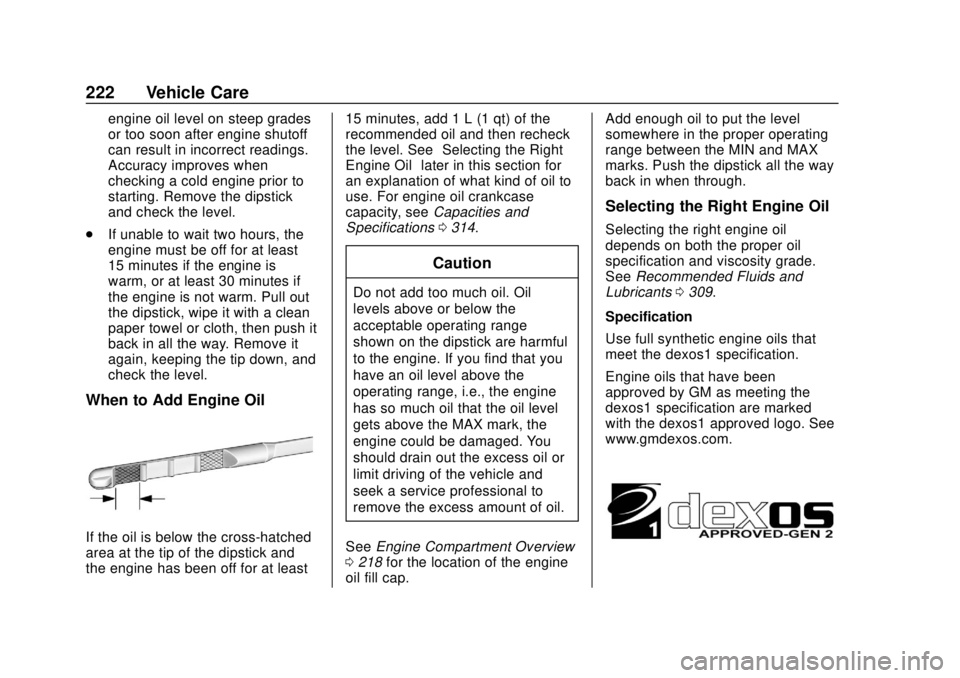
If the oil is below the cross-hatched
area at the tip of the dipstick and
the engine has been off for at least 15 minutes, add 1 L (1 qt) of the
recommended oil and then recheck
the level. See
“Selecting the Right
Engine Oil” later in this section for
an explanation of what kind of oil to
use. For engine oil crankcase
capacity, see Capacities and
Specifications 0314.
Caution
Do not add too much oil. Oil
levels above or below the
acceptable operating range
shown on the dipstick are harmful
to the engine. If you find that you
have an oil level above the
operating range, i.e., the engine
has so much oil that the oil level
gets above the MAX mark, the
engine could be damaged. You
should drain out the excess oil or
limit driving of the vehicle and
seek a service professional to
remove the excess amount of oil.
See Engine Compartment Overview
0 218 for the location of the engine
oil fill cap. Add enough oil to put the level
somewhere in the proper operating
range between the MIN and MAX
marks. Push the dipstick all the way
back in when through.
Selecting the Right Engine Oil
Selecting the right engine oil
depends on both the proper oil
specification and viscosity grade.
See
Recommended Fluids and
Lubricants 0309.
Specification
Use full synthetic engine oils that
meet the dexos1 specification.
Engine oils that have been
approved by GM as meeting the
dexos1 specification are marked
with the dexos1 approved logo. See
www.gmdexos.com.
Page 225 of 355
Chevrolet TRAX Owner Manual (GMNA-Localizing-U.S./Canada/Mexico-
13556235) - 2020 - CRC - 9/19/19
224 Vehicle Care
an oil change is not necessary for
up to a year. The engine oil and
filter must be changed at least once
a year and, at this time, the system
must be reset. Your dealer has
trained service people who will
perform this work and reset the
system. It is also important to check
the oil regularly over the course of
an oil drain interval and keep it at
the proper level.
If the system is ever reset
accidentally, the oil must be
changed at 5 000 km (3,000 mi)
since the last oil change.
Remember to reset the oil life
system whenever the oil is changed.
How to Reset the Engine Oil
Life System
Reset the system whenever the
engine oil is changed so that the
system can calculate the next
engine oil change. Always reset the
engine oil life to 100% after each oil
change. It will not reset itself. To
reset the system:Base Level Cluster
1. Press the MENU button to show Remaining Oil Life on the
display. This display shows an
estimate of the oil’s remaining
useful life. If 99% is displayed,
that means that 99% of the
current oil life remains.
2. To reset the engine oil life system, press SET/CLR while
the oil life display is active.
After a few seconds, the oil life
will be reset to 100%. Be
careful not to reset the oil life
display accidentally at any time
other than after the oil is
changed. It cannot be reset
accurately.
If the
:% CHANGE message in
the DIC comes back on when the
vehicle is started, the engine oil life
system has not reset. Repeat the
procedure.
Uplevel Cluster
1. Turn the ignition on without starting the engine. 2. Press the DIC MENU button on
the turn signal lever to enter
the Vehicle Information Menu.
Use the thumbwheel to scroll
through the menu items until
you reach REMAINING
OIL LIFE.
3. Press SET/CLR to reset the oil life at 100%.
4. Turn the ignition off.
The system is reset when the
CHANGE ENGINE OIL SOON
message is off and the REMAINING
OIL LIFE 100% message is
displayed. If the CHANGE ENGINE
OIL SOON message comes back on
when the vehicle is started, the
engine oil life system has not been
reset. Repeat the procedure.
Automatic Transmission
Fluid
How to Check Automatic
Transmission Fluid
It is not necessary to check the
transmission fluid level.
A transmission fluid leak is the only