headlamp CHEVROLET TRAX 2021 User Guide
[x] Cancel search | Manufacturer: CHEVROLET, Model Year: 2021, Model line: TRAX, Model: CHEVROLET TRAX 2021Pages: 280, PDF Size: 8.76 MB
Page 167 of 280
Chevrolet TRAX Owner Manual (GMNA-Localizing-U.S./Canada-14609828) -
2021 - CRC - 8/21/20
166 Vehicle Care
Vehicle Care
General Information
General Information . . . . . . . . . . . . . . . . . . . 167
California Proposition 65 Warning . . . . . 167
California Perchlorate MaterialsRequirements . . . . . . . . . . . . . . . . . . . . . . . . 167
Accessories and Modifications . . . . . . . . . 167
Vehicle Checks
Doing Your Own Service Work . . . . . . . . 168
Hood . . . . . . . . . . . . . . . . . . . . . . . . . . . . . . . . . . 168
Engine Compartment Overview . . . . . . . . 170
Engine Oil . . . . . . . . . . . . . . . . . . . . . . . . . . . . . 173
Engine Oil Life System . . . . . . . . . . . . . . . . . 175
Automatic Transmission Fluid . . . . . . . . . . 175
Engine Air Cleaner/Filter . . . . . . . . . . . . . . . 176
Cooling System . . . . . . . . . . . . . . . . . . . . . . . . 177
Engine Overheating . . . . . . . . . . . . . . . . . . . 180
Washer Fluid . . . . . . . . . . . . . . . . . . . . . . . . . . . 181
Brakes . . . . . . . . . . . . . . . . . . . . . . . . . . . . . . . . . 182
Brake Fluid . . . . . . . . . . . . . . . . . . . . . . . . . . . . 182
Battery - North America . . . . . . . . . . . . . . . 183
All-Wheel Drive . . . . . . . . . . . . . . . . . . . . . . . . 184
Starter Switch Check . . . . . . . . . . . . . . . . . . 184
Automatic Transmission Shift Lock Control Function Check . . . . . . . . . . . . . . 184
Park Brake and P (Park) Mechanism Check . . . . . . . . . . . . . . . . . . . . . . . . . . . . . . . . 185
Wiper Blade Replacement . . . . . . . . . . . . . 185 Windshield Replacement . . . . . . . . . . . . . . 186
Gas Strut(s) . . . . . . . . . . . . . . . . . . . . . . . . . . . 186
Headlamp Aiming
Front Headlamp Aiming . . . . . . . . . . . . . . . 187
Bulb Replacement
Bulb Replacement . . . . . . . . . . . . . . . . . . . . . 187
Halogen Bulbs . . . . . . . . . . . . . . . . . . . . . . . . . 188
LED Lighting . . . . . . . . . . . . . . . . . . . . . . . . . . . 188
Headlamps, Front Turn Signal and
Parking Lamps . . . . . . . . . . . . . . . . . . . . . . . 188
Taillamps, Turn Signal, Sidemarker, Stoplamps, and Back-Up Lamps . . . . . . 191
License Plate Lamp . . . . . . . . . . . . . . . . . . . . 192
Electrical System
Electrical System Overload . . . . . . . . . . . . . 193
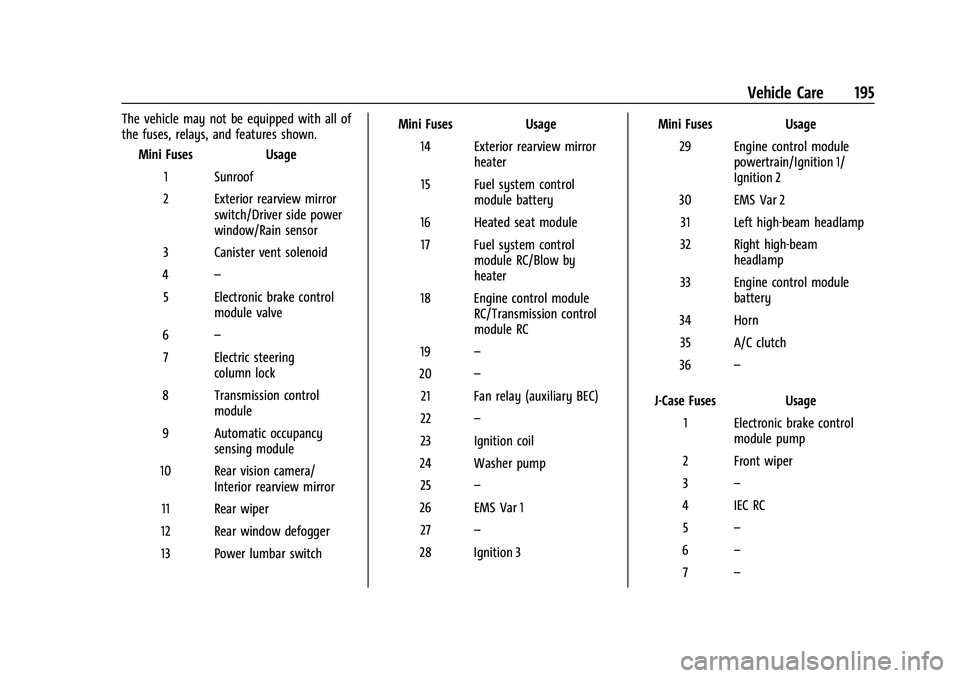
Fuses and Circuit Breakers . . . . . . . . . . . . . 193
Engine Compartment Fuse Block . . . . . . 194
Instrument Panel Fuse Block . . . . . . . . . . . 197
Rear Compartment Fuse Block . . . . . . . . . 198
Wheels and Tires
Tires . . . . . . . . . . . . . . . . . . . . . . . . . . . . . . . . . . . 199
All-Season Tires . . . . . . . . . . . . . . . . . . . . . . . 200
Winter Tires . . . . . . . . . . . . . . . . . . . . . . . . . . 200
Tire Sidewall Labeling . . . . . . . . . . . . . . . . . 201
Tire Designations . . . . . . . . . . . . . . . . . . . . . . 202
Tire Terminology and Definitions . . . . . . 203
Tire Pressure . . . . . . . . . . . . . . . . . . . . . . . . . . 205
Tire Pressure Monitor System . . . . . . . . . 206 Tire Pressure Monitor Operation . . . . . . 207
Tire Inspection . . . . . . . . . . . . . . . . . . . . . . . . 209
Tire Rotation . . . . . . . . . . . . . . . . . . . . . . . . . . 209
When It Is Time for New Tires . . . . . . . . 210
Buying New Tires . . . . . . . . . . . . . . . . . . . . . . 211
Different Size Tires and Wheels . . . . . . . . 212
Uniform Tire Quality Grading . . . . . . . . . . 213
Wheel Alignment and Tire Balance . . . . 214
Wheel Replacement . . . . . . . . . . . . . . . . . . . 214
Tire Chains . . . . . . . . . . . . . . . . . . . . . . . . . . . . . 215
If a Tire Goes Flat . . . . . . . . . . . . . . . . . . . . . 215
Tire Changing . . . . . . . . . . . . . . . . . . . . . . . . . . 216
Compact Spare Tire . . . . . . . . . . . . . . . . . . . 220
Jump Starting
Jump Starting - North America . . . . . . . . . 221
Towing the Vehicle
Towing the Vehicle . . . . . . . . . . . . . . . . . . . . 223
Recreational Vehicle Towing . . . . . . . . . . . 224
Appearance Care
Exterior Care . . . . . . . . . . . . . . . . . . . . . . . . . . 226
Interior Care . . . . . . . . . . . . . . . . . . . . . . . . . . . 230
Floor Mats . . . . . . . . . . . . . . . . . . . . . . . . . . . . . 232
Page 188 of 280

Chevrolet TRAX Owner Manual (GMNA-Localizing-U.S./Canada-14609828) -
2021 - CRC - 8/21/20
Vehicle Care 187
Caution
Do not apply tape or hang any objects
from gas struts. Also do not push down
or pull on gas struts. This may cause
damage to the vehicle.
See Maintenance Schedule 0235.
Hood
Trunk
Liftgate
Headlamp Aiming
Front Headlamp Aiming
Headlamp aim has been preset and should
need no further adjustment.
If the vehicle is damaged in a crash, the
headlamp aim may be affected.
If adjustment to the headlamps is necessary,
see your dealer.
Bulb Replacement
For the proper type of replacement bulbs,
or any bulb changing procedure not listed in
this section, contact your dealer.
Caution
Do not replace incandescent bulbs with
aftermarket LED replacement bulbs. This
can cause damage to the vehicle electrical
system.
Page 189 of 280
Chevrolet TRAX Owner Manual (GMNA-Localizing-U.S./Canada-14609828) -
2021 - CRC - 8/21/20
188 Vehicle Care
Halogen Bulbs
{Warning
Halogen bulbs have pressurized gas inside
and can burst if you drop or scratch the
bulb. You or others could be injured. Be
sure to read and follow the instructions
on the bulb package.
LED Lighting
This vehicle has several LED lamps. For
replacement of any LED lighting assembly,
contact your dealer.
Headlamps, Front Turn Signal and
Parking Lamps
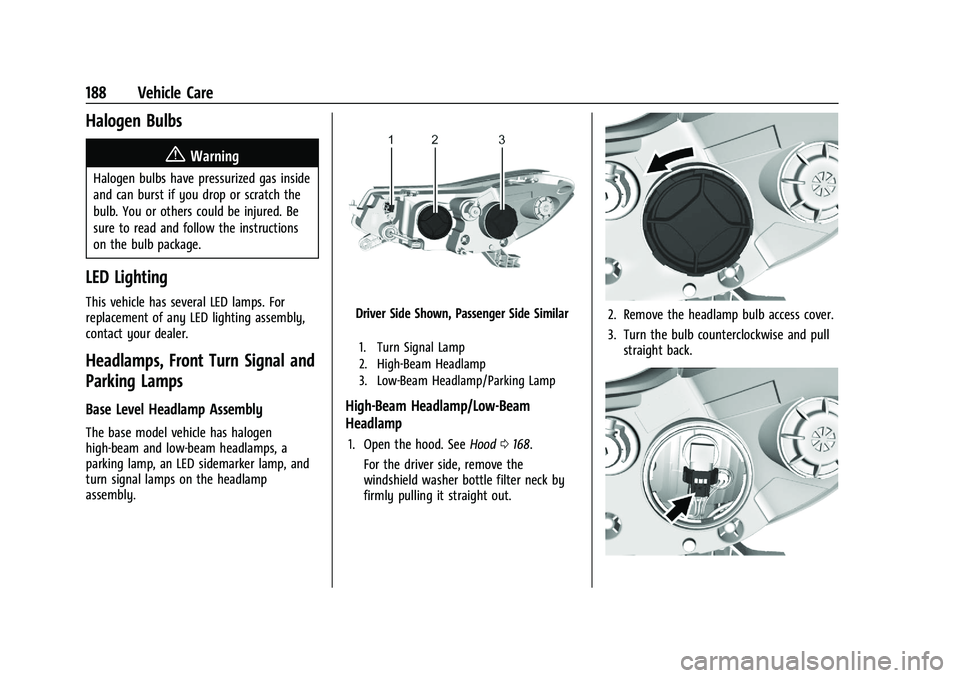
Base Level Headlamp Assembly
The base model vehicle has halogen
high-beam and low-beam headlamps, a
parking lamp, an LED sidemarker lamp, and
turn signal lamps on the headlamp
assembly.
Driver Side Shown, Passenger Side Similar
1. Turn Signal Lamp
2. High-Beam Headlamp
3. Low-Beam Headlamp/Parking Lamp
High-Beam Headlamp/Low-Beam
Headlamp
1. Open the hood. SeeHood0168.
For the driver side, remove the
windshield washer bottle filter neck by
firmly pulling it straight out.
2. Remove the headlamp bulb access cover.
3. Turn the bulb counterclockwise and pull straight back.
Page 190 of 280
Chevrolet TRAX Owner Manual (GMNA-Localizing-U.S./Canada-14609828) -
2021 - CRC - 8/21/20
Vehicle Care 189
4. Disconnect the wiring harness connectorfrom the bulb.
5. Install the new bulb in the headlamp assembly by turning clockwise.
6. Reconnect the wiring harness connector.
7. Install the headlamp bulb access cover.
For the driver side, reinstall the
windshield washer bottle filter neck by
firmly pushing it straight into the bottle.
Ensure that the filter neck clip engages
into the underhood electrical center
retainer.
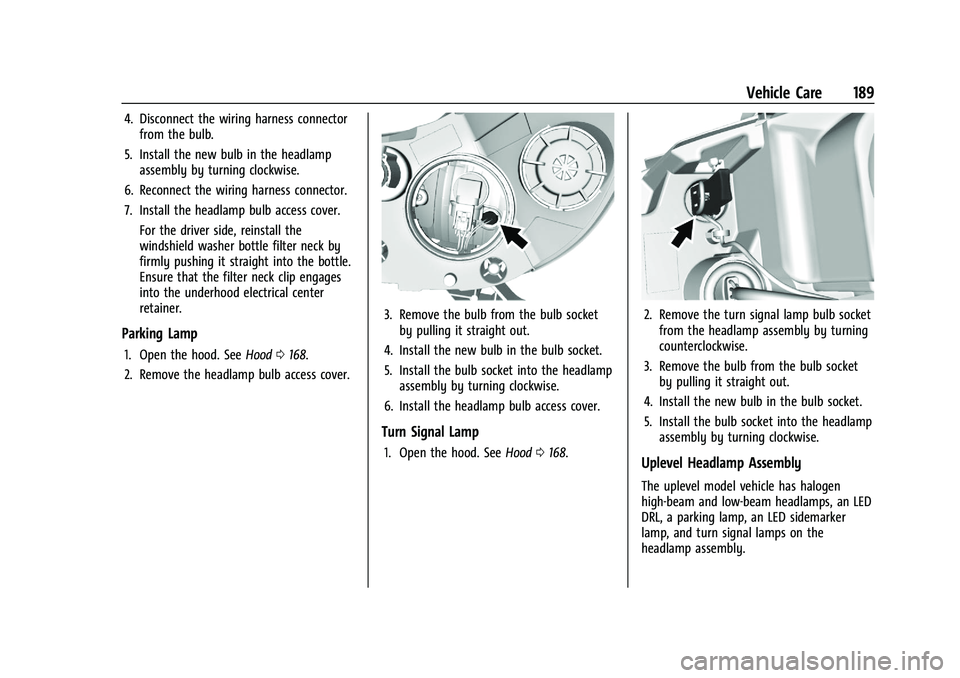
Parking Lamp
1. Open the hood. See Hood0168.
2. Remove the headlamp bulb access cover.
3. Remove the bulb from the bulb socket by pulling it straight out.
4. Install the new bulb in the bulb socket.
5. Install the bulb socket into the headlamp assembly by turning clockwise.
6. Install the headlamp bulb access cover.
Turn Signal Lamp
1. Open the hood. See Hood0168.
2. Remove the turn signal lamp bulb socket
from the headlamp assembly by turning
counterclockwise.
3. Remove the bulb from the bulb socket by pulling it straight out.
4. Install the new bulb in the bulb socket.
5. Install the bulb socket into the headlamp assembly by turning clockwise.
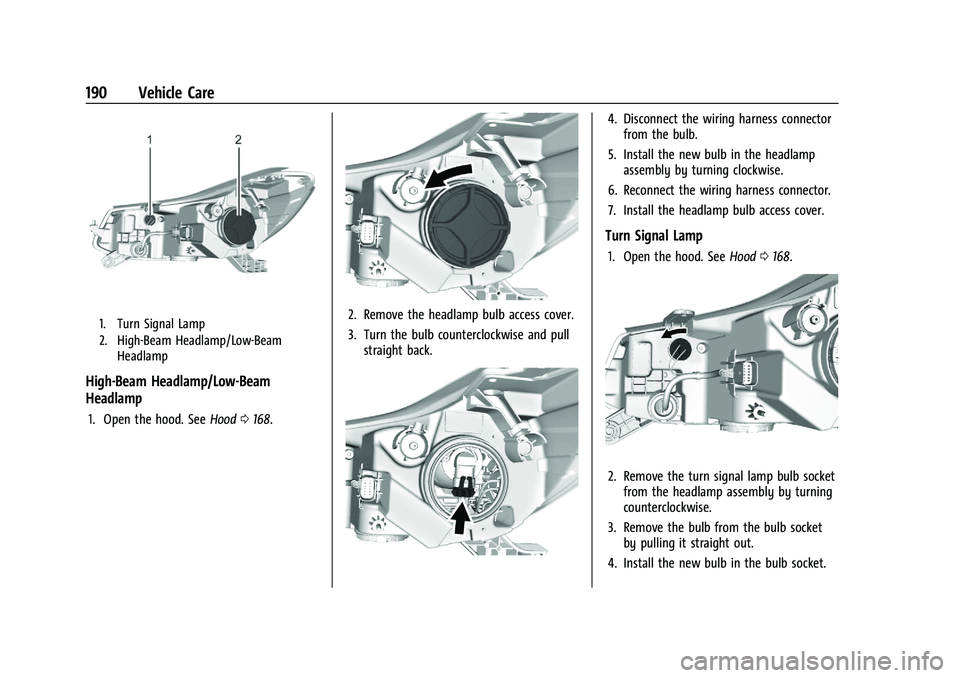
Uplevel Headlamp Assembly
The uplevel model vehicle has halogen
high-beam and low-beam headlamps, an LED
DRL, a parking lamp, an LED sidemarker
lamp, and turn signal lamps on the
headlamp assembly.
Page 191 of 280
Chevrolet TRAX Owner Manual (GMNA-Localizing-U.S./Canada-14609828) -
2021 - CRC - 8/21/20
190 Vehicle Care
1. Turn Signal Lamp
2. High-Beam Headlamp/Low-BeamHeadlamp
High-Beam Headlamp/Low-Beam
Headlamp
1. Open the hood. See Hood0168.
2. Remove the headlamp bulb access cover.
3. Turn the bulb counterclockwise and pull
straight back.
4. Disconnect the wiring harness connectorfrom the bulb.
5. Install the new bulb in the headlamp assembly by turning clockwise.
6. Reconnect the wiring harness connector.
7. Install the headlamp bulb access cover.
Turn Signal Lamp
1. Open the hood. See Hood0168.
2. Remove the turn signal lamp bulb socket
from the headlamp assembly by turning
counterclockwise.
3. Remove the bulb from the bulb socket by pulling it straight out.
4. Install the new bulb in the bulb socket.
Page 192 of 280

Chevrolet TRAX Owner Manual (GMNA-Localizing-U.S./Canada-14609828) -
2021 - CRC - 8/21/20
Vehicle Care 191
5. Install the bulb socket into the headlampassembly by turning clockwise.
Taillamps, Turn Signal,
Sidemarker, Stoplamps, and
Back-Up Lamps
Base Level Taillamp Assembly
The base model vehicle has a halogen
taillamp/stoplamp, a stoplamp, a turn signal
lamp, a back-up lamp, and a sidemarker
lamp on the taillamp assembly.
Driver Side Shown, Passenger Side Similar
1. Taillamp/Stoplamp
2. Back-Up Lamp 3. Turn Signal Lamp
4. Taillamp
5. Sidemarker Lamp
Passenger Side Shown, Driver Side Similar
1. Remove and retain both screws attaching the taillamp assembly to the
vehicle body.
2. Pull the taillamp assembly straight back to detach it from the vehicle body. Take
care that the cable duct remains in place.
3. Remove the bulb socket from the taillamp assembly.
4. Remove the old bulb from the bulb socket by pulling it straight out.
5. Insert a new bulb into the bulb socket. 6. Install the bulb socket into the taillamp
asembly.
7. Install the taillamp assembly to the vehicle body with the two screws.
Uplevel Taillamp Assembly
The uplevel vehicle has a halogen stoplamp,
an LED taillamp, a sidemarker lamp, a turn
signal lamp, and a back-up lamp on the
taillamp assembly.
Driver Side Shown, Passenger Side Similar
1. Sidemarker Lamp
2. Stoplamp
3. Back-Up Lamp
4. Turn Signal Lamp
Page 194 of 280

Chevrolet TRAX Owner Manual (GMNA-Localizing-U.S./Canada-14609828) -
2021 - CRC - 8/21/20
Vehicle Care 193
To replace one of these bulbs:1. Push the left end of the lamp assembly toward the right.
2. Turn the lamp assembly down to remove it.
3. Turn the bulb socket (1) counterclockwise to remove it from the lamp assembly (3).
4. Pull the bulb (2) straight out of the bulb socket (1).
5. Push the replacement bulb straight into the bulb socket and turn the bulb socket
clockwise to install it into the lamp
assembly.
6. Turn the lamp assembly into the lamp assembly opening engaging the clip side
first.
7. Push on the lamp side opposite the clip until the lamp assembly snaps into place.
Electrical System
Electrical System Overload
The vehicle has fuses and circuit breakers to
protect against an electrical system
overload. When the current electrical load is too
heavy, the circuit breaker opens and closes,
protecting the circuit until the current load
returns to normal or the problem is fixed.
This greatly reduces the chance of circuit
overload and fire caused by electrical
problems.
Fuses and circuit breakers protect power
devices in the vehicle.
Replace a bad fuse with a new one of the
identical size and rating.
If there is a problem on the road and a fuse
needs to be replaced, the same amperage
fuse can be borrowed. Choose some feature
of the vehicle that is not needed to use and
replace it as soon as possible.
Headlamp Wiring
An electrical overload may cause the lamps
to go on and off, or in some cases to
remain off. Have the headlamp wiring
checked right away if the lamps go on and
off or remain off.
Windshield Wipers
If the wiper motor overheats due to heavy
snow or ice, the windshield wipers will stop
until the motor cools and will then restart.Although the circuit is protected from
electrical overload, overload due to heavy
snow or ice may cause wiper linkage
damage. Always clear ice and heavy snow
from the windshield before using the
windshield wipers.
If the overload is caused by an electrical
problem and not snow or ice, be sure to get
it fixed.
Fuses and Circuit Breakers
The wiring circuits in the vehicle are
protected from short circuits by a
combination of fuses and circuit breakers.
This greatly reduces the chance of damage
caused by electrical problems.
{Danger
Fuses and circuit breakers are marked
with their ampere rating. Do not exceed
the specified amperage rating when
replacing fuses and circuit breakers. Use
of an oversized fuse or circuit breaker can
result in a vehicle fire. You and others
could be seriously injured or killed.
Page 196 of 280
Chevrolet TRAX Owner Manual (GMNA-Localizing-U.S./Canada-14609828) -
2021 - CRC - 8/21/20
Vehicle Care 195
The vehicle may not be equipped with all of
the fuses, relays, and features shown.Mini Fuses Usage
1 Sunroof
2 Exterior rearview mirror switch/Driver side power
window/Rain sensor
3 Canister vent solenoid
4 –
5 Electronic brake control module valve
6 –
7 Electric steering column lock
8 Transmission control module
9 Automatic occupancy sensing module
10 Rear vision camera/ Interior rearview mirror
11 Rear wiper
12 Rear window defogger
13 Power lumbar switch Mini Fuses
Usage
14 Exterior rearview mirror heater
15 Fuel system control module battery
16 Heated seat module 17 Fuel system control module RC/Blow by
heater
18 Engine control module RC/Transmission control
module RC
19 –
20 –
21 Fan relay (auxiliary BEC)
22 –
23 Ignition coil
24 Washer pump 25 –
26 EMS Var 1 27 –
28 Ignition 3 Mini Fuses
Usage
29 Engine control module powertrain/Ignition 1/
Ignition 2
30 EMS Var 2 31 Left high-beam headlamp
32 Right high-beam headlamp
33 Engine control module battery
34 Horn 35 A/C clutch
36 –
J-Case Fuses Usage 1 Electronic brake control module pump
2 Front wiper
3 –
4 IEC RC 5 –
6 –
7 –
Page 215 of 280

Chevrolet TRAX Owner Manual (GMNA-Localizing-U.S./Canada-14609828) -
2021 - CRC - 8/21/20
214 Vehicle Care
Temperature
The temperature grades are A (the
highest), B, and C, representing the
tire's resistance to the generation of
heat and its ability to dissipate heat
when tested under controlled conditions
on a specified indoor laboratory test
wheel. Sustained high temperature can
cause the material of the tire to
degenerate and reduce tire life, and
excessive temperature can lead to
sudden tire failure. The grade C
corresponds to a level of performance
which all passenger car tires must meet
under the Federal Motor Safety
Standard No. 109. Grades B and A
represent higher levels of performance
on the laboratory test wheel than the
minimum required by law. Warning:
The temperature grade for this tire is
established for a tire that is properly
inflated and not overloaded. Excessive
speed, underinflation, or excessive
loading, either separately or in
combination, can cause heat buildup
and possible tire failure.Wheel Alignment and Tire
Balance
The tires and wheels were aligned and
balanced at the factory to provide the
longest tire life and best overall
performance. Adjustments to wheel
alignment and tire balancing are not
necessary on a regular basis. Consider an
alignment check if there is unusual tire wear
or the vehicle is significantly pulling to one
side or the other. Some slight pull to the
left or right, depending on the crown of the
road and/or other road surface variations
such as troughs or ruts, is normal. If the
vehicle is vibrating when driving on a
smooth road, the tires and wheels may
need to be rebalanced. See your dealer for
proper diagnosis.
Wheel Replacement
Replace any wheel that is bent, cracked,
or badly rusted or corroded. If wheel nuts
keep coming loose, the wheel, wheel bolts,
and wheel nuts should be replaced. If the
wheel leaks air, replace it. Some aluminum
wheels can be repaired. See your dealer if
any of these conditions exist.Your dealer will know the kind of wheel that
is needed.
Each new wheel should have the same
load-carrying capacity, diameter, width,
offset, and be mounted the same way as
the one it replaces.
Replace wheels, wheel bolts, wheel nuts,
or Tire Pressure Monitor System (TPMS)
sensors with new GM original equipment
parts.
{Warning
Using the wrong replacement wheels,
wheel bolts, or wheel nuts can be
dangerous. It could affect the braking and
handling of the vehicle. Tires can lose air,
and cause loss of control, causing a crash.
Always use the correct wheel, wheel
bolts, and wheel nuts for replacement.
Caution
The wrong wheel can also cause
problems with bearing life, brake cooling,
speedometer or odometer calibration,
headlamp aim, bumper height, vehicle
ground clearance, and tire or tire chain
clearance to the body and chassis.
Page 242 of 280

Chevrolet TRAX Owner Manual (GMNA-Localizing-U.S./Canada-14609828) -
2021 - CRC - 8/21/20
Service and Maintenance 241
.Trained dealer technicians have the
diagnostic equipment to test the battery
and ensure that the connections and
cables are corrosion-free.
Belts
.Belts may need replacing if they squeak
or show signs of cracking or splitting.
.Trained dealer technicians have access to
tools and equipment to inspect the belts
and recommend adjustment or
replacement when necessary.
Brakes
Brakes stop the vehicle and are crucial to
safe driving.
.Signs of brake wear may include chirping,
grinding, or squealing noises, or difficulty
stopping.
.Trained dealer technicians have access to
tools and equipment to inspect the brakes
and recommend quality parts engineered
for the vehicle.
Fluids
Proper fluid levels and approved fluids
protect the vehicle’s systems and
components. See Recommended Fluids and
Lubricants 0243 for GM approved fluids.
.Engine oil and windshield washer fluid
levels should be checked at every fuel fill.
.Instrument cluster lights may come on to
indicate that fluids may be low and need
to be filled.
Hoses
Hoses transport fluids and should be
regularly inspected to ensure that there are
no cracks or leaks. With a multi-point
inspection, your dealer can inspect the hoses
and advise if replacement is needed.
Lamps
Properly working headlamps, taillamps, and
brake lamps are important to see and be
seen on the road.
.Signs that the headlamps need attention
include dimming, failure to light, cracking,
or damage. The brake lamps need to be
checked periodically to ensure that they
light when braking.
.With a multi-point inspection, your dealer
can check the lamps and note any
concerns.
Shocks and Struts
Shocks and struts help aid in control for a
smoother ride.
.Signs of wear may include steering wheel
vibration, bounce/sway while braking,
longer stopping distance, or uneven
tire wear.
.As part of the multi-point inspection,
trained dealer technicians can visually
inspect the shocks and struts for signs of
leaking, blown seals, or damage, and can
advise when service is needed.
Tires
Tires need to be properly inflated, rotated,
and balanced. Maintaining the tires can save
money and fuel, and can reduce the risk of
tire failure.
.Signs that the tires need to be replaced
include three or more visible treadwear
indicators; cord or fabric showing through
the rubber; cracks or cuts in the tread or
sidewall; or a bulge or split in the tire.
.Trained dealer technicians can inspect and
recommend the right tires. Your dealer
can also provide tire/wheel balancing
services to ensure smooth vehicle
operation at all speeds. Your dealer sells
and services name brand tires.