check engine CHEVROLET TRAX 2021 Owner's Guide
[x] Cancel search | Manufacturer: CHEVROLET, Model Year: 2021, Model line: TRAX, Model: CHEVROLET TRAX 2021Pages: 280, PDF Size: 8.76 MB
Page 181 of 280
Chevrolet TRAX Owner Manual (GMNA-Localizing-U.S./Canada-14609828) -
2021 - CRC - 8/21/20
180 Vehicle Care
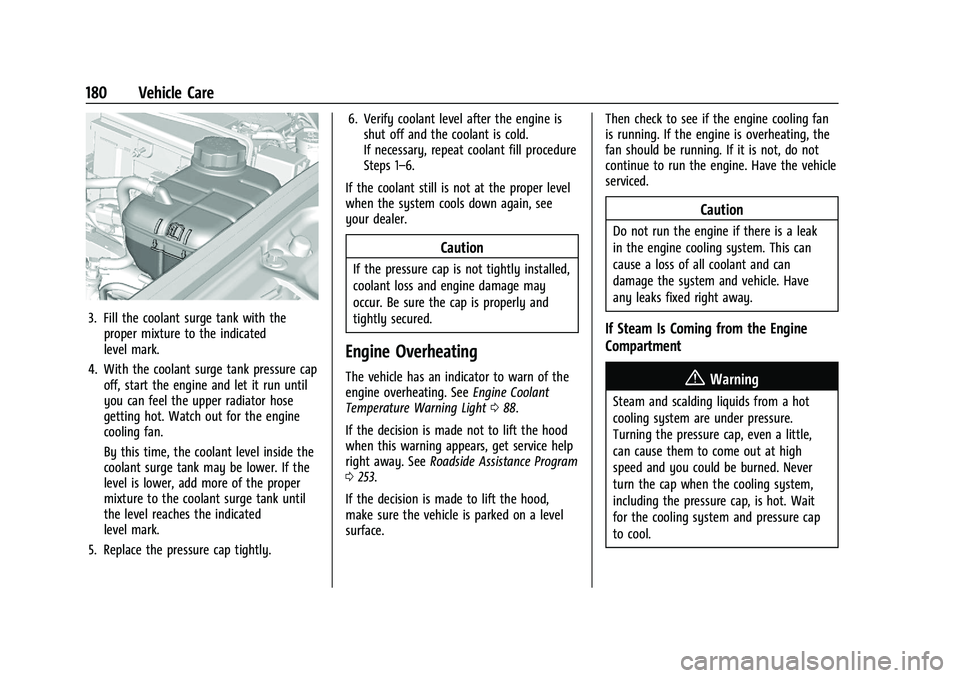
3. Fill the coolant surge tank with theproper mixture to the indicated
level mark.
4. With the coolant surge tank pressure cap off, start the engine and let it run until
you can feel the upper radiator hose
getting hot. Watch out for the engine
cooling fan.
By this time, the coolant level inside the
coolant surge tank may be lower. If the
level is lower, add more of the proper
mixture to the coolant surge tank until
the level reaches the indicated
level mark.
5. Replace the pressure cap tightly. 6. Verify coolant level after the engine is
shut off and the coolant is cold.
If necessary, repeat coolant fill procedure
Steps 1–6.
If the coolant still is not at the proper level
when the system cools down again, see
your dealer.
Caution
If the pressure cap is not tightly installed,
coolant loss and engine damage may
occur. Be sure the cap is properly and
tightly secured.
Engine Overheating
The vehicle has an indicator to warn of the
engine overheating. See Engine Coolant
Temperature Warning Light 088.
If the decision is made not to lift the hood
when this warning appears, get service help
right away. See Roadside Assistance Program
0 253.
If the decision is made to lift the hood,
make sure the vehicle is parked on a level
surface. Then check to see if the engine cooling fan
is running. If the engine is overheating, the
fan should be running. If it is not, do not
continue to run the engine. Have the vehicle
serviced.
Caution
Do not run the engine if there is a leak
in the engine cooling system. This can
cause a loss of all coolant and can
damage the system and vehicle. Have
any leaks fixed right away.
If Steam Is Coming from the Engine
Compartment
{Warning
Steam and scalding liquids from a hot
cooling system are under pressure.
Turning the pressure cap, even a little,
can cause them to come out at high
speed and you could be burned. Never
turn the cap when the cooling system,
including the pressure cap, is hot. Wait
for the cooling system and pressure cap
to cool.
Page 182 of 280
Chevrolet TRAX Owner Manual (GMNA-Localizing-U.S./Canada-14609828) -
2021 - CRC - 8/21/20
Vehicle Care 181
If No Steam Is Coming from the Engine
Compartment
If an engine overheat warning is displayed
but no steam can be seen or heard, the
problem may not be too serious. Sometimes
the engine can get a little too hot when the
vehicle:
.Climbs a long hill on a hot day
.Stops after high-speed driving
.Idles for long periods in traffic
If the overheat warning is displayed with no
sign of steam: 1. Turn the air conditioning off.
2. Turn the heater on to the highest temperature and to the highest fan
speed. Open the windows as necessary.
3. When it is safe to do so, pull off the road, shift to P (Park) or N (Neutral) for
an automatic transmission and let the
engine idle.
If the overheat warning no longer displays,
the vehicle can be driven. Continue to drive
the vehicle slowly for about 10 minutes.
Keep a safe vehicle distance from the vehicle
in front. If the warning does not come back on, continue to drive normally and have the
cooling system checked for proper fill and
function.
If the warning continues, pull over, stop, and
park the vehicle right away.
If there is no sign of steam, idle the engine
for three minutes while parked. If the
warning is still displayed, turn off the
engine until it cools down.Washer Fluid
What to Use
When the vehicle needs windshield washer
fluid, be sure to read the manufacturer's
instructions before use. If operating the
vehicle in an area where the temperature
may fall below freezing, use a fluid that has
sufficient protection against freezing.
Adding Washer Fluid
Open the cap with the washer symbol on it.
Add washer fluid until the tank is full. See
Engine Compartment Overview
0170 for
reservoir location.
Caution
.Do not use washer fluid that contains
any type of water repellent coating.
This can cause the wiper blades to
chatter or skip.
.Do not use engine coolant (antifreeze)
in the windshield washer. It can
damage the windshield washer system
and paint.
.Do not mix water with ready-to-use
washer fluid. Water can cause the
solution to freeze and damage the
washer fluid tank and other parts of
the washer system.
.When using concentrated washer fluid,
follow the manufacturer instructions
for adding water.
.Fill the washer fluid tank only
three-quarters full when it is very cold.
This allows for fluid expansion if
freezing occurs, which could damage
the tank if it is completely full.
Page 183 of 280
Chevrolet TRAX Owner Manual (GMNA-Localizing-U.S./Canada-14609828) -
2021 - CRC - 8/21/20
182 Vehicle Care
Brakes
Disc brake linings have built-in wear
indicators that make a high-pitched warning
sound when the brake linings are worn and
new linings are needed. The sound can come
and go or can be heard all the time when
the vehicle is moving, except when applying
the brake pedal firmly.
{Warning
The brake wear warning sound means
that soon the brakes will not work well.
That could lead to a crash. When the
brake wear warning sound is heard, have
the vehicle serviced.
Caution
Continuing to drive with worn-out brake
linings could result in costly brake
repairs.
Some driving conditions or climates can
cause a brake squeal when the brakes are
first applied, clearing up following several
applies. This does not mean something is
wrong with the brakes. Properly torqued wheel nuts are necessary
to help prevent brake pulsation. When tires
are rotated, inspect brake linings for wear
and evenly tighten wheel nuts in the proper
sequence to torque specifications. See
Capacities and Specifications
0248.
If the vehicle has rear drum brakes, they do
not have wear indicators. Drum brakes have
an inspection hole to inspect lining wear
during scheduled maintenance. When the
front brake linings are replaced, have the
rear brakes inspected. If a rear brake rubbing
noise is heard, have the rear brake linings
inspected immediately. Rear brake drums
should be removed and inspected each time
the tires are removed for rotation or
changing.
Brake pads should be replaced as complete
axle sets.Brake Pedal Travel
See your dealer if the brake pedal does not
return to normal height, or if there is a
rapid increase in pedal travel. This could be
a sign that brake service may be required.
Replacing Brake System Parts
Always replace brake system parts with
new, approved replacement parts. If this is
not done, the brakes may not work
properly. The braking performance can
change in many ways if the wrong brake
parts are installed or if parts are improperly
installed.
Brake Fluid
The brake master cylinder reservoir is filled
with GM approved DOT 4 brake fluid as
indicated on the reservoir cap. See Engine
Compartment Overview 0170 for the
location of the reservoir.
Checking Brake Fluid
With the vehicle in P (Park) on a level
surface, the brake fluid level should be
between the minimum and maximum marks
on the brake fluid reservoir.
Page 185 of 280
Chevrolet TRAX Owner Manual (GMNA-Localizing-U.S./Canada-14609828) -
2021 - CRC - 8/21/20
184 Vehicle Care
Vehicle Storage
{Warning
Batteries have acid that can burn you and
gas that can explode. You can be badly
hurt if you are not careful. SeeJump
Starting - North America 0221 for tips on
working around a battery without
getting hurt.
Infrequent Usage: Remove the black,
negative (−) cable from the battery to keep
the battery from running down.
Extended Storage: Remove the black,
negative (−) cable from the battery or use a
battery trickle charger.
All-Wheel Drive
Transfer Case
Under normal driving conditions, transfer
case fluid does not require maintenance
unless there is a fluid leak or unusual noise.
If required, have the transfer case serviced
by your dealer.
Starter Switch Check
{Warning
When you are doing this inspection, the
vehicle could move suddenly. If the
vehicle moves, you or others could be
injured.
1. Before starting this check, be sure there is enough room around the vehicle.
2. Apply both the parking brake and the regular brake.
Do not use the accelerator pedal, and be
ready to turn off the engine immediately
if it starts.
3. Try to start the engine in each gear. The vehicle should start only in P (Park) or
N (Neutral). If the vehicle starts in any
other position, contact your dealer for
service.
Automatic Transmission Shift Lock
Control Function Check
{Warning
When you are doing this inspection, the
vehicle could move suddenly. If the
vehicle moves, you or others could be
injured.
1. Before starting this check, be sure there is enough room around the vehicle.
It should be parked on a level surface.
2. Apply the parking brake. Be ready to apply the regular brake immediately if
the vehicle begins to move.
3. With the engine off, turn the ignition on, but do not start the engine. Without
applying the regular brake, try to move
the shift lever out of P (Park) with
normal effort. If the shift lever moves
out of P (Park), contact your dealer for
service.
Page 186 of 280
Chevrolet TRAX Owner Manual (GMNA-Localizing-U.S./Canada-14609828) -
2021 - CRC - 8/21/20
Vehicle Care 185
Park Brake and P (Park)
Mechanism Check
{Warning
When you are doing this check, the
vehicle could begin to move. You or
others could be injured and property
could be damaged. Make sure there is
room in front of the vehicle in case it
begins to roll. Be ready to apply the
regular brake at once should the vehicle
begin to move.
Park on a fairly steep hill, with the vehicle
facing downhill. Keeping your foot on the
regular brake, set the parking brake.
.To check the parking brake's holding
ability: With the engine running and the
transmission in N (Neutral), slowly remove
foot pressure from the regular brake
pedal. Do this until the vehicle is held by
the parking brake only.
.To check the P (Park) mechanism's holding
ability: With the engine running, shift to
P (Park). Then release the parking brake
followed by the regular brake.
Contact your dealer if service is required.
Wiper Blade Replacement
Windshield wiper blades should be replaced
periodically. See Maintenance Schedule
0 235.
Replacement blades come in different types
and are removed in different ways. For
proper type and length, see Maintenance
Replacement Parts 0244.
Caution
Allowing the wiper arm to touch the
windshield when no wiper blade is
installed could damage the windshield.
Any damage that occurs would not be
covered by the vehicle warranty. Do not
allow the wiper arm to touch the
windshield.
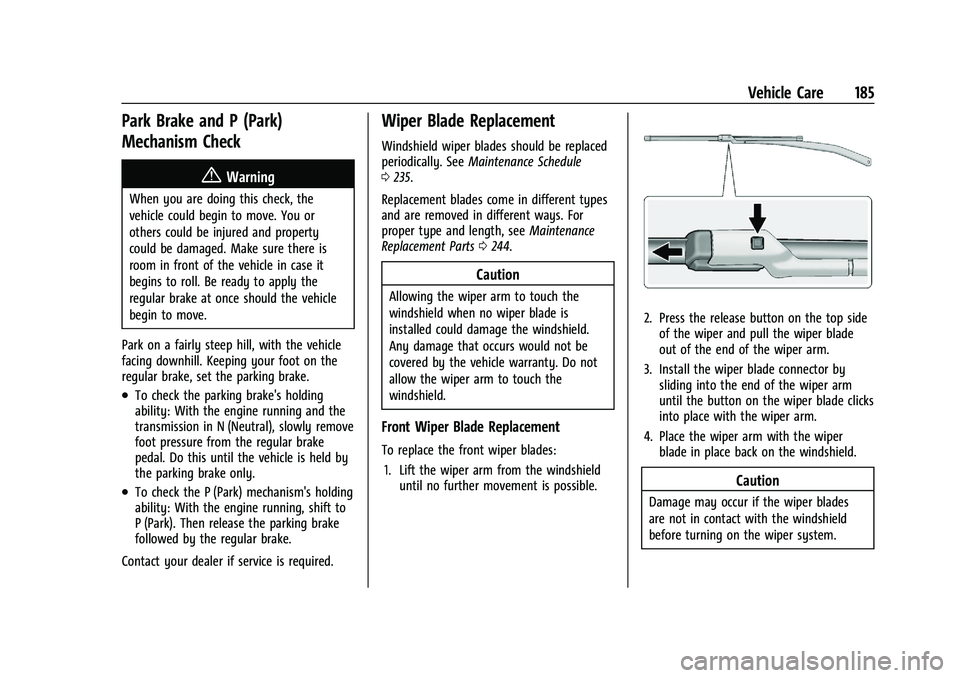
Front Wiper Blade Replacement
To replace the front wiper blades:
1. Lift the wiper arm from the windshield until no further movement is possible.
2. Press the release button on the top side
of the wiper and pull the wiper blade
out of the end of the wiper arm.
3. Install the wiper blade connector by sliding into the end of the wiper arm
until the button on the wiper blade clicks
into place with the wiper arm.
4. Place the wiper arm with the wiper blade in place back on the windshield.
Caution
Damage may occur if the wiper blades
are not in contact with the windshield
before turning on the wiper system.
Page 195 of 280

Chevrolet TRAX Owner Manual (GMNA-Localizing-U.S./Canada-14609828) -
2021 - CRC - 8/21/20
194 Vehicle Care
{Warning
Installation or use of fuses that do not
meet GM’s original fuse specifications is
dangerous. The fuses could fail, and result
in a fire. You or others could be injured
or killed, and the vehicle could be
damaged.
See Accessories and Modifications 0167 and
General Information 0167.
To check a fuse, look at the silver-colored
band inside the fuse. If the band is broken
or melted, replace the fuse. Be sure to
replace a bad fuse with a new one of the
identical size and rating.
Fuses of the same amperage can be
temporarily borrowed from another fuse
location, if a fuse goes out. Replace the fuse
as soon as possible.
Engine Compartment Fuse Block
To remove the fuse block cover, squeeze the
clip and lift it up.
Caution
Spilling liquid on any electrical
component on the vehicle may damage
it. Always keep the covers on any
electrical component.
Page 223 of 280
Chevrolet TRAX Owner Manual (GMNA-Localizing-U.S./Canada-14609828) -
2021 - CRC - 8/21/20
222 Vehicle Care
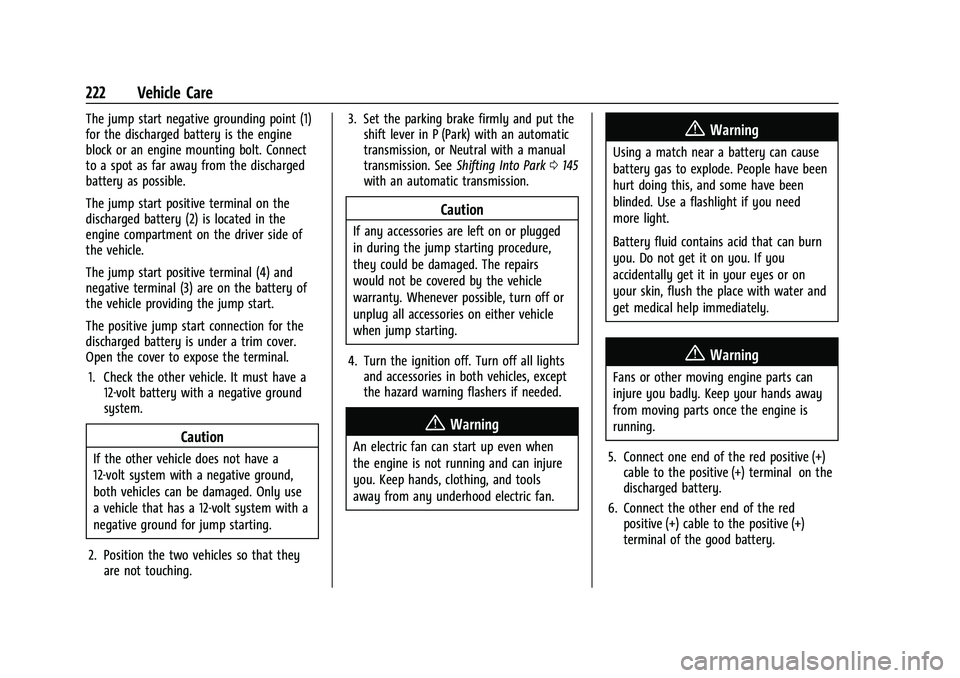
The jump start negative grounding point (1)
for the discharged battery is the engine
block or an engine mounting bolt. Connect
to a spot as far away from the discharged
battery as possible.
The jump start positive terminal on the
discharged battery (2) is located in the
engine compartment on the driver side of
the vehicle.
The jump start positive terminal (4) and
negative terminal (3) are on the battery of
the vehicle providing the jump start.
The positive jump start connection for the
discharged battery is under a trim cover.
Open the cover to expose the terminal.1. Check the other vehicle. It must have a 12-volt battery with a negative ground
system.
Caution
If the other vehicle does not have a
12-volt system with a negative ground,
both vehicles can be damaged. Only use
a vehicle that has a 12-volt system with a
negative ground for jump starting.
2. Position the two vehicles so that they are not touching. 3. Set the parking brake firmly and put the
shift lever in P (Park) with an automatic
transmission, or Neutral with a manual
transmission. See Shifting Into Park 0145
with an automatic transmission.
Caution
If any accessories are left on or plugged
in during the jump starting procedure,
they could be damaged. The repairs
would not be covered by the vehicle
warranty. Whenever possible, turn off or
unplug all accessories on either vehicle
when jump starting.
4. Turn the ignition off. Turn off all lights and accessories in both vehicles, except
the hazard warning flashers if needed.
{Warning
An electric fan can start up even when
the engine is not running and can injure
you. Keep hands, clothing, and tools
away from any underhood electric fan.
{Warning
Using a match near a battery can cause
battery gas to explode. People have been
hurt doing this, and some have been
blinded. Use a flashlight if you need
more light.
Battery fluid contains acid that can burn
you. Do not get it on you. If you
accidentally get it in your eyes or on
your skin, flush the place with water and
get medical help immediately.
{Warning
Fans or other moving engine parts can
injure you badly. Keep your hands away
from moving parts once the engine is
running.
5. Connect one end of the red positive (+) cable to the positive (+) terminal on the
discharged battery.
6. Connect the other end of the red positive (+) cable to the positive (+)
terminal of the good battery.
Page 236 of 280
Chevrolet TRAX Owner Manual (GMNA-Localizing-U.S./Canada-14609828) -
2021 - CRC - 8/21/20
Service and Maintenance 235
Because of the way people use vehicles,
maintenance needs vary. There may need to
be more frequent checks and services. The
Additional Required Services - Normal are for
vehicles that:
.Carry passengers and cargo within
recommended limits on the Tire and
Loading Information label. SeeVehicle
Load Limits 0134.
.Are driven on reasonable road surfaces
within legal driving limits.
.Use the recommended fuel. See
Recommended Fuel 0160.
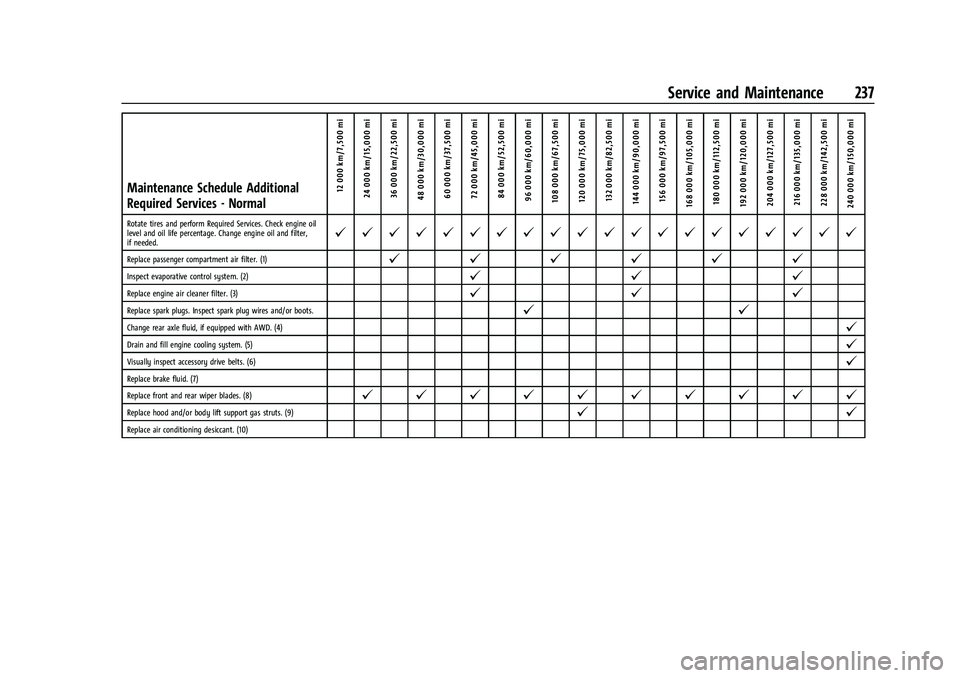
Refer to the information in the Maintenance
Schedule Additional Required Services -
Normal chart.
The Additional Required Services - Severe are
for vehicles that are:
.Mainly driven in heavy city traffic in hot
weather.
.Mainly driven in hilly or mountainous
terrain.
.Frequently towing a trailer.
.Used for high speed or competitive
driving.
.Used for taxi, police, or delivery service. Refer to the information in the Maintenance
Schedule Additional Required Services -
Severe chart.
{Warning
Performing maintenance work can be
dangerous and can cause serious injury.
Perform maintenance work only if the
required information, proper tools, and
equipment are available. If they are not,
see your dealer to have a trained
technician do the work. See
Doing Your
Own Service Work 0168.
Maintenance Schedule
Owner Checks and Services
Check the engine oil level. See Engine Oil
0 173.
Once a Month
.Check the tire inflation pressures. See Tire
Pressure 0205.
.Inspect the tires for wear. See Tire
Inspection 0209.
.Check the windshield washer fluid level.
See Washer Fluid 0181.
Engine Oil Change
When the CHANGE ENGINE OIL SOON DIC
message displays, have the engine oil and
filter changed within the next 1 000 km/
600 mi. If driven under the best conditions,
the engine oil life system may not indicate
the need for vehicle service for up to a year.
The engine oil and filter must be changed at
least once a year and the oil life system
must be reset. Your trained dealer technician
can perform this work. If the engine oil life
system is reset accidentally, service the
vehicle within 5 000 km/3,000 mi since the
last service. Reset the oil life system when
the oil is changed. See Engine Oil Life
System 0175.
Air Conditioning Desiccant (Replace Every
Seven Years)
The air conditioning system requires
maintenance every seven years. This service
requires replacement of the desiccant to
help the longevity and efficient operation of
the air conditioning system. This service can
be complex. See your dealer.
Page 237 of 280
Chevrolet TRAX Owner Manual (GMNA-Localizing-U.S./Canada-14609828) -
2021 - CRC - 8/21/20
236 Service and Maintenance
Tire Rotation and Required Services
Every 12 000 km/7,500 mi
Rotate the tires, if recommended for the
vehicle, and perform the following services.
SeeTire Rotation 0209.
.Check engine oil level and oil
life percentage. If needed, change engine
oil and filter, and reset oil life system.
See Engine Oil 0173 and
Engine Oil Life System 0175.
.Inspect the engine air cleaner filter. See
Engine Air Cleaner/Filter 0176.
.Check engine coolant level. See Cooling
System 0177.
.Check windshield washer fluid level. See
Washer Fluid 0181.
.Check tire inflation pressures. See Tire
Pressure 0205.
.Inspect tire wear. See Tire Inspection
0 209.
.Visually check for fluid leaks.
.Inspect brake system. See Exterior Care
0 226.
.Visually inspect steering, suspension, and
chassis components for damage, including
cracks or tears in the rubber boots, loose
or missing parts, or signs of wear at least
once a year. See Exterior Care0226.
.Inspect power steering for proper
attachment, connections, binding, leaks,
cracks, chafing, etc.
.Visually inspect halfshafts and drive
shafts for excessive wear, lubricant leaks,
and/or damage including: tube dents or
cracks, constant velocity joint or universal
joint looseness, cracked or missing boots,
loose or missing boot clamps, center
bearing excessive looseness, loose or
missing fasteners, and axle seal leaks.
.Check restraint system components. See
Safety System Check 044.
.Visually inspect fuel system for damage
or leaks.
.Visually inspect exhaust system and
nearby heat shields for loose or damaged
parts.
.Lubricate body components. See Exterior
Care 0226.
.Check automatic transmission shift lock
control function. See Automatic
Transmission Shift Lock Control Function
Check 0184.
.Check parking brake and automatic
transmission park mechanism. See Park
Brake and P (Park) Mechanism Check
0 185.
.Check accelerator pedal for damage, high
effort, or binding. Replace if needed.
.Visually inspect gas strut for signs of
wear, cracks, or other damage. Check the
hold open ability of the strut. If the hold
open is low, service the gas strut. See Gas
Strut(s) 0186.
Page 238 of 280
Chevrolet TRAX Owner Manual (GMNA-Localizing-U.S./Canada-14609828) -
2021 - CRC - 8/21/20
Service and Maintenance 237
Maintenance Schedule Additional
Required Services - Normal12 000 km/7,500 mi
24 000 km/15,000 mi
36 000 km/22,500 mi
48 000 km/30,000 mi 60 000 km/37,500 mi
72 000 km/45,000 mi84 000 km/52,500 mi
96 000 km/60,000 mi
108 000 km/67,500 mi 120 000 km/75,000 mi 132 000 km/82,500 mi
144 000 km/90,000 mi 156 000 km/97,500 mi
168 000 km/105,000 mi 180 000 km/112,500 mi
192 000 km/120,000 mi 204 000 km/127,500 mi 216 000 km/135,000 mi
228 000 km/142,500 mi
240 000 km/150,000 mi
Rotate tires and perform Required Services. Check engine oil
level and oil life percentage. Change engine oil and filter,
if needed.@ @ @ @ @ @ @ @ @ @ @ @ @ @ @ @ @ @ @ @
Replace passenger compartment air filter. (1)@ @@@@@
Inspect evaporative control system. (2)@ @@
Replace engine air cleaner filter. (3)@@@
Replace spark plugs. Inspect spark plug wires and/or boots.@ @
Change rear axle fluid, if equipped with AWD. (4)@
Drain and fill engine cooling system. (5)@
Visually inspect accessory drive belts. (6)@
Replace brake fluid. (7)
Replace front and rear wiper blades. (8)
@ @ @ @ @ @ @ @ @ @
Replace hood and/or body lift support gas struts. (9)@ @
Replace air conditioning desiccant. (10)