Tire CHEVROLET TRAX 2021 Service Manual
[x] Cancel search | Manufacturer: CHEVROLET, Model Year: 2021, Model line: TRAX, Model: CHEVROLET TRAX 2021Pages: 280, PDF Size: 8.76 MB
Page 219 of 280
Chevrolet TRAX Owner Manual (GMNA-Localizing-U.S./Canada-14609828) -
2021 - CRC - 8/21/20
218 Vehicle Care
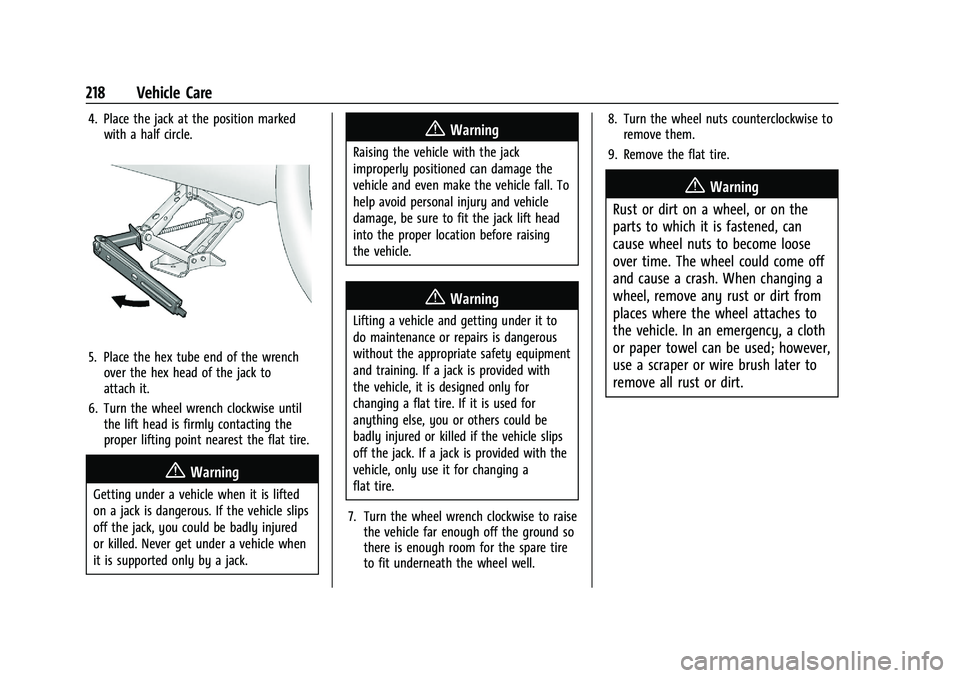
4. Place the jack at the position markedwith a half circle.
5. Place the hex tube end of the wrenchover the hex head of the jack to
attach it.
6. Turn the wheel wrench clockwise until the lift head is firmly contacting the
proper lifting point nearest the flat tire.
{Warning
Getting under a vehicle when it is lifted
on a jack is dangerous. If the vehicle slips
off the jack, you could be badly injured
or killed. Never get under a vehicle when
it is supported only by a jack.
{Warning
Raising the vehicle with the jack
improperly positioned can damage the
vehicle and even make the vehicle fall. To
help avoid personal injury and vehicle
damage, be sure to fit the jack lift head
into the proper location before raising
the vehicle.
{Warning
Lifting a vehicle and getting under it to
do maintenance or repairs is dangerous
without the appropriate safety equipment
and training. If a jack is provided with
the vehicle, it is designed only for
changing a flat tire. If it is used for
anything else, you or others could be
badly injured or killed if the vehicle slips
off the jack. If a jack is provided with the
vehicle, only use it for changing a
flat tire.
7. Turn the wheel wrench clockwise to raise the vehicle far enough off the ground so
there is enough room for the spare tire
to fit underneath the wheel well. 8. Turn the wheel nuts counterclockwise to
remove them.
9. Remove the flat tire.
{Warning
Rust or dirt on a wheel, or on the
parts to which it is fastened, can
cause wheel nuts to become loose
over time. The wheel could come off
and cause a crash. When changing a
wheel, remove any rust or dirt from
places where the wheel attaches to
the vehicle. In an emergency, a cloth
or paper towel can be used; however,
use a scraper or wire brush later to
remove all rust or dirt.
Page 220 of 280
Chevrolet TRAX Owner Manual (GMNA-Localizing-U.S./Canada-14609828) -
2021 - CRC - 8/21/20
Vehicle Care 219
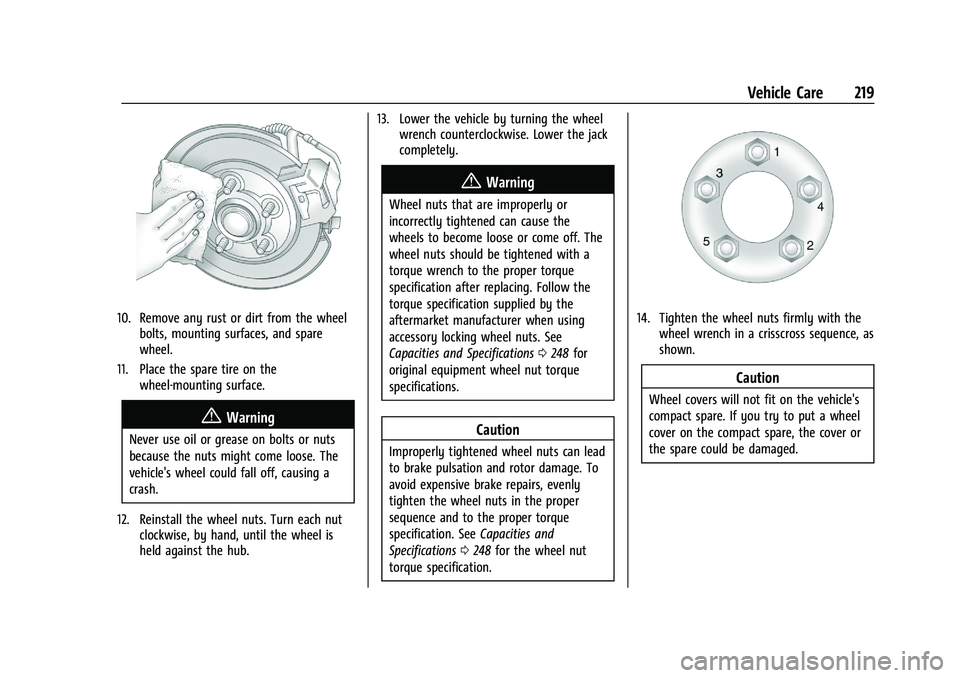
10. Remove any rust or dirt from the wheelbolts, mounting surfaces, and spare
wheel.
11. Place the spare tire on the wheel-mounting surface.
{Warning
Never use oil or grease on bolts or nuts
because the nuts might come loose. The
vehicle's wheel could fall off, causing a
crash.
12. Reinstall the wheel nuts. Turn each nut clockwise, by hand, until the wheel is
held against the hub. 13. Lower the vehicle by turning the wheel
wrench counterclockwise. Lower the jack
completely.
{Warning
Wheel nuts that are improperly or
incorrectly tightened can cause the
wheels to become loose or come off. The
wheel nuts should be tightened with a
torque wrench to the proper torque
specification after replacing. Follow the
torque specification supplied by the
aftermarket manufacturer when using
accessory locking wheel nuts. See
Capacities and Specifications 0248 for
original equipment wheel nut torque
specifications.
Caution
Improperly tightened wheel nuts can lead
to brake pulsation and rotor damage. To
avoid expensive brake repairs, evenly
tighten the wheel nuts in the proper
sequence and to the proper torque
specification. See Capacities and
Specifications 0248 for the wheel nut
torque specification.
14. Tighten the wheel nuts firmly with the wheel wrench in a crisscross sequence, as
shown.
Caution
Wheel covers will not fit on the vehicle's
compact spare. If you try to put a wheel
cover on the compact spare, the cover or
the spare could be damaged.
Page 221 of 280
Chevrolet TRAX Owner Manual (GMNA-Localizing-U.S./Canada-14609828) -
2021 - CRC - 8/21/20
220 Vehicle Care
Storing a Flat or Spare Tire and Tools
{Warning
Storing a jack, a tire, or other equipment
in the passenger compartment of the
vehicle could cause injury. In a sudden
stop or collision, loose equipment could
strike someone. Store all these in the
proper place.
Storing the Flat Tire and Tools 1. Return the jack and tools to their original storage location.
2. Replace the trim cover.
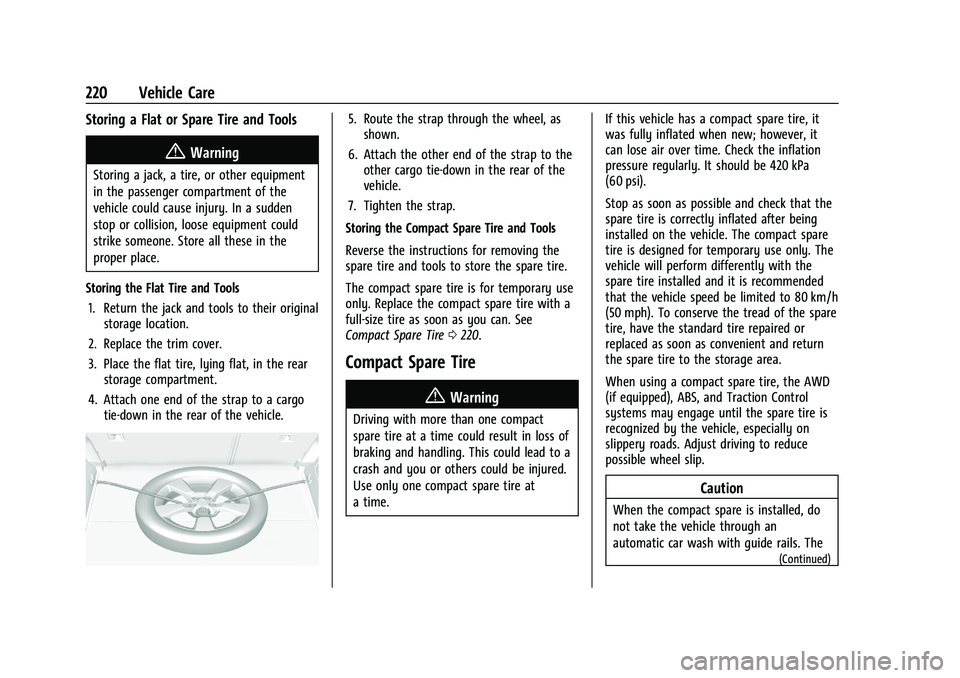
3. Place the flat tire, lying flat, in the rear storage compartment.
4. Attach one end of the strap to a cargo tie-down in the rear of the vehicle.
5. Route the strap through the wheel, asshown.
6. Attach the other end of the strap to the other cargo tie-down in the rear of the
vehicle.
7. Tighten the strap.
Storing the Compact Spare Tire and Tools
Reverse the instructions for removing the
spare tire and tools to store the spare tire.
The compact spare tire is for temporary use
only. Replace the compact spare tire with a
full-size tire as soon as you can. See
Compact Spare Tire 0220.
Compact Spare Tire
{Warning
Driving with more than one compact
spare tire at a time could result in loss of
braking and handling. This could lead to a
crash and you or others could be injured.
Use only one compact spare tire at
a time. If this vehicle has a compact spare tire, it
was fully inflated when new; however, it
can lose air over time. Check the inflation
pressure regularly. It should be 420 kPa
(60 psi).
Stop as soon as possible and check that the
spare tire is correctly inflated after being
installed on the vehicle. The compact spare
tire is designed for temporary use only. The
vehicle will perform differently with the
spare tire installed and it is recommended
that the vehicle speed be limited to 80 km/h
(50 mph). To conserve the tread of the spare
tire, have the standard tire repaired or
replaced as soon as convenient and return
the spare tire to the storage area.
When using a compact spare tire, the AWD
(if equipped), ABS, and Traction Control
systems may engage until the spare tire is
recognized by the vehicle, especially on
slippery roads. Adjust driving to reduce
possible wheel slip.
Caution
When the compact spare is installed, do
not take the vehicle through an
automatic car wash with guide rails. The
(Continued)
Page 222 of 280

Chevrolet TRAX Owner Manual (GMNA-Localizing-U.S./Canada-14609828) -
2021 - CRC - 8/21/20
Vehicle Care 221
Caution (Continued)
compact spare can get caught on the rails
which can damage the tire, wheel, and
other parts of the vehicle.
Do not use the compact spare on other
vehicles.
Do not mix the compact spare tire or wheel
with other wheels or tires. They will not fit.
Keep the spare tire and its wheel together.
Caution
Tire chains will not fit the compact spare.
Using them can damage the vehicle and
the chains. Do not use tire chains on the
compact spare.
Jump Starting
Jump Starting - North America
For more information about the vehicle
battery, see Battery - North America 0183.
If the battery has run down, try to use
another vehicle and some jumper cables to
start your vehicle. Be sure to use the
following steps to do it safely.
{Warning
WARNING: Battery posts, terminals, and
related accessories contain lead and lead
compounds, chemicals known to the
State of California to cause cancer and
birth defects or other reproductive harm.
Batteries also contain other chemicals
known to the State of California to cause
cancer. WASH HANDS AFTER HANDLING.
For more information go to
www.P65Warnings.ca.gov/
passenger-vehicle.
See California Proposition 65 Warning 0167
and the back cover.
{Warning
Batteries can hurt you. They can be
dangerous because:
.They contain acid that can burn you.
.They contain gas that can explode or
ignite.
.They contain enough electricity to
burn you.
If you do not follow these steps exactly,
some or all of these things can hurt you.
Caution
Ignoring these steps could result in costly
damage to the vehicle that would not be
covered by the vehicle warranty. Trying
to start the vehicle by pushing or pulling
it will not work, and it could damage the
vehicle.
1.4L L4 Engine (LUV) Shown, 1.4L L4 Engine (LE2) Similar
1. Discharged Battery Negative GroundingPoint
2. Discharged Battery Positive Terminal
3. Good Battery Negative Terminal
4. Good Battery Positive Terminal
Page 224 of 280

Chevrolet TRAX Owner Manual (GMNA-Localizing-U.S./Canada-14609828) -
2021 - CRC - 8/21/20
Vehicle Care 223
7. Connect one end of the blacknegative (–) cable to the negative (–)
terminal of the good battery.
8. Connect the other end of the black negative (–) cable to the negative (–)
grounding point for the discharged
battery.
9. Start the engine in the vehicle with the good battery and run the engine at idle
speed for at least four minutes.
10. Try to start the vehicle that had the dead battery. If it will not start after a
few tries, it probably needs service.
Caution
If the jumper cables are connected or
removed in the wrong order, electrical
shorting may occur and damage the
vehicle. The repairs would not be covered
by the vehicle warranty. Always connect
and remove the jumper cables in the
correct order, making sure that the cables
do not touch each other or other metal.
Jumper Cable Removal
Reverse the sequence exactly when
removing the jumper cables. After starting the disabled vehicle and
removing the jumper cables, allow it to idle
for several minutes.
Towing the Vehicle
Caution
Incorrectly towing a disabled vehicle may
cause damage. The damage would not be
covered by the vehicle warranty. Do not
lash or hook to suspension components.
Use the proper straps around the tires to
secure the vehicle. Do not drag a locked
wheel/tire. Use tire skates or dollies
under any locked wheel/tire while
loading the vehicle. Do not use a sling
type lift to tow the vehicle. This could
damage the vehicle.
Caution
Improper use of the tow eye can damage
the vehicle. If equipped, use the tow eye
to load a disabled vehicle onto a flatbed
tow truck from a flat road surface, or to
move the vehicle a short distance. Use
(Continued)
Caution (Continued)
caution and low speeds. The transmission
must be in (N) Neutral when moving the
vehicle.
GM recommends a flatbed tow truck to
transport a disabled vehicle. Use ramps to
help reduce approach angles, if necessary.
A towed vehicle should have its drive wheels
off the ground. Contact Roadside Assistance
or a professional towing service if the
disabled vehicle must be towed.
If the vehicle is equipped with a tow eye,
only use the tow eye to pull the vehicle
onto a flatbed or car carrier from a flat road
surface. Do not use the tow eye to pull the
vehicle from snow, mud, or sand.
Page 230 of 280

Chevrolet TRAX Owner Manual (GMNA-Localizing-U.S./Canada-14609828) -
2021 - CRC - 8/21/20
Vehicle Care 229
blades. Bugs, road grime, sap, and a buildup
of vehicle wash/wax treatments may cause
wiper streaking.
Replace the wiper blades if they are worn or
damaged. Damage can be caused by
extreme dusty conditions, sand, salt, heat,
sun, snow, and ice.
Weatherstrips
Apply weatherstrip lubricant on
weatherstrips to make them last longer, seal
better, and not stick or squeak. Lubricate
weatherstrips at least once a year. Hot, dry
climates may require more frequent
application. Black marks from rubber
material on painted surfaces can be removed
by rubbing with a clean cloth. See
Recommended Fluids and Lubricants0243.
Tires
Use a stiff brush with tire cleaner to clean
the tires.
Caution
Using petroleum-based tire dressing
products on the vehicle may damage the
paint finish and/or tires. When applying a
(Continued)
Caution (Continued)
tire dressing, always wipe off any
overspray from all painted surfaces on
the vehicle.
Wheels and Wheel Trim
Use a soft, clean cloth with mild soap and
water to clean the wheels. After rinsing
thoroughly with clean water, dry with a
soft, clean towel. A wax may then be
applied.
Caution
Chrome wheels and chrome wheel trim
may be damaged if the vehicle is not
washed after driving on roads that have
been sprayed with magnesium chloride or
calcium chloride. These are used on roads
for conditions such as dust and ice.
Always wash the chrome with soap and
water after exposure.
Caution
To avoid surface damage on wheels and
wheel trim, do not use strong soaps,
chemicals, abrasive polishes, cleaners,
(Continued)
Caution (Continued)
or brushes. Use only GM approved
cleaners. Do not drive the vehicle through
an automatic car wash that uses silicon
carbide tire/wheel cleaning brushes.
Damage could occur and the repairs
would not be covered by the vehicle
warranty.
Brake System
Visually inspect brake lines and hoses for
proper hook-up, binding, leaks, cracks,
chafing, etc. Inspect disc brake pads for wear
and rotors for surface condition. Inspect
drum brake linings/shoes for wear or cracks.
Inspect all other brake parts.
Steering, Suspension, and Chassis
Components
Visually inspect steering, suspension, and
chassis components for damaged, loose,
or missing parts or signs of wear at least
once a year.
Inspect power steering for proper
attachment, connections, binding, leaks,
cracks, chafing, etc.
Page 232 of 280
Chevrolet TRAX Owner Manual (GMNA-Localizing-U.S./Canada-14609828) -
2021 - CRC - 8/21/20
Vehicle Care 231
streaks and attract dirt. Do not use
solutions that contain strong or
caustic soap.
.Do not heavily saturate the upholstery
when cleaning.
.Do not use solvents or cleaners containing
solvents.
Interior Glass
To clean, use a terry cloth fabric dampened
with water. Wipe droplets left behind with a
clean dry cloth. If necessary, use a
commercial glass cleaner after cleaning with
plain water.
Caution
To prevent scratching, never use abrasive
cleaners on automotive glass. Abrasive
cleaners or aggressive cleaning may
damage the rear window defogger.
Cleaning the windshield with water during
the first three to six months of ownership
will reduce tendency to fog.
Speaker Covers
Vacuum around a speaker cover gently, so
that the speaker will not be damaged. Clean
spots with water and mild soap.
Coated Moldings
Coated moldings should be cleaned.
.When lightly soiled, wipe with a sponge
or soft, lint-free cloth dampened with
water.
.When heavily soiled, use warm soapy
water.
Fabric/Carpet/Suede
Start by vacuuming the surface using a soft
brush attachment. If a rotating vacuum
brush attachment is being used, only use it
on the floor carpet. Before cleaning, gently
remove as much of the soil as possible:
.Gently blot liquids with a paper towel.
Continue blotting until no more soil can
be removed.
.For solid soils, remove as much as
possible prior to vacuuming.
To clean: 1. Saturate a clean, lint-free colorfast cloth with water. Microfiber cloth is
recommended to prevent lint transfer to
the fabric or carpet.
2. Remove excess moisture by gently wringing until water does not drip from
the cleaning cloth. 3. Start on the outside edge of the soil and
gently rub toward the center. Fold the
cleaning cloth to a clean area frequently
to prevent forcing the soil in to the
fabric.
4. Continue gently rubbing the soiled area until there is no longer any color
transfer from the soil to the cleaning
cloth.
5. If the soil is not completely removed, use a mild soap solution followed only
by plain water.
If the soil is not completely removed, it may
be necessary to use a commercial upholstery
cleaner or spot lifter. Test a small hidden
area for colorfastness before using a
commercial upholstery cleaner or spot lifter.
If ring formation occurs, clean the entire
fabric or carpet.
After cleaning, use a paper towel to blot
excess moisture.
Cleaning High Gloss Surfaces and Vehicle
Information and Radio Displays
Use a microfiber cloth on high gloss surfaces
or vehicle displays. First, use a soft bristle
brush to remove dirt that can scratch the
surface. Then gently clean by rubbing with a
microfiber cloth. Never use window cleaners
Page 235 of 280
Chevrolet TRAX Owner Manual (GMNA-Localizing-U.S./Canada-14609828) -
2021 - CRC - 8/21/20
234 Service and Maintenance
Service and Maintenance
General Information
General Information . . . . . . . . . . . . . . . . . . . 234
Maintenance Schedule
Maintenance Schedule . . . . . . . . . . . . . . . . . 235
Special Application Services
Special Application Services . . . . . . . . . . . 240
Additional Maintenance and Care
Additional Maintenance and Care . . . . . 240
Recommended Fluids, Lubricants, and
Parts
Recommended Fluids andLubricants . . . . . . . . . . . . . . . . . . . . . . . . . . . 243
Maintenance Replacement Parts . . . . . . . 244
Maintenance Records
Maintenance Records . . . . . . . . . . . . . . . . . . 246
General Information
Your vehicle is an important investment.
This section describes the required
maintenance for the vehicle. Follow this
schedule to help protect against major repair
expenses resulting from neglect or
inadequate maintenance. It may also help to
maintain the value of the vehicle if it is
sold. It is the responsibility of the owner to
have all required maintenance performed.
Your dealer has trained technicians who can
perform required maintenance using genuine
replacement parts. They have up-to-date
tools and equipment for fast and accurate
diagnostics. Many dealers have extended
evening and Saturday hours, courtesy
transportation, and online scheduling to
assist with service needs.
Your dealer recognizes the importance of
providing competitively priced maintenance
and repair services. With trained technicians,
the dealer is the place for routine
maintenance such as oil changes and tire
rotations and additional maintenance items
like tires, brakes, batteries, and wiper blades.
Caution
Damage caused by improper maintenance
can lead to costly repairs and may not be
covered by the vehicle warranty.
Maintenance intervals, checks,
inspections, recommended fluids, and
lubricants are important to keep the
vehicle in good working condition.
Do not have chemical flushes that are not
approved by GM performed on the
vehicle. The use of flushes, solvents,
cleaners, or lubricants that are not
approved by GM could damage the
vehicle, requiring expensive repairs that
are not covered by the vehicle warranty.
The Tire Rotation and Required Services are
the responsibility of the vehicle owner. It is
recommended to have your dealer perform
these services every 12 000 km/7,500 mi.
Proper vehicle maintenance helps to keep
the vehicle in good working condition,
improves fuel economy, and reduces vehicle
emissions.
Page 236 of 280
Chevrolet TRAX Owner Manual (GMNA-Localizing-U.S./Canada-14609828) -
2021 - CRC - 8/21/20
Service and Maintenance 235
Because of the way people use vehicles,
maintenance needs vary. There may need to
be more frequent checks and services. The
Additional Required Services - Normal are for
vehicles that:
.Carry passengers and cargo within
recommended limits on the Tire and
Loading Information label. SeeVehicle
Load Limits 0134.
.Are driven on reasonable road surfaces
within legal driving limits.
.Use the recommended fuel. See
Recommended Fuel 0160.
Refer to the information in the Maintenance
Schedule Additional Required Services -
Normal chart.
The Additional Required Services - Severe are
for vehicles that are:
.Mainly driven in heavy city traffic in hot
weather.
.Mainly driven in hilly or mountainous
terrain.
.Frequently towing a trailer.
.Used for high speed or competitive
driving.
.Used for taxi, police, or delivery service. Refer to the information in the Maintenance
Schedule Additional Required Services -
Severe chart.
{Warning
Performing maintenance work can be
dangerous and can cause serious injury.
Perform maintenance work only if the
required information, proper tools, and
equipment are available. If they are not,
see your dealer to have a trained
technician do the work. See
Doing Your
Own Service Work 0168.
Maintenance Schedule
Owner Checks and Services
Check the engine oil level. See Engine Oil
0 173.
Once a Month
.Check the tire inflation pressures. See Tire
Pressure 0205.
.Inspect the tires for wear. See Tire
Inspection 0209.
.Check the windshield washer fluid level.
See Washer Fluid 0181.
Engine Oil Change
When the CHANGE ENGINE OIL SOON DIC
message displays, have the engine oil and
filter changed within the next 1 000 km/
600 mi. If driven under the best conditions,
the engine oil life system may not indicate
the need for vehicle service for up to a year.
The engine oil and filter must be changed at
least once a year and the oil life system
must be reset. Your trained dealer technician
can perform this work. If the engine oil life
system is reset accidentally, service the
vehicle within 5 000 km/3,000 mi since the
last service. Reset the oil life system when
the oil is changed. See Engine Oil Life
System 0175.
Air Conditioning Desiccant (Replace Every
Seven Years)
The air conditioning system requires
maintenance every seven years. This service
requires replacement of the desiccant to
help the longevity and efficient operation of
the air conditioning system. This service can
be complex. See your dealer.
Page 237 of 280
Chevrolet TRAX Owner Manual (GMNA-Localizing-U.S./Canada-14609828) -
2021 - CRC - 8/21/20
236 Service and Maintenance
Tire Rotation and Required Services
Every 12 000 km/7,500 mi
Rotate the tires, if recommended for the
vehicle, and perform the following services.
SeeTire Rotation 0209.
.Check engine oil level and oil
life percentage. If needed, change engine
oil and filter, and reset oil life system.
See Engine Oil 0173 and
Engine Oil Life System 0175.
.Inspect the engine air cleaner filter. See
Engine Air Cleaner/Filter 0176.
.Check engine coolant level. See Cooling
System 0177.
.Check windshield washer fluid level. See
Washer Fluid 0181.
.Check tire inflation pressures. See Tire
Pressure 0205.
.Inspect tire wear. See Tire Inspection
0 209.
.Visually check for fluid leaks.
.Inspect brake system. See Exterior Care
0 226.
.Visually inspect steering, suspension, and
chassis components for damage, including
cracks or tears in the rubber boots, loose
or missing parts, or signs of wear at least
once a year. See Exterior Care0226.
.Inspect power steering for proper
attachment, connections, binding, leaks,
cracks, chafing, etc.
.Visually inspect halfshafts and drive
shafts for excessive wear, lubricant leaks,
and/or damage including: tube dents or
cracks, constant velocity joint or universal
joint looseness, cracked or missing boots,
loose or missing boot clamps, center
bearing excessive looseness, loose or
missing fasteners, and axle seal leaks.
.Check restraint system components. See
Safety System Check 044.
.Visually inspect fuel system for damage
or leaks.
.Visually inspect exhaust system and
nearby heat shields for loose or damaged
parts.
.Lubricate body components. See Exterior
Care 0226.
.Check automatic transmission shift lock
control function. See Automatic
Transmission Shift Lock Control Function
Check 0184.
.Check parking brake and automatic
transmission park mechanism. See Park
Brake and P (Park) Mechanism Check
0 185.
.Check accelerator pedal for damage, high
effort, or binding. Replace if needed.
.Visually inspect gas strut for signs of
wear, cracks, or other damage. Check the
hold open ability of the strut. If the hold
open is low, service the gas strut. See Gas
Strut(s) 0186.