key CHEVROLET TRAX 2022 Service Manual
[x] Cancel search | Manufacturer: CHEVROLET, Model Year: 2022, Model line: TRAX, Model: CHEVROLET TRAX 2022Pages: 280, PDF Size: 12.13 MB
Page 124 of 280
Chevrolet TRAX Owner Manual (GMNA-Localizing-U.S./Canada-15498927) -
2022 - CRC - 5/27/21
Infotainment System 123
.Traction Control–the number of times
the Traction Control System activated to
reduce wheel spin or loss of traction.
.Stability Control –the number of events
which required the use of electronic
stability control.
.Antilock Braking System Active –The
number of Antilock Brake System
activations.
.Tailgating Alerts (if equipped) –the
number of times the driver was alerted
for following a vehicle ahead too closely.
Report Card Data
Cumulative Data is saved for all trips until
the Report Card is reset or until the
maximum count is exceeded. If the
maximum count is exceeded for a Report
Card line item, that item will no longer be
updated in the Report Card until it is reset.
Each item will report a maximum of
1,000 counts. The distance driven will report
a maximum of 64,374 km (40,000 mi). To delete Report Card data, do one of the
following:
.From the Report Card display, touch
Reset.
.Touch Clear All Teen Keys and PIN from
the Teen Driver menu. This will also
unregister any Teen Driver keys and
delete the PIN.
Forgotten PIN
See your dealer to reset the PIN.
Trademarks and License
Agreements
FCC Information
See Radio Frequency Statement 0257.
Bluetooth
The Bluetooth word mark and logos are
owned by the Bluetooth
®SIG, Inc. and any
use of such marks by General Motors is
under license. Other trademarks and trade
names are those of their respective owners.
"Made for iPod," and "Made for iPhone,"
mean that an electronic accessory has been
designed to connect specifically to iPod or
iPhone, respectively, and has been certified
by the developer to meet Apple
performance standards. Apple is not
responsible for the operation of this device
or its compliance with safety and regulatory
standards. Please note that the use of this
accessory with iPod or iPhone may affect
wireless performance. iPhone, iPod, iPod
classic, iPod nano, iPod shuffle, and iPod
touch are trademarks of Apple Inc.,
registered in the U.S. and other countries.
Page 130 of 280
Chevrolet TRAX Owner Manual (GMNA-Localizing-U.S./Canada-15498927) -
2022 - CRC - 5/27/21
Driving and Operating 129
Driving and Operating
Driving Information
Driver Behavior . . . . . . . . . . . . . . . . . . . . . . . . 130
Driving Environment . . . . . . . . . . . . . . . . . . . 130
Vehicle Design . . . . . . . . . . . . . . . . . . . . . . . . . 130
Driving for Better Fuel Economy . . . . . . . 130
Distracted Driving . . . . . . . . . . . . . . . . . . . . . 130
Defensive Driving . . . . . . . . . . . . . . . . . . . . . . 131
Impaired Driving . . . . . . . . . . . . . . . . . . . . . . . 131
Control of a Vehicle . . . . . . . . . . . . . . . . . . . . 131
Braking . . . . . . . . . . . . . . . . . . . . . . . . . . . . . . . . 132
Steering . . . . . . . . . . . . . . . . . . . . . . . . . . . . . . . 132
Off-Road Recovery . . . . . . . . . . . . . . . . . . . . . 133
Loss of Control . . . . . . . . . . . . . . . . . . . . . . . . . 133
Driving on Wet Roads . . . . . . . . . . . . . . . . . 133
Hill and Mountain Roads . . . . . . . . . . . . . . 134
Winter Driving . . . . . . . . . . . . . . . . . . . . . . . . . 135
If the Vehicle Is Stuck . . . . . . . . . . . . . . . . . 136
Vehicle Load Limits . . . . . . . . . . . . . . . . . . . . 136
Starting and Operating
New Vehicle Break-In . . . . . . . . . . . . . . . . . . 139
Ignition Positions (Key Access) . . . . . . . . 140
Ignition Positions (Keyless Access) . . . . . 142
Starting the Engine . . . . . . . . . . . . . . . . . . . . 143
Winter Cover . . . . . . . . . . . . . . . . . . . . . . . . . . 145
Engine Heater . . . . . . . . . . . . . . . . . . . . . . . . . 146
Retained Accessory Power (RAP) . . . . . . . 147
Shifting Into Park . . . . . . . . . . . . . . . . . . . . . . 147Shifting out of Park . . . . . . . . . . . . . . . . . . . 148
Parking over Things That Burn . . . . . . . . 149
Extended Parking (Keyless Access) . . . . . 149
Engine Exhaust
Engine Exhaust . . . . . . . . . . . . . . . . . . . . . . . . 149
Running the Vehicle While Parked . . . . . 150
Automatic Transmission
Automatic Transmission . . . . . . . . . . . . . . . 150
Manual Mode . . . . . . . . . . . . . . . . . . . . . . . . . . 152
Drive Systems
All-Wheel Drive . . . . . . . . . . . . . . . . . . . . . . . . 152
Brakes
Antilock Brake System (ABS) . . . . . . . . . . . 153
Parking Brake . . . . . . . . . . . . . . . . . . . . . . . . . . 153
Brake Assist . . . . . . . . . . . . . . . . . . . . . . . . . . . 154
Hill Start Assist (HSA) . . . . . . . . . . . . . . . . . . 154
Ride Control Systems
Traction Control/Electronic Stability
Control . . . . . . . . . . . . . . . . . . . . . . . . . . . . . . 154
Cruise Control
Cruise Control . . . . . . . . . . . . . . . . . . . . . . . . . 156
Driver Assistance Systems
Driver Assistance Systems . . . . . . . . . . . . . 158
Rear Vision Camera (RVC) . . . . . . . . . . . . . . 159
Park Assist . . . . . . . . . . . . . . . . . . . . . . . . . . . . 160 Side Blind Zone Alert (SBZA) . . . . . . . . . . . 161
Fuel
Top Tier Fuel . . . . . . . . . . . . . . . . . . . . . . . . . . 162
Recommended Fuel . . . . . . . . . . . . . . . . . . . . 163
Prohibited Fuels . . . . . . . . . . . . . . . . . . . . . . . 163
Fuels in Foreign Countries . . . . . . . . . . . . . 163
Fuel Additives . . . . . . . . . . . . . . . . . . . . . . . . . 163
Filling the Tank . . . . . . . . . . . . . . . . . . . . . . . . 164
Filling a Portable Fuel Container . . . . . . . 165
Trailer Towing
General Towing Information . . . . . . . . . . . 165
Conversions and Add-Ons
Add-On Electrical Equipment . . . . . . . . . . . 165
Page 141 of 280

Chevrolet TRAX Owner Manual (GMNA-Localizing-U.S./Canada-15498927) -
2022 - CRC - 5/27/21
140 Driving and Operating
Caution (Continued)
.Do not drive at any one constant
speed, fast or slow, for the first
805 km (500 mi). Do not make
full-throttle starts. Avoid downshifting
to brake or slow the vehicle.
.Avoid making hard stops for the first
322 km (200 mi) or so. During this
time the new brake linings are not yet
broken in. Hard stops with new linings
can mean premature wear and earlier
replacement. Follow this breaking-in
guideline every time you get new
brake linings.
Following break-in, engine speed and load
can be gradually increased.
Ignition Positions (Key Access)
0. Stopping the Engine/LOCK/OFF
1. ACC/ACCESSORY
2. ON/RUN
3. START
The ignition switch has four positions.
To shift out of P (Park), the ignition must be
in ON/RUN and the brake pedal must be
applied. 0 (Stopping the Engine/LOCK/OFF) :
This
position turns off the vehicle. It also locks
the ignition, the transmission, and the
steering column, if equipped with a locking
steering column.
To turn off the vehicle:
1. Make sure that the vehicle is stopped.
2. Shift to P (Park).
3. Continue to hold the brake pedal, then set the parking brake. See Parking Brake
0 153.
4. Push the key all the way in toward the steering column (1), then turn the key to
LOCK/OFF (2).
5. Remove the key.
Page 142 of 280
Chevrolet TRAX Owner Manual (GMNA-Localizing-U.S./Canada-15498927) -
2022 - CRC - 5/27/21
Driving and Operating 141
6. Release the brake pedal.
See your dealer if the key can be removed
in any other position.
Retained Accessory Power (RAP) will remain
active. See Retained Accessory Power (RAP)
0 147.
A warning chime will sound when the driver
door is opened and the key is in the
ignition.
If equipped with a locking steering column,
the steering can bind with the front wheels
turned off center, which may prevent key
rotation out of LOCK/OFF. If this happens,
move the steering wheel from right to left
while turning the key to ACC/ACCESSORY.
If this does not work, then the vehicle needs
service.
{Warning
Turning off the vehicle while moving may
cause loss of power assist in the brake
and steering systems and disable the
airbags. While driving, turn off the
vehicle only in an emergency. In an emergency, if the vehicle cannot be
pulled over and must be turned off while
driving:
1. Push the key all the way in toward the steering column, then turn the key to
ACC/ACCESSORY.
2. Brake using firm and steady pressure. Do not pump the brakes repeatedly. This
may deplete power assist, requiring
increased brake pedal force.
3. Shift the vehicle to N (Neutral). This can be done while the vehicle is moving.
Continue braking and steer the vehicle to
a safe location.
4. Come to a complete stop.
5. Shift to P (Park).
6. Continue to hold the brake pedal, then set the parking brake. See Parking Brake
0 153.
7. Push the key all the way in toward the steering column, then turn the ignition
to LOCK/OFF.
8. Remove the key.
9. Release the brake pedal.
Caution
Use the correct key, make sure it is all
the way in —or pushed all the way in
toward the steering column when turning
off the vehicle —and turn it only with
your hand.
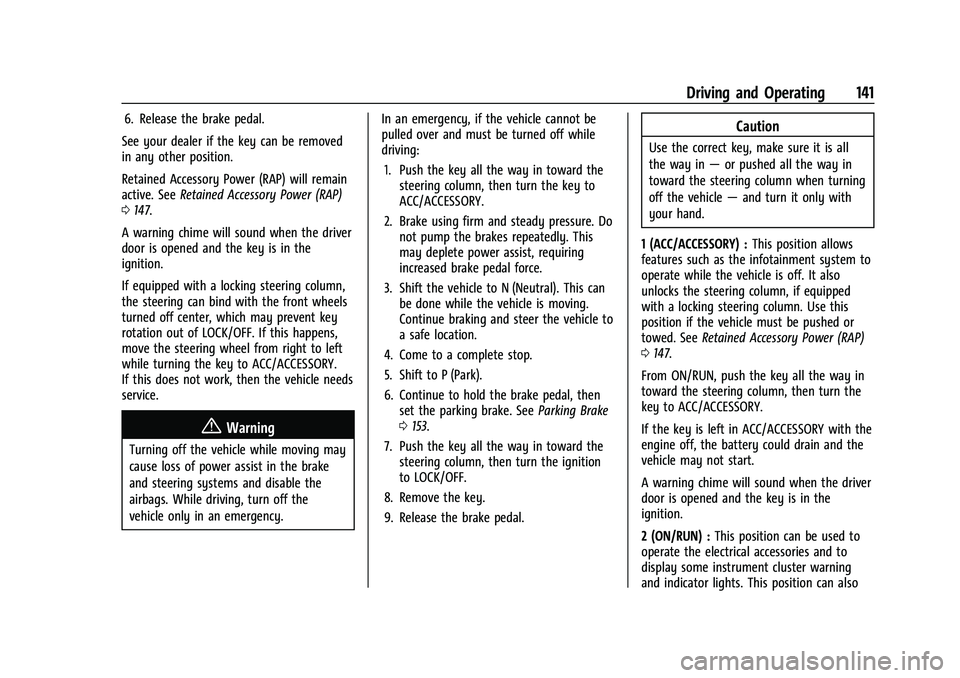
1 (ACC/ACCESSORY) : This position allows
features such as the infotainment system to
operate while the vehicle is off. It also
unlocks the steering column, if equipped
with a locking steering column. Use this
position if the vehicle must be pushed or
towed. See Retained Accessory Power (RAP)
0 147.
From ON/RUN, push the key all the way in
toward the steering column, then turn the
key to ACC/ACCESSORY.
If the key is left in ACC/ACCESSORY with the
engine off, the battery could drain and the
vehicle may not start.
A warning chime will sound when the driver
door is opened and the key is in the
ignition.
2 (ON/RUN) : This position can be used to
operate the electrical accessories and to
display some instrument cluster warning
and indicator lights. This position can also
Page 143 of 280
Chevrolet TRAX Owner Manual (GMNA-Localizing-U.S./Canada-15498927) -
2022 - CRC - 5/27/21
142 Driving and Operating
be used for service and diagnostics, and to
verify the proper operation of the
malfunction indicator lamp as may be
required for emission inspection purposes.
The switch stays in this position when the
engine is running. The transmission is also
unlocked in this position.
If the key is left in ON/RUN with the engine
off, the battery could drain and the vehicle
may not start.
3 (START) :This is the position that starts
the engine. When the engine starts, release
the key. The ignition returns to ON/RUN for
driving.
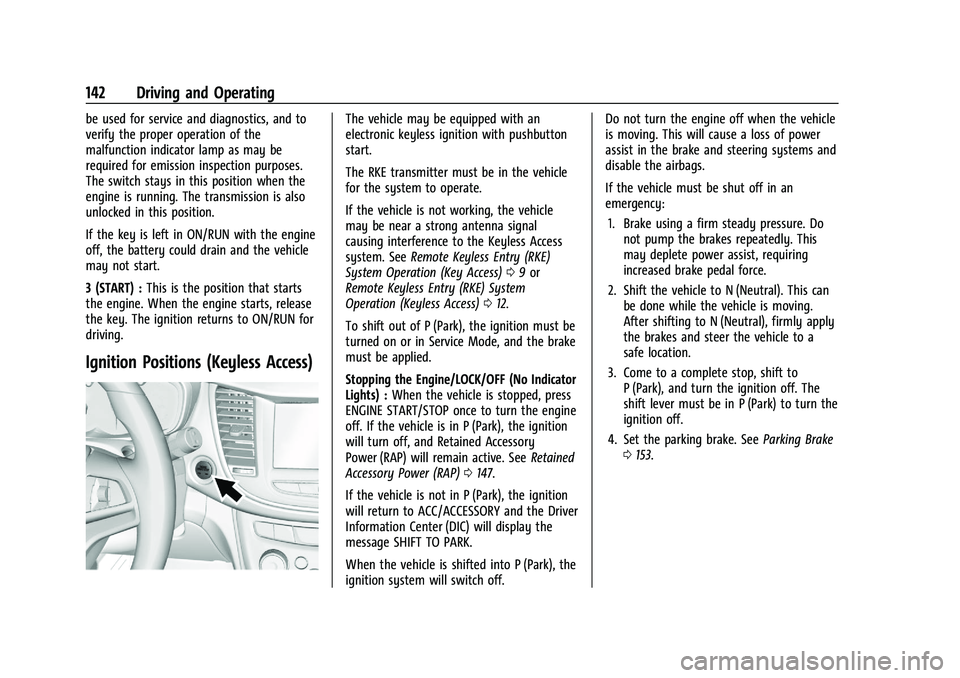
Ignition Positions (Keyless Access)
The vehicle may be equipped with an
electronic keyless ignition with pushbutton
start.
The RKE transmitter must be in the vehicle
for the system to operate.
If the vehicle is not working, the vehicle
may be near a strong antenna signal
causing interference to the Keyless Access
system. See Remote Keyless Entry (RKE)
System Operation (Key Access) 09or
Remote Keyless Entry (RKE) System
Operation (Keyless Access) 012.
To shift out of P (Park), the ignition must be
turned on or in Service Mode, and the brake
must be applied.
Stopping the Engine/LOCK/OFF (No Indicator
Lights) : When the vehicle is stopped, press
ENGINE START/STOP once to turn the engine
off. If the vehicle is in P (Park), the ignition
will turn off, and Retained Accessory
Power (RAP) will remain active. See Retained
Accessory Power (RAP) 0147.
If the vehicle is not in P (Park), the ignition
will return to ACC/ACCESSORY and the Driver
Information Center (DIC) will display the
message SHIFT TO PARK.
When the vehicle is shifted into P (Park), the
ignition system will switch off. Do not turn the engine off when the vehicle
is moving. This will cause a loss of power
assist in the brake and steering systems and
disable the airbags.
If the vehicle must be shut off in an
emergency:
1. Brake using a firm steady pressure. Do not pump the brakes repeatedly. This
may deplete power assist, requiring
increased brake pedal force.
2. Shift the vehicle to N (Neutral). This can be done while the vehicle is moving.
After shifting to N (Neutral), firmly apply
the brakes and steer the vehicle to a
safe location.
3. Come to a complete stop, shift to P (Park), and turn the ignition off. The
shift lever must be in P (Park) to turn the
ignition off.
4. Set the parking brake. See Parking Brake
0 153.
Page 145 of 280
Chevrolet TRAX Owner Manual (GMNA-Localizing-U.S./Canada-15498927) -
2022 - CRC - 5/27/21
144 Driving and Operating
Starting Procedure (Key Access)1. With your foot off the accelerator pedal, turn the ignition key to START. When
the engine starts, let go of the ignition.
The idle speed will go down as the
engine gets warm. Do not race the
engine immediately after starting it.
Operate the engine and transmission
gently to allow the oil to warm up and
lubricate all moving parts.
Caution
Cranking the engine for long periods of
time, by returning the ignition to the
START position immediately after
cranking has ended, can overheat and
damage the cranking motor, and drain
the battery. Wait at least 15 seconds
between each try, to let the cranking
motor cool down.
2. If the engine does not start after five to 10 seconds, especially in very cold
weather (below −18 °C or 0 °F), it could
be flooded with too much gasoline. Try
pushing the accelerator pedal all the way
to the floor and holding it there as you
hold the key in START for up to a
maximum of 15 seconds. Wait at least 15 seconds between each try, to allow
the cranking motor to cool down. When
the engine starts, let go of the key and
the accelerator. If the vehicle starts
briefly but then stops again, do the
same thing. This clears the extra gasoline
from the engine. Do not race the engine
immediately after starting it. Operate
the engine and transmission gently until
the oil warms up and lubricates all
moving parts.
Starting Procedure (Keyless Access) 1. Press the brake pedal, then press ENGINE START/STOP on the instrument panel.
The idle speed will go down as the
engine gets warm. Do not race the
engine immediately after starting it.
If the RKE transmitter is not in the
vehicle, if there is interference, or if the
RKE transmitter battery is low, the Driver
Information Center (DIC) will display a
message. See Driver Information Center
(DIC) 090 and
Remote Keyless Entry (RKE) System
Operation (Key Access) 09or
Remote Keyless Entry (RKE) System
Operation (Keyless Access) 012.
Caution
Cranking the engine for long periods of
time, by trying to start the engine
immediately after cranking has ended,
can overheat and damage the cranking
motor, and drain the battery. Wait at
least 15 seconds between each try, to let
the cranking motor cool down.
2. If the engine does not start after five to 10 seconds, especially in very cold
weather (below −18 °C or 0 °F), it could
be flooded with too much gasoline. Try
pushing the accelerator pedal all the way
to the floor and holding it there as you
hold ENGINE START/STOP, for up to a
maximum of 15 seconds. Wait at least
15 seconds between each try, to allow
the cranking motor to cool down.
When the engine starts, let go of the
button and the accelerator. If the vehicle
starts briefly but then stops again, follow
the same steps. This clears the extra
gasoline from the engine.
Do not race the engine immediately
after starting it. Operate the engine and
transmission gently until the oil warms
up and lubricates all moving parts.
Page 148 of 280

Chevrolet TRAX Owner Manual (GMNA-Localizing-U.S./Canada-15498927) -
2022 - CRC - 5/27/21
Driving and Operating 147
Warning (Continued)
or extension cord, could make it
overheat and cause a fire, property
damage, electric shock, and injury.
.Do not operate the vehicle with the
heater cord permanently attached to
the vehicle. Possible heater cord and
thermostat damage could occur.
.While in use, do not let the heater
cord touch vehicle parts or sharp
edges. Never close the hood on the
heater cord.
.Before starting the vehicle, unplug the
cord, reattach the cover to the plug,
and securely fasten the cord. Keep the
cord away from any moving parts.
4. Before starting the engine, be sure to unplug and store the cord as it was
before to keep it away from moving
engine parts. If you do not it could be
damaged.
The length of time the heater should remain
plugged in depends on several factors. Ask a
dealer in the area where you will be parking
the vehicle for the best advice on this.
Retained Accessory Power (RAP)
When the ignition is turned from on to off,
the following features (if equipped) will
continue to function for up to 10 minutes,
or until the driver door is opened. These
features will also work when the ignition is
in RUN or ACC/ACCESSORY:
.Infotainment System
.Power Windows (during RAP this
functionality will be lost when any door
is opened)
.Sunroof (during RAP this functionality will
be lost when any door is opened)
.Auxiliary Power Outlet
.Audio System
.OnStar System
Shifting Into Park
1. Hold the brake pedal down and set the parking brake. See Parking Brake0153.
2. Move the shift lever into P (Park) by pressing the button on the shift lever
and pushing the lever all the way
toward the front of the vehicle.
3. Push the ignition key in, towards the steering column and then turn the
ignition off. 4. Remove the key and take it with you.
If you can leave the vehicle with the
ignition key in your hand, the vehicle is
in P (Park).
Leaving the Vehicle with the Engine
Running
{Warning
It can be dangerous to leave the vehicle
with the engine running. It could
overheat and catch fire.
It is dangerous to get out of the vehicle
if the shift lever is not fully in P (Park)
with the parking brake firmly set. The
vehicle can roll.
Do not leave the vehicle when the engine
is running. If you have left the engine
running, the vehicle can move suddenly.
You or others could be injured. To be
sure the vehicle will not move, even
when you are on fairly level ground,
always set the parking brake and move
the shift lever to P (Park). See Shifting
Into Park 0147.
Page 150 of 280

Chevrolet TRAX Owner Manual (GMNA-Localizing-U.S./Canada-15498927) -
2022 - CRC - 5/27/21
Driving and Operating 149
3. Remove the cover on the console.
4. Insert and push the key into the slot.5. Move the shift lever out of P (Park).
If P (Park) is selected again after the key
is removed from the slot, the shift lever
will be locked again.
6. Remove the key from the slot.
7. Replace the cover.
8. Have the cause of the problem fixed by your dealer.
Parking over Things That Burn
{Warning
Things that can burn could touch hot
exhaust parts under the vehicle and
ignite. Do not park over papers, leaves,
dry grass, or other things that can burn.
Extended Parking (Keyless Access)
It is best not to park with the vehicle
running. If the vehicle is left running, be
sure it will not move and there is adequate
ventilation. See Shifting Into Park 0147 and
Engine Exhaust 0149.
If the vehicle is left parked and running with
the Remote Keyless Entry (RKE) transmitter
outside the vehicle, it will continue to run
for up to half an hour. If the vehicle is left parked and running with
the RKE transmitter inside the vehicle, it will
continue to run for up to an hour.
The vehicle could turn off sooner if it is
parked on a hill, due to lack of
available fuel.
The timer will reset if the vehicle is taken
out of P (Park) while it is running.
Engine Exhaust
{
Warning
Engine exhaust contains carbon monoxide
(CO), which cannot be seen or smelled.
Exposure to CO can cause
unconsciousness and even death.
Exhaust may enter the vehicle if:
.The vehicle idles in areas with poor
ventilation (parking garages, tunnels,
deep snow that may block underbody
airflow or tail pipes).
.The exhaust smells or sounds strange
or different.
.The exhaust system leaks due to
corrosion or damage. (Continued)
Page 169 of 280

Chevrolet TRAX Owner Manual (GMNA-Localizing-U.S./Canada-15498927) -
2022 - CRC - 5/27/21
168 Vehicle Care
General Information
For service and parts needs, visit your
dealer. You will receive genuine GM parts
and GM-trained and supported service
people.
Genuine GM parts have one of these marks:
California Perchlorate Materials
Requirements
Certain types of automotive applications,
such as airbag initiators, seat belt
pretensioners, and lithium batteries
contained in electronic keys, may contain
perchlorate materials. Perchlorate Material–special handling may apply. See
www.dtsc.ca.gov/hazardouswaste/
perchlorate.
Accessories and Modifications
Adding non-dealer accessories or making
modifications to the vehicle can affect
vehicle performance and safety, including
such things as airbags, braking, stability,
ride and handling, emissions systems,
aerodynamics, durability, and electronic
systems like antilock brakes, traction control,
and stability control. These accessories or
modifications could even cause malfunction
or damage not covered by the vehicle
warranty.
Damage to suspension components caused
by modifying vehicle height outside of
factory settings will not be covered by the
vehicle warranty.
Damage to vehicle components resulting
from modifications or the installation or use
of non-GM certified parts, including control
module or software modifications, is not
covered under the terms of the vehicle
warranty and may affect remaining
warranty coverage for affected parts.
GM Accessories are designed to complement
and function with other systems on the
vehicle. See your dealer to accessorize the
vehicle using genuine GM Accessories
installed by a dealer technician.
Also, see
Adding Equipment to the
Airbag-Equipped Vehicle 053.
Vehicle Checks
Doing Your Own Service Work
{Warning
It can be dangerous to work on your
vehicle if you do not have the proper
knowledge, service manual, tools,
or parts. Always follow owner’s manual
procedures and consult the service
manual for your vehicle before doing any
service work.
If doing some of your own service work, use
the proper service manual. It tells you much
more about how to service the vehicle than
this manual can. To order the proper service
manual, see Publication Ordering
Information 0257.
Page 209 of 280
Chevrolet TRAX Owner Manual (GMNA-Localizing-U.S./Canada-15498927) -
2022 - CRC - 5/27/21
208 Vehicle Care
completing the sensor matching process.
See "TPMS Sensor Matching Process" later
in this section.
.One or more TPMS sensors are missing or
damaged. The malfunction light and the
DIC message, if equipped, should go off
when the TPMS sensors are installed and
the sensor matching process is performed
successfully. See your dealer for service.
.Replacement tires or wheels do not match
the original equipment tires or wheels.
Tires and wheels other than those
recommended could prevent the TPMS
from functioning properly. SeeBuying
New Tires 0211.
.Operating electronic devices or being near
facilities using radio wave frequencies
similar to the TPMS could cause the TPMS
sensors to malfunction.
If the TPMS is not functioning properly, it
cannot detect or signal a low tire pressure
condition. See your dealer for service if the
TPMS malfunction light and DIC message,
if equipped, come on and stay on.
TPMS Sensor Matching Process
Each TPMS sensor has a unique
identification code. The identification code
needs to be matched to a new tire/wheel position after rotating the vehicle’s tires or
replacing one or more of the TPMS sensors.
Also, the TPMS sensor matching process
should be performed after replacing a spare
tire with a road tire containing the TPMS
sensor. The malfunction light and the DIC
message, if equipped, should go off at the
next ignition cycle. The sensors are matched
to the tire/wheel positions, using a TPMS
relearn tool, in the following order: driver
side front tire, passenger side front tire,
passenger side rear tire, and driver side rear.
See your dealer for service or to purchase a
relearn tool. A TPMS relearn tool can also be
purchased. See Tire Pressure Monitor Sensor
Activation Tool at
www.gmtoolsandequipment.com or call
1-800-GM TOOLS (1-800-468-6657).
There are two minutes to match the first
tire/wheel position, and five minutes overall
to match all four tire/wheel positions. If it
takes longer, the matching process stops
and must be restarted.
The TPMS sensor matching process is:
1. Set the parking brake. 2. Turn the ignition on without starting the
vehicle or place the vehicle in Service
Mode. See Ignition Positions (Key Access)
0 140 or
Ignition Positions (Keyless Access) 0142.
3. Use the MENU button to select the Vehicle Information Menu (Menu 2) in
the Driver Information Center (DIC). See
Driver Information Center (DIC) 090.
4. Use the thumbwheel (or up and down arrows) to scroll to the Tire Pressure
Menu Item screen.
5. Press and hold the SET/CLR button to begin the sensor matching process.
A message requesting acceptance of the
process may display.
6. If requested, press the SET/CLR button again to confirm the selection.
The horn sounds twice to signal the
receiver is in relearn mode and the TIRE
LEARN or TIRE LEARNING ACTIVE message
displays on the DIC screen.
7. Start with the driver side front tire.
8. Place the relearn tool against the tire sidewall, near the valve stem. Then press
the button to activate the TPMS sensor.