turn signal CHEVROLET TRAX 2023 Owner's Manual
[x] Cancel search | Manufacturer: CHEVROLET, Model Year: 2023, Model line: TRAX, Model: CHEVROLET TRAX 2023Pages: 280, PDF Size: 12.13 MB
Page 168 of 280
Chevrolet TRAX Owner Manual (GMNA-Localizing-U.S./Canada-15498927) -
2022 - CRC - 5/27/21
Vehicle Care 167
Vehicle Care
General Information
General Information . . . . . . . . . . . . . . . . . . . 168
California Perchlorate MaterialsRequirements . . . . . . . . . . . . . . . . . . . . . . . . 168
Accessories and Modifications . . . . . . . . . 168
Vehicle Checks
Doing Your Own Service Work . . . . . . . . 168
Hood . . . . . . . . . . . . . . . . . . . . . . . . . . . . . . . . . . 169
Engine Compartment Overview . . . . . . . . 171
Engine Oil . . . . . . . . . . . . . . . . . . . . . . . . . . . . . 172
Engine Oil Life System . . . . . . . . . . . . . . . . . 174
Automatic Transmission Fluid . . . . . . . . . . 174
Engine Air Cleaner/Filter . . . . . . . . . . . . . . . 175
Cooling System . . . . . . . . . . . . . . . . . . . . . . . . 176
Engine Overheating . . . . . . . . . . . . . . . . . . . . 179
Washer Fluid . . . . . . . . . . . . . . . . . . . . . . . . . . 180
Brakes . . . . . . . . . . . . . . . . . . . . . . . . . . . . . . . . . 180
Brake Fluid . . . . . . . . . . . . . . . . . . . . . . . . . . . . . 181
Battery - North America . . . . . . . . . . . . . . . 182
All-Wheel Drive . . . . . . . . . . . . . . . . . . . . . . . . 182
Starter Switch Check . . . . . . . . . . . . . . . . . . . 183
Automatic Transmission Shift Lock Control Function Check . . . . . . . . . . . . . . 183
Park Brake and P (Park) Mechanism Check . . . . . . . . . . . . . . . . . . . . . . . . . . . . . . . . 183
Wiper Blade Replacement . . . . . . . . . . . . . 184
Windshield Replacement . . . . . . . . . . . . . . . 185 Gas Strut(s) . . . . . . . . . . . . . . . . . . . . . . . . . . . . 185
Headlamp Aiming
Front Headlamp Aiming . . . . . . . . . . . . . . . 186
Bulb Replacement
Bulb Replacement . . . . . . . . . . . . . . . . . . . . . 186
Halogen Bulbs . . . . . . . . . . . . . . . . . . . . . . . . . 186
LED Lighting . . . . . . . . . . . . . . . . . . . . . . . . . . . 186
Headlamps, Front Turn Signal and
Parking Lamps . . . . . . . . . . . . . . . . . . . . . . . 186
Taillamps, Turn Signal, Sidemarker, Stoplamps, and Back-Up Lamps . . . . . . 189
License Plate Lamp . . . . . . . . . . . . . . . . . . . . . 191
Electrical System
Electrical System Overload . . . . . . . . . . . . . 191
Fuses and Circuit Breakers . . . . . . . . . . . . . 193
Engine Compartment Fuse Block . . . . . . . 193
Instrument Panel Fuse Block . . . . . . . . . . 196
Rear Compartment Fuse Block . . . . . . . . . 198
Wheels and Tires
Tires . . . . . . . . . . . . . . . . . . . . . . . . . . . . . . . . . . . 199
All-Season Tires . . . . . . . . . . . . . . . . . . . . . . . 200
Winter Tires . . . . . . . . . . . . . . . . . . . . . . . . . . 200
Tire Sidewall Labeling . . . . . . . . . . . . . . . . . 200
Tire Designations . . . . . . . . . . . . . . . . . . . . . . 202
Tire Terminology and Definitions . . . . . . 203
Tire Pressure . . . . . . . . . . . . . . . . . . . . . . . . . . 205
Tire Pressure Monitor System . . . . . . . . . 206
Tire Pressure Monitor Operation . . . . . . 206 Tire Inspection . . . . . . . . . . . . . . . . . . . . . . . . 209
Tire Rotation . . . . . . . . . . . . . . . . . . . . . . . . . . 209
When It Is Time for New Tires . . . . . . . . 210
Buying New Tires . . . . . . . . . . . . . . . . . . . . . . 211
Different Size Tires and Wheels . . . . . . . . 212
Uniform Tire Quality Grading . . . . . . . . . . 212
Wheel Alignment and Tire Balance . . . . 214
Wheel Replacement . . . . . . . . . . . . . . . . . . . 214
Tire Chains . . . . . . . . . . . . . . . . . . . . . . . . . . . . 214
If a Tire Goes Flat . . . . . . . . . . . . . . . . . . . . . 215
Tire Changing . . . . . . . . . . . . . . . . . . . . . . . . . . 216
Compact Spare Tire . . . . . . . . . . . . . . . . . . . 220
Jump Starting
Jump Starting - North America . . . . . . . . 220
Towing the Vehicle
Towing the Vehicle . . . . . . . . . . . . . . . . . . . . 223
Recreational Vehicle Towing . . . . . . . . . . . 224
Appearance Care
Exterior Care . . . . . . . . . . . . . . . . . . . . . . . . . . 226
Interior Care . . . . . . . . . . . . . . . . . . . . . . . . . . . 230
Floor Mats . . . . . . . . . . . . . . . . . . . . . . . . . . . . . 233
Page 187 of 280
Chevrolet TRAX Owner Manual (GMNA-Localizing-U.S./Canada-15498927) -
2022 - CRC - 5/27/21
186 Vehicle Care
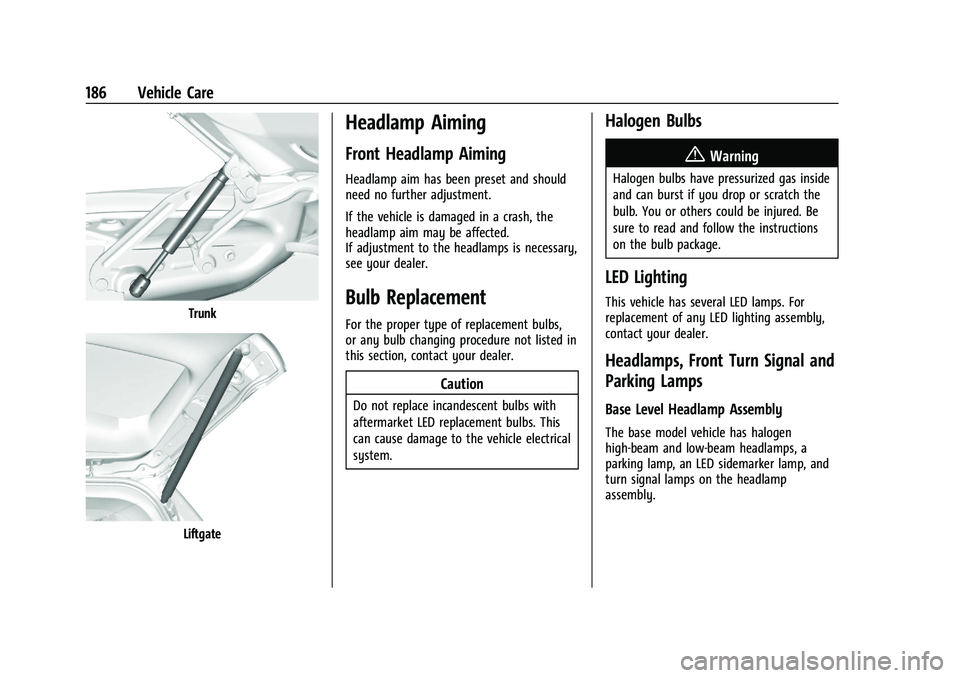
Trunk
Liftgate
Headlamp Aiming
Front Headlamp Aiming
Headlamp aim has been preset and should
need no further adjustment.
If the vehicle is damaged in a crash, the
headlamp aim may be affected.
If adjustment to the headlamps is necessary,
see your dealer.
Bulb Replacement
For the proper type of replacement bulbs,
or any bulb changing procedure not listed in
this section, contact your dealer.
Caution
Do not replace incandescent bulbs with
aftermarket LED replacement bulbs. This
can cause damage to the vehicle electrical
system.
Halogen Bulbs
{Warning
Halogen bulbs have pressurized gas inside
and can burst if you drop or scratch the
bulb. You or others could be injured. Be
sure to read and follow the instructions
on the bulb package.
LED Lighting
This vehicle has several LED lamps. For
replacement of any LED lighting assembly,
contact your dealer.
Headlamps, Front Turn Signal and
Parking Lamps
Base Level Headlamp Assembly
The base model vehicle has halogen
high-beam and low-beam headlamps, a
parking lamp, an LED sidemarker lamp, and
turn signal lamps on the headlamp
assembly.
Page 188 of 280
Chevrolet TRAX Owner Manual (GMNA-Localizing-U.S./Canada-15498927) -
2022 - CRC - 5/27/21
Vehicle Care 187
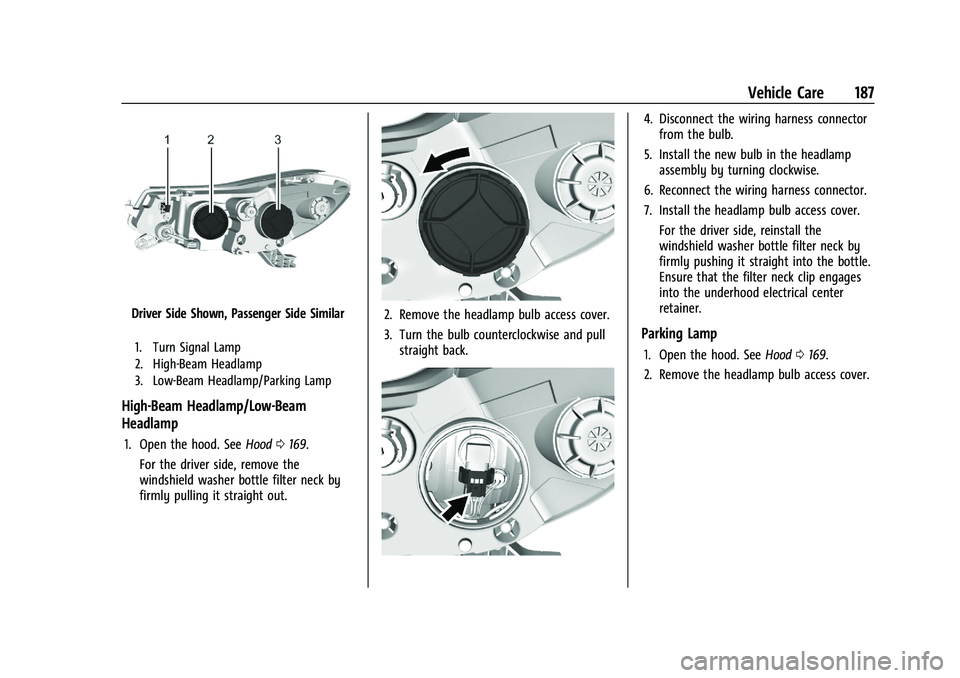
Driver Side Shown, Passenger Side Similar
1. Turn Signal Lamp
2. High-Beam Headlamp
3. Low-Beam Headlamp/Parking Lamp
High-Beam Headlamp/Low-Beam
Headlamp
1. Open the hood. SeeHood0169.
For the driver side, remove the
windshield washer bottle filter neck by
firmly pulling it straight out.
2. Remove the headlamp bulb access cover.
3. Turn the bulb counterclockwise and pull straight back.
4. Disconnect the wiring harness connectorfrom the bulb.
5. Install the new bulb in the headlamp assembly by turning clockwise.
6. Reconnect the wiring harness connector.
7. Install the headlamp bulb access cover.
For the driver side, reinstall the
windshield washer bottle filter neck by
firmly pushing it straight into the bottle.
Ensure that the filter neck clip engages
into the underhood electrical center
retainer.
Parking Lamp
1. Open the hood. See Hood0169.
2. Remove the headlamp bulb access cover.
Page 189 of 280
Chevrolet TRAX Owner Manual (GMNA-Localizing-U.S./Canada-15498927) -
2022 - CRC - 5/27/21
188 Vehicle Care
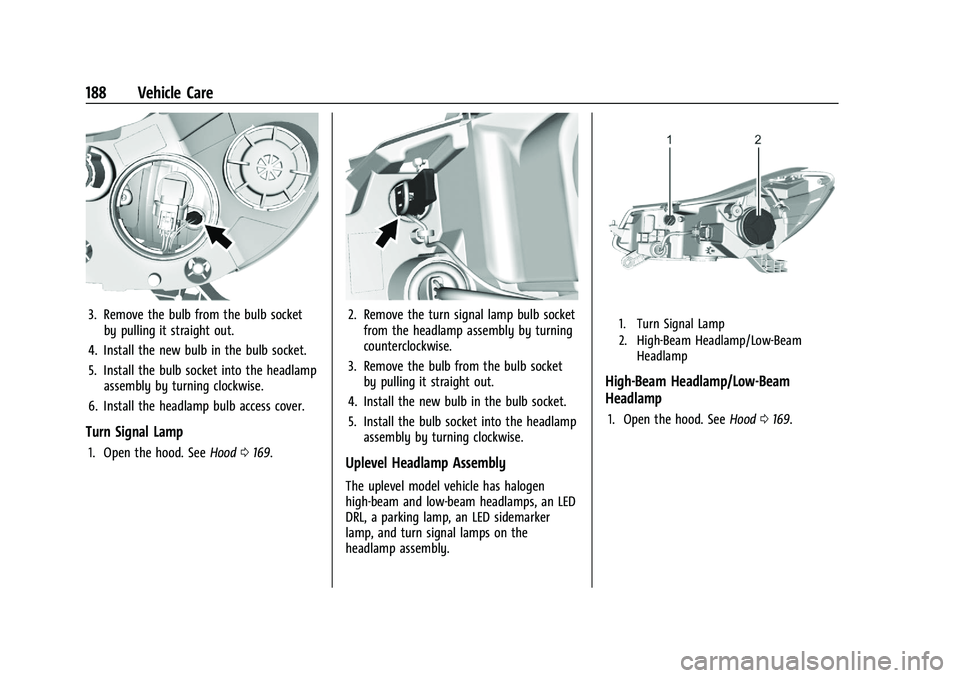
3. Remove the bulb from the bulb socketby pulling it straight out.
4. Install the new bulb in the bulb socket.
5. Install the bulb socket into the headlamp assembly by turning clockwise.
6. Install the headlamp bulb access cover.
Turn Signal Lamp
1. Open the hood. See Hood0169.
2. Remove the turn signal lamp bulb socket
from the headlamp assembly by turning
counterclockwise.
3. Remove the bulb from the bulb socket by pulling it straight out.
4. Install the new bulb in the bulb socket.
5. Install the bulb socket into the headlamp assembly by turning clockwise.
Uplevel Headlamp Assembly
The uplevel model vehicle has halogen
high-beam and low-beam headlamps, an LED
DRL, a parking lamp, an LED sidemarker
lamp, and turn signal lamps on the
headlamp assembly.
1. Turn Signal Lamp
2. High-Beam Headlamp/Low-Beam Headlamp
High-Beam Headlamp/Low-Beam
Headlamp
1. Open the hood. See Hood0169.
Page 190 of 280
Chevrolet TRAX Owner Manual (GMNA-Localizing-U.S./Canada-15498927) -
2022 - CRC - 5/27/21
Vehicle Care 189
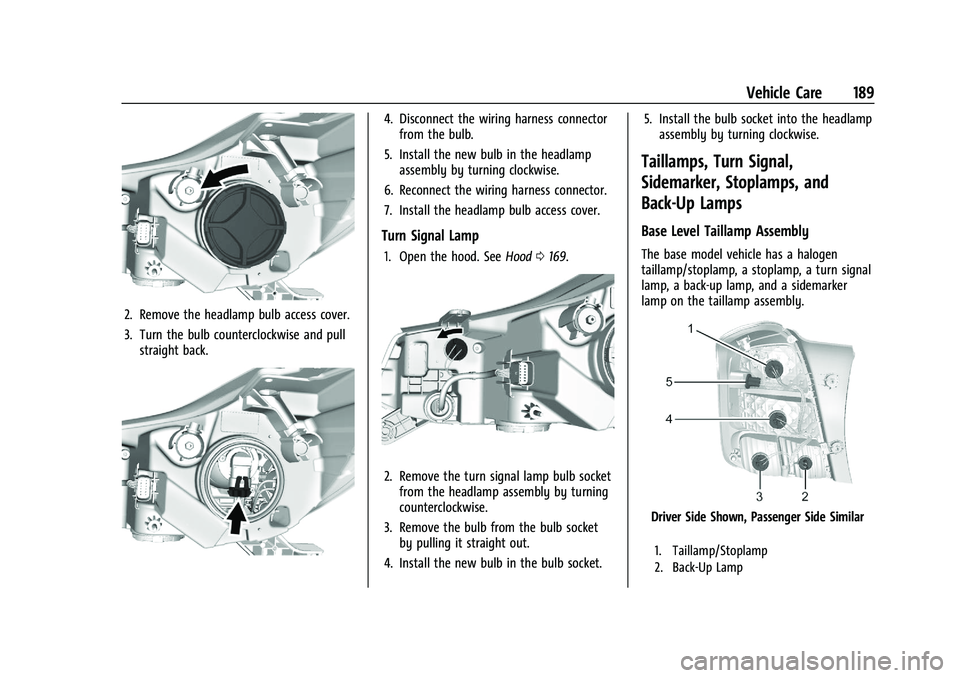
2. Remove the headlamp bulb access cover.
3. Turn the bulb counterclockwise and pullstraight back.
4. Disconnect the wiring harness connectorfrom the bulb.
5. Install the new bulb in the headlamp assembly by turning clockwise.
6. Reconnect the wiring harness connector.
7. Install the headlamp bulb access cover.
Turn Signal Lamp
1. Open the hood. See Hood0169.
2. Remove the turn signal lamp bulb socket
from the headlamp assembly by turning
counterclockwise.
3. Remove the bulb from the bulb socket by pulling it straight out.
4. Install the new bulb in the bulb socket. 5. Install the bulb socket into the headlamp
assembly by turning clockwise.
Taillamps, Turn Signal,
Sidemarker, Stoplamps, and
Back-Up Lamps
Base Level Taillamp Assembly
The base model vehicle has a halogen
taillamp/stoplamp, a stoplamp, a turn signal
lamp, a back-up lamp, and a sidemarker
lamp on the taillamp assembly.
Driver Side Shown, Passenger Side Similar
1. Taillamp/Stoplamp
2. Back-Up Lamp
Page 191 of 280

Chevrolet TRAX Owner Manual (GMNA-Localizing-U.S./Canada-15498927) -
2022 - CRC - 5/27/21
190 Vehicle Care
3. Turn Signal Lamp
4. Taillamp
5. Sidemarker Lamp
Passenger Side Shown, Driver Side Similar
1. Remove and retain both screws attaching the taillamp assembly to the
vehicle body.
2. Pull the taillamp assembly straight back to detach it from the vehicle body. Take
care that the cable duct remains in place.
3. Remove the bulb socket from the taillamp assembly.
4. Remove the old bulb from the bulb socket by pulling it straight out.
5. Insert a new bulb into the bulb socket. 6. Install the bulb socket into the taillamp
asembly.
7. Install the taillamp assembly to the vehicle body with the two screws.
Uplevel Taillamp Assembly
The uplevel vehicle has a halogen stoplamp,
an LED taillamp, a sidemarker lamp, a turn
signal lamp, and a back-up lamp on the
taillamp assembly.
Driver Side Shown, Passenger Side Similar
1. Sidemarker Lamp
2. Stoplamp
3. Back-Up Lamp
4. Turn Signal Lamp
Passenger Side Shown, Driver Side Similar
1. Remove and retain both screws attaching the taillamp assembly to the
vehicle body.
2. Pull the taillamp assembly straight back to detach it from the vehicle body. Take
care that the cable duct remains in place.
3. Remove the bulb socket from the taillamp assembly.
Page 209 of 280
Chevrolet TRAX Owner Manual (GMNA-Localizing-U.S./Canada-15498927) -
2022 - CRC - 5/27/21
208 Vehicle Care
completing the sensor matching process.
See "TPMS Sensor Matching Process" later
in this section.
.One or more TPMS sensors are missing or
damaged. The malfunction light and the
DIC message, if equipped, should go off
when the TPMS sensors are installed and
the sensor matching process is performed
successfully. See your dealer for service.
.Replacement tires or wheels do not match
the original equipment tires or wheels.
Tires and wheels other than those
recommended could prevent the TPMS
from functioning properly. SeeBuying
New Tires 0211.
.Operating electronic devices or being near
facilities using radio wave frequencies
similar to the TPMS could cause the TPMS
sensors to malfunction.
If the TPMS is not functioning properly, it
cannot detect or signal a low tire pressure
condition. See your dealer for service if the
TPMS malfunction light and DIC message,
if equipped, come on and stay on.
TPMS Sensor Matching Process
Each TPMS sensor has a unique
identification code. The identification code
needs to be matched to a new tire/wheel position after rotating the vehicle’s tires or
replacing one or more of the TPMS sensors.
Also, the TPMS sensor matching process
should be performed after replacing a spare
tire with a road tire containing the TPMS
sensor. The malfunction light and the DIC
message, if equipped, should go off at the
next ignition cycle. The sensors are matched
to the tire/wheel positions, using a TPMS
relearn tool, in the following order: driver
side front tire, passenger side front tire,
passenger side rear tire, and driver side rear.
See your dealer for service or to purchase a
relearn tool. A TPMS relearn tool can also be
purchased. See Tire Pressure Monitor Sensor
Activation Tool at
www.gmtoolsandequipment.com or call
1-800-GM TOOLS (1-800-468-6657).
There are two minutes to match the first
tire/wheel position, and five minutes overall
to match all four tire/wheel positions. If it
takes longer, the matching process stops
and must be restarted.
The TPMS sensor matching process is:
1. Set the parking brake. 2. Turn the ignition on without starting the
vehicle or place the vehicle in Service
Mode. See Ignition Positions (Key Access)
0 140 or
Ignition Positions (Keyless Access) 0142.
3. Use the MENU button to select the Vehicle Information Menu (Menu 2) in
the Driver Information Center (DIC). See
Driver Information Center (DIC) 090.
4. Use the thumbwheel (or up and down arrows) to scroll to the Tire Pressure
Menu Item screen.
5. Press and hold the SET/CLR button to begin the sensor matching process.
A message requesting acceptance of the
process may display.
6. If requested, press the SET/CLR button again to confirm the selection.
The horn sounds twice to signal the
receiver is in relearn mode and the TIRE
LEARN or TIRE LEARNING ACTIVE message
displays on the DIC screen.
7. Start with the driver side front tire.
8. Place the relearn tool against the tire sidewall, near the valve stem. Then press
the button to activate the TPMS sensor.
Page 265 of 280
Chevrolet TRAX Owner Manual (GMNA-Localizing-U.S./Canada-15498927) -
2022 - CRC - 5/27/21
264 OnStar
TTY Users
OnStar has the ability to communicate to
deaf, hard-of-hearing, or speech-impaired
customers while in the vehicle. The available
TTY system can provide in-vehicle access to
all OnStar services, except Virtual Advisor
and OnStar Turn-by-Turn Navigation.
If equipped, TTY mode can be turned on or
off by touching Settings, then Apps, and
then Phone. When TTY mode is on, phone
calls can be made or received with OnStar
using the infotainment display.
OnStar Personal Identification
Number (PIN)
A PIN is needed to access some OnStar
services. The PIN will need to be changed
the first time when speaking with an
Advisor. To change the OnStar PIN, contact
an OnStar Advisor by pressing
Qor calling
1-888-4ONSTAR.
Warranty
OnStar equipment may be warranted as part
of the vehicle warranty.
Languages
The vehicle can be programmed to respond
in multiple languages. Press
Qand ask for
an Advisor. Advisors are available in English,
Spanish, and French. Available languages
may vary by country.
Potential Issues
OnStar cannot perform Remote Door Unlock
or Stolen Vehicle Assistance after the vehicle
has been off continuously for an extended
period of time without an ignition cycle. To
find out the duration of time that applies
for the vehicle, contact an OnStar Advisor by
pressing
Qor calling 1-888-4ONSTAR. If the
vehicle has not been started for an extended
period of time, OnStar can contact Roadside
Assistance or a locksmith to help gain access
to the vehicle.
Global Positioning System (GPS)
.Obstruction of the GPS can occur in a
large city with tall buildings; in parking
garages; around airports; in tunnels and
underpasses; or in an area with very
dense trees. If GPS signals are not
available, the OnStar system should still operate to call OnStar. However, OnStar
could have difficulty identifying the exact
location.
.In emergency situations, OnStar can use
the last stored GPS location to send to
emergency responders.
A temporary loss of GPS can cause loss of
the ability to send a Turn-by-Turn
Navigation route. The Advisor may give a
verbal route or may ask for a call back after
the vehicle is driven into an open area.
Cellular and GPS Antennas
Cellular reception is required for OnStar to
send remote signals to the vehicle. Do not
place items over or near the antenna to
prevent blocking cellular and GPS signal
reception.
Unable to Connect to OnStar Message
If there is limited cellular coverage or the
cellular network has reached maximum
capacity, this message may come on. Press
Qto try the call again or try again after
driving a few miles into another
cellular area.
Page 268 of 280
Chevrolet TRAX Owner Manual (GMNA-Localizing-U.S./Canada-15498927) -
2022 - CRC - 5/27/21
Connected Services 267
Ensuring Security
.Change the default passwords for the
Wi-Fi hotspot and myChevrolet mobile
application. Make these passwords
different from each other and use a
combination of letters and numbers to
increase the security.
.Change the default name of the SSID
(Service Set Identifier). This is your
network’s name that is visible to other
wireless devices. Choose a unique name
and avoid family names or vehicle
descriptions.
Wi-Fi Hotspot (If Equipped)
The vehicle may have a built-in Wi-Fi
hotspot that provides access to the Internet
and web content at 4G LTE speed. Up to
seven mobile devices can be connected.
A data plan is required. Use the in-vehicle
controls only when it is safe to do so. 1. To retrieve Wi-Fi hotspot information, press
=to open the OnStar app on the
infotainment display, then select Wi-Fi
Hotspot. On some vehicles, touch Wi-Fi
or Wi-Fi Settings on the screen. 2. The Wi-Fi settings will display the Wi-Fi
hotspot name (SSID), password, and on
some vehicles, the connection type (no
Internet connection, 3G, 4G, 4G LTE), and
signal quality (poor, good, excellent).
3. To change the SSID or password, press
Qor call 1-888-4ONSTAR to connect
with an Advisor. On some vehicles, the
SSID and password can be changed in
the Wi-Fi Hotspot menu.
After initial set-up, your vehicle’s Wi-Fi
hotspot will connect automatically to your
mobile devices. Manage data usage by
turning Wi-Fi on or off on your mobile
device, using the myChevrolet mobile app,
or by contacting an OnStar Advisor. On
some vehicles, Wi-Fi can also be managed
from the Wi-Fi Hotspot menu.
MyChevrolet Mobile App (If Available)
Download the myChevrolet mobile app to
compatible Apple and Android smartphones.
Chevrolet users can access the following
services from a smartphone:
.Remotely start/stop the vehicle,
if factory-equipped.
.Lock/unlock doors, if equipped with
automatic locks.
.Activate the horn and lamps.
.Check the vehicle’s fuel level, oil life,
or tire pressure, if factory-equipped with
the Tire Pressure Monitor System.
.Send destinations to the vehicle.
.Locate the vehicle on a map (U.S.
market only).
.Turn the vehicle's Wi-Fi hotspot on/off,
manage settings, and monitor data
consumption, if equipped.
.Locate a dealer and schedule service.
.Request roadside assistance.
.Set a parking reminder with pin drop,
take a photo, make a note, and set a
timer.
.Connect with Chevrolet on social media.
Features are subject to change. For
myChevrolet mobile app information and
compatibility, see my.chevrolet.com.
An active OnStar or connected service plan
may be required. A compatible device,
factory-installed remote start, and power
locks are required. Data rates apply. See
www.onstar.com for details and system
limitations.
Page 271 of 280
Chevrolet TRAX Owner Manual (GMNA-Localizing-U.S./Canada-15498927) -
2022 - CRC - 5/27/21
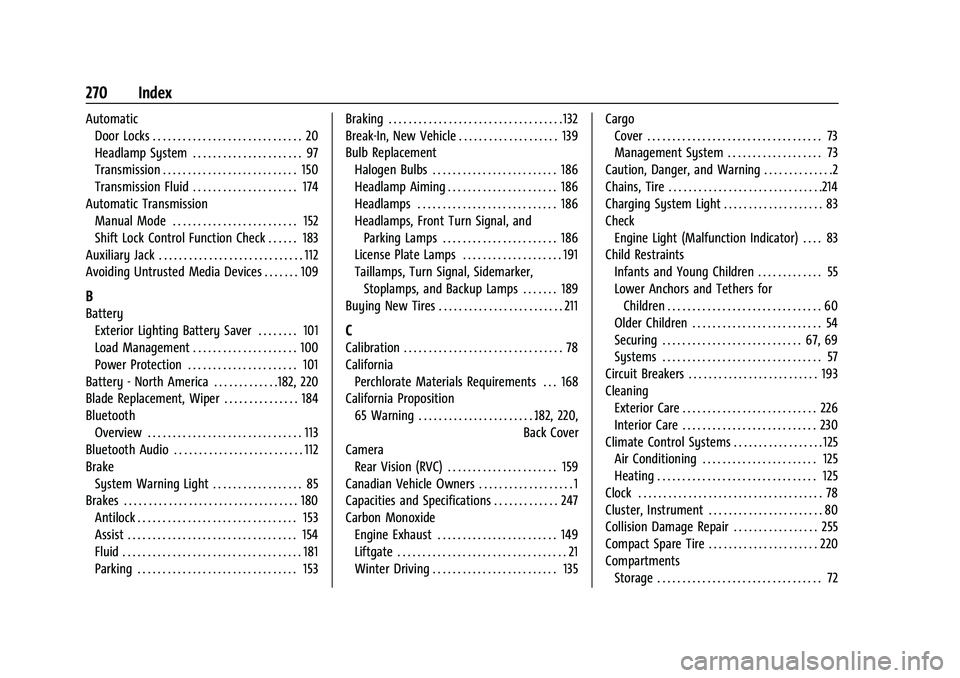
270 Index
AutomaticDoor Locks . . . . . . . . . . . . . . . . . . . . . . . . . . . . . . 20
Headlamp System . . . . . . . . . . . . . . . . . . . . . . 97
Transmission . . . . . . . . . . . . . . . . . . . . . . . . . . . 150
Transmission Fluid . . . . . . . . . . . . . . . . . . . . . 174
Automatic Transmission Manual Mode . . . . . . . . . . . . . . . . . . . . . . . . . 152
Shift Lock Control Function Check . . . . . . 183
Auxiliary Jack . . . . . . . . . . . . . . . . . . . . . . . . . . . . . 112
Avoiding Untrusted Media Devices . . . . . . . 109
B
Battery Exterior Lighting Battery Saver . . . . . . . . 101
Load Management . . . . . . . . . . . . . . . . . . . . . 100
Power Protection . . . . . . . . . . . . . . . . . . . . . . 101
Battery - North America . . . . . . . . . . . . .182, 220
Blade Replacement, Wiper . . . . . . . . . . . . . . . 184
Bluetooth
Overview . . . . . . . . . . . . . . . . . . . . . . . . . . . . . . . 113
Bluetooth Audio . . . . . . . . . . . . . . . . . . . . . . . . . . 112
Brake
System Warning Light . . . . . . . . . . . . . . . . . . 85
Brakes . . . . . . . . . . . . . . . . . . . . . . . . . . . . . . . . . . . 180 Antilock . . . . . . . . . . . . . . . . . . . . . . . . . . . . . . . . 153
Assist . . . . . . . . . . . . . . . . . . . . . . . . . . . . . . . . . . 154
Fluid . . . . . . . . . . . . . . . . . . . . . . . . . . . . . . . . . . . . 181
Parking . . . . . . . . . . . . . . . . . . . . . . . . . . . . . . . . 153 Braking . . . . . . . . . . . . . . . . . . . . . . . . . . . . . . . . . . . 132
Break-In, New Vehicle . . . . . . . . . . . . . . . . . . . . 139
Bulb Replacement
Halogen Bulbs . . . . . . . . . . . . . . . . . . . . . . . . . 186
Headlamp Aiming . . . . . . . . . . . . . . . . . . . . . . 186
Headlamps . . . . . . . . . . . . . . . . . . . . . . . . . . . . 186
Headlamps, Front Turn Signal, andParking Lamps . . . . . . . . . . . . . . . . . . . . . . . 186
License Plate Lamps . . . . . . . . . . . . . . . . . . . . 191
Taillamps, Turn Signal, Sidemarker, Stoplamps, and Backup Lamps . . . . . . . 189
Buying New Tires . . . . . . . . . . . . . . . . . . . . . . . . . 211
C
Calibration . . . . . . . . . . . . . . . . . . . . . . . . . . . . . . . . 78
California Perchlorate Materials Requirements . . . 168
California Proposition 65 Warning . . . . . . . . . . . . . . . . . . . . . . . .182, 220, Back Cover
Camera
Rear Vision (RVC) . . . . . . . . . . . . . . . . . . . . . . 159
Canadian Vehicle Owners . . . . . . . . . . . . . . . . . . . 1
Capacities and Specifications . . . . . . . . . . . . . 247
Carbon Monoxide Engine Exhaust . . . . . . . . . . . . . . . . . . . . . . . . 149
Liftgate . . . . . . . . . . . . . . . . . . . . . . . . . . . . . . . . . . 21
Winter Driving . . . . . . . . . . . . . . . . . . . . . . . . . 135 Cargo
Cover . . . . . . . . . . . . . . . . . . . . . . . . . . . . . . . . . . . 73
Management System . . . . . . . . . . . . . . . . . . . 73
Caution, Danger, and Warning . . . . . . . . . . . . . .2
Chains, Tire . . . . . . . . . . . . . . . . . . . . . . . . . . . . . . .214
Charging System Light . . . . . . . . . . . . . . . . . . . . 83
Check Engine Light (Malfunction Indicator) . . . . 83
Child Restraints Infants and Young Children . . . . . . . . . . . . . 55
Lower Anchors and Tethers forChildren . . . . . . . . . . . . . . . . . . . . . . . . . . . . . . . 60
Older Children . . . . . . . . . . . . . . . . . . . . . . . . . . 54
Securing . . . . . . . . . . . . . . . . . . . . . . . . . . . . 67, 69
Systems . . . . . . . . . . . . . . . . . . . . . . . . . . . . . . . . 57
Circuit Breakers . . . . . . . . . . . . . . . . . . . . . . . . . . 193
Cleaning
Exterior Care . . . . . . . . . . . . . . . . . . . . . . . . . . . 226
Interior Care . . . . . . . . . . . . . . . . . . . . . . . . . . . 230
Climate Control Systems . . . . . . . . . . . . . . . . . . 125 Air Conditioning . . . . . . . . . . . . . . . . . . . . . . . 125
Heating . . . . . . . . . . . . . . . . . . . . . . . . . . . . . . . . 125
Clock . . . . . . . . . . . . . . . . . . . . . . . . . . . . . . . . . . . . . 78
Cluster, Instrument . . . . . . . . . . . . . . . . . . . . . . . 80
Collision Damage Repair . . . . . . . . . . . . . . . . . 255
Compact Spare Tire . . . . . . . . . . . . . . . . . . . . . . 220
Compartments Storage . . . . . . . . . . . . . . . . . . . . . . . . . . . . . . . . . 72