display CHEVROLET TRAX 2023 Workshop Manual
[x] Cancel search | Manufacturer: CHEVROLET, Model Year: 2023, Model line: TRAX, Model: CHEVROLET TRAX 2023Pages: 280, PDF Size: 12.13 MB
Page 157 of 280
Chevrolet TRAX Owner Manual (GMNA-Localizing-U.S./Canada-15498927) -
2022 - CRC - 5/27/21
156 Driving and Operating
If TCS is limiting wheel spin whengis
pressed, the system will not turn off until
the wheels stop spinning.
To turn off both TCS and StabiliTrak/ESC,
press and hold
guntil the Traction Off light
iand StabiliTrak/ESC Off lightgcome on
and stay on in the instrument cluster. The
appropriate message may display in the DIC.
To turn TCS and StabiliTrak/ESC on again,
press and release
g. The Traction Off light
iand StabiliTrak/ESC Off lightgin the
instrument cluster turn off.
Adding accessories can affect the vehicle
performance. See Accessories and
Modifications 0168.
Cruise Control
If equipped with cruise control, a speed of
about 40 km/h (25 mph) or more can be
maintained without keeping your foot on
the accelerator. Cruise control does not work
at speeds below 40 km/h (25 mph).
{Warning
Cruise control can be dangerous where
you cannot drive safely at a steady
speed. Do not use cruise control on
winding roads or in heavy traffic.
Cruise control can be dangerous on
slippery roads. On such roads, fast
changes in tire traction can cause
excessive wheel slip, and you could lose
control. Do not use cruise control on
slippery roads.
If the vehicle's Traction Control System (TCS)
or StabiliTrak/Electronic Stability Control
(ESC) system begins to limit wheel spin
while using cruise control, the cruise control
will automatically disengage. See Traction
Control/Electronic Stability Control 0154.
When road conditions allow you to safely
use it again, cruise control can be turned
back on.
If the brakes are applied, cruise control
disengages.
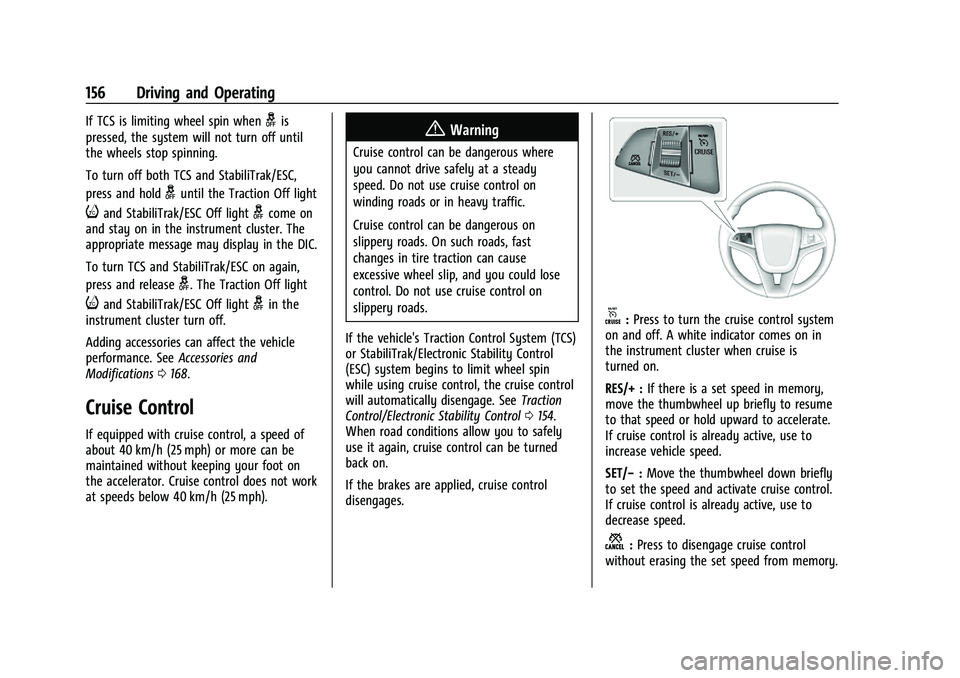
o: Press to turn the cruise control system
on and off. A white indicator comes on in
the instrument cluster when cruise is
turned on.
RES/+ : If there is a set speed in memory,
move the thumbwheel up briefly to resume
to that speed or hold upward to accelerate.
If cruise control is already active, use to
increase vehicle speed.
SET/− :Move the thumbwheel down briefly
to set the speed and activate cruise control.
If cruise control is already active, use to
decrease speed.
n: Press to disengage cruise control
without erasing the set speed from memory.
Page 158 of 280
Chevrolet TRAX Owner Manual (GMNA-Localizing-U.S./Canada-15498927) -
2022 - CRC - 5/27/21
Driving and Operating 157
Setting Cruise Control
If
ois on when not in use, SET/−or RES/+
could get bumped and go into cruise when
not desired. Keep
ooff when cruise control
is not being used.
To set cruise control:
1. Press
oto turn the cruise system on.
2. Get up to the desired speed.
3. Move the thumbwheel down to SET/− and release it.
4. Remove your foot from the accelerator.
The cruise control indicator on the
instrument cluster turns green after cruise
control has been set to the desired speed.
See Instrument Cluster 080.
Resuming a Set Speed
If the cruise control is set at a desired speed
and then the brakes are applied, the cruise
control is disengaged without erasing the
set speed from memory.
Once the vehicle reaches about 40 km/h
(25 mph) or more, move the thumbwheel up
toward RES/+ briefly. The vehicle returns to
the previous set speed. Increasing Speed While Using Cruise Control
If the cruise control system is already
activated:
.Move the thumbwheel up toward RES/+
and hold it until the desired speed is
reached, then release it.
.To increase vehicle speed in small
increments, move the thumbwheel up
toward RES/+ briefly. For each press, the
vehicle goes about 1 km/h (1 mph) faster.
The speedometer reading can be displayed
in either English or metric units. See
Instrument Cluster 080. The increment
value used depends on the units displayed.
Reducing Speed While Using Cruise Control
If the cruise control system is already
activated:
.Move the thumbwheel toward SET/− and
hold until the desired lower speed is
reached, then release it.
.To decrease the vehicle speed in small
increments, move the thumbwheel
toward SET/− briefly. For each press, the
vehicle goes about 1 km/h (1 mph) slower. The speedometer reading can be displayed
in either English or metric units. See
Instrument Cluster
080. The increment
value used depends on the units displayed.
Passing Another Vehicle While Using Cruise
Control
Use the accelerator pedal to increase the
vehicle speed. When you take your foot off
the pedal, the vehicle slows down to the
previously set cruise control speed. While
pressing the accelerator pedal or shortly
following the release to override cruise,
briefly moving the thumbwheel toward SET/
− will result in cruise set to the current
vehicle speed.
Using Cruise Control on Hills
How well cruise control works on hills
depends on the vehicle speed, load, and the
steepness of the hills. When going up steep
hills, you might have to step on the
accelerator pedal to maintain the vehicle
speed. When going downhill, you might
have to brake or shift to a lower gear to
keep your speed down. If the brake pedal is
applied, cruise control will disengage.
Page 159 of 280
Chevrolet TRAX Owner Manual (GMNA-Localizing-U.S./Canada-15498927) -
2022 - CRC - 5/27/21
158 Driving and Operating
Ending Cruise Control
There are four ways to end cruise control:
.Step lightly on the brake pedal.
.Pressn.
.Shift the transmission to N (Neutral).
.To turn off cruise control, presso.
Erasing Speed Memory
The cruise control set speed is erased from
memory if
ois pressed or if the ignition is
turned off.
Driver Assistance Systems
This vehicle may have features that work
together to help avoid crashes or reduce
crash damage while driving, backing, and
parking. Read this entire section before
using these systems.
{Warning
Do not rely on the Driver Assistance
Systems. These systems do not replace
the need for paying attention and driving
safely. You may not hear or see alerts or
warnings provided by these systems.
(Continued)
Warning (Continued)
Failure to use proper care when driving
may result in injury, death, or vehicle
damage. SeeDefensive Driving 0131.
Under many conditions, these systems
will not:
.Detect children, pedestrians, bicyclists,
or animals.
.Detect vehicles or objects outside the
area monitored by the system.
.Work at all driving speeds.
.Warn you or provide you with enough
time to avoid a crash.
.Work under poor visibility or bad
weather conditions.
.Work if the detection sensor is not
cleaned or is covered by ice, snow,
mud, or dirt.
.Work if the detection sensor is
covered up, such as with a sticker,
magnet, or metal plate.
.Work if the area surrounding the
detection sensor is damaged or not
properly repaired. (Continued)
Warning (Continued)
Complete attention is always required
while driving, and you should be ready to
take action and apply the brakes and/or
steer the vehicle to avoid crashes.
Audible Alert
Some driver assistance features alert the
driver of obstacles by beeping. To change
the volume of the warning chime, see
“Comfort and Convenience” underVehicle
Personalization 092.
Cleaning
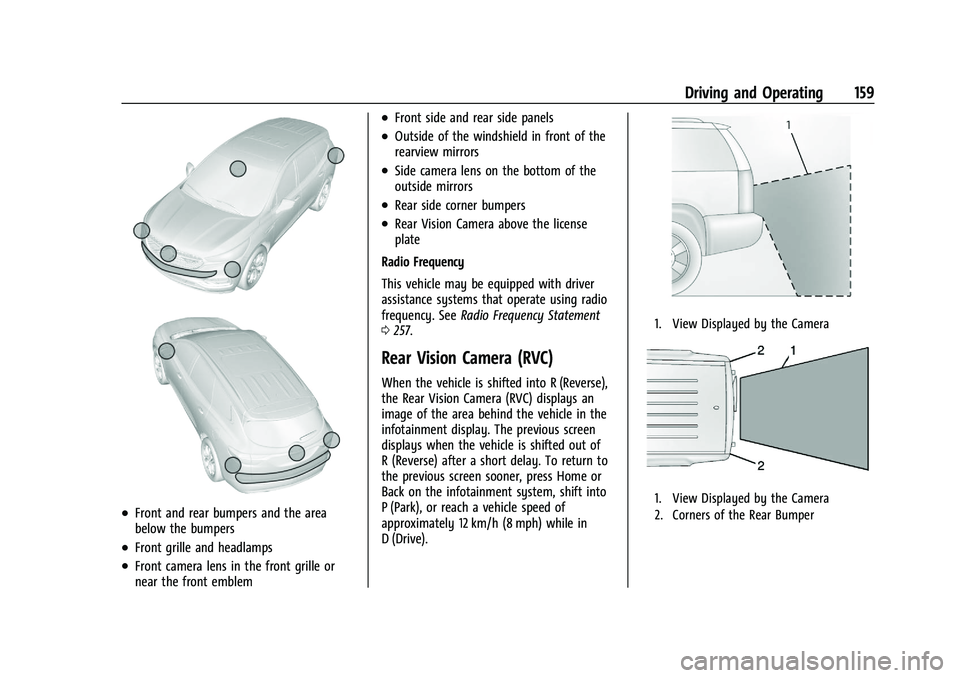
Depending on vehicle options, keep these
areas of the vehicle clean to ensure the best
driver assistance feature performance. Driver
Information Center (DIC) messages may
display when the systems are unavailable or
blocked.
Page 160 of 280
Chevrolet TRAX Owner Manual (GMNA-Localizing-U.S./Canada-15498927) -
2022 - CRC - 5/27/21
Driving and Operating 159
.Front and rear bumpers and the area
below the bumpers
.Front grille and headlamps
.Front camera lens in the front grille or
near the front emblem
.Front side and rear side panels
.Outside of the windshield in front of the
rearview mirrors
.Side camera lens on the bottom of the
outside mirrors
.Rear side corner bumpers
.Rear Vision Camera above the license
plate
Radio Frequency
This vehicle may be equipped with driver
assistance systems that operate using radio
frequency. See Radio Frequency Statement
0 257.
Rear Vision Camera (RVC)
When the vehicle is shifted into R (Reverse),
the Rear Vision Camera (RVC) displays an
image of the area behind the vehicle in the
infotainment display. The previous screen
displays when the vehicle is shifted out of
R (Reverse) after a short delay. To return to
the previous screen sooner, press Home or
Back on the infotainment system, shift into
P (Park), or reach a vehicle speed of
approximately 12 km/h (8 mph) while in
D (Drive).
1. View Displayed by the Camera
1. View Displayed by the Camera
2. Corners of the Rear Bumper
Page 161 of 280
Chevrolet TRAX Owner Manual (GMNA-Localizing-U.S./Canada-15498927) -
2022 - CRC - 5/27/21
160 Driving and Operating
Displayed images may be farther or closer
than they appear. The area displayed is
limited and objects that are close to either
corner of the bumper or under the bumper
do not display.
A warning triangle may appear on the
infotainment display to show that Rear Park
Assist (RPA) or Rear Cross Traffic Alert (RCTA)
has detected an object. This triangle changes
from amber to red and increases in size the
closer the object.
{Warning
The camera(s) do not display children,
pedestrians, bicyclists, crossing traffic,
animals, or any other object outside of
the cameras’field of view, below the
bumper, or under the vehicle. Shown
distances may be different from actual
distances. Do not drive or park the
vehicle using only these camera(s).
Always check behind and around the
vehicle before driving. Failure to use
proper care may result in injury, death,
or vehicle damage. Rear Cross Traffic Alert (RCTA)
On vehicles with RCTA, a triangle with an
arrow may display on the infotainment
display to warn of traffic coming from either
direction. This system detects objects
coming from up to 20 m (65 ft) from the left
or right side, behind the vehicle. When an
object is detected, three beeps sound from
the left or right side, depending on the
direction of the detected vehicle.
The Park Assist and RCTA symbols appear
and may cover an object when viewing the
infotainment display when an object is
detected by the RPA or RCTA system. To
turn the symbols on or off, see
Vehicle
Personalization 092.
RCTA can be turned on or off through
vehicle personalization. See “Collision
Detection Systems” underVehicle
Personalization 092.
Park Assist
If equipped, Rear Park Assist (RPA) system, it
assists you with parking and avoiding
objects while in R (Reverse). RPA operates at
speeds less than 8 km/h (5 mph), and the
sensors on the rear bumper detect objects
up to 1.5 m (5 ft) behind the vehicle, and at least 30 cm (12 in) off the ground. The
distance objects can be detected may be
less during warmer or humid weather.
{Warning
The Park Assist system does not detect
children, pedestrians, bicyclists, animals,
or objects below the bumper or that are
too close or too far from the vehicle. It is
not available at speeds greater than
8 km/h (5 mph). To prevent injury, death,
or vehicle damage, even with Park Assist,
always check the area around the vehicle
and check all mirrors before backing.
How the System Works
RPA comes on automatically when the shift
lever is moved into R (Reverse).
An obstacle is indicated by audible beeps.
The interval between the beeps becomes
shorter as the vehicle gets closer to the
obstacle. When the distance is less than
30 cm (12 in) the beeping is a continuous
tone for five seconds.
Page 162 of 280
Chevrolet TRAX Owner Manual (GMNA-Localizing-U.S./Canada-15498927) -
2022 - CRC - 5/27/21
Driving and Operating 161
Turning the System On and Off
The RPA system can be turned on and off
using the infotainment system controls. See
Vehicle Personalization092.
When the System Does Not Seem to
Work Properly
This light may come on for the following
reasons:
.The sensors are not clean. Keep the
vehicle's rear bumper free of mud, dirt,
snow, ice, and slush. For cleaning
instructions, see Exterior Care0226.
.The Park Assist sensors are covered by
frost or ice. Frost or ice can form around
and behind the sensors and may not
always be seen; this can occur after
washing the vehicle in cold weather. The
light may not clear until the frost or ice
has melted.
.An object was hanging out of the liftgate
during the last drive cycle. Once the
object is removed, RPA will return to
normal operation.
.The bumper is damaged. Take the vehicle
to your dealer to repair the system.
.Other conditions, such as vibrations from
a jackhammer or the compression of air
brakes on a very large truck, are affecting
system performance.
If the above conditions do not exist, take
the vehicle to your dealer to repair the
system.
Side Blind Zone Alert (SBZA)
If equipped, the SBZA system is a
lane-changing aid that assists drivers with
avoiding crashes that occur with moving
vehicles in the side blind zone (or spot)
areas. The SBZA warning display will light
up in the corresponding outside side mirror
and will flash if the turn signal is on.
{Warning
SBZA does not alert the driver to vehicles
rapidly approaching outside of the side
blind zones, pedestrians, bicyclists, (Continued)
Warning (Continued)
or animals. It may not provide alerts
when changing lanes under all driving
conditions. Failure to use proper care
when changing lanes may result in injury,
death, or vehicle damage. Before making
a lane change, always check mirrors,
glance over your shoulder, and use the
turn signals.
SBZA Detection Zones
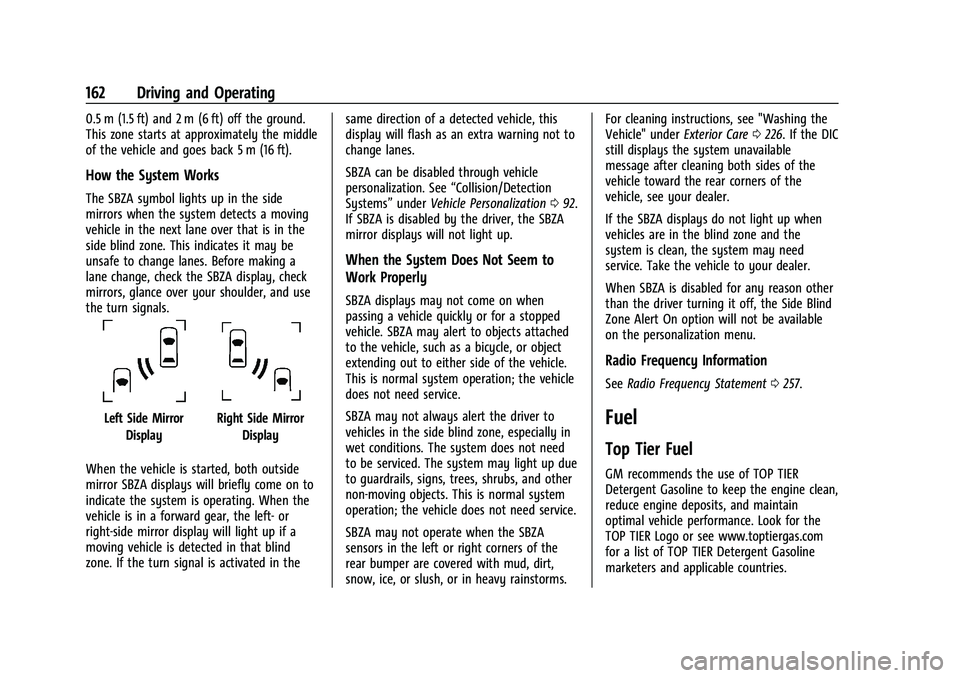
The SBZA sensor covers a zone of
approximately one lane over from both
sides of the vehicle, or 3.5 m (11 ft). The
height of the zone is approximately between
Page 163 of 280
Chevrolet TRAX Owner Manual (GMNA-Localizing-U.S./Canada-15498927) -
2022 - CRC - 5/27/21
162 Driving and Operating
0.5 m (1.5 ft) and 2 m (6 ft) off the ground.
This zone starts at approximately the middle
of the vehicle and goes back 5 m (16 ft).
How the System Works
The SBZA symbol lights up in the side
mirrors when the system detects a moving
vehicle in the next lane over that is in the
side blind zone. This indicates it may be
unsafe to change lanes. Before making a
lane change, check the SBZA display, check
mirrors, glance over your shoulder, and use
the turn signals.
Left Side MirrorDisplayRight Side Mirror Display
When the vehicle is started, both outside
mirror SBZA displays will briefly come on to
indicate the system is operating. When the
vehicle is in a forward gear, the left- or
right-side mirror display will light up if a
moving vehicle is detected in that blind
zone. If the turn signal is activated in the same direction of a detected vehicle, this
display will flash as an extra warning not to
change lanes.
SBZA can be disabled through vehicle
personalization. See
“Collision/Detection
Systems” underVehicle Personalization 092.
If SBZA is disabled by the driver, the SBZA
mirror displays will not light up.
When the System Does Not Seem to
Work Properly
SBZA displays may not come on when
passing a vehicle quickly or for a stopped
vehicle. SBZA may alert to objects attached
to the vehicle, such as a bicycle, or object
extending out to either side of the vehicle.
This is normal system operation; the vehicle
does not need service.
SBZA may not always alert the driver to
vehicles in the side blind zone, especially in
wet conditions. The system does not need
to be serviced. The system may light up due
to guardrails, signs, trees, shrubs, and other
non-moving objects. This is normal system
operation; the vehicle does not need service.
SBZA may not operate when the SBZA
sensors in the left or right corners of the
rear bumper are covered with mud, dirt,
snow, ice, or slush, or in heavy rainstorms. For cleaning instructions, see "Washing the
Vehicle" under
Exterior Care0226. If the DIC
still displays the system unavailable
message after cleaning both sides of the
vehicle toward the rear corners of the
vehicle, see your dealer.
If the SBZA displays do not light up when
vehicles are in the blind zone and the
system is clean, the system may need
service. Take the vehicle to your dealer.
When SBZA is disabled for any reason other
than the driver turning it off, the Side Blind
Zone Alert On option will not be available
on the personalization menu.
Radio Frequency Information
See Radio Frequency Statement 0257.
Fuel
Top Tier Fuel
GM recommends the use of TOP TIER
Detergent Gasoline to keep the engine clean,
reduce engine deposits, and maintain
optimal vehicle performance. Look for the
TOP TIER Logo or see www.toptiergas.com
for a list of TOP TIER Detergent Gasoline
marketers and applicable countries.
Page 173 of 280
Chevrolet TRAX Owner Manual (GMNA-Localizing-U.S./Canada-15498927) -
2022 - CRC - 5/27/21
172 Vehicle Care
1.Engine Air Cleaner/Filter 0175.
2. Engine Oil Fill Cap. See Engine Oil0172.
3. Engine Oil Dipstick. See Engine Oil0172.
4. Engine Cooling Fan (Out of View). See Cooling System 0176.
5. Engine Coolant Surge Tank and Pressure Cap. See Cooling System 0176.
6. Brake Fluid Reservoir. See Brakes0180.
7. Auxiliary Fuse Block. See Engine
Compartment Fuse Block 0193.
8. Battery - North America 0182.
9. Windshield Washer Fluid Reservoir. See Washer Fluid 0180.
10. Engine Compartment Fuse Block 0193.
Engine Oil
To ensure proper engine performance and
long life, careful attention must be paid to
engine oil. Following these simple, but
important steps will help protect your
investment:
.Use engine oil approved to the proper
specification and of the proper viscosity
grade. See “Selecting the Right Engine
Oil” in this section.
.Check the engine oil level regularly and
maintain the proper oil level. See
“Checking Engine Oil” and“When to Add
Engine Oil” in this section.
.Change the engine oil at the appropriate
time. SeeEngine Oil Life System 0174.
.Always dispose of engine oil properly. See
“What to Do with Used Oil” in this
section.
Checking Engine Oil
Check the engine oil level regularly, every
650 km (400 mi), especially prior to a long
trip. The engine oil dipstick handle is a loop.
See Engine Compartment Overview 0171 for
the location.
{Warning
The engine oil dipstick handle may be
hot; it could burn you. Use a towel or
glove to touch the dipstick handle.
If a low oil Driver Information Center (DIC)
message displays, check the oil level.
Follow these guidelines:
.To get an accurate reading, park the
vehicle on level ground. Check the engine
oil level after the engine has been off for
at least two hours. Checking the engine oil level on steep grades or too soon after
engine shutoff can result in incorrect
readings. Accuracy improves when
checking a cold engine prior to starting.
Remove the dipstick and check the level.
.If unable to wait two hours, the engine
must be off for at least 15 minutes if the
engine is warm, or at least 30 minutes if
the engine is not warm. Pull out the
dipstick, wipe it with a clean paper towel
or cloth, then push it back in all the way.
Remove it again, keeping the tip down,
and check the level.
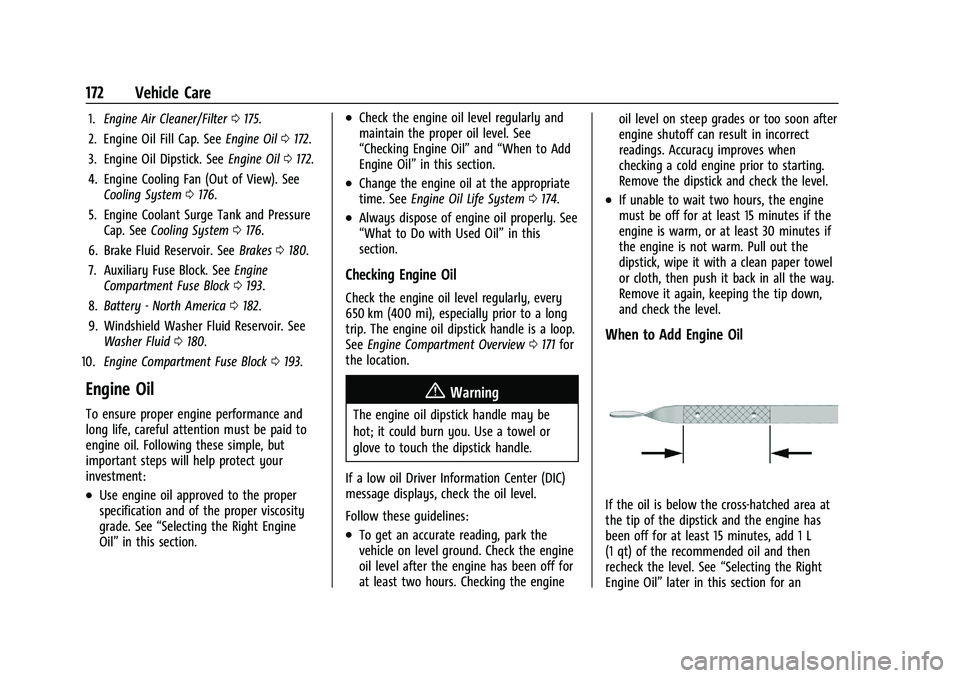
When to Add Engine Oil
If the oil is below the cross-hatched area at
the tip of the dipstick and the engine has
been off for at least 15 minutes, add 1 L
(1 qt) of the recommended oil and then
recheck the level. See
“Selecting the Right
Engine Oil” later in this section for an
Page 175 of 280
Chevrolet TRAX Owner Manual (GMNA-Localizing-U.S./Canada-15498927) -
2022 - CRC - 5/27/21
174 Vehicle Care
Engine Oil Life System
When to Change Engine Oil
This vehicle has a computer system that
indicates when to change the engine oil and
filter. This is based on a combination of
factors which include engine revolutions,
engine temperature, and miles driven. Based
on driving conditions, the mileage at which
an oil change is indicated can vary
considerably. For the oil life system to work
properly, the system must be reset every
time the oil is changed.
When the system has calculated that oil life
has been diminished, it indicates that an oil
change is necessary. A CHANGE ENGINE OIL
SOON DIC message comes on. Change the
oil as soon as possible within the next
1 000 km (600 mi). It is possible that,
if driving under the best conditions, the oil
life system might indicate that an oil change
is not necessary for up to a year. The
engine oil and filter must be changed at
least once a year and, at this time, the
system must be reset. Your dealer has
trained service people who will perform this
work and reset the system. It is alsoimportant to check the oil regularly over the
course of an oil drain interval and keep it at
the proper level.
If the system is ever reset accidentally, the
oil must be changed at 5 000 km (3,000 mi)
since the last oil change. Remember to reset
the oil life system whenever the oil is
changed.
How to Reset the Engine Oil Life System
Reset the system whenever the engine oil is
changed so that the system can calculate
the next engine oil change. To reset the
system:
1. Press the MENU button to show Remaining Oil Life on the display. This
display shows an estimate of the oil’s
remaining useful life. If 99% is displayed,
that means that 99% of the current oil
life remains.
2. To reset the engine oil life system, press the SET/CLR button while the oil life
display is active. After a few seconds,
there will be a single chime and the oil
life will be reset to 100%.
Be careful not to reset the oil life display
accidentally at any time other than after the
oil is changed. It cannot be reset accurately. If the CHANGE ENGINE OIL SOON DIC
message comes back on when the vehicle is
started, the engine oil life system has not
reset. Repeat the procedure.
Automatic Transmission Fluid
How to Check Automatic Transmission
Fluid
It is not necessary to check the transmission
fluid level. A transmission fluid leak is the
only reason for fluid loss. If a leak occurs,
take the vehicle to your dealer and have it
repaired as soon as possible.
There is a special procedure for checking and
changing the transmission fluid. Because this
procedure is difficult, you should have this
done at your dealer.
Caution
Use of the incorrect automatic
transmission fluid may damage the
vehicle, and the damage may not be
covered by the vehicle warranty. Always
use the correct automatic transmission
fluid. See
Recommended Fluids and
Lubricants 0243.
Page 180 of 280
Chevrolet TRAX Owner Manual (GMNA-Localizing-U.S./Canada-15498927) -
2022 - CRC - 5/27/21
Vehicle Care 179
6. Verify coolant level after the engine isshut off and the coolant is cold.
If necessary, repeat coolant fill procedure
Steps 1–6.
If the coolant still is not at the proper level
when the system cools down again, see
your dealer.
Caution
If the pressure cap is not tightly installed,
coolant loss and engine damage may
occur. Be sure the cap is properly and
tightly secured.
Engine Overheating
The vehicle has an indicator to warn of the
engine overheating. See Engine Coolant
Temperature Warning Light 087.
If the decision is made not to lift the hood
when this warning appears, get service help
right away. See Roadside Assistance Program
0 253.
If the decision is made to lift the hood,
make sure the vehicle is parked on a level
surface. Then check to see if the engine cooling fan
is running. If the engine is overheating, the
fan should be running. If it is not, do not
continue to run the engine. Have the vehicle
serviced.
Caution
Do not run the engine if there is a leak
in the engine cooling system. This can
cause a loss of all coolant and can
damage the system and vehicle. Have
any leaks fixed right away.
If Steam Is Coming from the Engine
Compartment
{Warning
Steam and scalding liquids from a hot
cooling system are under pressure.
Turning the pressure cap, even a little,
can cause them to come out at high
speed and you could be burned. Never
turn the cap when the cooling system,
including the pressure cap, is hot. Wait
for the cooling system and pressure cap
to cool.
If No Steam Is Coming from the Engine
Compartment
If an engine overheat warning is displayed
but no steam can be seen or heard, the
problem may not be too serious. Sometimes
the engine can get a little too hot when the
vehicle:
.Climbs a long hill on a hot day
.Stops after high-speed driving
.Idles for long periods in traffic
If the overheat warning is displayed with no
sign of steam: 1. Turn the air conditioning off.
2. Turn the heater on to the highest temperature and to the highest fan
speed. Open the windows as necessary.
3. When it is safe to do so, pull off the road, shift to P (Park) or N (Neutral) for
an automatic transmission and let the
engine idle.
If the overheat warning no longer displays,
the vehicle can be driven. Continue to drive
the vehicle slowly for about 10 minutes.
Keep a safe vehicle distance from the vehicle
in front. If the warning does not come back