fuel pressure CHEVROLET TRAX 2023 Owners Manual
[x] Cancel search | Manufacturer: CHEVROLET, Model Year: 2023, Model line: TRAX, Model: CHEVROLET TRAX 2023Pages: 280, PDF Size: 12.13 MB
Page 76 of 280
Chevrolet TRAX Owner Manual (GMNA-Localizing-U.S./Canada-15498927) -
2022 - CRC - 5/27/21
Instruments and Controls 75
Instruments and Controls
Controls
Steering Wheel Adjustment . . . . . . . . . . . . . 75
Steering Wheel Controls . . . . . . . . . . . . . . . . 76
Horn . . . . . . . . . . . . . . . . . . . . . . . . . . . . . . . . . . . 76
Windshield Wiper/Washer . . . . . . . . . . . . . . 76
Rear Window Wiper/Washer . . . . . . . . . . . 77
Compass . . . . . . . . . . . . . . . . . . . . . . . . . . . . . . . . 78
Clock . . . . . . . . . . . . . . . . . . . . . . . . . . . . . . . . . . . 78
Power Outlets . . . . . . . . . . . . . . . . . . . . . . . . . . 78
Warning Lights, Gauges, and Indicators
Warning Lights, Gauges, andIndicators . . . . . . . . . . . . . . . . . . . . . . . . . . . . . 79
Instrument Cluster . . . . . . . . . . . . . . . . . . . . . 80
Speedometer . . . . . . . . . . . . . . . . . . . . . . . . . . . 80
Odometer . . . . . . . . . . . . . . . . . . . . . . . . . . . . . . 80
Trip Odometer . . . . . . . . . . . . . . . . . . . . . . . . . 80
Tachometer . . . . . . . . . . . . . . . . . . . . . . . . . . . . 80
Fuel Gauge . . . . . . . . . . . . . . . . . . . . . . . . . . . . . 81
Seat Belt Reminders . . . . . . . . . . . . . . . . . . . . 81
Airbag Readiness Light . . . . . . . . . . . . . . . . . 82
Passenger Airbag Status Indicator . . . . . . 82
Charging System Light . . . . . . . . . . . . . . . . . 83
Malfunction Indicator Lamp (Check Engine Light) . . . . . . . . . . . . . . . . . . . . . . . . . 83
Service Vehicle Soon Light . . . . . . . . . . . . . . 85
Owner Manual Indicator . . . . . . . . . . . . . . . . 85
Brake System Warning Light . . . . . . . . . . . 85 Antilock Brake System (ABS) Warning
Light . . . . . . . . . . . . . . . . . . . . . . . . . . . . . . . . . . 85
Power Steering Warning Light . . . . . . . . . . 86
Ultrasonic Parking Sensor Light . . . . . . . . . 86
Traction Off Light . . . . . . . . . . . . . . . . . . . . . . 86
StabiliTrak OFF Light . . . . . . . . . . . . . . . . . . . 86
Traction Control System (TCS)/StabiliTrak Light . . . . . . . . . . . . . . . . . . . . . . . . . . . . . . . . . . 87
Engine Coolant Temperature Warning Light . . . . . . . . . . . . . . . . . . . . . . . . . . . . . . . . . . 87
Tire Pressure Light . . . . . . . . . . . . . . . . . . . . . . 87
Engine Oil Pressure Light . . . . . . . . . . . . . . . 88
Low Fuel Warning Light . . . . . . . . . . . . . . . . 88
Immobilizer Light . . . . . . . . . . . . . . . . . . . . . . . 88
Reduced Engine Power Light . . . . . . . . . . . 89
High-Beam On Light . . . . . . . . . . . . . . . . . . . . 89
Lamps On Reminder . . . . . . . . . . . . . . . . . . . . 89
Cruise Control Light . . . . . . . . . . . . . . . . . . . . 89
Door Ajar Light . . . . . . . . . . . . . . . . . . . . . . . . . 89
Information Displays
Driver Information Center (DIC) . . . . . . . . 90
Vehicle Messages
Vehicle Messages . . . . . . . . . . . . . . . . . . . . . . . 92
Engine Power Messages . . . . . . . . . . . . . . . . 92
Vehicle Speed Messages . . . . . . . . . . . . . . . . 92
Vehicle Personalization
Vehicle Personalization . . . . . . . . . . . . . . . . . 92
Controls
Steering Wheel Adjustment
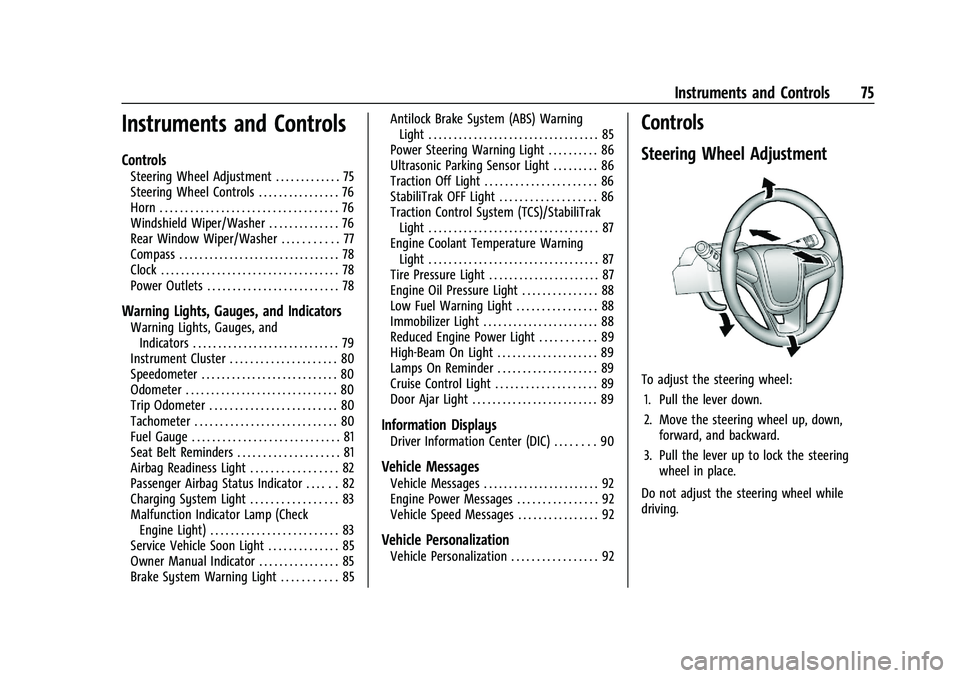
To adjust the steering wheel:
1. Pull the lever down.
2. Move the steering wheel up, down, forward, and backward.
3. Pull the lever up to lock the steering wheel in place.
Do not adjust the steering wheel while
driving.
Page 89 of 280
Chevrolet TRAX Owner Manual (GMNA-Localizing-U.S./Canada-15498927) -
2022 - CRC - 5/27/21
88 Instruments and Controls
When the Light Is On Steady
This indicates that one or more of the tires
are significantly underinflated.
A Driver Information Center (DIC) tire
pressure message may also display. Stop as
soon as possible, and inflate the tires to the
pressure value shown on the Tire and
Loading Information label. SeeTire Pressure
0 205.
When the Light Flashes First and Then Is On
Steady
If the light flashes for about a minute and
then stays on, there may be a problem with
the TPMS. If the problem is not corrected,
the light will come on at every ignition
cycle. See Tire Pressure Monitor Operation
0 206.
Engine Oil Pressure Light
Caution
Lack of proper engine oil maintenance
can damage the engine. Driving with the
engine oil low can also damage the
engine. The repairs would not be covered
by the vehicle warranty. Check the oil
level as soon as possible. Add oil if
(Continued)
Caution (Continued)
required, but if the oil level is within the
operating range and the oil pressure is
still low, have the vehicle serviced.
Always follow the maintenance schedule
for changing engine oil.
This light should come on briefly as the
engine is started. If it does not come on,
have the vehicle serviced by your dealer.
If the light comes on and stays on, it means
that oil is not flowing through the engine
properly. The vehicle could be low on oil
and might have some other system
problem. See your dealer.
Low Fuel Warning Light
A Low Fuel Warning Light near the fuel
gauge comes on briefly when the ignition is
turned on as a check to show it is working.
It also comes on when the fuel gauge
indicator nears empty. The light turns off
when fuel is added. If it does not, have the
vehicle serviced.
Immobilizer Light
The immobilizer light should come on briefly
as the engine is started. If it does not come
on, have the vehicle serviced by your dealer.
If the system is working normally, the
indicator light turns off.
Page 92 of 280
Chevrolet TRAX Owner Manual (GMNA-Localizing-U.S./Canada-15498927) -
2022 - CRC - 5/27/21
Instruments and Controls 91
Average Fuel Economy
This display shows the approximate average
liters per 100 kilometers (L/100 km) or miles
per gallon (mpg). This number is calculated
based on the number of L/100 km (mpg)
recorded since the last time this menu item
was reset. This number reflects only the
approximate average fuel economy that the
vehicle has right now, and will change as
driving conditions change. The fuel economy
can be reset by pressing SET/CLR while the
Average Fuel Economy display is showing.
Average Vehicle Speed
This display shows the average speed of the
vehicle in kilometers per hour (km/h) or
miles per hour (mph). This average is
calculated based on the various vehicle
speeds recorded since the last reset of this
value. The average speed can be reset by
pressing SET/CLR while the Average Vehicle
Speed display is showing.
Timer
Available on some vehicles, this display can
be used as a timer. To start the timer, press
SET/CLR while Timer is displayed. The
display will show the amount of time that
has passed since the timer was last reset,
not including time the ignition is off. Timewill continue to be counted as long as the
ignition is on, even if another display is
being shown on the DIC. The timer will
record up to 99 hours, 59 minutes, and
59 seconds (99:59:59) after which the
display will return to zero. To stop the
timer, press SET/CLR briefly while Timer is
displayed. To reset the timer to zero, press
and hold SET/CLR.
Vehicle Information Menu Items
Press MENU on the turn signal lever until
Vehicle Information menu is displayed. Use
w/xto scroll through the following
possible menu items:
.Display Units
.Tire Pressure
.Remaining Oil Life
Display Units
Move
w/xto switch between metric or
US when the Unit display is active. Press
SET/CLR to confirm the setting. This will
change the displays on the cluster and DIC
to either metric or English (US)
measurements. Tire Pressure
The display will show a vehicle with the
approximate pressures of all four tires. Tire
pressure is displayed in either
kilopascal (kPa) or pounds per square
inch (psi). See
Tire Pressure Monitor System
0 206 and
Tire Pressure Monitor Operation 0206.
Remaining Oil Life
This menu is not available while the vehicle
is moving. This display shows an estimate of
the oil's remaining useful life. If REMAINING
OIL LIFE 99 % is displayed, that means 99%
of the current oil life remains.
When the remaining oil life is low, the
CHANGE ENGINE OIL SOON message will
appear on the display. The oil should
changed as soon as possible. See Engine Oil
0 172. In addition to the engine oil life
system monitoring the oil life, additional
maintenance is recommended. See
Maintenance Schedule 0235.
Remember, the Oil Life display must be
reset after each oil change. It will not reset
itself. Also, be careful not to reset the Oil
Life display accidentally at any time other
than when the oil has just been changed.
Page 140 of 280
Chevrolet TRAX Owner Manual (GMNA-Localizing-U.S./Canada-15498927) -
2022 - CRC - 5/27/21
Driving and Operating 139
Certification/Tire Label
Label Example
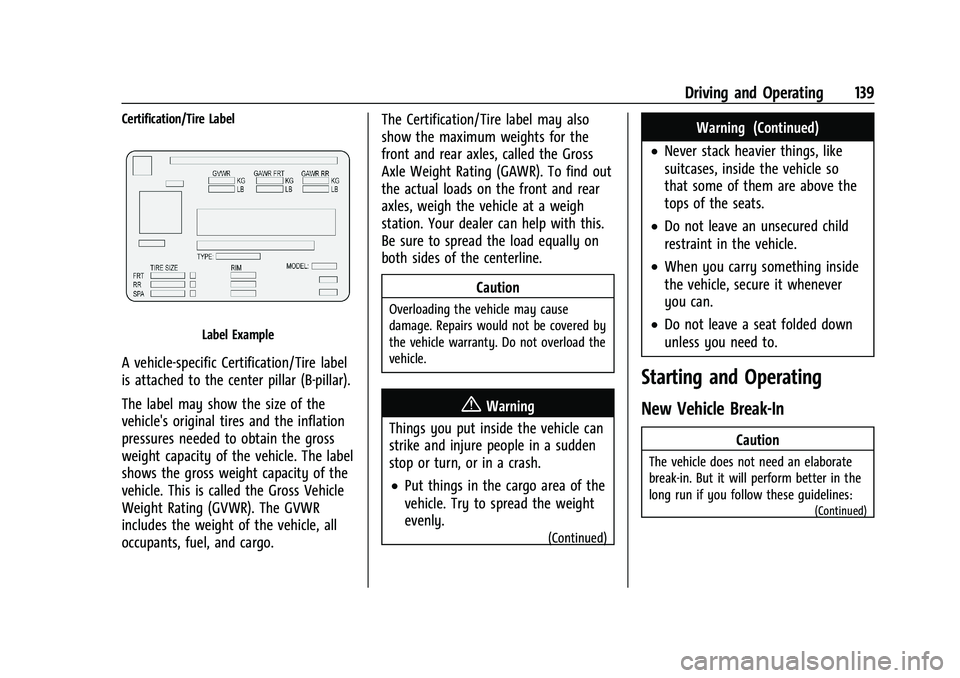
A vehicle-specific Certification/Tire label
is attached to the center pillar (B-pillar).
The label may show the size of the
vehicle's original tires and the inflation
pressures needed to obtain the gross
weight capacity of the vehicle. The label
shows the gross weight capacity of the
vehicle. This is called the Gross Vehicle
Weight Rating (GVWR). The GVWR
includes the weight of the vehicle, all
occupants, fuel, and cargo.The Certification/Tire label may also
show the maximum weights for the
front and rear axles, called the Gross
Axle Weight Rating (GAWR). To find out
the actual loads on the front and rear
axles, weigh the vehicle at a weigh
station. Your dealer can help with this.
Be sure to spread the load equally on
both sides of the centerline.
Caution
Overloading the vehicle may cause
damage. Repairs would not be covered by
the vehicle warranty. Do not overload the
vehicle.
{Warning
Things you put inside the vehicle can
strike and injure people in a sudden
stop or turn, or in a crash.
.Put things in the cargo area of the
vehicle. Try to spread the weight
evenly.
(Continued)
Warning (Continued)
.Never stack heavier things, like
suitcases, inside the vehicle so
that some of them are above the
tops of the seats.
.Do not leave an unsecured child
restraint in the vehicle.
.When you carry something inside
the vehicle, secure it whenever
you can.
.Do not leave a seat folded down
unless you need to.
Starting and Operating
New Vehicle Break-In
Caution
The vehicle does not need an elaborate
break-in. But it will perform better in the
long run if you follow these guidelines:
(Continued)
Page 204 of 280
Chevrolet TRAX Owner Manual (GMNA-Localizing-U.S./Canada-15498927) -
2022 - CRC - 5/27/21
Vehicle Care 203
tire is certified to carry. The speed
rating is the maximum speed a tire is
certified to carry a load.
Tire Terminology and Definitions
Air Pressure:The amount of air inside
the tire pressing outward on each
square inch of the tire. Air pressure is
expressed in kPa (kilopascal) or psi
(pounds per square inch).
Accessory Weight
:The combined
weight of optional accessories. Some
examples of optional accessories are
automatic transmission, power
windows, power seats, and air
conditioning.
Aspect Ratio
:The relationship of a
tire's height to its width.
Belt
:A rubber coated layer of cords
between the plies and the tread. Cords
may be made from steel or other
reinforcing materials.
Bead
:The tire bead contains steel
wires wrapped by steel cords that hold
the tire onto the rim. Bias Ply Tire
:A pneumatic tire in which
the plies are laid at alternate angles
less than 90 degrees to the centerline
of the tread.
Cold Tire Pressure
:The amount of air
pressure in a tire, measured in kPa
(kilopascal) or psi (pounds per square
inch) before a tire has built up heat
from driving. See Tire Pressure0205.
Curb Weight
:The weight of a motor
vehicle with standard and optional
equipment including the maximum
capacity of fuel, oil, and coolant, but
without passengers and cargo.
DOT Markings
:A code molded into the
sidewall of a tire signifying that the tire
is in compliance with the U.S.
Department of Transportation (DOT)
Motor Vehicle Safety Standards. The
DOT code includes the Tire Identification
Number (TIN), an alphanumeric
designator which can also identify the
tire manufacturer, production plant,
brand, and date of production.
GVWR
:Gross Vehicle Weight Rating.
See Vehicle Load Limits 0136. GAWR FRT
:Gross Axle Weight Rating
for the front axle. See Vehicle Load
Limits 0136.
GAWR RR
:Gross Axle Weight Rating
for the rear axle. See Vehicle Load
Limits 0136.
Intended Outboard Sidewall
:The side
of an asymmetrical tire that must
always face outward when mounted on
a vehicle.
Kilopascal (kPa)
:The metric unit for air
pressure.
Light Truck (LT-Metric) Tire
:A tire used
on light duty trucks and some
multipurpose passenger vehicles.
Load Index
:An assigned number
ranging from 1 to 279 that corresponds
to the load carrying capacity of a tire.
Maximum Inflation Pressure
:The
maximum air pressure to which a cold
tire can be inflated. The maximum air
pressure is molded onto the sidewall.
Maximum Load Rating
:The load rating
for a tire at the maximum permissible
inflation pressure for that tire.
Page 206 of 280
Chevrolet TRAX Owner Manual (GMNA-Localizing-U.S./Canada-15498927) -
2022 - CRC - 5/27/21
Vehicle Care 205
equipment tire size and recommended
inflation pressure. See“Tire and Loading
Information Label” underVehicle Load
Limits 0136.
Tire Pressure
Tires need the correct amount of air
pressure to operate effectively.
{Warning
Neither tire underinflation nor
overinflation is good. Underinflated
tires, or tires that do not have
enough air, can result in:
.Tire overloading and overheating,
which could lead to a blowout.
.Premature or irregular wear.
.Poor handling.
.Reduced fuel economy.
Overinflated tires, or tires that have
too much air, can result in:
.Unusual wear.
.Poor handling.
(Continued)
Warning (Continued)
.Rough ride.
.Needless damage from road
hazards.
The Tire and Loading Information label
on the vehicle indicates the original
equipment tires and the correct cold
tire inflation pressures. The
recommended pressure is the minimum
air pressure needed to support the
vehicle's maximum load carrying
capacity. See Vehicle Load Limits 0136.
How the vehicle is loaded affects
vehicle handling and ride comfort.
Never load the vehicle with more
weight than it was designed to carry.
When to Check
Check the pressure of the tires once a
month or more. Do not forget the
compact spare, if the vehicle has one.
The compact spare cold tire pressure
should be at 420 kPa (60 psi). See
Compact Spare Tire 0220. How to Check
Use a good quality pocket-type gauge
to check tire pressure. Proper tire
inflation cannot be determined by
looking at the tire. Check the tire
inflation pressure when the tires are
cold, meaning the vehicle has not been
driven for at least three hours or no
more than 1.6 km (1 mi).
Remove the valve cap from the tire
valve stem. Press the tire gauge firmly
onto the valve to get a pressure
measurement. If the cold tire inflation
pressure matches the recommended
pressure on the Tire and Loading
Information label, no further adjustment
is necessary. If the inflation pressure is
low, add air until the recommended
pressure is reached. If the inflation
pressure is high, press on the metal
stem in the center of the tire valve to
release air.
Recheck the tire pressure with the tire
gauge.
Page 207 of 280
Chevrolet TRAX Owner Manual (GMNA-Localizing-U.S./Canada-15498927) -
2022 - CRC - 5/27/21
206 Vehicle Care
Put the valve caps back on the valve
stems to keep out dirt and moisture.
Use only valve caps designed for the
vehicle by GM. TPMS sensors could be
damaged and would not be covered by
the vehicle warranty.
Tire Pressure Monitor System
The Tire Pressure Monitor System (TPMS)
uses radio and sensor technology to check
tire pressure levels. The TPMS sensors
monitor the air pressure in your tires and
transmit tire pressure readings to a receiver
located in the vehicle.
Each tire, including the spare (if provided),
should be checked monthly when cold and
inflated to the inflation pressure
recommended by the vehicle manufacturer
on the vehicle placard or tire inflation
pressure label. (If your vehicle has tires of a
different size than the size indicated on the
vehicle placard or tire inflation pressure
label, you should determine the proper tire
inflation pressure for those tires.)As an added safety feature, your vehicle has
been equipped with a tire pressure
monitoring system (TPMS) that illuminates a
low tire pressure telltale when one or more
of your tires is significantly under-inflated.
Accordingly, when the low tire pressure
telltale illuminates, you should stop and
check your tires as soon as possible, and
inflate them to the proper pressure. Driving
on a significantly under-inflated tire causes
the tire to overheat and can lead to tire
failure. Under-inflation also reduces fuel
efficiency and tire tread life, and may affect
the vehicle's handling and stopping ability.
Please note that the TPMS is not a
substitute for proper tire maintenance, and
it is the driver's responsibility to maintain
correct tire pressure, even if under-inflation
has not reached the level to trigger
illumination of the TPMS low tire pressure
telltale.
Your vehicle has also been equipped with a
TPMS malfunction indicator to indicate when
the system is not operating properly. The
TPMS malfunction indicator is combined
with the low tire pressure telltale. When the
system detects a malfunction, the telltale
will flash for approximately one minute and
then remain continuously illuminated. Thissequence will continue upon subsequent
vehicle start-ups as long as the malfunction
exists.
When the malfunction indicator is
illuminated, the system may not be able to
detect or signal low tire pressure as
intended. TPMS malfunctions may occur for
a variety of reasons, including the
installation of replacement or alternate tires
or wheels on the vehicle that prevent the
TPMS from functioning properly. Always
check the TPMS malfunction telltale after
replacing one or more tires or wheels on
your vehicle to ensure that the replacement
or alternate tires and wheels allow the
TPMS to continue to function properly.
See
Tire Pressure Monitor Operation 0206.
See Radio Frequency Statement 0257.
Tire Pressure Monitor Operation
This vehicle may have a Tire Pressure
Monitor System (TPMS). The TPMS is
designed to warn the driver when a low tire
pressure condition exists. TPMS sensors are
mounted onto each tire and wheel
assembly, excluding the spare tire and
wheel assembly. The TPMS sensors monitor
Page 230 of 280
Chevrolet TRAX Owner Manual (GMNA-Localizing-U.S./Canada-15498927) -
2022 - CRC - 5/27/21
Vehicle Care 229
Caution (Continued)
tire dressing, always wipe off any
overspray from all painted surfaces on
the vehicle.
Wheels and Wheel Trim
Use a soft, clean cloth with mild soap and
water to clean the wheels. After rinsing
thoroughly with clean water, dry with a
soft, clean towel. A wax may then be
applied.
Caution
Chrome wheels and chrome wheel trim
may be damaged if the vehicle is not
washed after driving on roads that have
been sprayed with magnesium chloride or
calcium chloride. These are used on roads
for conditions such as dust and ice.
Always wash the chrome with soap and
water after exposure.
Caution
To avoid surface damage on wheels and
wheel trim, do not use strong soaps,
chemicals, abrasive polishes, cleaners,
(Continued)
Caution (Continued)
or brushes. Use only GM approved
cleaners. Do not drive the vehicle through
an automatic car wash that uses silicon
carbide tire/wheel cleaning brushes.
Damage could occur and the repairs
would not be covered by the vehicle
warranty.
Brake System
Visually inspect brake lines and hoses for
proper hook-up, binding, leaks, cracks,
chafing, etc. Inspect disc brake pads for wear
and rotors for surface condition. Inspect
drum brake linings/shoes for wear or cracks.
Inspect all other brake parts.
Steering, Suspension, and Chassis
Components
Visually inspect steering, suspension, and
chassis components for damaged, loose,
or missing parts or signs of wear at least
once a year.
Inspect power steering for proper
attachment, connections, binding, leaks,
cracks, chafing, etc.Visually check constant velocity joint boots
and axle seals for leaks.
Body Component Lubrication
Lubricate all key lock cylinders, hood hinges,
liftgate hinges, and the steel fuel door
hinges, unless the components are plastic.
Applying silicone grease on weatherstrips
with a clean cloth will make them last
longer, seal better, and not stick or squeak.
Underbody Maintenance
At least twice a year, spring and fall, use
plain water to flush any corrosive materials
from the underbody. Take care to
thoroughly clean any areas where mud and
other debris can collect.
Do not directly power wash the transfer
case and/or front/rear axle output seals.
High pressure water can overcome the seals
and contaminate the fluid. Contaminated
fluid will decrease the life of the transfer
case and/or axles and should be replaced.
Sheet Metal Damage
If the vehicle is damaged and requires sheet
metal repair or replacement, make sure the
body repair shop applies anti-corrosion
material to parts repaired or replaced to
restore corrosion protection.
Page 236 of 280
Chevrolet TRAX Owner Manual (GMNA-Localizing-U.S./Canada-15498927) -
2022 - CRC - 5/27/21
Service and Maintenance 235
Because of the way people use vehicles,
maintenance needs vary. There may need to
be more frequent checks and services. The
Additional Required Services - Normal are for
vehicles that:
.Carry passengers and cargo within
recommended limits on the Tire and
Loading Information label. SeeVehicle
Load Limits 0136.
.Are driven on reasonable road surfaces
within legal driving limits.
.Use the recommended fuel. See
Recommended Fuel 0163.
Refer to the information in the Maintenance
Schedule Additional Required Services -
Normal chart.
The Additional Required Services - Severe are
for vehicles that are:
.Mainly driven in heavy city traffic in hot
weather.
.Mainly driven in hilly or mountainous
terrain.
.Frequently towing a trailer.
.Used for high speed or competitive
driving.
.Used for taxi, police, or delivery service. Refer to the information in the Maintenance
Schedule Additional Required Services -
Severe chart.
{Warning
Performing maintenance work can be
dangerous and can cause serious injury.
Perform maintenance work only if the
required information, proper tools, and
equipment are available. If they are not,
see your dealer to have a trained
technician do the work. See
Doing Your
Own Service Work 0168.
Maintenance Schedule
Owner Checks and Services
Check the engine oil level. See Engine Oil
0 172.
Once a Month
.Check the tire inflation pressures. See Tire
Pressure 0205.
.Inspect the tires for wear. See Tire
Inspection 0209.
.Check the windshield washer fluid level.
See Washer Fluid 0180.
Engine Oil Change
When the CHANGE ENGINE OIL SOON DIC
message displays, have the engine oil and
filter changed within the next 1 000 km/
600 mi. If driven under the best conditions,
the engine oil life system may not indicate
the need for vehicle service for up to a year.
The engine oil and filter must be changed at
least once a year and the oil life system
must be reset. Your trained dealer technician
can perform this work. If the engine oil life
system is reset accidentally, service the
vehicle within 5 000 km/3,000 mi since the
last service. Reset the oil life system when
the oil is changed. See Engine Oil Life
System 0174.
Air Conditioning Desiccant (Replace Every
Seven Years)
The air conditioning system requires
maintenance every seven years. This service
requires replacement of the desiccant to
help the longevity and efficient operation of
the air conditioning system. This service can
be complex. See your dealer.
Page 237 of 280
Chevrolet TRAX Owner Manual (GMNA-Localizing-U.S./Canada-15498927) -
2022 - CRC - 5/27/21
236 Service and Maintenance
Tire Rotation and Required Services
Every 12 000 km/7,500 mi
Rotate the tires, if recommended for the
vehicle, and perform the following services.
SeeTire Rotation 0209.
.Check engine oil level and oil
life percentage. If needed, change engine
oil and filter, and reset oil life system.
See Engine Oil 0172 and
Engine Oil Life System 0174.
.Inspect the engine air cleaner filter. See
Engine Air Cleaner/Filter 0175.
.Check engine coolant level. See Cooling
System 0176.
.Check windshield washer fluid level. See
Washer Fluid 0180.
.Check tire inflation pressures. See Tire
Pressure 0205.
.Inspect tire wear. See Tire Inspection
0 209.
.Visually check for fluid leaks.
.Inspect brake system. See Exterior Care
0 226.
.Visually inspect steering, suspension, and
chassis components for damage, including
cracks or tears in the rubber boots, loose
or missing parts, or signs of wear at least
once a year. See Exterior Care0226.
.Inspect power steering for proper
attachment, connections, binding, leaks,
cracks, chafing, etc.
.Visually inspect halfshafts and drive
shafts for excessive wear, lubricant leaks,
and/or damage including: tube dents or
cracks, constant velocity joint or universal
joint looseness, cracked or missing boots,
loose or missing boot clamps, center
bearing excessive looseness, loose or
missing fasteners, and axle seal leaks.
.Check restraint system components. See
Safety System Check 043.
.Visually inspect the fuel system including
the evaporative (EVAP) system for
damage or leaks. Visually check all fuel
pipes, vapor lines, and hoses for proper
attachment, connection, routing, and
condition.
.Visually inspect exhaust system and
nearby heat shields for loose or damaged
parts.
.Lubricate body components. See Exterior
Care 0226.
.Check automatic transmission shift lock
control function. See Automatic
Transmission Shift Lock Control Function
Check 0183.
.Check parking brake and automatic
transmission park mechanism. See Park
Brake and P (Park) Mechanism Check
0 183.
.Check accelerator pedal for damage, high
effort, or binding. Replace if needed.
.Visually inspect gas strut for signs of
wear, cracks, or other damage. Check the
hold open ability of the strut. If the hold
open is low, service the gas strut. See Gas
Strut(s) 0185.