turn CHEVROLET TRAX 2024 Owners Manual
[x] Cancel search | Manufacturer: CHEVROLET, Model Year: 2024, Model line: TRAX, Model: CHEVROLET TRAX 2024Pages: 328, PDF Size: 7.3 MB
Page 264 of 328

Chevrolet TRAX Owner Manual (GMNA-Localizing-U.S./Canada/Mexico-
17041293) - 2024 - CRC - 12/6/22
Vehicle Care 263
4. Attach the air only hose (10) to thesealant canister inlet valve (1) by turning
it clockwise until tight.
5. Slide the base of the tire sealantcanister (3) into the slot on the top of
the compressor (6) to hold it upright.
Make sure the tire valve stem is
positioned close to the ground so the
hose will reach it.
6. Remove the valve stem cap from the flat tire by turning it counterclockwise.
7. Attach the sealant/air hose (2) to the tirevalve stem by turning it clockwise until
tight.
8. Plug the power plug (9) into the accessory power outlet in the vehicle.
Unplug all items from other accessory
power outlets. See Power Outlets082. If the vehicle has an accessory power
outlet, do not use the cigarette lighter.
If the vehicle only has a cigarette lighter,
use the cigarette lighter.
Do not pinch the power plug cord in the
door or window.
9. Start the vehicle. The vehicle must be running while using the air compressor.
10. Press the on/off button (5) to turn the tire sealant and compressor kit on.
The compressor will inject sealant and air
into the tire.
The pressure gauge (8) will initially show
a high pressure while the compressor
pushes the sealant into the tire. Once
the sealant is completely dispersed into
the tire, the pressure will quickly drop
and start to rise again as the tire inflates
with air only.
11. Inflate the tire to the recommended inflation pressure using the pressure
gauge (8). The recommended inflation
pressure can be found on the Tire and
Loading Information label. See Tire
Pressure 0248.
The pressure gauge (8) may read higher
than the actual tire pressure while the
compressor is on. Turn the compressor
Page 265 of 328

Chevrolet TRAX Owner Manual (GMNA-Localizing-U.S./Canada/Mexico-
17041293) - 2024 - CRC - 12/6/22
264 Vehicle Care
off to get an accurate pressure reading.
The compressor may be turned on/off
until the correct pressure is reached.
Caution
If the recommended pressure cannot be
reached after approximately 25 minutes,
the vehicle should not be driven farther.
The tire is too severely damaged and the
tire sealant and compressor kit cannot
inflate the tire. Remove the power plug
from the accessory power outlet and
unscrew the inflating hose from the tire
valve. SeeRoadside Assistance Program
0 300.
12. Press the on/off button (5) to turn the tire sealant and compressor kit off.
The tire is not sealed and will continue
to leak air until the vehicle is driven and
the sealant is distributed in the tire.
Therefore, Steps 13–21 must be done
immediately after Step 12.
Be careful while handling the tire sealant
and compressor kit as it could be warm
after usage.
13. Unplug the power plug (9) from the accessory power outlet in the vehicle. 14. Turn the sealant/air hose (2)
counterclockwise to remove it from the
tire valve stem.
15. Replace the tire valve stem cap.
16. Remove the tire sealant canister (4) from the slot on top of the compressor (6).
17. Turn the air only hose (10) counterclockwise to remove it from the
tire sealant canister inlet valve (1).
18. Turn the sealant/air hose (2) clockwise onto the sealant canister inlet valve (1)
to prevent sealant leakage.
19. Return the air only hose (10) and power plug (9) back to their original storage
location.
20. If the flat tire was able to inflate to therecommended inflation pressure, remove
the maximum speed label from the
sealant canister and place it in a highly
visible location. Do not exceed the speed on this label
until the damaged tire is repaired or
replaced.
21. Return the equipment to its original storage location in the vehicle.
22. Immediately drive the vehicle 8 km (5 mi) to distribute the sealant in
the tire.
23. Stop at a safe location and check the tire pressure. Refer to Steps 1–10 under
“Using the Tire Sealant and Compressor
Kit without Sealant to Inflate a Tire (Not
Punctured).”
If the tire pressure has fallen more than
68 kPa (10 psi) below the recommended
inflation pressure, stop driving the
vehicle. The tire is too severely damaged
and the tire sealant cannot seal the tire.
SeeRoadside Assistance Program 0300.
If the tire pressure has not dropped
more than 68 kPa (10 psi) from the
recommended inflation pressure, inflate
the tire to the recommended inflation
pressure.
24. Wipe off any sealant from the wheel, tire, or vehicle.
Page 266 of 328
Chevrolet TRAX Owner Manual (GMNA-Localizing-U.S./Canada/Mexico-
17041293) - 2024 - CRC - 12/6/22
Vehicle Care 265
25. Dispose of the used tire sealantcanister (4) at a local dealer or in
accordance with local state codes and
practices.
26. Replace it with a new canister available from your dealer.
27. After temporarily sealing a tire using the tire sealant and compressor kit, take the
vehicle to an authorized dealer within
161 km (100 mi) of driving to have the
tire repaired or replaced.
Using the Tire Sealant and Compressor
Kit without Sealant to Inflate a Tire (Not
Punctured)
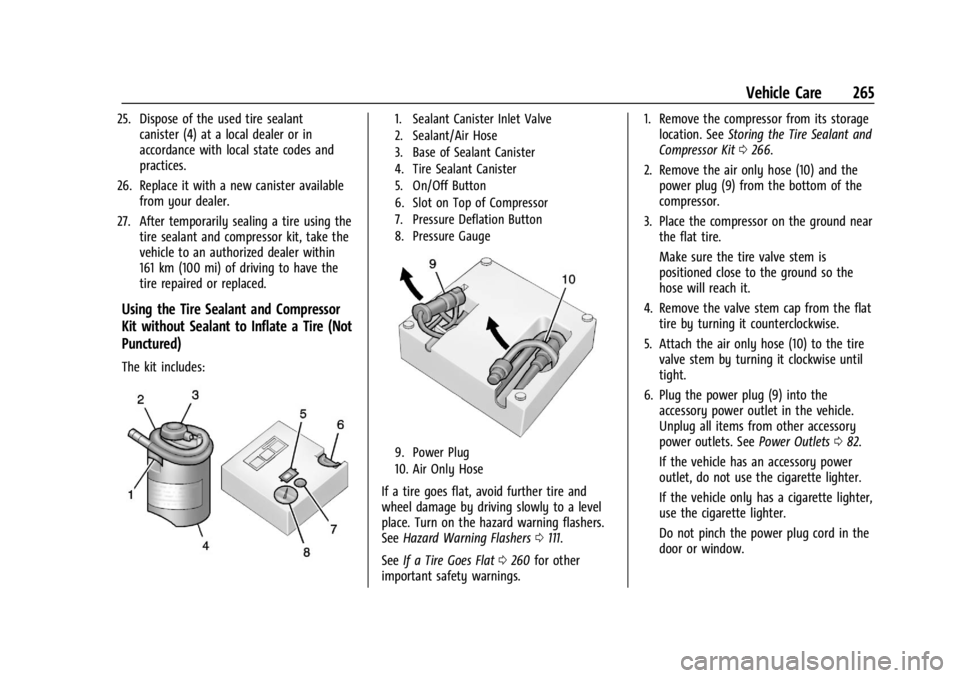
The kit includes:
1. Sealant Canister Inlet Valve
2. Sealant/Air Hose
3. Base of Sealant Canister
4. Tire Sealant Canister
5. On/Off Button
6. Slot on Top of Compressor
7. Pressure Deflation Button
8. Pressure Gauge
9. Power Plug
10. Air Only Hose
If a tire goes flat, avoid further tire and
wheel damage by driving slowly to a level
place. Turn on the hazard warning flashers.
SeeHazard Warning Flashers 0111.
See If a Tire Goes Flat 0260 for other
important safety warnings. 1. Remove the compressor from its storage
location. See Storing the Tire Sealant and
Compressor Kit 0266.
2. Remove the air only hose (10) and the power plug (9) from the bottom of the
compressor.
3. Place the compressor on the ground near the flat tire.
Make sure the tire valve stem is
positioned close to the ground so the
hose will reach it.
4. Remove the valve stem cap from the flat tire by turning it counterclockwise.
5. Attach the air only hose (10) to the tire valve stem by turning it clockwise until
tight.
6. Plug the power plug (9) into the accessory power outlet in the vehicle.
Unplug all items from other accessory
power outlets. See Power Outlets082.
If the vehicle has an accessory power
outlet, do not use the cigarette lighter.
If the vehicle only has a cigarette lighter,
use the cigarette lighter.
Do not pinch the power plug cord in the
door or window.
Page 267 of 328

Chevrolet TRAX Owner Manual (GMNA-Localizing-U.S./Canada/Mexico-
17041293) - 2024 - CRC - 12/6/22
266 Vehicle Care
7. Start the vehicle. The vehicle must berunning while using the air compressor.
8. Press the on/off button (5) to turn the tire sealant and compressor kit on.
The compressor will inflate the tire with
air only.
9. Inflate the tire to the recommended inflation pressure using the pressure
gauge (8). The recommended inflation
pressure can be found on the Tire and
Loading Information label. See Tire
Pressure 0248.
The pressure gauge (8) may read higher
than the actual tire pressure while the
compressor is on. Turn the compressor
off to get an accurate pressure reading.
The compressor may be turned on/off
until the correct pressure is reached.
Caution
If the recommended pressure cannot be
reached after approximately 25 minutes,
the vehicle should not be driven farther.
The tire is too severely damaged and the
tire sealant and compressor kit cannot
inflate the tire. Remove the power plug
from the accessory power outlet and
(Continued)
Caution (Continued)
unscrew the inflating hose from the tire
valve. See Roadside Assistance Program
0 300.
10. Press the on/off button (5) to turn the tire sealant and compressor kit off.
Be careful while handling the compressor
as it could be warm after usage.
11. Unplug the power plug (9) from the accessory power outlet in the vehicle.
12. Turn the air only hose (10) counterclockwise to remove it from the
tire valve stem.
13. Replace the tire valve stem cap.
14. Return the air only hose (10) and power plug (9) back to their original storage
location.
15. Return the equipment to its original storage location in the vehicle.
The tire sealant and compressor kit has
accessory adapters located in a
compartment on the bottom of its housing
that can be used to inflate air mattresses,
balls, etc.
Storing the Tire Sealant and
Compressor Kit
The van model is equipped with a tire
sealant and compressor kit, which is stored
under the load floor in the rear
storage area.
To access the tire sealant and
compressor kit: 1. Open a rear door.
2. Lift the load floor using the handle, or if equipped with sliding load floor, open
the lift gate, release the latch on the
load floor tray, and slide the load floor
toward the rear of the vehicle. See Cargo
Management System 076.
3. Remove the tire sealant and compressor kit from its storage location.
To store the tire sealant and compressor kit,
reverse the steps.
Page 269 of 328
Chevrolet TRAX Owner Manual (GMNA-Localizing-U.S./Canada/Mexico-
17041293) - 2024 - CRC - 12/6/22
268 Vehicle Care
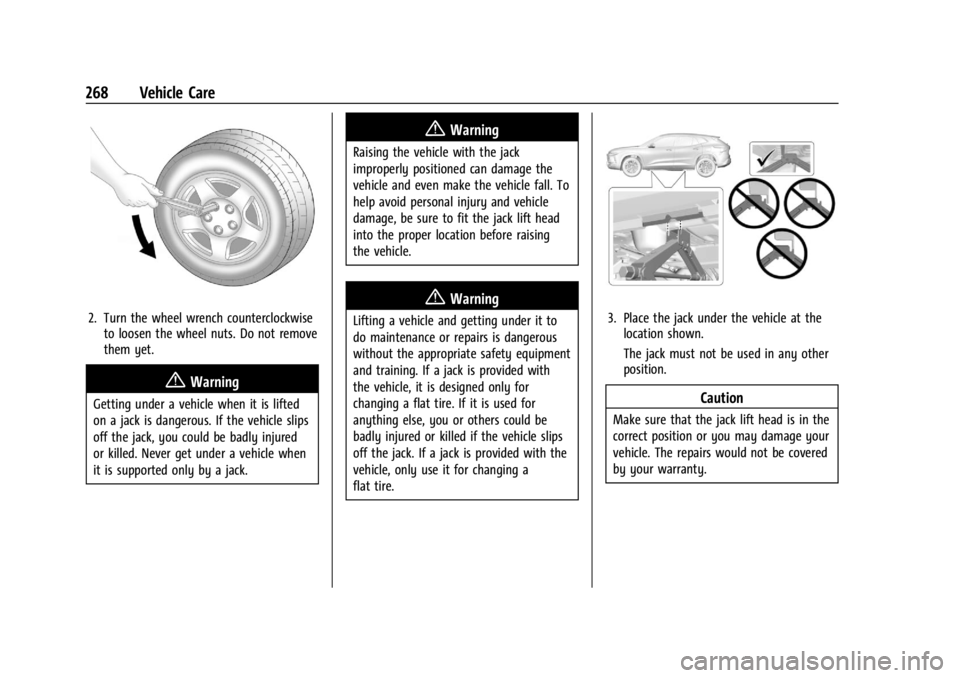
2. Turn the wheel wrench counterclockwiseto loosen the wheel nuts. Do not remove
them yet.
{Warning
Getting under a vehicle when it is lifted
on a jack is dangerous. If the vehicle slips
off the jack, you could be badly injured
or killed. Never get under a vehicle when
it is supported only by a jack.
{Warning
Raising the vehicle with the jack
improperly positioned can damage the
vehicle and even make the vehicle fall. To
help avoid personal injury and vehicle
damage, be sure to fit the jack lift head
into the proper location before raising
the vehicle.
{Warning
Lifting a vehicle and getting under it to
do maintenance or repairs is dangerous
without the appropriate safety equipment
and training. If a jack is provided with
the vehicle, it is designed only for
changing a flat tire. If it is used for
anything else, you or others could be
badly injured or killed if the vehicle slips
off the jack. If a jack is provided with the
vehicle, only use it for changing a
flat tire.3. Place the jack under the vehicle at thelocation shown.
The jack must not be used in any other
position.
Caution
Make sure that the jack lift head is in the
correct position or you may damage your
vehicle. The repairs would not be covered
by your warranty.
Page 270 of 328
Chevrolet TRAX Owner Manual (GMNA-Localizing-U.S./Canada/Mexico-
17041293) - 2024 - CRC - 12/6/22
Vehicle Care 269
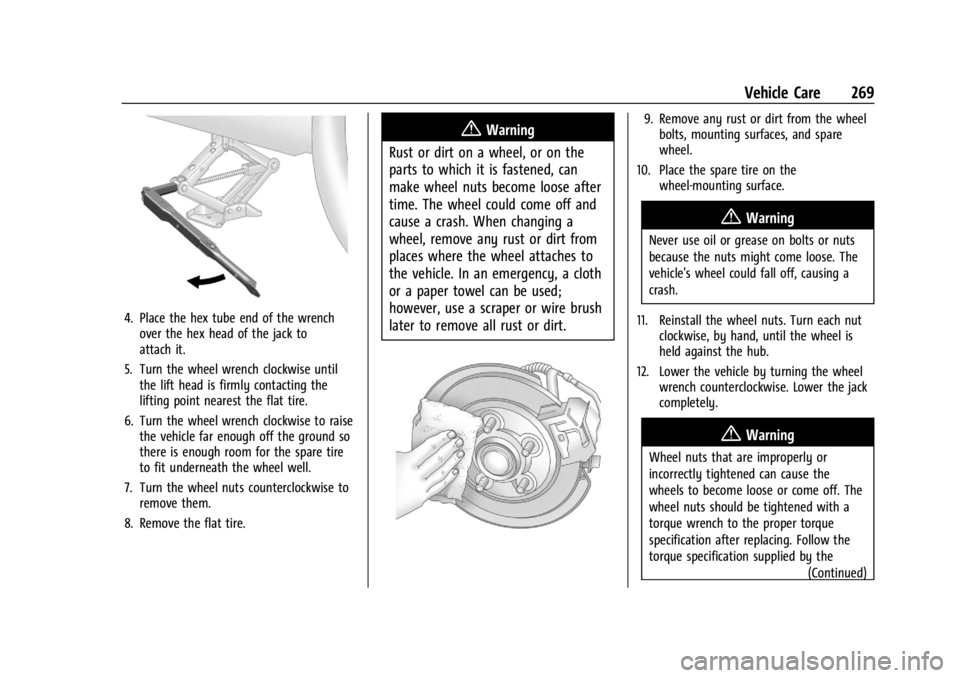
4. Place the hex tube end of the wrenchover the hex head of the jack to
attach it.
5. Turn the wheel wrench clockwise until the lift head is firmly contacting the
lifting point nearest the flat tire.
6. Turn the wheel wrench clockwise to raise the vehicle far enough off the ground so
there is enough room for the spare tire
to fit underneath the wheel well.
7. Turn the wheel nuts counterclockwise to remove them.
8. Remove the flat tire.
{Warning
Rust or dirt on a wheel, or on the
parts to which it is fastened, can
make wheel nuts become loose after
time. The wheel could come off and
cause a crash. When changing a
wheel, remove any rust or dirt from
places where the wheel attaches to
the vehicle. In an emergency, a cloth
or a paper towel can be used;
however, use a scraper or wire brush
later to remove all rust or dirt.9. Remove any rust or dirt from the wheel bolts, mounting surfaces, and spare
wheel.
10. Place the spare tire on the wheel-mounting surface.
{Warning
Never use oil or grease on bolts or nuts
because the nuts might come loose. The
vehicle's wheel could fall off, causing a
crash.
11. Reinstall the wheel nuts. Turn each nut clockwise, by hand, until the wheel is
held against the hub.
12. Lower the vehicle by turning the wheel wrench counterclockwise. Lower the jack
completely.
{Warning
Wheel nuts that are improperly or
incorrectly tightened can cause the
wheels to become loose or come off. The
wheel nuts should be tightened with a
torque wrench to the proper torque
specification after replacing. Follow the
torque specification supplied by the
(Continued)
Page 271 of 328
Chevrolet TRAX Owner Manual (GMNA-Localizing-U.S./Canada/Mexico-
17041293) - 2024 - CRC - 12/6/22
270 Vehicle Care
Warning (Continued)
aftermarket manufacturer when using
accessory locking wheel nuts. See
Capacities and Specifications0295 for
original equipment wheel nut torque
specifications.
Caution
Improperly tightened wheel nuts can lead
to brake pulsation and rotor damage. To
avoid expensive brake repairs, evenly
tighten the wheel nuts in the proper
sequence and to the proper torque
specification. See Capacities and
Specifications 0295 for the wheel nut
torque specification.
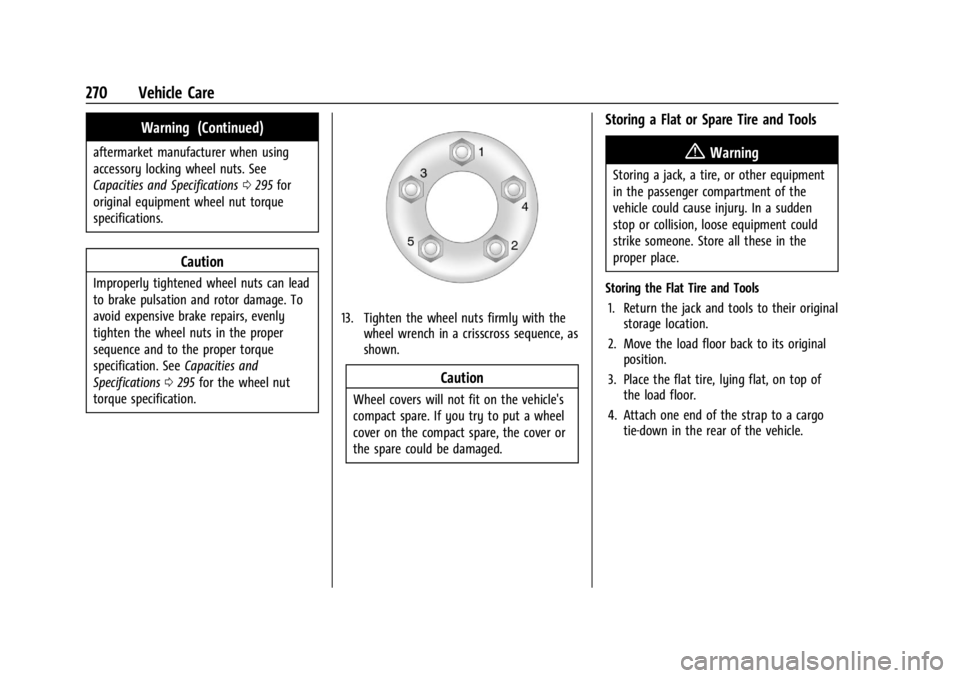
13. Tighten the wheel nuts firmly with the wheel wrench in a crisscross sequence, as
shown.
Caution
Wheel covers will not fit on the vehicle's
compact spare. If you try to put a wheel
cover on the compact spare, the cover or
the spare could be damaged.
Storing a Flat or Spare Tire and Tools
{Warning
Storing a jack, a tire, or other equipment
in the passenger compartment of the
vehicle could cause injury. In a sudden
stop or collision, loose equipment could
strike someone. Store all these in the
proper place.
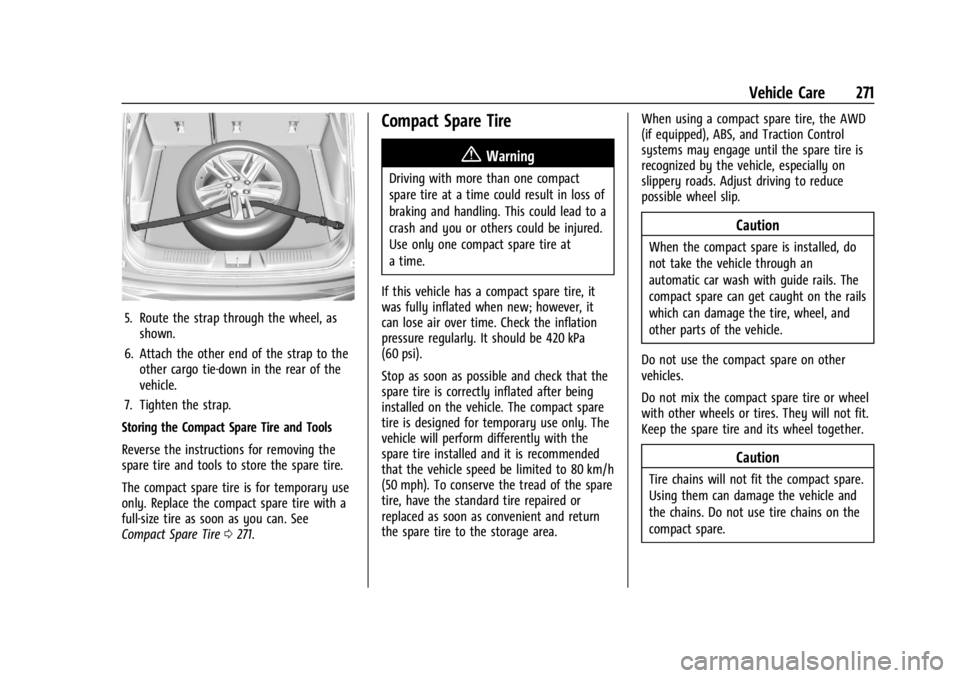
Storing the Flat Tire and Tools 1. Return the jack and tools to their original storage location.
2. Move the load floor back to its original position.
3. Place the flat tire, lying flat, on top of the load floor.
4. Attach one end of the strap to a cargo tie-down in the rear of the vehicle.
Page 272 of 328
Chevrolet TRAX Owner Manual (GMNA-Localizing-U.S./Canada/Mexico-
17041293) - 2024 - CRC - 12/6/22
Vehicle Care 271
5. Route the strap through the wheel, asshown.
6. Attach the other end of the strap to the other cargo tie-down in the rear of the
vehicle.
7. Tighten the strap.
Storing the Compact Spare Tire and Tools
Reverse the instructions for removing the
spare tire and tools to store the spare tire.
The compact spare tire is for temporary use
only. Replace the compact spare tire with a
full-size tire as soon as you can. See
Compact Spare Tire 0271.
Compact Spare Tire
{Warning
Driving with more than one compact
spare tire at a time could result in loss of
braking and handling. This could lead to a
crash and you or others could be injured.
Use only one compact spare tire at
a time.
If this vehicle has a compact spare tire, it
was fully inflated when new; however, it
can lose air over time. Check the inflation
pressure regularly. It should be 420 kPa
(60 psi).
Stop as soon as possible and check that the
spare tire is correctly inflated after being
installed on the vehicle. The compact spare
tire is designed for temporary use only. The
vehicle will perform differently with the
spare tire installed and it is recommended
that the vehicle speed be limited to 80 km/h
(50 mph). To conserve the tread of the spare
tire, have the standard tire repaired or
replaced as soon as convenient and return
the spare tire to the storage area. When using a compact spare tire, the AWD
(if equipped), ABS, and Traction Control
systems may engage until the spare tire is
recognized by the vehicle, especially on
slippery roads. Adjust driving to reduce
possible wheel slip.
Caution
When the compact spare is installed, do
not take the vehicle through an
automatic car wash with guide rails. The
compact spare can get caught on the rails
which can damage the tire, wheel, and
other parts of the vehicle.
Do not use the compact spare on other
vehicles.
Do not mix the compact spare tire or wheel
with other wheels or tires. They will not fit.
Keep the spare tire and its wheel together.
Caution
Tire chains will not fit the compact spare.
Using them can damage the vehicle and
the chains. Do not use tire chains on the
compact spare.
Page 274 of 328
Chevrolet TRAX Owner Manual (GMNA-Localizing-U.S./Canada/Mexico-
17041293) - 2024 - CRC - 12/6/22
Vehicle Care 273
The discharged battery positive (+) terminal
and the discharged battery negative (–)
terminal are in the engine compartment on
the driver side of the vehicle.
The good battery negative (–) terminal and
the good battery positive (+) terminal are on
the battery of the vehicle providing the
jump start.
The discharged battery positive (+) terminal
is under a trim cover. Open the cover to
expose the terminal.1. Check the other vehicle. It must have a 12-volt battery with a negative ground
system.
Caution
If the other vehicle does not have a
12-volt system with a negative ground,
both vehicles can be damaged. Only use
a vehicle that has a 12-volt system with a
negative ground for jump starting.
2. Position the two vehicles so that they are not touching. 3. Set the parking brake firmly and put the
shift lever in P (Park) with an automatic
transmission, or Neutral with a manual
transmission. See Shifting Into Park 0181
with an automatic transmission.
Caution
If any accessories are left on or plugged
in during the jump starting procedure,
they could be damaged. The repairs
would not be covered by the vehicle
warranty. Whenever possible, turn off or
unplug all accessories on either vehicle
when jump starting.
4. Turn the ignition off. Turn off all lights and accessories in both vehicles, except
the hazard warning flashers if needed.
{Warning
An electric fan can start up even when
the engine is not running and can injure
you. Keep hands, clothing, and tools
away from any underhood electric fan.
{Warning
Using a match near a battery can cause
battery gas to explode. People have been
hurt doing this, and some have been
blinded. Use a flashlight if you need
more light.
Battery fluid contains acid that can burn
you. Do not get it on you. If you
accidentally get it in your eyes or on
your skin, flush the place with water and
get medical help immediately.
{Warning
Fans or other moving engine parts can
injure you badly. Keep your hands away
from moving parts once the engine is
running.
5. Connect one end of the red positive (+) cable to the discharged battery
positive (+) terminal.
6. Connect the other end of the red positive (+) cable to the good battery
positive (+) terminal.
Page 277 of 328
Chevrolet TRAX Owner Manual (GMNA-Localizing-U.S./Canada/Mexico-
17041293) - 2024 - CRC - 12/6/22
276 Vehicle Care
Caution
Use of a shield mounted in front of the
vehicle grille could restrict airflow and
cause damage to the transmission. The
repairs would not be covered by the
vehicle warranty. If using a shield, only
use one that attaches to the towing
vehicle.
Caution
Do not tow a vehicle with the front drive
wheels on the ground if one of the front
tires is a compact spare tire. Towing with
two different tire sizes on the front of
the vehicle can cause severe damage to
the transmission.
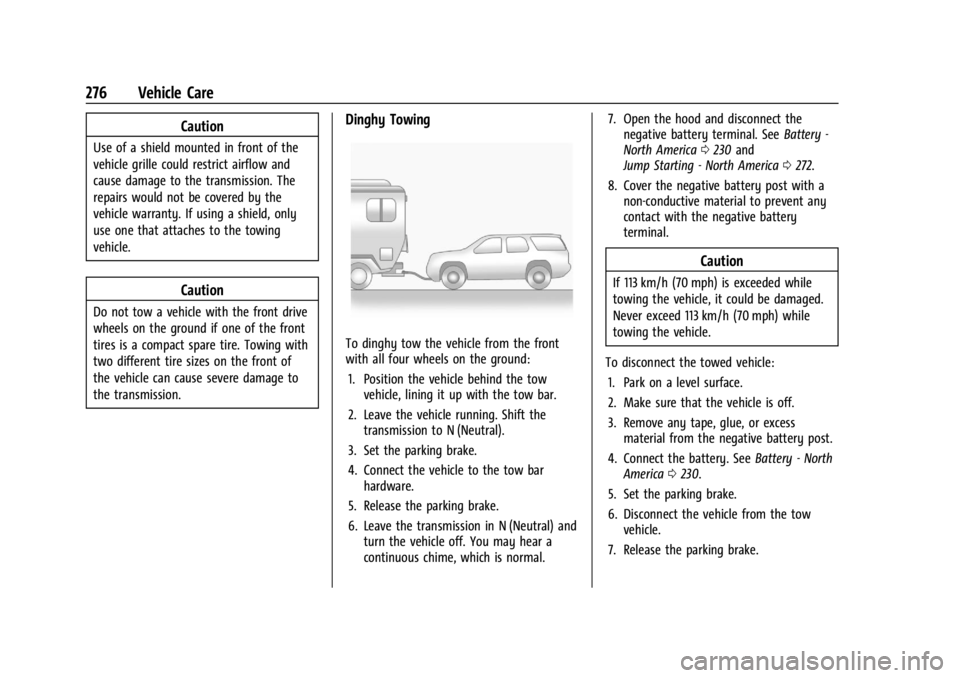
Dinghy Towing
To dinghy tow the vehicle from the front
with all four wheels on the ground:1. Position the vehicle behind the tow vehicle, lining it up with the tow bar.
2. Leave the vehicle running. Shift the transmission to N (Neutral).
3. Set the parking brake.
4. Connect the vehicle to the tow bar hardware.
5. Release the parking brake.
6. Leave the transmission in N (Neutral) and turn the vehicle off. You may hear a
continuous chime, which is normal. 7. Open the hood and disconnect the
negative battery terminal. See Battery -
North America 0230 and
Jump Starting - North America 0272.
8. Cover the negative battery post with a non-conductive material to prevent any
contact with the negative battery
terminal.
Caution
If 113 km/h (70 mph) is exceeded while
towing the vehicle, it could be damaged.
Never exceed 113 km/h (70 mph) while
towing the vehicle.
To disconnect the towed vehicle: 1. Park on a level surface.
2. Make sure that the vehicle is off.
3. Remove any tape, glue, or excess material from the negative battery post.
4. Connect the battery. See Battery - North
America 0230.
5. Set the parking brake.
6. Disconnect the vehicle from the tow vehicle.
7. Release the parking brake.