Panel CHEVROLET TRAX 2024 Owner's Manual
[x] Cancel search | Manufacturer: CHEVROLET, Model Year: 2024, Model line: TRAX, Model: CHEVROLET TRAX 2024Pages: 328, PDF Size: 7.3 MB
Page 162 of 328

Chevrolet TRAX Owner Manual (GMNA-Localizing-U.S./Canada/Mexico-
17041293) - 2024 - CRC - 12/2/22
Climate Controls 161
ON/OFF :Press to turn the fan off or on.
When off, no air will flow into the vehicle.
Turning the fan on, pressing any other
button, or turning a knob will turn the
system back on using the current setting.
9: Turn the knob clockwise or
counterclockwise to increase or decrease the
fan speed. The fan speed setting appears on
the main display. Pressing either button
cancels automatic fan control and the fan is
controlled manually. Press AUTO to return
to automatic operation.
Air Delivery Mode Controls : Press any
combination of
z,Y, or6to change the
direction of the airflow. The indicator light
in the button will turn on. The current mode
appears in the display screen.
Pressing any of the three buttons cancels
automatic air delivery control and the
direction of the airflow is controlled
manually. Press AUTO to return to
automatic operation.
To change the current mode, select one or
more of the following:
z: Clears the windows of fog or moisture.
Air is directed to the windshield.
Y: Air is directed to the instrument panel
outlets.
6: Air is directed to the floor outlets.
0MAX : Air is directed to the windshield
and the fan runs at a higher speed. Fog or
frost is cleared from the windshield more
quickly. When the button is pressed again,
the system returns to the previous mode
setting.
For best results, clear all snow and ice from
the windshield before defrosting.
A/C : Press to turn the air conditioning
system on or off. If the climate control
system is turned off or the outside
temperature falls below freezing, the air
conditioner will not run.
Pressing A/C cancels automatic air
conditioning and turns off the air
conditioner. Press AUTO to return to
automatic operation and the air conditioner
runs automatically as needed. When the
indicator light is on, the air conditioner runs
automatically to cool the air inside the
vehicle or to dry the air needed to defog
the windshield faster.
@: Press to turn on recirculation. An
indicator light comes on. Air is recirculated
to quickly cool the inside of the vehicle or
to reduce the entry of outside air and odors.
Auto Defog : The climate control system
may have a sensor to automatically detect
high humidity inside the vehicle. When high
humidity is detected, the climate control
system may adjust to outside air supply and
turn on the air conditioner. The fan speed
may slightly increase to help prevent
fogging. If the climate control system does
not detect possible window fogging, it
returns to normal operation.
To turn Auto Defog off or on, select
Settings > Climate and Air Quality > Auto
Defog > Select ON or OFF.
Rear Window Defogger
K: Press to turn the rear window defogger
on or off. An indicator light on the button
comes on to show that the rear window
defogger is on. The defogger only works
when the vehicle is on.
The defogger can be turned off by turning
the vehicle off or to accessory mode.
Page 163 of 328

Chevrolet TRAX Owner Manual (GMNA-Localizing-U.S./Canada/Mexico-
17041293) - 2024 - CRC - 12/2/22
162 Climate Controls
To turn Auto Rear Defog off or on, select
Settings > Climate and Air Quality > Auto
Rear Defog > Select ON or OFF.
When auto rear defog is selected, the rear
window defogger turns on automatically
when the interior temperature is cold and
the outside temperature is about 5 °C (41 °F)
and below. The Auto Rear Defogger turns off
automatically.
If the vehicle is equipped with heated
outside mirrors, they turn on when the rear
window defogger button is on and help to
clear fog or frost from the surface of the
mirror. SeeHeated Mirrors 026
Caution
Do not try to clear frost or other material
from the inside of the front windshield
and rear window with a razor blade or
anything else that is sharp. This may
damage the rear window defogger grid
and affect the radio's ability to pick up
stations clearly. The repairs would not be
covered by the vehicle warranty.
MorL:If equipped, pressMorLto
heat the driver or passenger seat. See
Heated Front Seats 034. Remote Start Climate Control Operation
(If Equipped) :
If the vehicle is equipped
with the remote start feature, the climate
control system may run when the vehicle is
started remotely. The system uses the
driver’s previous settings to heat or cool the
inside of the vehicle. The rear defog may
come on during remote start based on cold
ambient conditions. If the vehicle has heated
seats, they may come on during a remote
start. See Remote Vehicle Start 018 and
Heated Front Seats 034.
Sensors
The solar sensor on top of the instrument
panel near the windshield monitors the solar
heat. The climate control system uses the
sensor information to adjust the
temperature, fan speed, recirculation, and air
delivery mode for best comfort.
Do not cover the sensor; otherwise the
automatic climate control system may not
work properly.
Afterblow Feature
If equipped, under certain conditions, the
fan may stay on or may turn on and off
several times after you turn off and lock the
vehicle. This is normal.
Air Vents
Use the louvers located on the air vents to
change the direction of the airflow.
To open or close off the airflow:
.Move slider knobs away from the
occupant for shut off closing.
Operation Tips
.Clear away any ice, snow, or leaves from
air inlets at the base of the windshield
that could block the flow of air into the
vehicle.
.Clear snow off the hood to improve
visibility and help decrease moisture
drawn into the vehicle, which may
improve long term system performance.
.Keep the path under the front seats clear
of objects to help circulate the air inside
of the vehicle more effectively.
.Use of non-GM approved hood deflectors
can adversely affect the performance of
the system. Check with your dealer
before adding equipment to the outside
of the vehicle.
.Do not attach any devices to the air vent
slats. This restricts airflow and may cause
damage to the air vents.
Page 172 of 328
Chevrolet TRAX Owner Manual (GMNA-Localizing-U.S./Canada/Mexico-
17041293) - 2024 - CRC - 12/6/22
Driving and Operating 171
Warning (Continued)
.Open a window about 5 cm (2 in) on
the vehicle side that is away from the
wind, to bring in fresh air.
.Fully open the air outlets on or under
the instrument panel.
.Adjust the climate control system to
circulate the air inside the vehicle and
set the fan speed to the highest
setting. See“Climate Control Systems.”
For more information about CO, see
Engine Exhaust 0183.
To save fuel, run the engine for short
periods to warm the vehicle and then shut
the engine off and partially close the
window. Moving about to keep warm also
helps.
If it takes time for help to arrive, when
running the engine, push the accelerator
pedal slightly so the engine runs faster than
the idle speed. This keeps the battery
charged to restart the vehicle and to signal
for help with the headlamps. Do this as
little as possible, to save fuel.
If the Vehicle Is Stuck
Slowly and cautiously spin the wheels to
free the vehicle when stuck in sand, mud,
ice, or snow.
If stuck too severely for the traction system
to free the vehicle, turn the traction system
off and use the rocking method. See
Traction Control/Electronic Stability Control
0 188.
{Warning
If the vehicle's tires spin at high speed,
they can explode, and you or others
could be injured. The vehicle can
overheat, causing an engine compartment
fire or other damage. Spin the wheels as
little as possible and avoid going above
56 km/h (35 mph).
Rocking the Vehicle to Get it Out
Turn the steering wheel left and right to
clear the area around the front wheels. Turn
off any traction system. Shift back and forth
between R (Reverse) and a low forward gear,
spinning the wheels as little as possible. To
prevent transmission wear, wait until the
wheels stop spinning before shifting gears.
Release the accelerator pedal while shifting, and press lightly on the accelerator pedal
when the transmission is in gear. Slowly
spinning the wheels in the forward and
reverse directions causes a rocking motion
that could free the vehicle. If that does not
get the vehicle out after a few tries, it may
need to be towed out. If the vehicle does
need to be towed out, see
Transporting a
Disabled Vehicle 0274.
Vehicle Load Limits
It is very important to know how much
weight the vehicle can carry. This
weight is called the vehicle capacity
weight and includes the weight of all
occupants, cargo, and all
nonfactory-installed options. Two labels
on the vehicle may show how much
weight it may properly carry, the Tire
and Loading Information label and the
Certification/Tire label.
{Warning
Do not load the vehicle any heavier
than the Gross Vehicle Weight Rating
(GVWR), or either the maximum
front or rear Gross Axle Weight
(Continued)
Page 202 of 328

Chevrolet TRAX Owner Manual (GMNA-Localizing-U.S./Canada/Mexico-
17041293) - 2024 - CRC - 12/6/22
Driving and Operating 201
.Front and rear bumpers and the area
below the bumpers
.Front grille and headlamps
.Front camera lens in the front grille or
near the front emblem
.Front side and rear side panels
.Outside of the windshield in front of the
rearview mirror
.Side camera lens on the bottom of the
outside mirrors
.Rear side corner bumpers
.Rear Vision Camera above the license
plate
Assistance Systems for Parking or
Backing
If equipped, the Rear Vision Camera (RVC),
Rear Park Assist (RPA), and Rear Cross Traffic
Alert (RCTA) may help the driver park or
avoid objects. Always check around the
vehicle when parking or backing.
Rear Vision Camera (RVC)
When the vehicle is shifted into R (Reverse),
the RVC displays an image of the area
behind the vehicle in the infotainment
display. The previous screen displays when
the vehicle is shifted out of R (Reverse) after
a short delay. To return to the previous
screen sooner, press any button on the
infotainment display, shift into P (Park),
or reach a vehicle speed of approximately
12 km/h (8 mph).
1. View Displayed by the Rear VisionCamera
1. View Displayed by the Rear VisionCamera
2. Corners of the Rear Bumper
Page 216 of 328
Chevrolet TRAX Owner Manual (GMNA-Localizing-U.S./Canada/Mexico-
17041293) - 2024 - CRC - 12/6/22
Vehicle Care 215
Vehicle Care
General Information
General Information . . . . . . . . . . . . . . . . . . . 216
California Perchlorate MaterialsRequirements . . . . . . . . . . . . . . . . . . . . . . . . 216
Accessories and Modifications . . . . . . . . . 216
Vehicle Checks
Doing Your Own Service Work . . . . . . . . . 216
Hood . . . . . . . . . . . . . . . . . . . . . . . . . . . . . . . . . . 217
Engine Compartment Overview . . . . . . . . 219
Engine Oil . . . . . . . . . . . . . . . . . . . . . . . . . . . . . 220
Engine Oil Life System . . . . . . . . . . . . . . . . . 222
Automatic Transmission Fluid . . . . . . . . . . 223
Engine Air Filter Life System . . . . . . . . . . . 223
Engine Air Cleaner/Filter . . . . . . . . . . . . . . . 223
Cooling System . . . . . . . . . . . . . . . . . . . . . . . . 225
Engine Overheating . . . . . . . . . . . . . . . . . . . . 227
Washer Fluid . . . . . . . . . . . . . . . . . . . . . . . . . . 228
Brakes . . . . . . . . . . . . . . . . . . . . . . . . . . . . . . . . . 229
Brake Fluid . . . . . . . . . . . . . . . . . . . . . . . . . . . . 230
Battery - North America . . . . . . . . . . . . . . . 230
Starter Switch Check . . . . . . . . . . . . . . . . . . . 231
Automatic Transmission Shift Lock Control Function Check . . . . . . . . . . . . . . . 231
Park Brake and P (Park) Mechanism Check . . . . . . . . . . . . . . . . . . . . . . . . . . . . . . . . 232
Wiper Blade Replacement . . . . . . . . . . . . . 232 Windshield Replacement . . . . . . . . . . . . . . . 233
Gas Strut(s) . . . . . . . . . . . . . . . . . . . . . . . . . . . . 233
Headlamp Aiming
Front Headlamp Aiming . . . . . . . . . . . . . . . 234
Bulb Replacement
Bulb Replacement . . . . . . . . . . . . . . . . . . . . . 234
Halogen Bulbs . . . . . . . . . . . . . . . . . . . . . . . . . 235
LED Lighting . . . . . . . . . . . . . . . . . . . . . . . . . . . 235
Headlamps, Front Turn Signal,
Sidemarker, and Parking Lamps . . . . . . 235
Taillamps, Turn Signal, Sidemarker, Stoplamps, and Back-Up Lamps . . . . . . 236
Electrical System
Electrical System Overload . . . . . . . . . . . . . 237
Fuses and Circuit Breakers . . . . . . . . . . . . . 238
Engine Compartment Fuse Block . . . . . . 239
Instrument Panel Fuse Block . . . . . . . . . . . 241
Wheels and Tires
Tires . . . . . . . . . . . . . . . . . . . . . . . . . . . . . . . . . . . 243
All-Season Tires . . . . . . . . . . . . . . . . . . . . . . . . 243
Winter Tires . . . . . . . . . . . . . . . . . . . . . . . . . . . 244
Tire Sidewall Labeling . . . . . . . . . . . . . . . . . 244
Tire Designations . . . . . . . . . . . . . . . . . . . . . . 246
Tire Terminology and Definitions . . . . . . 246
Tire Pressure . . . . . . . . . . . . . . . . . . . . . . . . . . 248
Tire Pressure for High-SpeedOperation . . . . . . . . . . . . . . . . . . . . . . . . . . . 249 Tire Pressure Monitor System . . . . . . . . . 249
Tire Pressure Monitor Operation . . . . . . 250
Tire Inspection . . . . . . . . . . . . . . . . . . . . . . . . 254
Tire Rotation . . . . . . . . . . . . . . . . . . . . . . . . . . 254
When It Is Time for New Tires . . . . . . . . 255
Buying New Tires . . . . . . . . . . . . . . . . . . . . . 256
Different Size Tires and Wheels . . . . . . . . 257
Uniform Tire Quality Grading . . . . . . . . . . 257
Wheel Alignment and Tire Balance . . . . 258
Wheel Replacement . . . . . . . . . . . . . . . . . . . 258
Tire Chains . . . . . . . . . . . . . . . . . . . . . . . . . . . . 259
If a Tire Goes Flat . . . . . . . . . . . . . . . . . . . . . 260
Tire Sealant and Compressor Kit . . . . . . . 261
Storing the Tire Sealant and
Compressor Kit . . . . . . . . . . . . . . . . . . . . . . 266
Tire Changing . . . . . . . . . . . . . . . . . . . . . . . . . 267
Compact Spare Tire . . . . . . . . . . . . . . . . . . . . 271
Jump Starting
Jump Starting - North America . . . . . . . . 272
Towing the Vehicle
Transporting a Disabled Vehicle . . . . . . . 274
Recreational Vehicle Towing . . . . . . . . . . . 275
Appearance Care
Exterior Care . . . . . . . . . . . . . . . . . . . . . . . . . . . 277
Interior Care . . . . . . . . . . . . . . . . . . . . . . . . . . . 281
Floor Mats . . . . . . . . . . . . . . . . . . . . . . . . . . . . 284
Page 218 of 328
Chevrolet TRAX Owner Manual (GMNA-Localizing-U.S./Canada/Mexico-
17041293) - 2024 - CRC - 12/6/22
Vehicle Care 217
This vehicle has an airbag system. Before
attempting to do your own service work,
seeServicing the Airbag-Equipped Vehicle
0 53.
If equipped with remote vehicle start, open
the hood before performing any service
work to prevent remote starting the vehicle
accidentally. See Remote Vehicle Start 018.
Keep a record with all parts receipts and list
the mileage and the date of any service
work performed. See Maintenance Records
0 293.
Caution
Even small amounts of contamination can
cause damage to vehicle systems. Do not
allow contaminants to contact the fluids,
reservoir caps, or dipsticks.
Hood
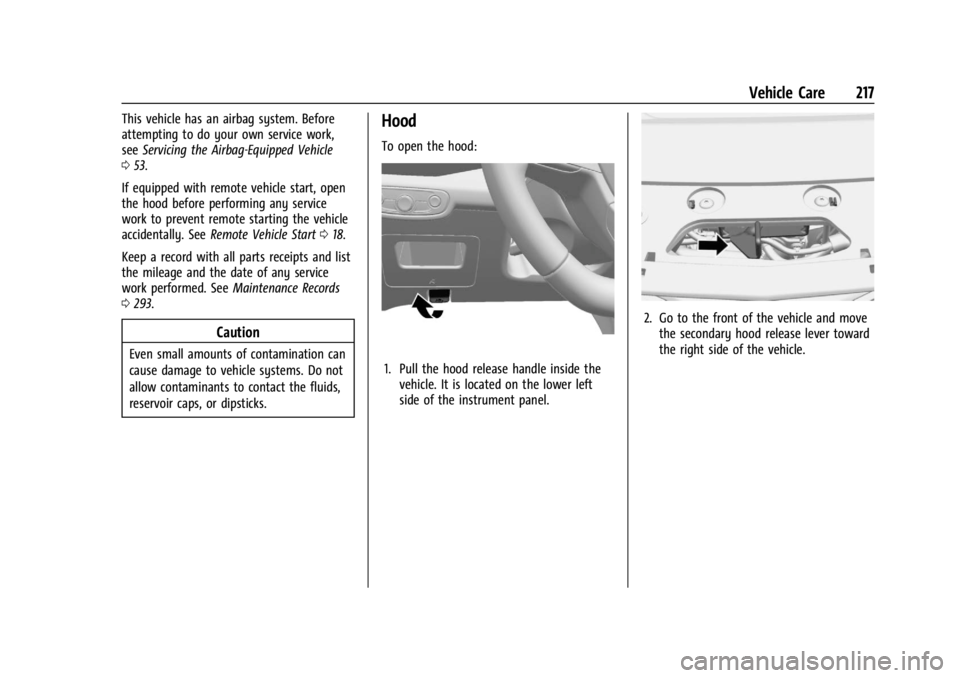
To open the hood:
1. Pull the hood release handle inside the
vehicle. It is located on the lower left
side of the instrument panel.
2. Go to the front of the vehicle and movethe secondary hood release lever toward
the right side of the vehicle.
Page 242 of 328
Chevrolet TRAX Owner Manual (GMNA-Localizing-U.S./Canada/Mexico-
17041293) - 2024 - CRC - 12/6/22
Vehicle Care 241
M-case Fuses UsageF38 EBCM_2
F39 COOLING FAN HIGH
F43 –
F60 POWER WINDOW LT F61 POWER WINDOW RT
Mini Relays Usage K04 COOLING FAN HIGH RELAY
Micro Relays Usage K01 STARTER SOL RELAY
K02 –
K03 POWERTRAIN RELAYInstrument Panel Fuse Block
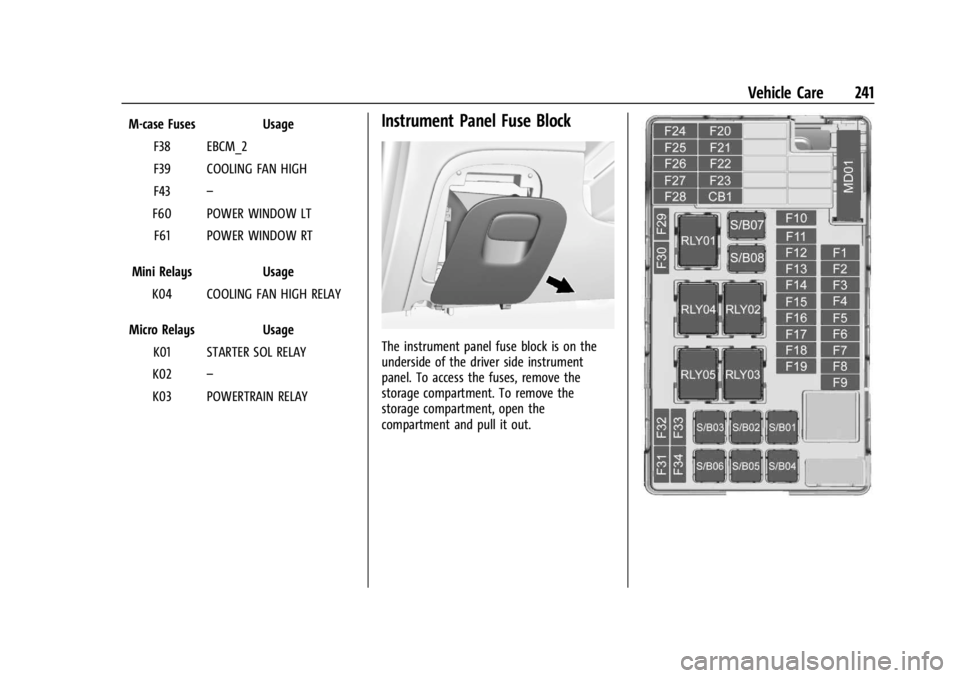
The instrument panel fuse block is on the
underside of the driver side instrument
panel. To access the fuses, remove the
storage compartment. To remove the
storage compartment, open the
compartment and pull it out.
Page 284 of 328
Chevrolet TRAX Owner Manual (GMNA-Localizing-U.S./Canada/Mexico-
17041293) - 2024 - CRC - 12/6/22
Vehicle Care 283
Warning (Continued)
slippery. Your foot could slip while
operating the vehicle, and you could lose
control, resulting in a crash. You or
others could be injured.
Fabric/Carpet/Suede
Start by vacuuming the surface using a soft
brush attachment. If a rotating vacuum
brush attachment is being used, only use it
on the floor carpet. Before cleaning, gently
remove as much of the soil as possible:
.Gently blot liquids with a paper towel.
Continue blotting until no more soil can
be removed.
.For solid soils, remove as much as
possible prior to vacuuming.
To clean: 1. Saturate a clean, lint-free colorfast cloth with water. Microfiber cloth is
recommended to prevent lint transfer to
the fabric or carpet.
2. Remove excess moisture by gently wringing until water does not drip from
the cleaning cloth. 3. Start on the outside edge of the soil and
gently rub toward the center. Fold the
cleaning cloth to a clean area frequently
to prevent forcing the soil into the
fabric.
4. Continue gently rubbing the soiled area until there is no longer any color
transfer from the soil to the cleaning
cloth.
5. If the soil is not completely removed, use a mild soap solution followed only
by plain water.
If the soil is not completely removed, it may
be necessary to use a commercial upholstery
cleaner or spot lifter. Test a small hidden
area for colorfastness before using a
commercial upholstery cleaner or spot lifter.
If ring formation occurs, clean the entire
fabric or carpet.
After cleaning, use a paper towel to blot
excess moisture.
Cleaning High Gloss Surfaces and Vehicle
Status and Radio Displays
Use a microfiber cloth on high gloss surfaces
or vehicle displays. First, use a soft bristle
brush to remove dirt that can scratch the
surface. Then gently clean by rubbing with a
microfiber cloth. Never use window cleaners or solvents. Periodically hand wash the
microfiber cloth separately, using mild soap.
Do not use bleach or fabric softener. Rinse
thoroughly and air dry before next use.
Caution
Do not attach a device with a suction cup
to the display. This may cause damage
and would not be covered by the vehicle
warranty.
Instrument Panel, Leather, Vinyl, Other
Plastic Surfaces, Low Gloss Paint
Surfaces, and Natural Open Pore Wood
Surfaces
Use a soft bristle brush to remove dust from
knobs and crevices on the instrument
cluster. Use a soft microfiber cloth
dampened with water to remove dust and
loose dirt. For a more thorough cleaning,
use a soft microfiber cloth dampened with a
mild soap and water solution.
Caution
Soaking or saturating leather, especially
perforated leather, as well as other
interior surfaces, may cause permanent
damage. Wipe excess moisture from
(Continued)
Page 285 of 328
Chevrolet TRAX Owner Manual (GMNA-Localizing-U.S./Canada/Mexico-
17041293) - 2024 - CRC - 12/6/22
284 Vehicle Care
Caution (Continued)
these surfaces after cleaning and allow
them to dry naturally. Never use heat,
steam, or spot removers. Do not use
liquids that contain alcohol or solvents on
leather seats. Do not use cleaners that
contain silicone or wax-based products.
Cleaners containing these solvents can
permanently change the appearance and
feel of leather or soft trim, and are not
recommended.
Do not use cleaners that increase gloss,
especially on the instrument panel. Reflected
glare can decrease visibility through the
windshield under certain conditions.
Caution
Use of air fresheners may cause
permanent damage to plastics and
painted surfaces. If an air freshener
comes in contact with any plastic or
painted surface in the vehicle, blot
immediately and clean with a soft cloth
dampened with a mild soap solution.
Damage caused by air fresheners would
not be covered by the vehicle warranty.
Cargo Cover and Convenience Net
If equipped, wash with warm water and
mild detergent. Do not use chlorine bleach.
Rinse with cold water, and then dry
completely.
Care of Seat Belts
Keep belts clean and dry.
{Warning
Do not bleach or dye seat belt webbing.
It may severely weaken the webbing. In
a crash, they might not be able to
provide adequate protection. Clean and
rinse seat belt webbing only with mild
soap and lukewarm water. Allow the
webbing to dry.
Floor Mats
{Warning
If a floor mat is the wrong size or is not
properly installed, it can interfere with
the pedals. Interference with the pedals
can cause unintended acceleration and/or
increased stopping distance which can (Continued)
Warning (Continued)
cause a crash and injury. Make sure the
floor mat does not interfere with the
pedals.
Use the following guidelines for proper floor
mat use.
.The original equipment floor mats are
designed for your vehicle. If the floor
mats need to be replaced, it is
recommended that GM-certified floor
mats are purchased. Non-GM floor mats
may not fit properly and may interfere
with the pedals. Always check that the
floor mats do not interfere with the
pedals.
.Do not use a floor mat if the vehicle is
not equipped with a floor mat retainer on
the driver side floor.
.Use the floor mat with the correct side
up. Do not turn it over.
.Do not place anything on top of the
driver side floor mat.
.Use only a single floor mat on the
driver side.
.Do not place one floor mat on top of
another.
Page 295 of 328

Chevrolet TRAX Owner Manual (GMNA-Localizing-U.S./Canada/Mexico-
17041293) - 2024 - CRC - 12/2/22
294 Technical Data
Technical Data
Vehicle Identification
Vehicle Identification Number (VIN) . . . 294
Service Parts Identification . . . . . . . . . . . . 294
Vehicle Data
Capacities and Specifications . . . . . . . . . . 295
Engine Drive Belt Routing . . . . . . . . . . . . . 296
Vehicle Identification
Vehicle Identification
Number (VIN)
This legal identifier is in the front corner of
the instrument panel, on the driver side of
the vehicle. It can be seen through the
windshield from outside. The Vehicle
Identification Number (VIN) also appears on
the Vehicle Certification label and certificates
of title and registration.
Engine Identification
The eighth character in the VIN is the
engine code. This code identifies the
vehicle's engine, specifications, and
replacement parts. See“Engine
Specifications” underCapacities and
Specifications 0295 for the vehicle's
engine code.
Service Parts Identification
There may be a large barcode on the
certification label on the center pillar that
you can scan for the following information:
.Vehicle Identification Number (VIN)
.Model designation
.Paint information
.Production options
If there is not a large barcode on this label,
then you will find this same information on
the inside of the rear compartment area.