remote start CHEVROLET UPLANDER 2006 User Guide
[x] Cancel search | Manufacturer: CHEVROLET, Model Year: 2006, Model line: UPLANDER, Model: CHEVROLET UPLANDER 2006Pages: 458, PDF Size: 3.19 MB
Page 219 of 458
DIC Vehicle Personalization
(Uplevel Only)
Your vehicle may have customization capabilities that
allow you to program certain features to one preferred
setting. Customization features can only be programmed
to one setting on the vehicle and cannot be programmed
to a preferred setting for two different drivers. The
customization features include the following:
Exterior lighting delay
Interior lighting delay
Delayed locking
Content theft
Remote keyless entry feedback
Remote start
Rear park chimeYour vehicle may also have personalization capabilities
that allow you to program certain features to a
preferred setting for up to two drivers. The �rst
personalized key corresponds to driver 1 and the second
personalized key corresponds to driver 2. The
personalization features include the following:
Radio station presets
Auto door unlock preferences
Remote keyless entry unlock preferences
All of the customization and personalization options may
not be available on your vehicle. Only the options
available will be displayed on your DIC.
The default settings for the customization and
personalization features were set when your vehicle left
the factory, but may have been changed from their
default setting since then.
The customization preferences are automatically
recalled.
The driver’s personalization preferences are recalled by
using the key programmed for driver 1 or 2.
To change customization and personalization
preferences, use the following procedure.
3-69
ProCarManuals.com
Page 224 of 458
REMOTE START
If your vehicle has remote start, this feature allows the
remote start to be turned OFF or ON. The remote
start feature allows you to start the engine from outside
of the vehicle using the remote keyless entry
transmitter. See “Remote Vehicle Start” underRemote
Keyless Entry System Operation on page 2-5for
more information.
Press the menu button until REMOTE START appears
on the DIC display. Press the set/reset button to
scroll through the following choices:
OFF:The remote start feature will be disabled.
ON (default):The remote start feature will be enabled.
Choose one of the available settings and press the
menu button while it is displayed on the DIC to select it
and move on to the next feature.
REAR PARK CHIME
If your vehicle has the Ultrasonic Rear Parking Assist
(URPA) system, this feature allows the URPA system’s
chime to be turned OFF or ON. SeeUltrasonic Rear
Parking Assist (URPA) on page 3-20for more
information.Press the option button until REAR PARK CHIME
appears on the DIC display. Press the set/reset button
to scroll through the following choices:
OFF:The URPA system’s chime will be disabled.
ON (default):The URPA system’s chime will be
enabled.
Choose one of the available settings and press the
menu button while it is displayed on the DIC to select it
and move on to the next feature.
Personalization Menu Items
The following are personalization features that allow you
to program setting for up to two drivers:
PERSONALIZE KEY
If you are using a key that has already been
personalized to be recognized as key 1 or 2, this screen
will not display. This feature allows you to personalize
a key to be recognized as key 1 or 2. A personalized key
allows you to program personalization features to a
preferred setting to correspond to key 1 or 2.
3-74
ProCarManuals.com
Page 238 of 458
Do not add any label to a CD, it could get caught in the
CD player. If a CD is recorded on a personal computer
and a description label is needed, try labeling the top of
the recorded CD with a marking pen instead.
Notice:If you add any label to a CD, insert more
than one CD into the slot at a time, or attempt
to play scratched or damaged CDs, you could
damage the CD player. When using the CD player,
use only CDs in good condition without any
label, load one CD at a time, and keep the CD player
and the loading slot free of foreign materials,
liquids, and debris.
If an error appears on the display, see “CD Messages”
later in this section.
O/e(Tune):Turn this knob to go to the next or
previous track.
{(Reverse):Press and hold this button to reverse
the current track.
|(Fast Forward):Press and hold this button to fast
forward through the current track.
RDM (Random):Press this button to hear the tracks in
random, rather than sequential, order. RANDOM
DISC will appear on the display. Press this button again
to turn off random play.RPT (Repeat):Press this button to hear a track over
again. REPEAT will appear on the display. Press
this button again to turn off repeat play.
MUTE:Press this button to silence the system. Press
this button again to turn the sound on.
tSEEKu:Press the left arrow to go to the start of
the current track if more than eight seconds have
played. Press the right arrow to go to the start of the
next track. If either arrow is held or pressed more than
once, the player will continue moving backward or
forward through the CD.
BAND:Press this button to listen to the radio when a
CD is playing. The inactive CD will remain safely
inside the radio for future listening.
CD AUX (Auxiliary):Press this button to play a CD
when listening to the radio. CD will appear on the display
when a CD is in the player. If the system has a remote
playback device, pressing this button a second time
will allow the remote device to play.
AUTO EQ (Automatic Equalization):Press AUTO EQ
to select the equalization setting while playing a CD.
The equalization will be stored whenever a CD is played.
For more information on AUTO EQ, see “AUTO EQ”
listed previously in this section.
X(Eject):Press this button to eject the CD. EJECT
may be activated with either the ignition or radio off.
3-88
ProCarManuals.com
Page 253 of 458
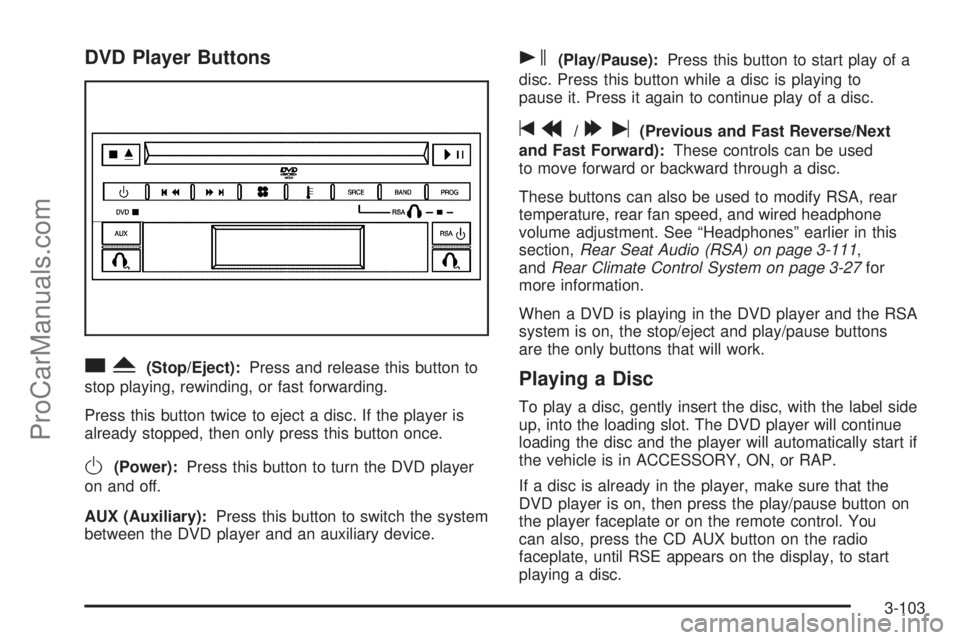
DVD Player Buttons
cY(Stop/Eject):Press and release this button to
stop playing, rewinding, or fast forwarding.
Press this button twice to eject a disc. If the player is
already stopped, then only press this button once.
O(Power):Press this button to turn the DVD player
on and off.
AUX (Auxiliary):Press this button to switch the system
between the DVD player and an auxiliary device.
s(Play/Pause):Press this button to start play of a
disc. Press this button while a disc is playing to
pause it. Press it again to continue play of a disc.
tr/[u(Previous and Fast Reverse/Next
and Fast Forward):These controls can be used
to move forward or backward through a disc.
These buttons can also be used to modify RSA, rear
temperature, rear fan speed, and wired headphone
volume adjustment. See “Headphones” earlier in this
section,Rear Seat Audio (RSA) on page 3-111,
andRear Climate Control System on page 3-27for
more information.
When a DVD is playing in the DVD player and the RSA
system is on, the stop/eject and play/pause buttons
are the only buttons that will work.
Playing a Disc
To play a disc, gently insert the disc, with the label side
up, into the loading slot. The DVD player will continue
loading the disc and the player will automatically start if
the vehicle is in ACCESSORY, ON, or RAP.
If a disc is already in the player, make sure that the
DVD player is on, then press the play/pause button on
the player faceplate or on the remote control. You
can also, press the CD AUX button on the radio
faceplate, until RSE appears on the display, to start
playing a disc.
3-103
ProCarManuals.com
Page 262 of 458
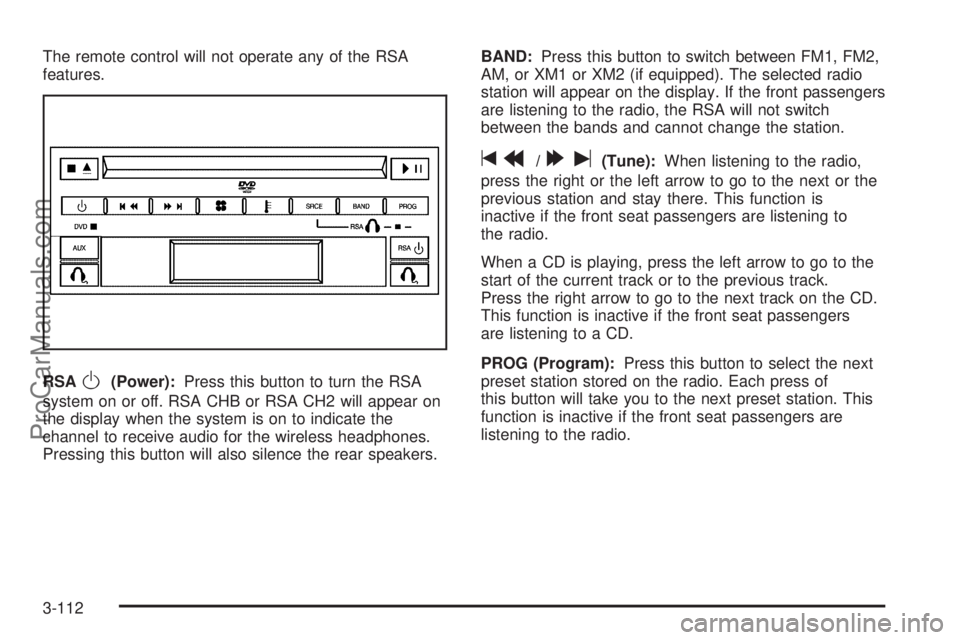
The remote control will not operate any of the RSA
features.
RSA
O(Power):Press this button to turn the RSA
system on or off. RSA CHB or RSA CH2 will appear on
the display when the system is on to indicate the
channel to receive audio for the wireless headphones.
Pressing this button will also silence the rear speakers.BAND:Press this button to switch between FM1, FM2,
AM, or XM1 or XM2 (if equipped). The selected radio
station will appear on the display. If the front passengers
are listening to the radio, the RSA will not switch
between the bands and cannot change the station.
tr/[u(Tune):When listening to the radio,
press the right or the left arrow to go to the next or the
previous station and stay there. This function is
inactive if the front seat passengers are listening to
the radio.
When a CD is playing, press the left arrow to go to the
start of the current track or to the previous track.
Press the right arrow to go to the next track on the CD.
This function is inactive if the front seat passengers
are listening to a CD.
PROG (Program):Press this button to select the next
preset station stored on the radio. Each press of
this button will take you to the next preset station. This
function is inactive if the front seat passengers are
listening to the radio.
3-112
ProCarManuals.com
Page 325 of 458
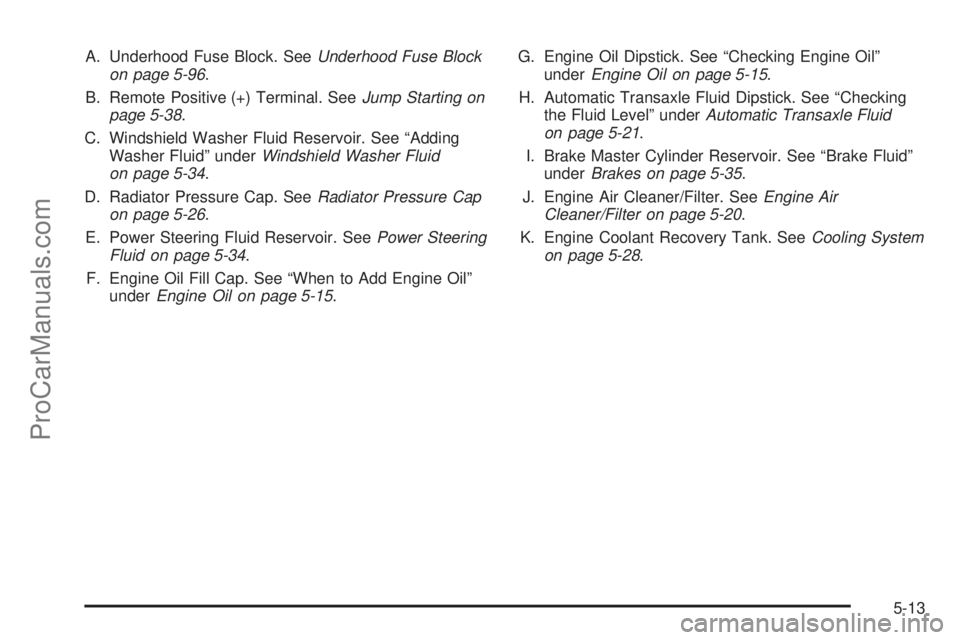
A. Underhood Fuse Block. SeeUnderhood Fuse Block
on page 5-96.
B. Remote Positive (+) Terminal. SeeJump Starting on
page 5-38.
C. Windshield Washer Fluid Reservoir. See “Adding
Washer Fluid” underWindshield Washer Fluid
on page 5-34.
D. Radiator Pressure Cap. SeeRadiator Pressure Cap
on page 5-26.
E. Power Steering Fluid Reservoir. SeePower Steering
Fluid on page 5-34.
F. Engine Oil Fill Cap. See “When to Add Engine Oil”
underEngine Oil on page 5-15.G. Engine Oil Dipstick. See “Checking Engine Oil”
underEngine Oil on page 5-15.
H. Automatic Transaxle Fluid Dipstick. See “Checking
the Fluid Level” underAutomatic Transaxle Fluid
on page 5-21.
I. Brake Master Cylinder Reservoir. See “Brake Fluid”
underBrakes on page 5-35.
J. Engine Air Cleaner/Filter. SeeEngine Air
Cleaner/Filter on page 5-20.
K. Engine Coolant Recovery Tank. SeeCooling System
on page 5-28.
5-13
ProCarManuals.com
Page 327 of 458
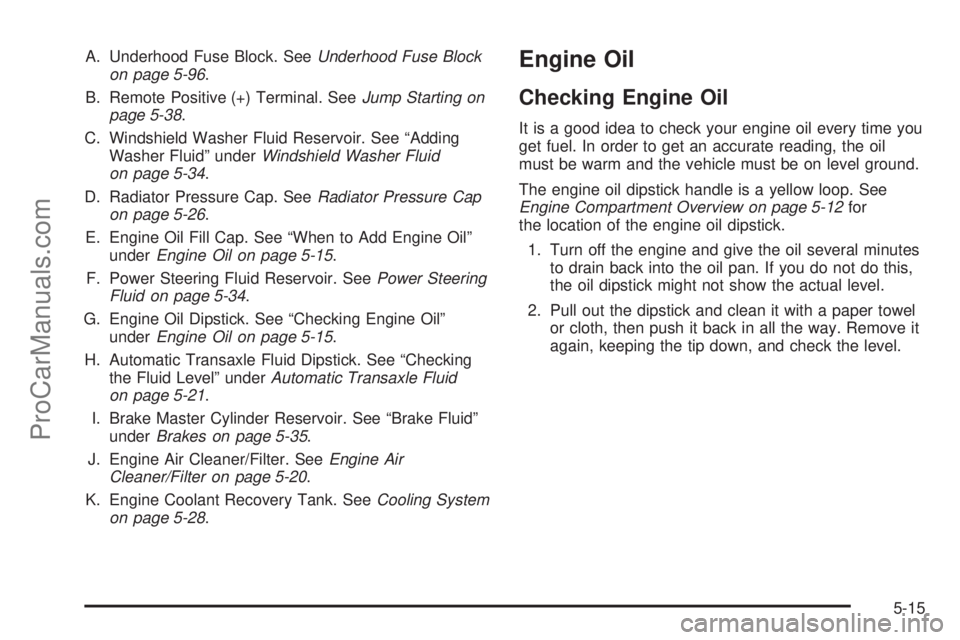
A. Underhood Fuse Block. SeeUnderhood Fuse Block
on page 5-96.
B. Remote Positive (+) Terminal. SeeJump Starting on
page 5-38.
C. Windshield Washer Fluid Reservoir. See “Adding
Washer Fluid” underWindshield Washer Fluid
on page 5-34.
D. Radiator Pressure Cap. SeeRadiator Pressure Cap
on page 5-26.
E. Engine Oil Fill Cap. See “When to Add Engine Oil”
underEngine Oil on page 5-15.
F. Power Steering Fluid Reservoir. SeePower Steering
Fluid on page 5-34.
G. Engine Oil Dipstick. See “Checking Engine Oil”
underEngine Oil on page 5-15.
H. Automatic Transaxle Fluid Dipstick. See “Checking
the Fluid Level” underAutomatic Transaxle Fluid
on page 5-21.
I. Brake Master Cylinder Reservoir. See “Brake Fluid”
underBrakes on page 5-35.
J. Engine Air Cleaner/Filter. SeeEngine Air
Cleaner/Filter on page 5-20.
K. Engine Coolant Recovery Tank. SeeCooling System
on page 5-28.Engine Oil
Checking Engine Oil
It is a good idea to check your engine oil every time you
get fuel. In order to get an accurate reading, the oil
must be warm and the vehicle must be on level ground.
The engine oil dipstick handle is a yellow loop. See
Engine Compartment Overview on page 5-12for
the location of the engine oil dipstick.
1. Turn off the engine and give the oil several minutes
to drain back into the oil pan. If you do not do this,
the oil dipstick might not show the actual level.
2. Pull out the dipstick and clean it with a paper towel
or cloth, then push it back in all the way. Remove it
again, keeping the tip down, and check the level.
5-15
ProCarManuals.com
Page 352 of 458
4. Open the hoods and locate the batteries. Find the
positive (+) and negative (−) terminal locations on
each vehicle.
You will not need to access your battery for jump
starting. Your vehicle has a remote positive (+) jump
starting terminal for that purpose.
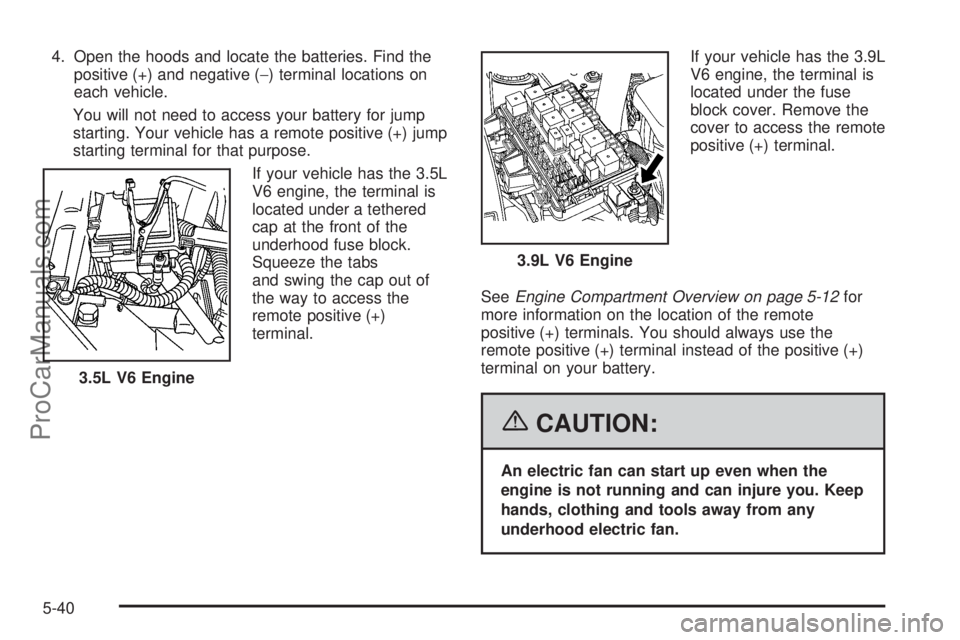
If your vehicle has the 3.5L
V6 engine, the terminal is
located under a tethered
cap at the front of the
underhood fuse block.
Squeeze the tabs
and swing the cap out of
the way to access the
remote positive (+)
terminal.If your vehicle has the 3.9L
V6 engine, the terminal is
located under the fuse
block cover. Remove the
cover to access the remote
positive (+) terminal.
SeeEngine Compartment Overview on page 5-12for
more information on the location of the remote
positive (+) terminals. You should always use the
remote positive (+) terminal instead of the positive (+)
terminal on your battery.
{CAUTION:
An electric fan can start up even when the
engine is not running and can injure you. Keep
hands, clothing and tools away from any
underhood electric fan. 3.5L V6 Engine
3.9L V6 Engine
5-40
ProCarManuals.com
Page 354 of 458
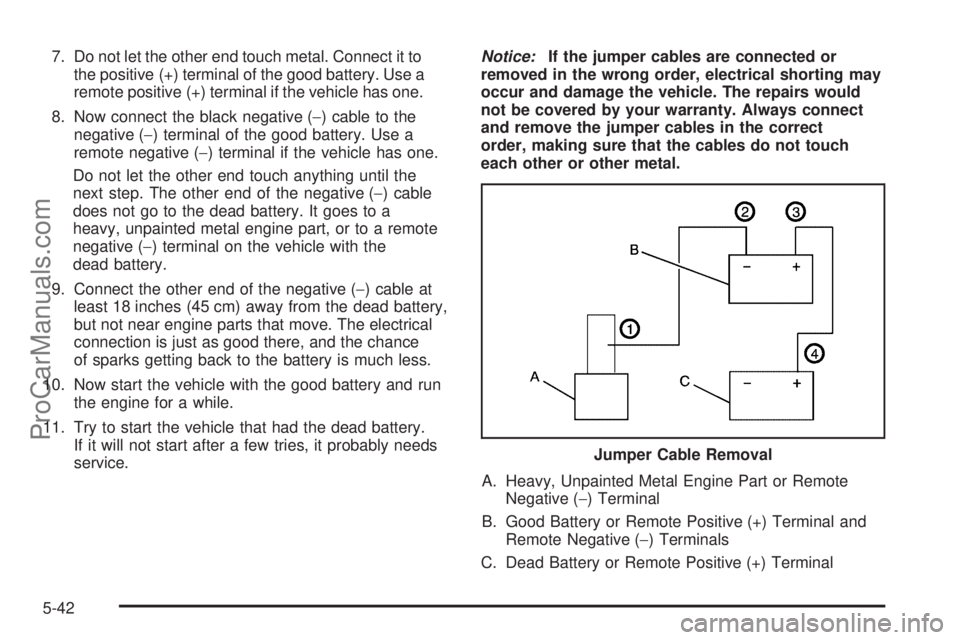
7. Do not let the other end touch metal. Connect it to
the positive (+) terminal of the good battery. Use a
remote positive (+) terminal if the vehicle has one.
8. Now connect the black negative (−) cable to the
negative (−) terminal of the good battery. Use a
remote negative (−) terminal if the vehicle has one.
Do not let the other end touch anything until the
next step. The other end of the negative (−) cable
does not go to the dead battery. It goes to a
heavy, unpainted metal engine part, or to a remote
negative (−) terminal on the vehicle with the
dead battery.
9. Connect the other end of the negative (−) cable at
least 18 inches (45 cm) away from the dead battery,
but not near engine parts that move. The electrical
connection is just as good there, and the chance
of sparks getting back to the battery is much less.
10. Now start the vehicle with the good battery and run
the engine for a while.
11. Try to start the vehicle that had the dead battery.
If it will not start after a few tries, it probably needs
service.Notice:If the jumper cables are connected or
removed in the wrong order, electrical shorting may
occur and damage the vehicle. The repairs would
not be covered by your warranty. Always connect
and remove the jumper cables in the correct
order, making sure that the cables do not touch
each other or other metal.
A. Heavy, Unpainted Metal Engine Part or Remote
Negative (−) Terminal
B. Good Battery or Remote Positive (+) Terminal and
Remote Negative (−) Terminals
C. Dead Battery or Remote Positive (+) TerminalJumper Cable Removal
5-42
ProCarManuals.com