remote control CHEVROLET UPLANDER 2006 Owners Manual
[x] Cancel search | Manufacturer: CHEVROLET, Model Year: 2006, Model line: UPLANDER, Model: CHEVROLET UPLANDER 2006Pages: 458, PDF Size: 3.19 MB
Page 1 of 458
Seats and Restraint Systems........................... 1-1
Front Seats
............................................... 1-2
Rear Seats
............................................... 1-6
Safety Belts
.............................................1-21
Child Restraints
.......................................1-40
Airbag System
.........................................1-74
Restraint System Check
............................1-89
Features and Controls..................................... 2-1
Keys
........................................................ 2-3
Doors and Locks
......................................2-10
Windows
.................................................2-24
Theft-Deterrent Systems
............................2-26
Starting and Operating Your Vehicle
...........2-30
Mirrors
....................................................2-41
OnStar
®System
......................................2-42
Universal Home Remote System
................2-44
Storage Areas
.........................................2-48
Instrument Panel............................................. 3-1
Instrument Panel Overview
.......................... 3-4
Climate Controls
......................................3-24
Warning Lights, Gages, and Indicators
........3-31
Driver Information Center (DIC)
..................3-46
Audio System(s)
.......................................3-77Driving Your Vehicle....................................... 4-1
Your Driving, the Road, and Your Vehicle
..... 4-2
Towing
...................................................4-35
Service and Appearance Care.......................... 5-1
Service
..................................................... 5-3
Fuel
......................................................... 5-5
Checking Things Under the Hood
...............5-10
All-Wheel Drive
........................................5-43
Bulb Replacement
....................................5-45
Windshield Wiper Blade Replacement
.........5-49
Tires
......................................................5-50
Appearance Care
.....................................5-84
Vehicle Identi�cation
.................................5-92
Electrical System
......................................5-93
Capacities and Speci�cations
.....................5-99
Maintenance Schedule..................................... 6-1
Maintenance Schedule
................................ 6-2
Customer Assistance and Information.............. 7-1
Customer Assistance and Information
........... 7-2
Reporting Safety Defects
...........................7-14
Index................................................................ 1
2006 Chevrolet Uplander Owner ManualM
ProCarManuals.com
Page 97 of 458
Keys...............................................................2-3
Remote Keyless Entry System.........................2-4
Remote Keyless Entry System Operation...........2-5
Doors and Locks............................................2-10
Door Locks..................................................2-10
Power Door Locks........................................2-11
Delayed Locking...........................................2-12
Automatic Door Lock.....................................2-12
Programmable Automatic Door Unlock.............2-13
Lockout Protection........................................2-13
Dual Sliding Doors........................................2-13
Power Sliding Door (PSD)..............................2-16
Liftgate........................................................2-22
Windows........................................................2-24
Power Windows............................................2-25
Manual Rear Quarter Windows.......................2-25
Power Rear Quarter Windows........................2-26
Sun Visors...................................................2-26
Theft-Deterrent Systems..................................2-26
Content Theft-Deterrent.................................2-27
PASS-Key
®III ..............................................2-28
PASS-Key®III Operation...............................2-29Starting and Operating Your Vehicle................2-30
New Vehicle Break-In....................................2-30
Ignition Positions..........................................2-31
Retained Accessory Power (RAP)...................2-31
Starting the Engine.......................................2-32
Engine Coolant Heater..................................2-33
Automatic Transaxle Operation.......................2-34
Parking Brake..............................................2-37
Shifting Into Park (P).....................................2-38
Shifting Out of Park (P).................................2-39
Parking Over Things That Burn.......................2-39
Engine Exhaust............................................2-40
Running the Engine While Parked...................2-40
Mirrors...........................................................2-41
Outside Power Mirrors...................................2-41
Outside Convex Mirror...................................2-42
Outside Heated Mirrors..................................2-42
OnStar
®System.............................................2-42
Universal Home Remote System......................2-44
Universal Home Remote System Operation......2-45
Section 2 Features and Controls
2-1
ProCarManuals.com
Page 105 of 458
After two remote starts have been provided, the
vehicle’s ignition switch must be turned to RUN and
then back to LOCK using the key before the remote start
procedure can be used again.
If you enter the vehicle after a remote start, and the
engine is running, insert the key into the ignition switch
and turn it to the RUN position to drive the vehicle.
To manually shut off the engine after a remote start, do
any of the following:
Aim the remote keyless entry transmitter at the
vehicle and press the remote start button until
the parking lamps turn off.
Turn on the hazard warning �ashers.
Insert the vehicle’s key into the ignition switch and
turn the switch to RUN and then back to LOCK.
The remote vehicle start feature will not operate if:
The remote start system is disabled. See “REMOTE
START” underDIC Vehicle Personalization (Uplevel
Only) on page 3-69.
The vehicle’s key is in the ignition.
The vehicle’s hood, liftgate or doors are not closed.
The hazard warning �ashers are on.
There is an emission control system malfunction.
The engine coolant temperature is too high.
The oil pressure is low.
Two remote vehicle starts have already been
provided. The maximum number of remote starts or
remote start attempts between ignition cycles
with the key is two.
Remote Start Ready
If your vehicle does not have the remote vehicle start
feature, it may have the remote start ready feature. This
feature allows your dealer to add the manufacturer’s
remote vehicle start feature.
If the keyless entry transmitter has a plus (+) symbol on
the back cover, your vehicle has the remote start
ready feature. You can lock or unlock your vehicle from
approximately 197 feet (60 m) away.
See your dealer if you would like to add the
manufacturer’s remote vehicle start feature to your
vehicle.
2-9
ProCarManuals.com
Page 117 of 458
{CAUTION:
If your vehicle is facing downward on a steep
grade (15 percent or more), the door may not
stay open and could slam shut, possibly
injuring someone. To make sure the door does
not slam shut, turn on the power sliding door
feature. Then if the door closes, it will close
under the control of the power door system.
Power Sliding Door Second Row
Passenger Override (Deactivation)
To help avoid accidental operation of the sliding door(s)
by using the passenger PSD activation switch, press
the override (deactivation) part of the overhead console
switch. The door can still be manually opened from
the inside or outside with the override (deactivation) on.
To open a power sliding door(s) manually when the
overhead console switch is in override (deactivation)
position, pull the inside or outside door handle and slide
the door all the way back.To close the door(s) manually when the override
switch(es) is in the override (deactivation) position, pull
the inside or outside door handle and slide the door
all the way forward to the latched position.
To stop the door(s) immediately while the door(s) is
opening or closing, press the PSD override
(deactivation) part of the switch.
Pressing the PSD button(s) on the remote keyless entry
will open and close the door unless the door has
been manually locked using the mechanical slider.
Resetting the Power Sliding Door
The power sliding door may operate incorrectly or not at
all because of the following conditions:
A low voltage or dead battery
A disconnected battery
If the instrument panel PSD/fuse 21, LHPSD/fuse
24 or RHPSD/fuse 25 are removed or blown.
SeeFuses and Circuit Breakers on page 5-94for more
information.
2-21
ProCarManuals.com
Page 167 of 458
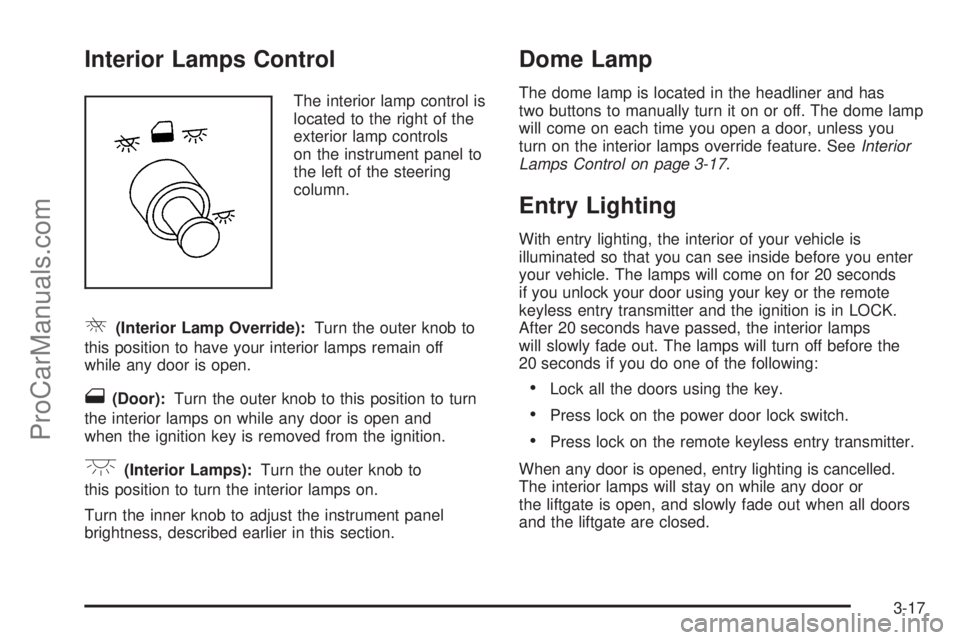
Interior Lamps Control
The interior lamp control is
located to the right of the
exterior lamp controls
on the instrument panel to
the left of the steering
column.
R(Interior Lamp Override):Turn the outer knob to
this position to have your interior lamps remain off
while any door is open.
1(Door):Turn the outer knob to this position to turn
the interior lamps on while any door is open and
when the ignition key is removed from the ignition.
+(Interior Lamps):Turn the outer knob to
this position to turn the interior lamps on.
Turn the inner knob to adjust the instrument panel
brightness, described earlier in this section.
Dome Lamp
The dome lamp is located in the headliner and has
two buttons to manually turn it on or off. The dome lamp
will come on each time you open a door, unless you
turn on the interior lamps override feature. SeeInterior
Lamps Control on page 3-17.
Entry Lighting
With entry lighting, the interior of your vehicle is
illuminated so that you can see inside before you enter
your vehicle. The lamps will come on for 20 seconds
if you unlock your door using your key or the remote
keyless entry transmitter and the ignition is in LOCK.
After 20 seconds have passed, the interior lamps
will slowly fade out. The lamps will turn off before the
20 seconds if you do one of the following:
Lock all the doors using the key.
Press lock on the power door lock switch.
Press lock on the remote keyless entry transmitter.
When any door is opened, entry lighting is cancelled.
The interior lamps will stay on while any door or
the liftgate is open, and slowly fade out when all doors
and the liftgate are closed.
3-17
ProCarManuals.com
Page 168 of 458
The interior lamps may stay on for up to 25 seconds
after all doors have been closed if they have not been
locked. SeeDelayed Lighting on page 3-18.
To turn the entry lighting feature off or on, seeDIC
Vehicle Personalization (Uplevel Only) on page 3-69.
Delayed Lighting
The delayed lighting feature will continue to illuminate
the interior for 20 seconds after all doors have been
closed, so that you can �nd your ignition and buckle your
safety belt at night. Delayed lighting will not occur
while the ignition is in RUN or ACCESSORY. After
20 seconds have passed, the interior lamps will slowly
fade out. The lamps will fade out before the 20 seconds
have passed if you do one of the following:
Turn the ignition to RUN or ACCESSORY.
Lock all doors using the remote keyless entry
transmitter.
Lock all doors using the power door lock switch or
the key.
To turn the delayed lighting feature off or on, seeDIC
Vehicle Personalization (Uplevel Only) on page 3-69.
Exit Lighting
With exit lighting, the interior lamps will come on for
about 25 seconds whenever you remove the key from
the ignition. If you turn the ignition key to RUN or
ACCESSORY, the lamps will fade out. The lamps will
also fade out if you lock the doors with the power
door lock switch or the remote keyless entry transmitter.
When any door is opened, exit lighting is cancelled.
The interior lamps will stay on while any door or
the liftgate is open, and slowly fade out when all doors
and the liftgate are closed.
The interior lamps may stay on for up to 20 seconds
after all doors have been closed if they have not been
locked. SeeDelayed Lighting on page 3-18.
To turn the exit lighting feature off or on, seeDIC
Vehicle Personalization (Uplevel Only) on page 3-69.
Front Reading Lamps
There are two reading lamps and one courtesy lamp in
the overhead console. To turn either reading lamp
on or off, press the lens of the lamp. The courtesy lamp
will come on each time you open a door, unless you
turn on the interior lamps override feature. SeeInterior
Lamps Control on page 3-17.
3-18
ProCarManuals.com
Page 207 of 458
To avoid added strain on the engine, turn off the air
conditioner if it is on. When the coolant temperature
returns to normal, the air conditioner can be turned
back on.
This message will display only when the ignition is in
RUN. A chime will sound continuously when this
message is displayed. Press any of the DIC buttons to
acknowledge this message and to clear it from the
screen.
This message will continue to display for two seconds if
it has not been acknowledged when the engine is
turned off. It will also re-display for two seconds if the
message has been acknowledged, but the condition still
exists when the engine is turned off.
If the condition still exists, the message will re-appear
when the engine is turned on.
HEADLAMPS SUGGESTED
This message will display when the amount of available
light outside of the vehicle is low, or the windshield
wipers have been on for approximately 30 seconds, and
the exterior lamps control is off or in the park lamps
position. This message informs the driver that turning on
the exterior lamps is recommended. SeeExterior
Lamps on page 3-14for more information.
This message will display while the ignition is in RUN.
Press any of the DIC buttons to acknowledge this
message and to clear it from the screen.This message will continue to display for two seconds if
it has not been acknowledged when the engine is
turned off. It will also re-display for two seconds if the
message has been acknowledged, but the condition still
exists when the engine is turned off.
If the condition still exists, the message will re-appear
when the engine is turned on.
HOOD AJAR
If your vehicle has the remote start feature, this
message will display when the hood is not closed
properly. When this message appears, you should make
sure that the hood is closed completely. SeeHood
Release on page 5-11.
This message will display while the ignition is in RUN.
Press any of the DIC buttons to acknowledge this
message and to clear it from the screen.
This message will continue to display for two seconds if
it has not been acknowledged when the engine is
turned off. It will also re-display for two seconds if the
message has been acknowledged, but the condition still
exists when the engine is turned off.
If the condition still exists, the message will re-appear
when the engine is turned on.
3-57
ProCarManuals.com
Page 213 of 458
REMOTE START DISABLED
This warning message will come on if a remote start
attempt is unsuccessful. This may be caused if any of
the following conditions are true when a remote
start attempt is made:
The remote start system is disabled through
the DIC.
The key is in the ignition.
The hood or the doors are not closed.
There is an emission control system malfunction.
The engine coolant temperature is too high.
The oil pressure is low.
The hazard warning �ashers are turned on.
The maximum number of remote starts or remote
start attempts between ignition cycles has been
reached.
The content theft-deterrent alarm is on while
attempting to remote start the vehicle.
See “REMOTE START” underDIC Vehicle
Personalization (Uplevel Only) on page 3-69and
“Remote Vehicle Start” underRemote Keyless Entry
System Operation on page 2-5for more information.
REMOTE START ON
If your vehicle has the remote start feature, this
message will display when a remote start is initiated.
See “Remote Vehicle Start” underRemote Keyless Entry
System Operation on page 2-5for more information.
RIGHT FRONT TURN LAMP OUT
This message will display when the right front turn
signal bulb needs to be replaced. SeeHeadlamps and
Sidemarker Lamps on page 5-45.
This message will display while the ignition is in RUN.
Press any of the DIC buttons to acknowledge this
message and to clear it from the screen.
This message will continue to display for two seconds if
it has not been acknowledged when the engine is
turned off. It will also re-display for two seconds if the
message has been acknowledged, but the condition still
exists when the engine is turned off.
If the condition still exists, the message will re-appear
when the engine is turned on.
3-63
ProCarManuals.com
Page 248 of 458
Rear Seat Entertainment System
Your vehicle may have a DVD Rear Seat Entertainment
(RSE) system. The RSE system includes a DVD player, a
video display screen, auxiliary inputs, two sets of wireless
headphones (if included), and a remote control.
Parental Control
rj
(Parental Control):This button is located behind
the video screen, below the auxiliary jacks. Press this
button while using RSA, or when a DVD or CD is playing
to blank the video screen and to mute the audio. The
power indicator lights on the DVD player will �ash.
Turning on the parental control will also disable all other
button operations from the remote control and the
DVD player, except for the eject button. Press this
button again to restore operation of the RSA, DVD
player, and remote control.
This button may also be used to turn the DVD player
power on and automatically resume play if the vehicle is
on and a disc is in the player. If no disc is in the
player, the system will power up in auxiliary mode.
Before You Drive
The RSE is designed for rear seat passengers only.
The driver cannot safely view the video screen
while driving and should not try to do so. The RSE
system will play DVD, CD, and MP3 discs. You can also
connect an auxiliary device to the RSE system to play
games, watch videos, look at pictures, etc.
Normal operation may be limited under extremely low or
high temperatures, in order to protect the system
from damage. Operate the RSE system under normal or
comfortable cabin temperature ranges.
Headphones
Wireless Headphones
The RSE system may include two sets of wireless
headphones (batteries are included).
The wireless headphones have an ON/OFF switch, a
channel select switch, and a volume control. To use the
headphones, turn the switch to ON. An indicator light on
the headphones will illuminate. If the light does not
illuminate, the batteries may need to be replaced. See
“Battery Replacement” later in this section for more
information. Switch the headphones to OFF when not
in use.
3-98
ProCarManuals.com
Page 251 of 458
To use the auxiliary audio and video inputs, connect an
external auxiliary device such as a camcorder to the
RCA jacks and turn on both the auxiliary device power
and the power on the front of the RSE player.
If a disc is present when the RSE power is turned on,
the player will automatically begin playing the disc
and the user will need to press the AUX button on the
remote control or on the DVD player faceplate to switch
the system between the DVD player and the auxiliary
device. See “DVD Player” and “Remote Control” later in
this section for more information.
Audio Output
Audio from the DVD player or auxiliary devices can be
heard through the following possible sources:
Vehicle Speakers
Wireless Headphones
Wired Headphones (not included)
Vehicle Speakers
Only one audio source can be heard through the
vehicle’s speakers at a time.
The RSE system or an auxiliary device can be heard
through all of the vehicle’s speakers when the following
occurs:
A DVD or auxiliary device is playing
The front audio system is on and the CD AUX
button is pressed to enable the RSE system
DVD will appear on the radio display when the RSE
system is on.
To turn the vehicles speakers on and off, press the CD
AUX button on the radio. The audio from the RSE
system can be heard through the wireless headphones
and the vehicles speakers at the same time. The
volume on the radio may vary when switching between
the radio, CD, DVD, MP3, or an auxiliary device.
3-101
ProCarManuals.com