seats CHEVROLET UPLANDER 2008 1.G Owner's Manual
[x] Cancel search | Manufacturer: CHEVROLET, Model Year: 2008, Model line: UPLANDER, Model: CHEVROLET UPLANDER 2008 1.GPages: 476, PDF Size: 5.77 MB
Page 78 of 476
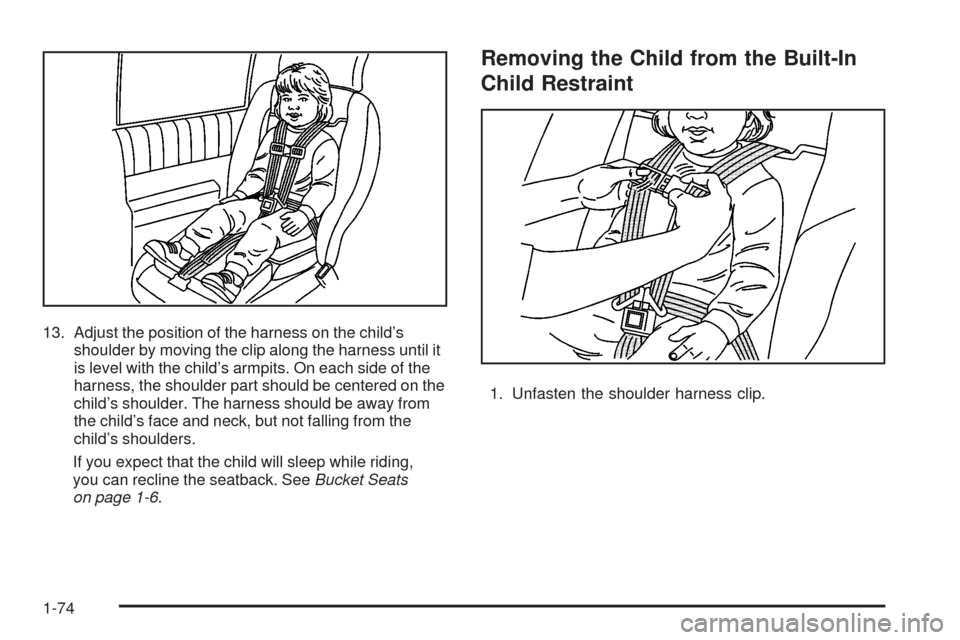
13. Adjust the position of the harness on the child’s
shoulder by moving the clip along the harness until it
is level with the child’s armpits. On each side of the
harness, the shoulder part should be centered on the
child’s shoulder. The harness should be away from
the child’s face and neck, but not falling from the
child’s shoulders.
If you expect that the child will sleep while riding,
you can recline the seatback. SeeBucket Seats
on page 1-6.
Removing the Child from the Built-In
Child Restraint
1. Unfasten the shoulder harness clip.
1-74
Page 94 of 476
Servicing Your Airbag-Equipped
Vehicle
Airbags affect how your vehicle should be serviced.
There are parts of the airbag system in several places
around your vehicle. Your dealer/retailer and the service
manual have information about servicing your vehicle and
the airbag system. To purchase a service manual, see
Service Publications Ordering Information on page 7-15.
{CAUTION:
For up to 10 seconds after the ignition is
turned off and the battery is disconnected,
an airbag can still in�ate during improper
service. You can be injured if you are close
to an airbag when it in�ates. Avoid yellow
connectors. They are probably part of the
airbag system. Be sure to follow proper
service procedures, and make sure the person
performing work for you is quali�ed to do so.
Adding Equipment to Your
Airbag-Equipped Vehicle
Q:Is there anything I might add to or change
about the vehicle that could keep the airbags
from working properly?
A:Yes. If you add things that change your vehicle’s
frame, bumper system, height, front end or side
sheet metal, they may keep the airbag system from
working properly. Changing or moving any parts
of the front seats, safety belts, the airbag sensing
and diagnostic module, steering wheel, instrument
panel, front sensors, or airbag wiring can affect
the operation of the airbag system.
In addition, your vehicle has a passenger sensing
system for the right front passenger’s position,
which includes sensors that are part of the
passenger’s seat. The passenger sensing system
may not operate properly if the original seat
trim is replaced with non-GM covers, upholstery
or trim, or with GM covers, upholstery or trim
designed for a different vehicle. Any object,
such as an aftermarket seat heater or a comfort
enhancing pad or device, installed under or on
top of the seat fabric, could also interfere with
the operation of the passenger sensing system.
1-90
Page 152 of 476
Reprogramming a Single Universal
Home Remote Button
To reprogram any of the three Universal Home Remote
buttons, repeat the programming instructions earlier
in this section, beginning with Step 2.
For help or information on the Universal Home Remote
System, call the customer assistance phone number
underCustomer Assistance Offices on page 7-5.
Storage Areas
Your vehicle’s large carrying capacity can store many
items. If the vehicle has an extended wheelbase, it can
carry even larger items. The �oor pins that are used
to attach the seats, can be used to secure larger loads.
Glove Box
To open, lift the handle up. Use the key to lock and
unlock.
Cupholder(s)
There are cupholders located below the center
instrument panel switchbank. The cupholders have a
rubber liner that can be removed, so that larger cups can
�t into the cupholders. You can also remove the liner
to clean it.
To use the cupholders, pull the tray out. Push the tray
back when not in use.
Your vehicle may be equipped with cupholders in the
second row.
Overhead Console (Without Rail)
If your vehicle has an overhead console without the rail
system, it has two reading lights, a courtesy light,
and a switchbank. SeeOverhead Console Switchbank
on page 3-21for more information.
2-56
Page 155 of 476
Floor Console Storage Area
Your vehicle may have a storage compartment located
on the front console below the front cupholders. Pull
up and then forward on the handle to open the storage
compartment.
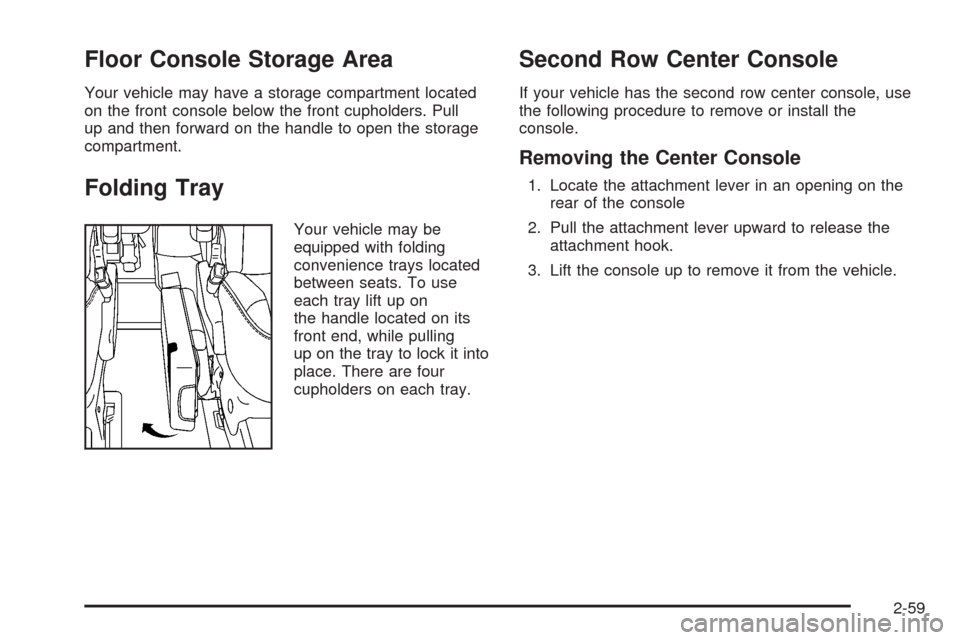
Folding Tray
Your vehicle may be
equipped with folding
convenience trays located
between seats. To use
each tray lift up on
the handle located on its
front end, while pulling
up on the tray to lock it into
place. There are four
cupholders on each tray.
Second Row Center Console
If your vehicle has the second row center console, use
the following procedure to remove or install the
console.
Removing the Center Console
1. Locate the attachment lever in an opening on the
rear of the console
2. Pull the attachment lever upward to release the
attachment hook.
3. Lift the console up to remove it from the vehicle.
2-59
Page 156 of 476
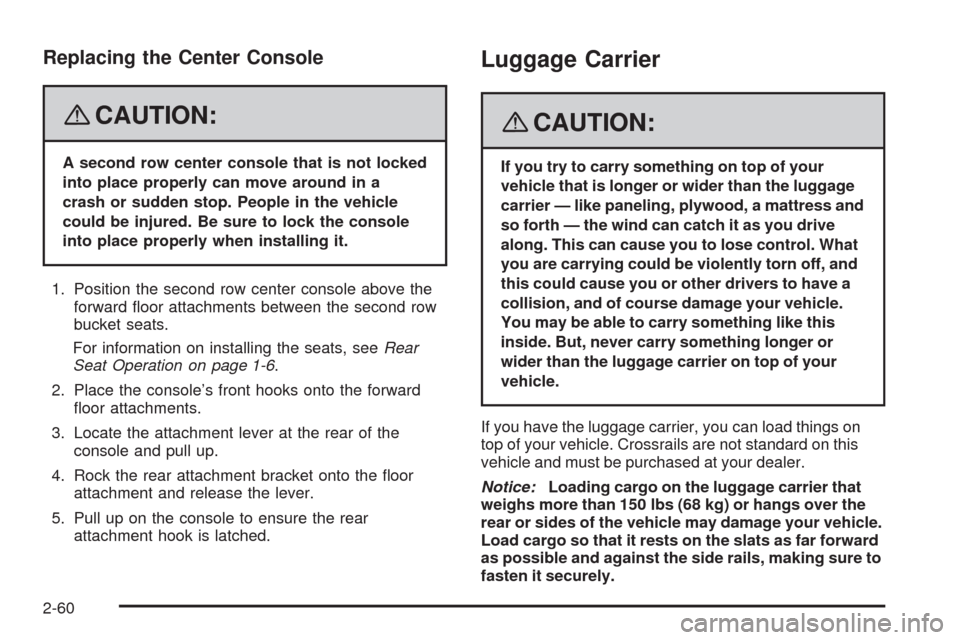
Replacing the Center Console
{CAUTION:
A second row center console that is not locked
into place properly can move around in a
crash or sudden stop. People in the vehicle
could be injured. Be sure to lock the console
into place properly when installing it.
1. Position the second row center console above the
forward �oor attachments between the second row
bucket seats.
For information on installing the seats, seeRear
Seat Operation on page 1-6.
2. Place the console’s front hooks onto the forward
�oor attachments.
3. Locate the attachment lever at the rear of the
console and pull up.
4. Rock the rear attachment bracket onto the �oor
attachment and release the lever.
5. Pull up on the console to ensure the rear
attachment hook is latched.
Luggage Carrier
{CAUTION:
If you try to carry something on top of your
vehicle that is longer or wider than the luggage
carrier — like paneling, plywood, a mattress and
so forth — the wind can catch it as you drive
along. This can cause you to lose control. What
you are carrying could be violently torn off, and
this could cause you or other drivers to have a
collision, and of course damage your vehicle.
You may be able to carry something like this
inside. But, never carry something longer or
wider than the luggage carrier on top of your
vehicle.
If you have the luggage carrier, you can load things on
top of your vehicle. Crossrails are not standard on this
vehicle and must be purchased at your dealer.
Notice:Loading cargo on the luggage carrier that
weighs more than 150 lbs (68 kg) or hangs over the
rear or sides of the vehicle may damage your vehicle.
Load cargo so that it rests on the slats as far forward
as possible and against the side rails, making sure to
fasten it securely.
2-60
Page 165 of 476
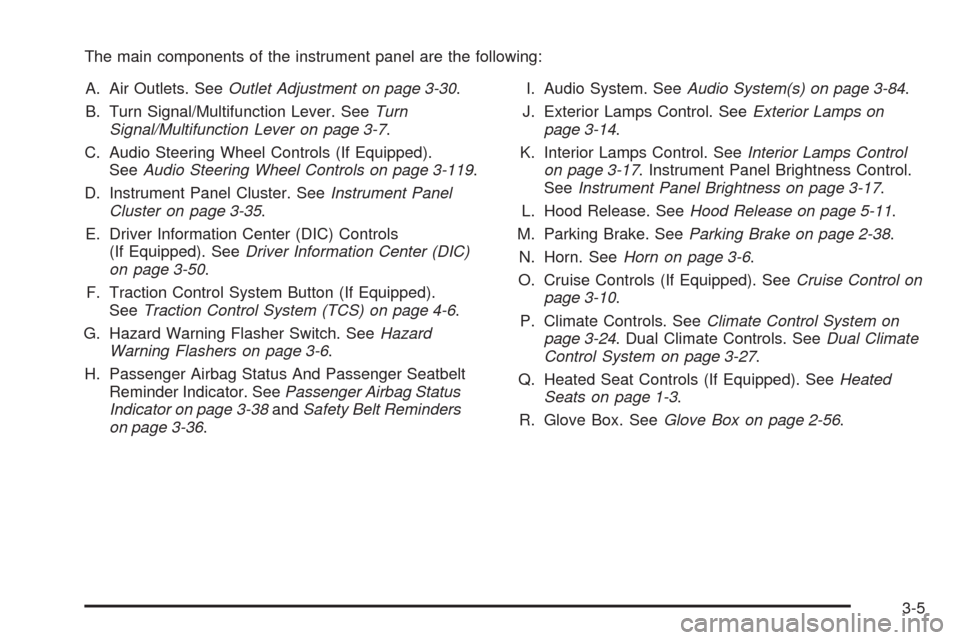
The main components of the instrument panel are the following:
A. Air Outlets. SeeOutlet Adjustment on page 3-30.
B. Turn Signal/Multifunction Lever. SeeTurn
Signal/Multifunction Lever on page 3-7.
C. Audio Steering Wheel Controls (If Equipped).
SeeAudio Steering Wheel Controls on page 3-119.
D. Instrument Panel Cluster. SeeInstrument Panel
Cluster on page 3-35.
E. Driver Information Center (DIC) Controls
(If Equipped). SeeDriver Information Center (DIC)
on page 3-50.
F. Traction Control System Button (If Equipped).
SeeTraction Control System (TCS) on page 4-6.
G. Hazard Warning Flasher Switch. SeeHazard
Warning Flashers on page 3-6.
H. Passenger Airbag Status And Passenger Seatbelt
Reminder Indicator. SeePassenger Airbag Status
Indicator on page 3-38andSafety Belt Reminders
on page 3-36.I. Audio System. SeeAudio System(s) on page 3-84.
J. Exterior Lamps Control. SeeExterior Lamps on
page 3-14.
K. Interior Lamps Control. SeeInterior Lamps Control
on page 3-17. Instrument Panel Brightness Control.
SeeInstrument Panel Brightness on page 3-17.
L. Hood Release. SeeHood Release on page 5-11.
M. Parking Brake. SeeParking Brake on page 2-38.
N. Horn. SeeHorn on page 3-6.
O. Cruise Controls (If Equipped). SeeCruise Control on
page 3-10.
P. Climate Controls. SeeClimate Control System on
page 3-24. Dual Climate Controls. SeeDual Climate
Control System on page 3-27.
Q. Heated Seat Controls (If Equipped). SeeHeated
Seats on page 1-3.
R. Glove Box. SeeGlove Box on page 2-56.
3-5
Page 180 of 476
Electric Power Management
The vehicle has Electric Power Management (EPM)
that estimates the battery’s temperature and state
of charge. It then adjusts the voltage for best
performance and extended life of the battery.
When the battery’s state of charge is low, the voltage is
raised slightly to quickly put the charge back in. When
the state of charge is high, the voltage is lowered slightly
to prevent overcharging. If the vehicle has a voltmeter
gage or a voltage display on the Driver Information
Center (DIC), you may see the voltage move up
or down. This is normal. If there is a problem,
an alert will be displayed.
The battery can be discharged at idle if the electrical
loads are very high. This is true for all vehicles.
This is because the generator (alternator) may
not be spinning fast enough at idle to produce all
the power that is needed for very high electrical loads.A high electrical load occurs when several of the
following loads are on: headlamps, high beams, fog
lamps, rear window defogger, climate control fan at
high speed, heated seats, engine cooling fans, trailer
loads, and loads plugged into accessory power outlets.
EPM works to prevent excessive discharge of the
battery. It does this by balancing the generator’s output
and the vehicle’s electrical needs. It can increase engine
idle speed to generate more power, whenever needed.
It can temporarily reduce the power demands of some
accessories.
Normally, these actions occur in steps or levels, without
being noticeable. In rare cases at the highest levels of
corrective action, this action may be noticeable to the
driver. If so, a Driver Information Center (DIC) message
might be displayed, such as Battery Saver Active or
Service Battery Charging System. If this message is
displayed, it is recommended that the driver reduce the
electrical loads as much as possible. SeeDIC Warnings
and Messages on page 3-58.
3-20
Page 183 of 476
Power Outlet 115 Volt Alternating
Current
Your vehicle may have a power outlet that can be used
to plug in electrical equipment that uses a maximum
limit of 150 watts.
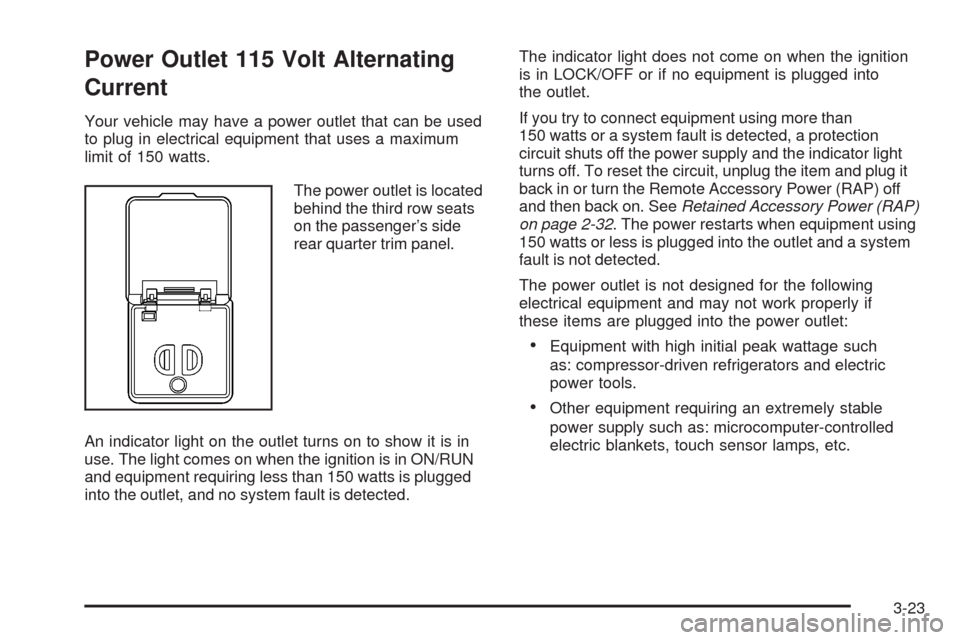
The power outlet is located
behind the third row seats
on the passenger’s side
rear quarter trim panel.
An indicator light on the outlet turns on to show it is in
use. The light comes on when the ignition is in ON/RUN
and equipment requiring less than 150 watts is plugged
into the outlet, and no system fault is detected.The indicator light does not come on when the ignition
is in LOCK/OFF or if no equipment is plugged into
the outlet.
If you try to connect equipment using more than
150 watts or a system fault is detected, a protection
circuit shuts off the power supply and the indicator light
turns off. To reset the circuit, unplug the item and plug it
back in or turn the Remote Accessory Power (RAP) off
and then back on. SeeRetained Accessory Power (RAP)
on page 2-32. The power restarts when equipment using
150 watts or less is plugged into the outlet and a system
fault is not detected.
The power outlet is not designed for the following
electrical equipment and may not work properly if
these items are plugged into the power outlet:
Equipment with high initial peak wattage such
as: compressor-driven refrigerators and electric
power tools.
Other equipment requiring an extremely stable
power supply such as: microcomputer-controlled
electric blankets, touch sensor lamps, etc.
3-23
Page 185 of 476
Operation
Turn the right knob clockwise or counterclockwise to
direct the air�ow inside of your vehicle.
To change the current mode, select one of the following:
H(Vent):This mode directs air to the instrument
panel outlets.
)(Bi-Level):This mode directs half of the air to the
instrument panel outlets, then directs the remaining
air to the �oor outlets. Cooler air is directed to the
upper outlets and warmer air to the �oor outlets.
6(Floor):This mode directs most of the air to the
�oor outlets. Use this mode to send air to the rear of
the vehicle. Keep the area under the front seats free
of objects that could obstruct air�ow to the rear of
the vehicle.
The right knob can also be used to select defog or
defrost mode. For more information, see “Defogging
and Defrosting” later in this section.
Outside Air:This mode will be automatically selected
when your vehicle is in any mode except maximum
air conditioning.
A(Fan):Turn the left knob clockwise or
counterclockwise to increase or decrease the fan speed.
Turn the knob to 0 to turn off the fan. The fan must
be turned on for the air conditioning compressor
to operate.
Temperature Control:Turn the center knob clockwise
or counterclockwise to increase or decrease the air
temperature inside your vehicle.
#(Air Conditioning):Press this button to turn the
air-conditioning system on or off. When it is pressed,
an indicator light in the button will come on to let
you know that air conditioning is activated.
You may notice a slight change in engine performance
when the air conditioning compressor shuts off and
turns on again. This is normal. The system is designed
to make adjustments to help with fuel economy while
still maintaining the selected temperature.
On hot days, open the windows to let hot inside air
escape; then close them. This helps to reduce the time
it takes for your vehicle to cool down. It also helps
the system to operate more efficiently.
3-25
Page 186 of 476
The air conditioning system removes moisture from the
air, so you may sometimes notice a small amount of
water dripping underneath your vehicle while idling
or after turning off the engine. This is normal.
@MAX A/C (Maximum Air Conditioning):Turn the
right knob to this position for maximum air conditioning.
This will select air conditioning and recirculation for
maximum cooling of your vehicle. This mode directs
air to the instrument panel outlets.
Recirculation:This mode keeps outside air from
coming in the vehicle. It can be used to prevent outside
air and odors from entering your vehicle or help heat
or cool the air inside your vehicle more quickly.
This mode will automatically be selected when
you select maximum air conditioning.
((Heated Seats):Press this button to turn on the
heated seats. The button on the left controls the driver’s
seat and the button on the right controls the passenger’s
seat. SeeHeated Seats on page 1-3for additional
information.
Defogging and Defrosting
Fog on the inside of windows is a result of high humidity,
or moisture, condensing on the cool window glass.
This can be minimized if the climate control system is
used properly. There are two modes to clear fog or frost
from your windshield. Use the defog mode to clear the
windows of fog or moisture and warm the passengers.
Use the defrost mode to remove fog or frost from the
windshield more quickly.
Turn the right knob to select the defog or defrost mode.
-(Defog):This mode directs air to the windshield
and the �oor outlets. When you select this mode,
the system runs the air-conditioning compressor
unless the outside temperature is at or below freezing.
The recirculation mode cannot be selected while in
the defog mode.
0(Defrost):This mode directs most of the air to the
windshield and the side window outlets, with some air
directed to the �oor outlets. In this mode, the system
will automatically run the air-conditioning compressor,
unless the outside temperature is at or below freezing.
Recirculation cannot be selected while in the
defrost mode.
Do not drive the vehicle until all the windows are clear.
3-26