seat adjustment CHEVROLET UPLANDER 2009 1.G Owners Manual
[x] Cancel search | Manufacturer: CHEVROLET, Model Year: 2009, Model line: UPLANDER, Model: CHEVROLET UPLANDER 2009 1.GPages: 464, PDF Size: 2.59 MB
Page 13 of 464
Adjusting the Bucket Seats Forward
and Rearward
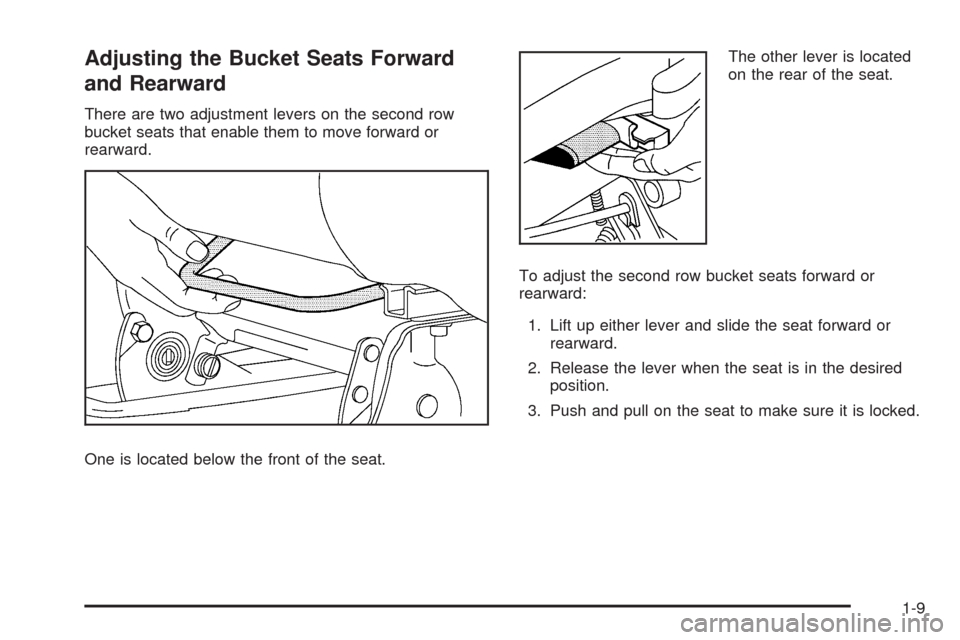
There are two adjustment levers on the second row
bucket seats that enable them to move forward or
rearward.
One is located below the front of the seat.The other lever is located
on the rear of the seat.
To adjust the second row bucket seats forward or
rearward:
1. Lift up either lever and slide the seat forward or
rearward.
2. Release the lever when the seat is in the desired
position.
3. Push and pull on the seat to make sure it is locked.
1-9
Page 18 of 464
5. Pull the nylon strap, located on the rear right hand
side of the seat, or lift the recline lever, located on
the front right hand side of the seatback, to
raise the seatback to the upright position.
{CAUTION:
If the seatback is not locked, it could move
forward in a sudden stop or crash. That could
cause injury to the person sitting there. Always
push and pull on the seatback to be sure it is
locked.
6. Push and pull on the seatback to make sure that it
is locked.
Captain Chairs
Your vehicle may have second row captain chairs. If so,
they can be adjusted forward or rearward and the
seatbacks can be adjusted.
Adjusting the Captain Chairs Forward
and Rearward
There are two manual adjustment bars on each seat. One
is located under the front of the seat cushion. The other
one is located under the rear of the seat cushion.
Lift up either bar to slide the seat forward or rearward.
Release the lever. Push and pull on the seat to
make sure it is locked into place.
Folding or Reclining the Seatbacks
{CAUTION:
If the seatback is not locked, it could move forward
in a sudden stop or crash. That could cause injury
to the person sitting there. Always push and pull on
the seatback to be sure it is locked.
1-14
Page 23 of 464
Folding the Seatback(s)
Notice:Folding a rear seat with the safety belts
still fastened may cause damage to the seat or the
safety belts. Always unbuckle the safety belts
and return them to their normal stowed position
before folding a rear seat.
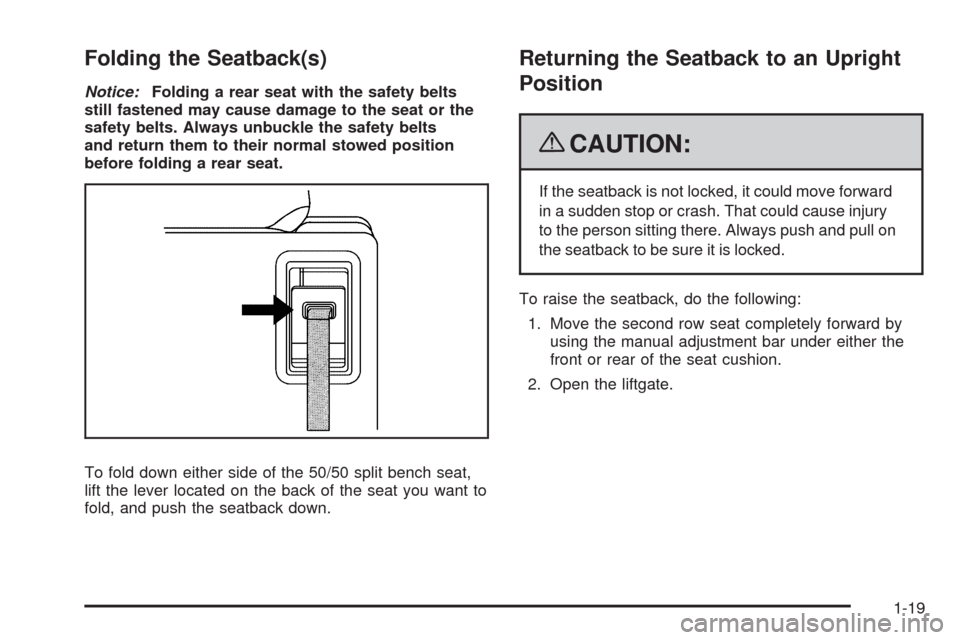
To fold down either side of the 50/50 split bench seat,
lift the lever located on the back of the seat you want to
fold, and push the seatback down.
Returning the Seatback to an Upright
Position
{CAUTION:
If the seatback is not locked, it could move forward
in a sudden stop or crash. That could cause injury
to the person sitting there. Always push and pull on
the seatback to be sure it is locked.
To raise the seatback, do the following:
1. Move the second row seat completely forward by
using the manual adjustment bar under either the
front or rear of the seat cushion.
2. Open the liftgate.
1-19
Page 41 of 464
Lap-Shoulder Belt
All seating positions in the vehicle have a
lap-shoulder belt.
The following instructions explain how to wear a
lap-shoulder belt properly.
1. Adjust the seat, if the seat is adjustable, so you can
sit up straight. To see how, see “Seats” in the Index.
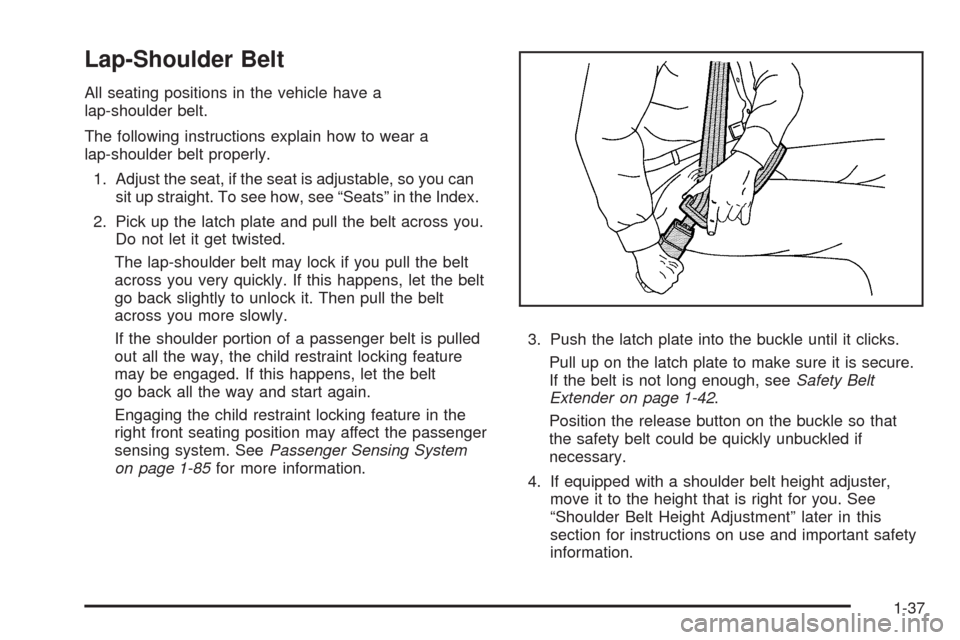
2. Pick up the latch plate and pull the belt across you.
Do not let it get twisted.
The lap-shoulder belt may lock if you pull the belt
across you very quickly. If this happens, let the belt
go back slightly to unlock it. Then pull the belt
across you more slowly.
If the shoulder portion of a passenger belt is pulled
out all the way, the child restraint locking feature
may be engaged. If this happens, let the belt
go back all the way and start again.
Engaging the child restraint locking feature in the
right front seating position may affect the passenger
sensing system. SeePassenger Sensing System
on page 1-85for more information.3. Push the latch plate into the buckle until it clicks.
Pull up on the latch plate to make sure it is secure.
If the belt is not long enough, seeSafety Belt
Extender on page 1-42.
Position the release button on the buckle so that
the safety belt could be quickly unbuckled if
necessary.
4. If equipped with a shoulder belt height adjuster,
move it to the height that is right for you. See
“Shoulder Belt Height Adjustment” later in this
section for instructions on use and important safety
information.
1-37
Page 43 of 464
Shoulder Belt Height Adjuster
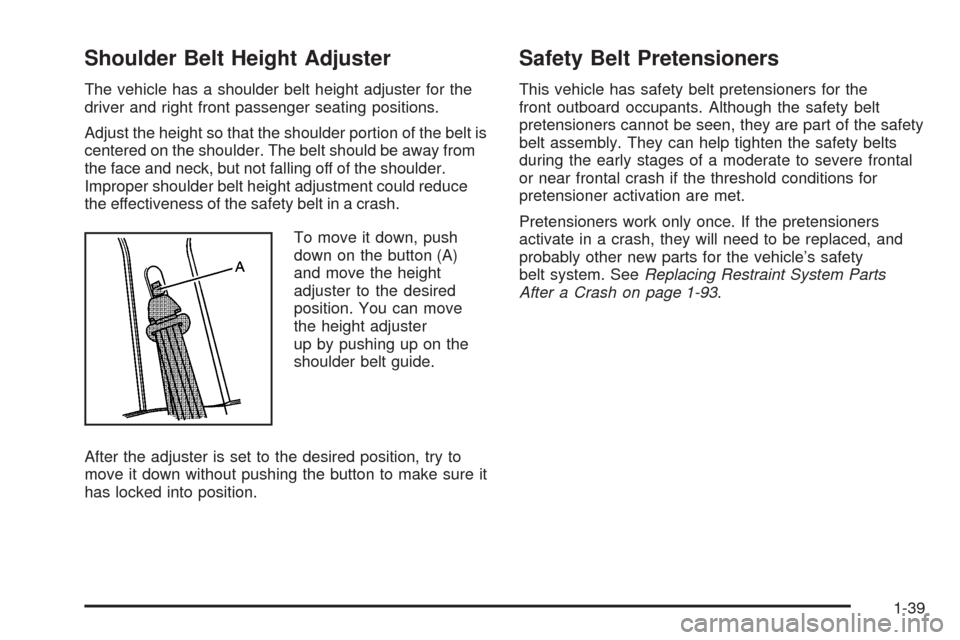
The vehicle has a shoulder belt height adjuster for the
driver and right front passenger seating positions.
Adjust the height so that the shoulder portion of the belt is
centered on the shoulder. The belt should be away from
the face and neck, but not falling off of the shoulder.
Improper shoulder belt height adjustment could reduce
the effectiveness of the safety belt in a crash.
To move it down, push
down on the button (A)
and move the height
adjuster to the desired
position. You can move
the height adjuster
up by pushing up on the
shoulder belt guide.
After the adjuster is set to the desired position, try to
move it down without pushing the button to make sure it
has locked into position.
Safety Belt Pretensioners
This vehicle has safety belt pretensioners for the
front outboard occupants. Although the safety belt
pretensioners cannot be seen, they are part of the safety
belt assembly. They can help tighten the safety belts
during the early stages of a moderate to severe frontal
or near frontal crash if the threshold conditions for
pretensioner activation are met.
Pretensioners work only once. If the pretensioners
activate in a crash, they will need to be replaced, and
probably other new parts for the vehicle’s safety
belt system. SeeReplacing Restraint System Parts
After a Crash on page 1-93.
1-39
Page 162 of 464
Tire Pressure Light.......................................3-38
Malfunction Indicator Lamp.............................3-38
Oil Pressure Light.........................................3-41
Security Light...............................................3-41
Cruise Control Light......................................3-42
Highbeam On Light.......................................3-42
Fuel Gage...................................................3-42
Low Fuel Warning Light.................................3-43
Driver Information Center (DIC).......................3-43
DIC Operation and Displays...........................3-44
DIC Compass (Uplevel Only)..........................3-49
DIC Warnings and Messages.........................3-51
DIC Vehicle Personalization (Uplevel Only).......3-68Audio System(s).............................................3-76
Setting the Clock..........................................3-77
Radio(s) (MP3).............................................3-77
Using an MP3..............................................3-89
XM Radio Messages.....................................3-92
Rear Seat Entertainment (RSE) System...........3-93
Rear Seat Audio (RSA)................................3-108
Theft-Deterrent Feature................................3-110
Audio Steering Wheel Controls......................3-111
Radio Reception.........................................3-112
Fixed Mast Antenna....................................3-113
XM™ Satellite Radio Antenna System............3-113
Chime Level Adjustment...............................3-113
Section 3 Instrument Panel
3-2
Page 165 of 464
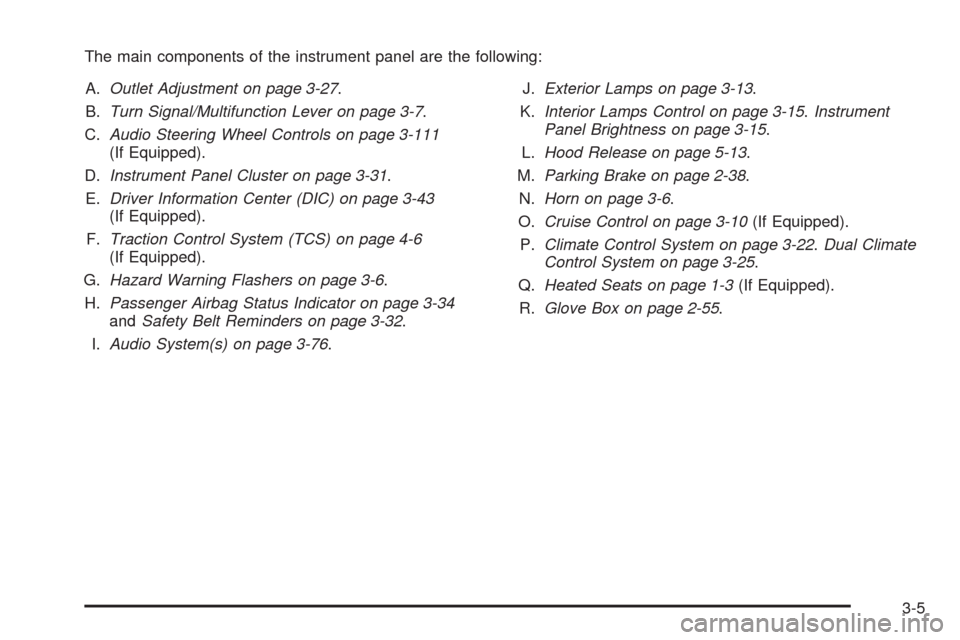
The main components of the instrument panel are the following:
A.Outlet Adjustment on page 3-27.
B.Turn Signal/Multifunction Lever on page 3-7.
C.Audio Steering Wheel Controls on page 3-111
(If Equipped).
D.Instrument Panel Cluster on page 3-31.
E.Driver Information Center (DIC) on page 3-43
(If Equipped).
F.Traction Control System (TCS) on page 4-6
(If Equipped).
G.Hazard Warning Flashers on page 3-6.
H.Passenger Airbag Status Indicator on page 3-34
andSafety Belt Reminders on page 3-32.
I.Audio System(s) on page 3-76.J.Exterior Lamps on page 3-13.
K.Interior Lamps Control on page 3-15.Instrument
Panel Brightness on page 3-15.
L.Hood Release on page 5-13.
M.Parking Brake on page 2-38.
N.Horn on page 3-6.
O.Cruise Control on page 3-10(If Equipped).
P.Climate Control System on page 3-22.Dual Climate
Control System on page 3-25.
Q.Heated Seats on page 1-3(If Equipped).
R.Glove Box on page 2-55.
3-5
Page 184 of 464
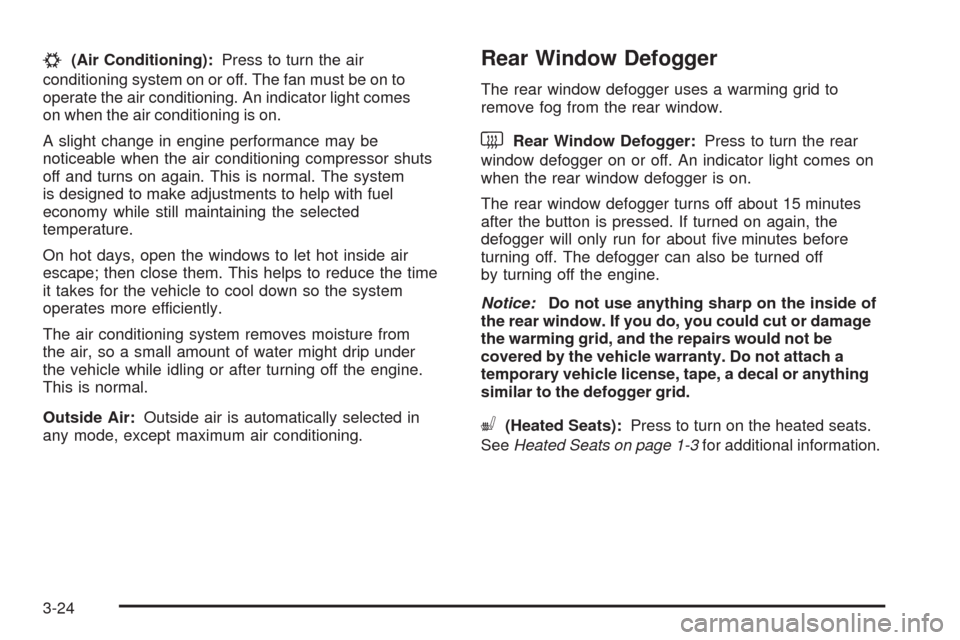
#(Air Conditioning):Press to turn the air
conditioning system on or off. The fan must be on to
operate the air conditioning. An indicator light comes
on when the air conditioning is on.
A slight change in engine performance may be
noticeable when the air conditioning compressor shuts
off and turns on again. This is normal. The system
is designed to make adjustments to help with fuel
economy while still maintaining the selected
temperature.
On hot days, open the windows to let hot inside air
escape; then close them. This helps to reduce the time
it takes for the vehicle to cool down so the system
operates more efficiently.
The air conditioning system removes moisture from
the air, so a small amount of water might drip under
the vehicle while idling or after turning off the engine.
This is normal.
Outside Air:Outside air is automatically selected in
any mode, except maximum air conditioning.Rear Window Defogger
The rear window defogger uses a warming grid to
remove fog from the rear window.
when the rear window defogger is on.
The rear window defogger turns off about 15 minutes
after the button is pressed. If turned on again, the
defogger will only run for about �ve minutes before
turning off. The defogger can also be turned off
by turning off the engine.
Notice:Do not use anything sharp on the inside of
the rear window. If you do, you could cut or damage
the warming grid, and the repairs would not be
covered by the vehicle warranty. Do not attach a
temporary vehicle license, tape, a decal or anything
similar to the defogger grid.
((Heated Seats):Press to turn on the heated seats.
SeeHeated Seats on page 1-3for additional information.
3-24
Page 186 of 464
)(Bi-Level):Air is divided between the instrument
panel and �oor outlets. Some air is directed towards the
windshield and side window outlets.
6(Floor):Air is directed to the �oor outlets. Use this
mode to send air to the rear of the vehicle. Keep the
area under the front seats free of objects that could
obstruct air�ow to the rear of the vehicle.
-(Defog):This mode clears the windows of fog or
moisture. Air is directed to the windshield and the �oor
outlets. When this mode is selected, the system runs
the air-conditioning compressor unless the outside
temperature is at or below freezing. The recirculation
mode cannot be selected while in the defog mode.
0(Defrost):This mode clears the windshield of fog
or frost more quickly. Air is directed to the windshield
and the side window outlets, with some air directed to
the �oor outlets. In this mode, the system automatically
runs the air-conditioning system, unless the outside
temperature is at or below freezing. Recirculation cannot
be selected while in the defrost mode.
Do not drive the vehicle until all the windows are clear.
#(Air Conditioning):Press to turn the air
conditioning system on or off. The fan must be on
to operate the air conditioning. An indicator light
comes on when the air conditioning is on.
A slight change in engine performance may be
noticeable when the air conditioning turns off and on
again. This is normal. The system is designed to make
adjustments to help with fuel economy while still
maintaining the selected temperature.
On hot days, open the windows to let hot inside air
escape; then close them. This helps to reduce the time
it takes for the vehicle to cool down so the system
operates more efficiently.
The air conditioning system removes moisture from
the air, so a small amount of water might drip under
the vehicle while idling or after turning off the engine.
This is normal.
Outside Air:Outside air is automatically selected in
any mode, except maximum air conditioning.
3-26
Page 187 of 464
Rear Window Defogger
The rear window defogger uses a warming grid to
remove fog from the rear window.
when the rear window defogger is on.
The rear window defogger turns off about 15 minutes
after the button is pressed. If turned on again, the
defogger will only run for about �ve minutes before
turning off. The defogger can also be turned off
by turning off the engine.
Notice:Do not use anything sharp on the inside of
the rear window. If you do, you could cut or damage
the warming grid, and the repairs would not be
covered by the vehicle warranty. Do not attach a
temporary vehicle license, tape, a decal or anything
similar to the defogger grid.
((Heated Seats):Press to turn on the heated seats.
SeeHeated Seats on page 1-3for additional
information.
Outlet Adjustment
Use the louvers located on the air outlets to change the
direction of the air�ow.
Use the thumbwheels on the driver side and passenger
side air outlets to open or close the air�ow from
these outlets.
Operation Tips
Clear away any ice, snow, or leaves from the air
inlets at the base of the vehicle that could block
the �ow of air into the vehicle.
Do not use any non-GM approved hood de�ectors
that could adversely affect the performance of the
system.
Keep the path under the front seats clear of objects
to help circulate the air inside of the vehicle more
effectively.
3-27