engine oil CHEVROLET VEGA 1976 1.G Owners Manual
[x] Cancel search | Manufacturer: CHEVROLET, Model Year: 1976, Model line: VEGA, Model: CHEVROLET VEGA 1976 1.GPages: 87, PDF Size: 32.36 MB
Page 15 of 87
Downloaded from www.Manualslib.com manuals search engine Maintenance
More frequent vehicle mainte
nance
is required when using your
car to pull a trailer. Change the:
• Automatic transmission fluid
and filter each
15,000 miles,
(see Trailering brochure for addi
tional information).
• Rear axle fluid each 15,000
miles,
• Engine oil each 90 days or 3,000
miles, whichever occurs first,
• Positive crankcase ventilation
valve each
12 months or 15,000
miles, whichever occurs first.
• See index for important informa
tion on belts, cooling system care
and automatic brake adjustment.
Break-in Schedule
In addition to the new car preak-in
instructions in this manual, it is
recommended that your new car
be operated for
500 miles before
trailer towing.
If it is necessary to
tow during this period, avoid speeds
over
50 MPH and full throttle
starts. The same precautions should
be observed whenever a new en
gine, transmission or axle
is in
stalled in your car.
1-10
Page 31 of 87
Downloaded from www.Manualslib.com manuals search engine Generator Indicator Light
The red light will go on when
the ignition key
is in the "on" posi
tion, but before the engine
is started.
After the engine starts, the light
should go out and remain out.
If
the light remains on when engine
is running, have your Authorized
Chevrolet Dealer locate and correct
the trouble
as soon as possible.
Temp. Pressure Indicator
Light
This indicator light is provided
in the instrument cluster to quickly
warn of an overheated engine
and/or extreme low oil pressure
or oil supply. This light will be on
when the ignition switch is turned
"ON" and should go out after the
engine
is started. Occasionally the
light may be seen to flicker momen
tarily, but this will do no harm. Ex
treme low oil pressure or oil supply
will prevent the electric fuel pump from
operating and under this con
dition the engine will not run.
If the light comes on during ex
treme driving conditions, such
as an
extended idle, turn off the air con
ditioner (if used) and run the en
gine slightly faster than idle speed
with the transmission in
neutral
gear. If the light does not go off
within a short period of time (1-2
minutes), then turn the engine off
until the cause of
the overheating is
corrected. Glance at the instrument
cluster frequently
as you drive to
see if this light is on.
Add Coolant Indicator Light
This indicator light is provided to
warn of a low coolant condition in
the radiator.
If coolant level is low
the yellow
"Add Coolant" warning
light will glow. Coolant level in the
coolant recovery tank, and radiator,
should be checked at the first oppor
tunity.
If necessary add sufficient
2-15
coolant to both the radiator and
coolant recovery tank.
(See Service
and Maintenance, Section 5, for
proper procedure) .
If frequent
additions are required, see your
dealer for a complete cooling sys
tem check.
Brake System Warning
Light
The service brake system is a dual
system designed so that one part will
provide some braking action in the
event of loss of hydraulic pressure
in the other part of the system.
If the
warning light labeled
"Brake" lo
cated in the speedometer face comes
on and stays
on when the ignition is
on and after the brakes have been
firmly applied
it may indicate that
there
is a malfunction in one part of
the brake system.
• As a reminder, the light is de
signed to come
on with the park
ing brake applied and the igni
tion on.
Page 33 of 87
Downloaded from www.Manualslib.com manuals search engine especially useful when driving on
dark roads since they provide ex
cellent long range illumination. The
headlight beam indicator will be on
whenever the high beams or
"brights" are in use. The Headlight
Beam
Switch controls the headlight
beams (see Page
2-12).
Light Switch
The three position light switch
controls the headlights, taillights,
parking lights, side marker lights,
instrument lights and dome lights
as shown. The headlamp circuit
is protected by a circuit breaker in
the light switch.
An overload on
the breaker will cause the lamps to
"flicker" on and off. If this condi
tion develops, have your headlamp
wiring checked immediately.
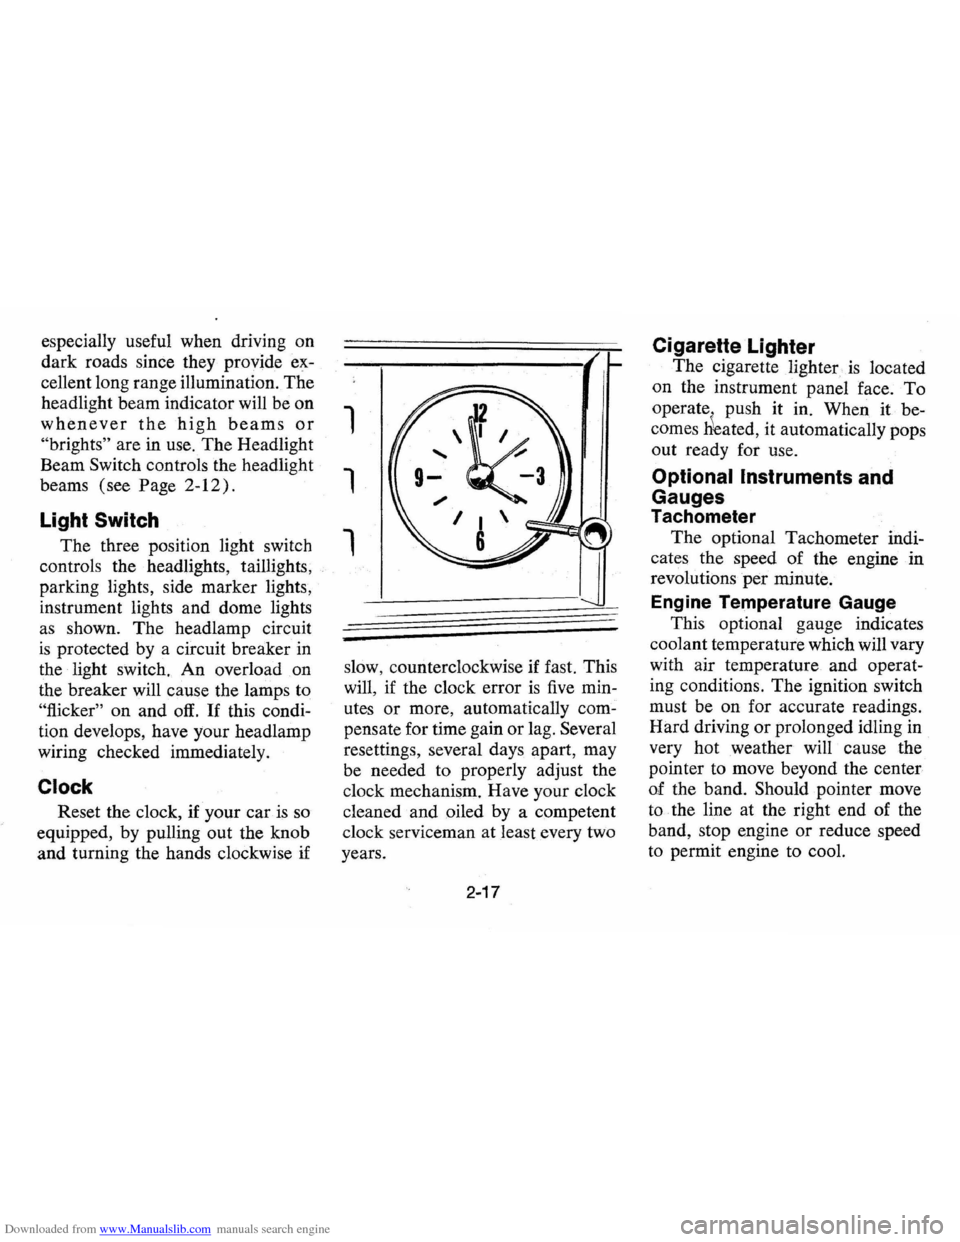
Clock
Reset the clock, if your car is so
equipped, by pulling out the knob
and turning the hands clockwise if
1
1
1
slow, counterclockwise if fast. This
will,
if the clock error is five min
utes
or more, automatically com
pensate for time gain or lag. Several
resettings, several days apart, may
be needed to properly adjust the
clock mechanism. Have your clock
cleaned and oiled by a competent
clock serviceman at least every two
years.
2-17
Cigarette Lighter
The cigarette lighter is located
on the instrument panel
face. To
operate . push it in. When it be
comes
Heated, it automatically pops
out ready for use.
Optional Instruments and
Gauges
Tachometer
The optional Tachometer indi
cates the speed of the engine in
revolutions
per minute.
Engine Temperature Gauge
This optional gauge indicates
coolant temperature which will vary
with air temperature and operat
ing conditions.
The ignition switch
must be on for accurate readings.
Hard driving
or prolonged idling in
very hot weather will cause the
pointer to move beyond the center
of the band. Should pointer move
to the line at the right end of the
band, stop engine or reduce speed
to permit engine to cool.
Page 51 of 87
Downloaded from www.Manualslib.com manuals search engine APPEARANCE CARE
CARE AND CLEANING OF
INTERIOR TRIM
IMPORTANT: Be sure vehicle is
well ventilated while using any
cleaning agents. Follow manufac
turer's recommendations in using
such products.
With the advent of modern trim
materials composed of synthetic
plastics and/or man made fibers,
it
is EXTREMELY IMPORTANT
that proper cleaning techniques
and cleaners be used when clean
ing interior trim. Failure to
do this
on the first cleaning may result in
water spots, spot rings, setting of
stains or soilage, all of which make
it more difficult or impossible to
remove in a second cleaning.
Certain portions of the following
cleaning instructions are in bold type;
they are particularly impor
tant and
must be performed.
Dust and loose dirt that accu
mulates on interior
fabric trim
should be removed frequently with
a vacuum cleaner, whisk broom or
DESCRIPTION*
G.M. Spot Lifter (8 oz. Solvent Type)
soft brush. Vinyl or leather trim
should
be wiped regularly with a
clean damp cloth. Normal trim
soilage, spots or stains can be
cleaned with the following G.M.
cleaners.
G.M. Multi-Purpose Powdered Cleaner (16 oz. Foam Type)
G.M. PART NO.
1051398
1050803
·T~e a,bove cJeaner~ are EXCELLENT CLEANERS when used properly aooording to
directions on containers, They are available through your Chevrolet Dealer.
4-1
Page 52 of 87
Downloaded from www.Manualslib.com manuals search engine NEVER use gasoline, nail polish
remover or acetone, lacquer
thin
ners, bleaches, etc. Some basic
steps should be remembered
l;>efore
the cleaning is attempted:
1. Remove stains as. quickly as pos
sible before they become "set".
2. Use a clean cloth or sponge and
change to a clean area
fre
quently. (A soft brush may be
used if stains persist.)
3. Use solvent type cleaners in a
well ventilated area, also, do not
saturate the stained area.
4.
If a ring should form after spot
cleaning, the entire area of the
trim assembly should be cleaned
immediately.
5. Follow instructions on the label
of the cleaner.
Cleaning General Soilage
or Water Spots from Fabric
Type Trim with Foam Type
Cleaner
G.M. Multi-Purpose Powdered
Cleaner
is excellent for this type
cleaning and for cleaning a panel
section where a minor cleaning ring
may be left from spot cleaning.
Vacuum area thoroughly to
re
move excess loose dirt. ALWAYS
clean a full trim assembly or com
plete trim section-mask adjacent
4-2
trim along stitch or welt liiles. Mix
Multi-Purpose Powdered Cleaner
in strict accordance with directions
on label of container
___ mix propor-
tionally for smaller
quantities/USE
SUDS ONLY ON A CLEAN
SPONGE or SOFT BRISTLE
BRUSH-DO NOT
WET FAB
RIC EXCESSIVELY OR RUB
HARSHL
Y WITH BRUSH. IM
MEDIATELY AFTER CLEAN
ING WIPE OFF ANY CLEANER
RESIDUE WITH SLIGHTLY
DAMP ABSORBENT TOWEL
OR CLOTH.
IMPORTANT
IMMEDIATELY AFTER WIP
ING, FORCE -DRY FABRIC
WITH AIR
HOSE, HEAT DRY
ER OR HEAT LAMP. (Use cau
tion with heat dryer or heat lamp
to prevent damage to fabric. )
When trim materials with a sheen
or luster finish are dry, wipe fabric
lightly with a soft, dry clean cloth
to restore sheen or luster.
Page 53 of 87
Downloaded from www.Manualslib.com manuals search engine Spot Cleaning Fabric Type
Trim Materials with
Solvent
Type Cleaner
Before attempting to remove
spots or stains from fabric, deter
mine
as accurately as possible the
nature and age of the spot or stain.
Some spots or stains can be re
moved satisfactorily with water or
mild soap solution (refer to ac
companying
"Removal of Specific
Stains"). For best results, spots or
stains should be removed
as soon
as possible. Some types of stains
or soilage such
as lipstick, some
inks, certain types of grease etc.,
are extremely difficult and,
in some
cases, impossible to completely re
move. When cleaning this type of
stain or soilage, care must be taken
not to enlarge the soiled area.
It is
sometimes more desirable to have
a small stain than an enlarged stain
as a result of careless cleaning.
G.M.
Spot Lifter (Solvent Type)
is excellent for spot cleaning stains
containing grease, oil or fats from
fabric type trim. Excess stain
should be gently scraped off trim
material with a clean DULL knife
or scraper.
USE VERY LITTLE
CLEANER, light pressure, and
clean cloths (preferably cheese
cloth). Cleaning action should be
from outside of stain FEATHER
ING towards center of stain and
constantly changing· to a clean sec
tion of cloth.
When stain is cleaned
from · fabric, immediately dry area
with an· air
hose, heat dryer or heat
l~mp to help prevent a cleaning
flng (use caution with heat dryer
or heat
lamp to prevent damage to
fabric material).
If a ring forms,
immediately repeat the
. cleaning
operation over a slightly larger
area with special emphasis on
FEATHERING towards center of
area.
If ring still persists, mark
off adjacent trim sections and clean
4-3
entire affected trim panel sectIOn
with G.M. Multi-Purpose Powdered
Cleaner
as previously described
under
"Cleaning General Soilage
or Water
Spots with Foam Type
Cleaner."
Removal of Specific Stains
Grease or Oil Stains-Includes
grease, oil, butter, margarine shoe
polish, coffee with cream,
ch~wing
gum, cosmetic creams, vegetable
oils, wax crayon, tar and asphalts.
Carefully scrape off excess stain;
then use Spot Lifter (Solvent
Type) as previously described.
Shoe polish, wax crayons, tar and
asphalts
will stain if allowed to
remain on trim; they should be
removed
as soon as possible-use
caution
as cleaner will dissolve
them and may cause them to bleed.
Non-Greasy Stains-Includes cat
sup, coffee (black), egg, fruit, fruit
Page 54 of 87
Downloaded from www.Manualslib.com manuals search engine juice, milk, soft drinks, wine, vomit
and blood. Carefully scrape
off eX
cess stain; then sponge stain with
cool water.
If stain remains use
Multi-Purpose Powdered Cleaner
(Foam Type)
as previously de
scribed .
If odor persists after clean-'
ingvomitus or urine, treat area with
a water-baking soda solution ( 1
teaspoon baking soda to 1 cup of
tepid water) -finally , if necessary ,
clean lightly with
Spot Lifter (Sol
vent Type).
IMPORTANT: In the event white
or light-colored seat trim becomes
stained due to contact with materials
that do not have color-fast dyes
(certain types of casual clothing,
decorative paper, etc.) the
trim
must be cleaned IMMEDIATELY to
avoid permanent discoloration.
Clean with Multi-Purpose Powdered
Cleaner (Foam Type)
as previously
described.
Combination Stains-Includes
candy, ice cream, mayonnaise, chili
sauce and unknown stains. Care
fully scrape
off excess stain; then
clean first with
cool water and
allow to dry.
If stain remains, clean
with
Spot Lifter (Solvent Type).
Cleaning Vinyl or Leather
Trim
Ordinary soilage can be re
moved
·from vinyl or leather with
warm water and a mild soap such
as' saddle soap or oil soap, orap
proved equivalent. Apply a small
4-4
amount of soap solution and allow
to soak for a few minutes to loosen
d irt; then , rub briskly with a clean
damp cloth to remove
dirt-and
soap residues-this operation may
be repeated several times
if nec
essary.
Some soilage such as tars ,
asphalts, shoe polish, etc. will stain
if allowed to remain on trim-they
should be wiped off as quickly as
possible and the area cleaned with .
a clean cloth dampened with G.M.
Spot Lifter (Solvent Type).
Belt Restraint Care
• Clean only with mild soap solu
tion and lukewarm water.
• Do not bleach or dye belts since
this may severely weaken belts.
Page 55 of 87
Downloaded from www.Manualslib.com manuals search engine Interior Glass Surface
The interior glass surface should
be cleaned
on a periodic basis for
continued good visibility. A com
mercial household glass cleaning
agent containing ammonia will re
move normal tobacco smoke
and
dust films sometimes caused by in
gredients used in vinyls, plastics
or
other interior trim materials.
EXTERIOR APPEARANCE
Your car is finished with General
Motors
"Magic-Mirror" acrylic lac
quer. This
is a finish of maximum
beauty which,
in depth of color,
gloss retention
and durability is
superior to conventional lacquer
finishes.
Washing Your Car
The best way to preserve the
finish
and maintain original beauty
of appearance
is to keep it clean. Wash
the
car in lukewarm or cold • water. Never use strong soap or
chemical detergents. Cleaning
agents should be quickly flushed
from the surfaces.
Polishing and Waxing
Your Car
Although acrylic paint on your
car is durable, you may wish to
wax
or polish for added protection.
Your Chevrolet Dealer offers many
polishes
and waxes now ava,ilable
which have proven of real value in
maintaining a good
paint finish.
When using a
tar and road oil
remover, be certain
it is safe for
use
on acrylic painted surfaces.
Protection of Exterior
Bright
Metal Parts
Bright metal parts should be
cleaned regularly to maintain
luster. Washing with water is all
that
is usually required. However,
G.M. Chrome Polish may be used
4-5
on CHROME or STAINLESS
STEEL trim . if necessary.
Use special care with ALU
MINUM trim. Never use auto
or chrome polish, stearn
or any
caustic soap to clean aluminum.
A coating of wax,
rubbed to a
high polish,
is recommended for
all bright metal parts.
Cleaning White Sidewall
Tires
Use a tire cleaner which will not
harm aluminum trim. A stiff brush
may
be used with the cleaner to
remove road grime
and dirt from
white sidewall tires.
Cleaning the Optional
Vinyl
Top
The top should be washed fre
quently with neutral soap suds,
lukewarm water
and a brush with
soft bristles. Rinse top with suffi
cient quantities of clear water to
remove all traces of soap.
Page 56 of 87
Downloaded from www.Manualslib.com manuals search engine If the top requires additional
cleaning after using soap and
water, a mild foaming cleanser can
be used such
as GM Multi-Purpose
Powdered Cleaner. Rinse the whole
top with water; then apply a mild
foaming type cleanser on an area of
approximately two square feet.
Scrub area with a small soft bristle hand
brush, adding
wa~er as neces
sary until the cleanser foams to a
soapy consistency. Remove the first
accumulated soilage with a cloth
or sponge before it can be ground
into the top material. Apply addi
tional cleanser to the area and
scrub until the top
is clean. Care
must be exercised to keep the
4-6
cleanser running onto body finish
as it may cause streaks if allowed
to run down and dry. After the en
tire top has been cleaned, rinse gen
erously with clear water to remove
all traces of cleanser. Do not use
volatile cleaner or household bleach
ing agents on the top material.
Page 57 of 87
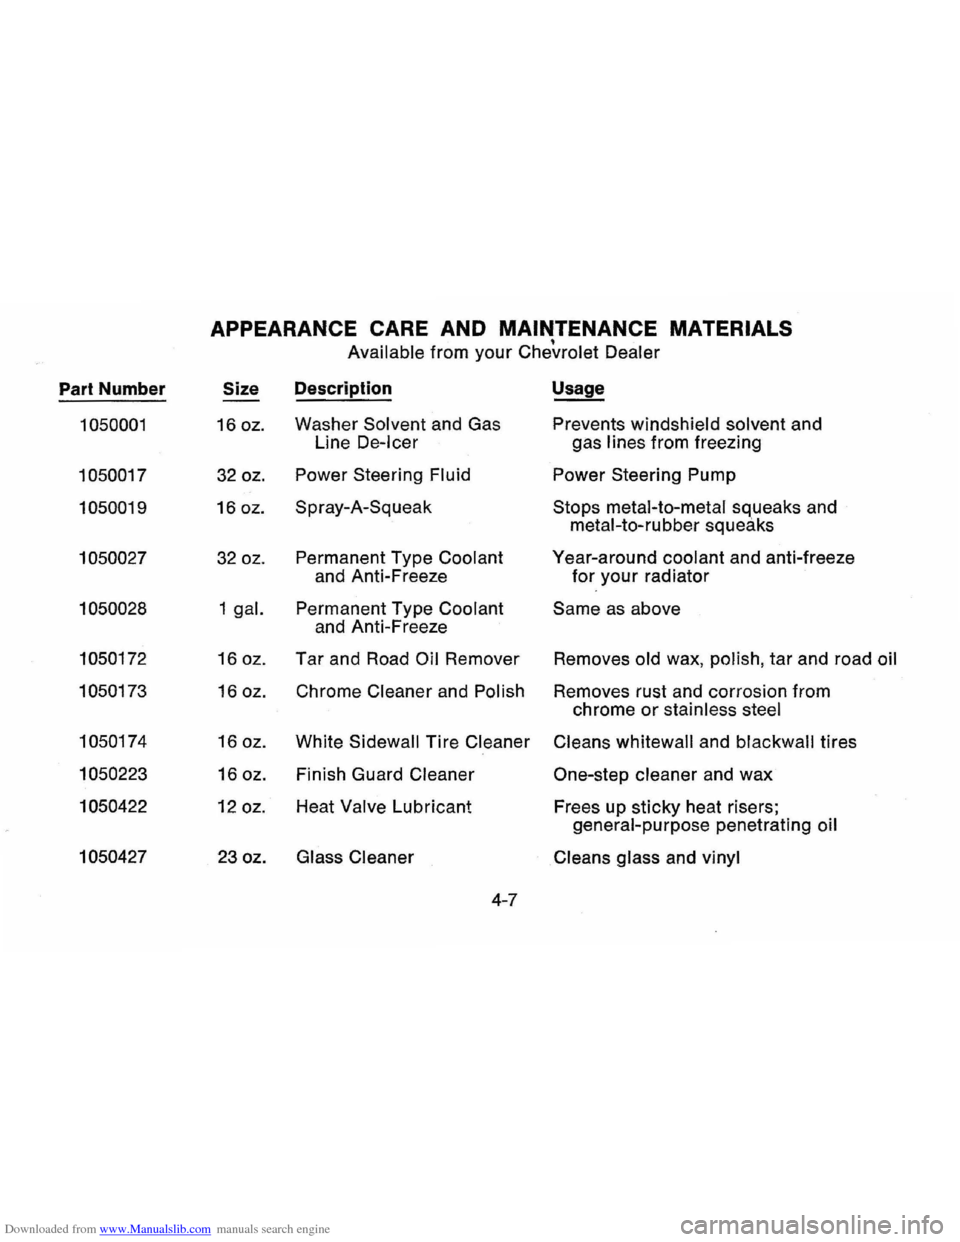
Downloaded from www.Manualslib.com manuals search engine APPEARANCE CARE AND MAINTENANCE MATERIALS • Available from your Chevrolet Dealer
Part Number Size Description Usage
1050001 16 oz. Washer Solvent and
Gas Prevents windshield solvent and
Line
De-leer gas lines from freezing
1050017 32 oz. Power
Steering Fluid Power Steering Pump
1050019 16 oz. Spray-A-Squeak Stops metal-to-metal squeaks and
metal-to-rubber squeaks
1050027 32 oz. Permanent
Type Coolant Year-around coolant and anti-freeze
and Anti-Freeze
for your radiator
1050028 1 gal. Permanent Type Coolant Same as above
and Anti-Freeze
1050172 16 oz. Tar and Road Oil Remover Removes old wax, polish, tar and road oil
1050173
16 oz. Chrome Cleaner and Polish Removes rust and corrosion from
chrome
or stainless steel
1050174
16 oz.
White Sidewall Tire Cleaner Cleans whitewall and blackwall tires
1050223 16 oz. Finish Guard Cleaner One-step cleaner and wax
1050422 12 oz. Heat Valve Lubricant
Frees up sticky heat risers;
general-purpose penetrating oil
1050427 23 oz. Glass Cleaner
Cleans glass and vinyl
4 -7