fold seats CHEVROLET VENTURE 2003 1.G Owners Manual
[x] Cancel search | Manufacturer: CHEVROLET, Model Year: 2003, Model line: VENTURE, Model: CHEVROLET VENTURE 2003 1.GPages: 486, PDF Size: 3.3 MB
Page 7 of 486

Front Seats......................................................1-3
Manual Seats................................................1-3
Six-Way Power Seats.....................................1-4
Reclining Seatbacks........................................1-4
Head Restraints.............................................1-6
Rear Seats.......................................................1-7
Rear Seat Operation.......................................1-7
Second Row Safety Belt Stowage.....................1-7
Flip and Fold Feature.....................................1-7
Split Bench Seats...........................................1-8
Bucket Seats...............................................1-15
Captain Chairs.............................................1-22
Stowable Seat..............................................1-26
Safety Belts...................................................1-30
Safety Belts: They Are for Everyone................1-30
Questions and Answers About Safety Belts......1-34
How to Wear Safety Belts Properly.................1-35
Driver Position..............................................1-36
Safety Belt Use During Pregnancy..................1-44
Right Front Passenger Position.......................1-45
Center Passenger Position
(Bucket Seat)............................................1-45
Center Passenger Position
(Bench Seat)............................................1-47
Rear Seat Passengers..................................1-48Rear Safety Belt Comfort Guides for
Children and Small Adults..........................1-52
Safety Belt Pretensioners...............................1-54
Safety Belt Extender.....................................1-54
Child Restraints.............................................1-55
Older Children..............................................1-55
Infants and Young Children............................1-58
Child Restraint Systems.................................1-61
Where to Put the Restraint.............................1-65
Top Strap....................................................1-66
Top Strap Anchor Location.............................1-67
Lower Anchorages and Top Tethers for
Children (LATCH System)...........................1-69
Securing a Child Restraint Designed for
the LATCH System....................................1-71
Securing a Child Restraint in a Rear
Outside Seat Position................................1-71
Securing a Child Restraint in a Center
Seat Position (Third Row Bench Seat)..........1-75
Securing a Child Restraint in a Center
Seat Position (Bucket Seat)........................1-77
Securing a Child Restraint in the Right
Front Seat Position....................................1-79
Built-In Child Restraint...................................1-82
Section 1 Seats and Restraint Systems
1-1
Page 13 of 486
Rear Seats
Rear Seat Operation
The rear seats in your vehicle have levers and straps
used to adjust, remove and reinstall the seats. By using
the levers and straps, in the correct order, you can
easily remove the seats from the vehicle.
When you put the seats back in the vehicle, be sure to
follow the label on the back of the seat for proper
location.
Second Row Safety Belt Stowage
If your vehicle has a split bench seat in the second row,
use the clip on the safety belt to secure the belt after
it is disconnected from the mini-buckle. When removing
the second row split bench seat, secure the loose
end of the safety belt in this clip. This will keep the
safety belt from dangling and possibly striking
something.
Do not have the second row outside safety belt stored if
someone is sitting in the second row outside position.
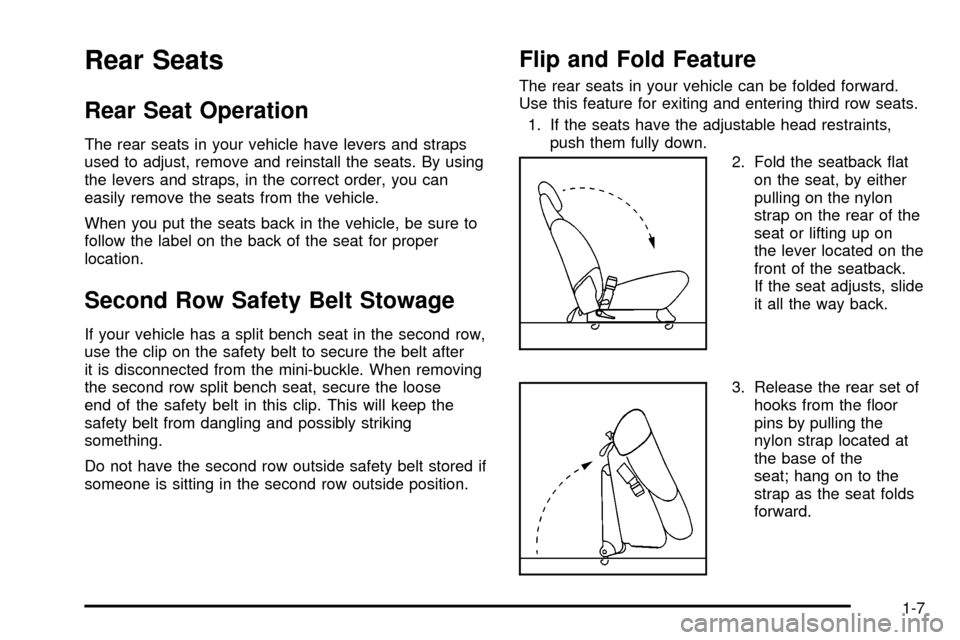
Flip and Fold Feature
The rear seats in your vehicle can be folded forward.
Use this feature for exiting and entering third row seats.
1. If the seats have the adjustable head restraints,
push them fully down.
2. Fold the seatback ¯at
on the seat, by either
pulling on the nylon
strap on the rear of the
seat or lifting up on
the lever located on the
front of the seatback.
If the seat adjusts, slide
it all the way back.
3. Release the rear set of
hooks from the ¯oor
pins by pulling the
nylon strap located at
the base of the
seat; hang on to the
strap as the seat folds
forward.
1-7
Page 14 of 486

To return the seat(s) to the normal position, do the
following:
1. Push the seat back and ®rmly push the rear hooks
onto the rear ¯oor pins by pushing down on the
rear of the seat.
2. Try to raise the seat to check that it is locked down.
3. Lift the seatback recliner lever or pull the nylon
strap on the back of the seat and raise the
seatback until it locks upright.
4. Push and pull on the seatback to check that it is
locked.Split Bench Seats
If you have the split bench seat (50/50 or 40/60), the
seatbacks can be folded forward or reclined individually
and the seats can be removed individually. The
second row (40/60) sections can also be adjusted
forward or rearward individually.
The second row (40/60) split bench may be equipped
with a built-in child restraint. See
Built-In Child Restraint
on page 1-82.
1-8
Page 21 of 486

5. Lift the seatback recliner lever or pull the nylon
strap on the back of the seat and raise the
seatback until it locks upright.
6. Push and pull on the seatback to check that it is
locked.
7. If you have the 40/60 seat, attach the mini-buckle
so that the safety belt is ready for use when a
passenger uses the seat.
The buckle reattaches by pushing the latch into the
buckle until the red center pops out again.
Repeat these steps for the other section of the split
bench seat.Bucket Seats
If your vehicle has the bucket seats, the seatbacks can
be folded down or reclined. The seats can also be
adjusted forward or rearward and removed.
One of the bucket seats may be equipped with a built-in
child restraint. See
Built-In Child Restraint on page 1-82.
1-15
Page 24 of 486
To raise a seatback, pull the nylon strap or lift the
recliner lever while raising the seatback until it locks
upright. Push and pull on the seatback to check that it is
locked into place.
To recline the seatback, pull the nylon strap or lift the
recliner lever. Press back on the seatback until you
reach the desired position then let go of the strap
or lever.
To return the seatback to an upright position, pull on the
nylon strap or lift the recliner lever without putting any
pressure on the seatback. Push and pull on the
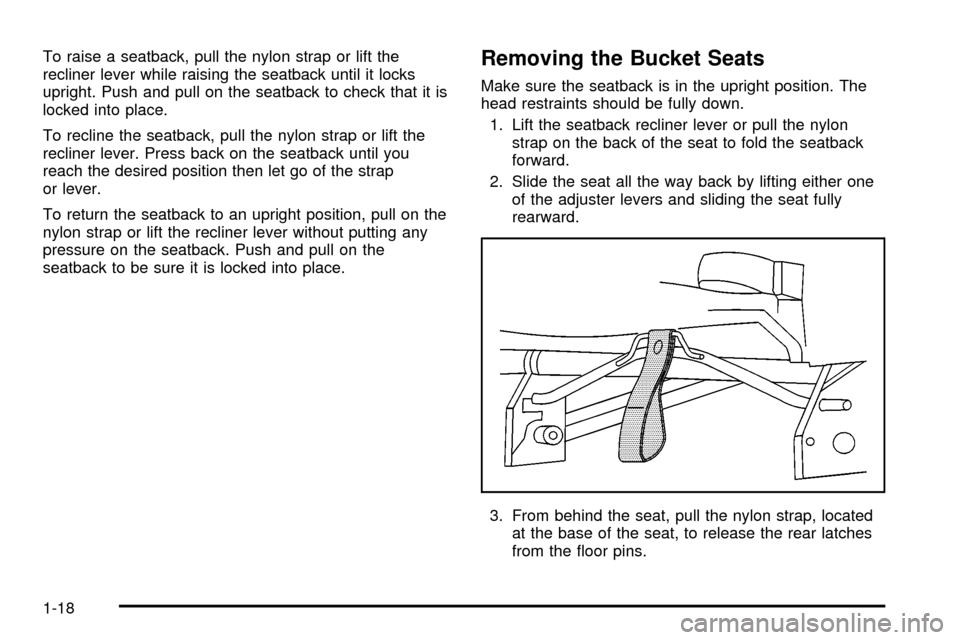
seatback to be sure it is locked into place.Removing the Bucket Seats
Make sure the seatback is in the upright position. The
head restraints should be fully down.
1. Lift the seatback recliner lever or pull the nylon
strap on the back of the seat to fold the seatback
forward.
2. Slide the seat all the way back by lifting either one
of the adjuster levers and sliding the seat fully
rearward.
3. From behind the seat, pull the nylon strap, located
at the base of the seat, to release the rear latches
from the ¯oor pins.
1-18
Page 27 of 486
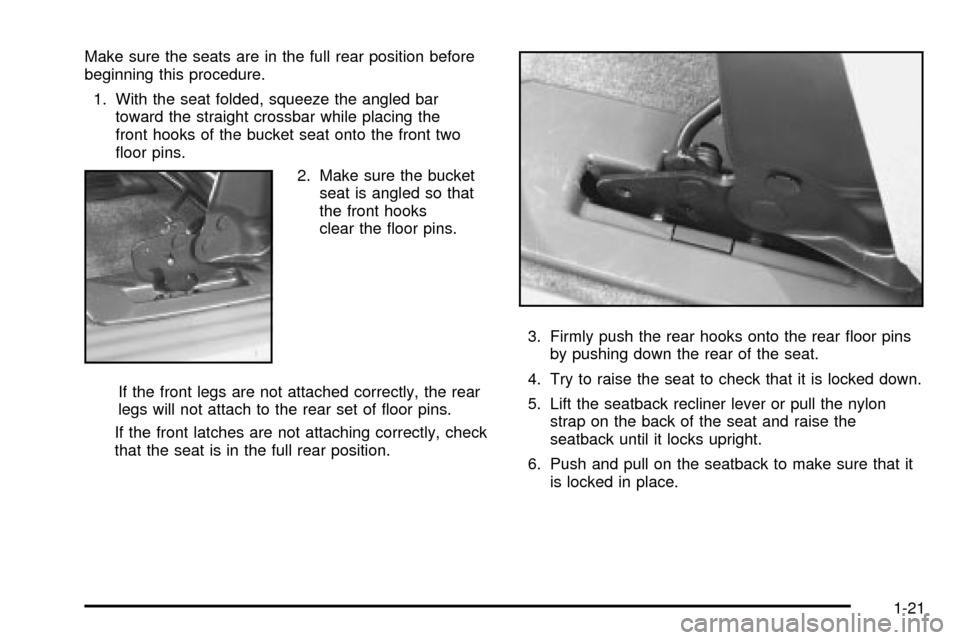
Make sure the seats are in the full rear position before
beginning this procedure.
1. With the seat folded, squeeze the angled bar
toward the straight crossbar while placing the
front hooks of the bucket seat onto the front two
¯oor pins.
2. Make sure the bucket
seat is angled so that
the front hooks
clear the ¯oor pins.
If the front legs are not attached correctly, the rear
legs will not attach to the rear set of ¯oor pins.
If the front latches are not attaching correctly, check
that the seat is in the full rear position.3. Firmly push the rear hooks onto the rear ¯oor pins
by pushing down the rear of the seat.
4. Try to raise the seat to check that it is locked down.
5. Lift the seatback recliner lever or pull the nylon
strap on the back of the seat and raise the
seatback until it locks upright.
6. Push and pull on the seatback to make sure that it
is locked in place.
1-21
Page 29 of 486
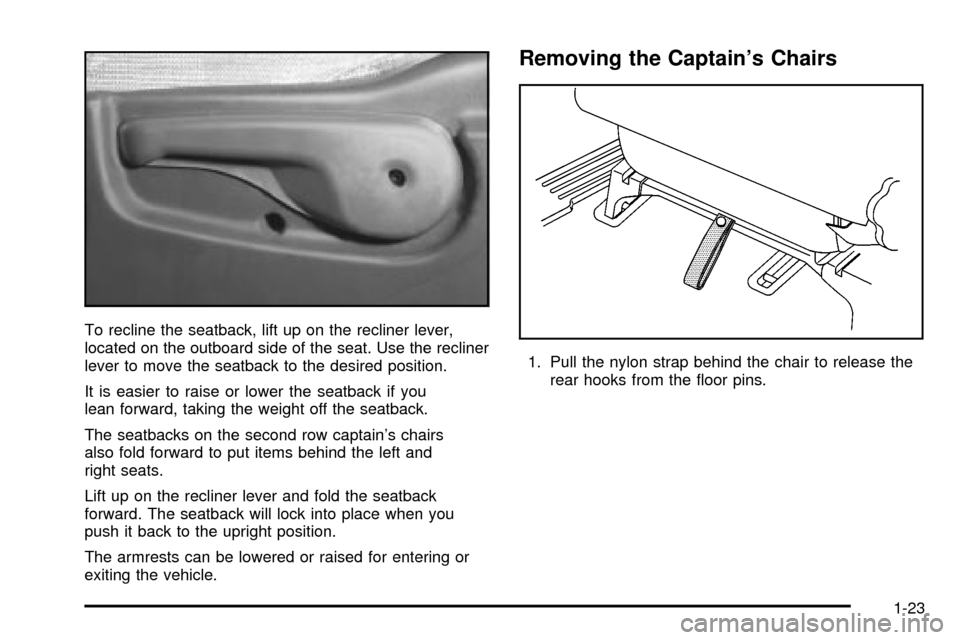
To recline the seatback, lift up on the recliner lever,
located on the outboard side of the seat. Use the recliner
lever to move the seatback to the desired position.
It is easier to raise or lower the seatback if you
lean forward, taking the weight off the seatback.
The seatbacks on the second row captain's chairs
also fold forward to put items behind the left and
right seats.
Lift up on the recliner lever and fold the seatback
forward. The seatback will lock into place when you
push it back to the upright position.
The armrests can be lowered or raised for entering or
exiting the vehicle.
Removing the Captain's Chairs
1. Pull the nylon strap behind the chair to release the
rear hooks from the ¯oor pins.
1-23
Page 161 of 486

Reprogramming a Single HomeLinkž
Button
To program a device to HomeLinkžusing a HomeLinkž
button previously trained, follow these steps:
1. Press and hold the desired HomeLink
žbutton. Do
not release the button.
2. The indicator light will begin to ¯ash after
20 seconds. While still holding the HomeLink
ž
button, proceed with Step 2 under ªProgramming
HomeLinkž.º
Resetting Defaults
To reset HomeLinkžto default settings do the following:
1. Hold down the two outside buttons for about
20 seconds until the indicator light begins to ¯ash.
2. Continue to hold both buttons until the HomeLink
ž
indicator light turns off.
3. Release both buttons.
For questions or comments, contact HomeLink
žat
1-800-355-3515, or on the internet at
www.homelink.com.
Storage Areas
Your vehicle's large carrying capacity can store many
items. If you have the extended wheelbase version, you
can carry things as large as a 4' x 8' piece of plywood.
You can also use the ¯oor pins that are used to
attach the seats, to secure larger loads.
Glove Box
Your vehicle has a glove box below the instrument
panel. To open the glove box, lift the latch release.
The glove box door has a detent to prevent the door
from lowering too far. Open the glove box until the door
is partway open, then pull the door down if you need
it fully open. To close the glove box, the door must
be pushed up past the detent.
Cupholder(s)
There are cupholders located below the center
instrument panel switchbank. The cupholders have a
removable liner for larger size cups and for cleaning the
cupholders.
To use the cupholders, simply pull out the tray. Keep
the tray stowed in when not in use.
Your vehicle also has cupholders on the bottom inboard
side of the second row driver's side captain's chairs
and the seatbacks have cupholders that can be
used when the seatbacks are folded forward.
2-51
Page 321 of 486
If you put things inside your vehicle ± like suitcases,
tools, packages, or anything else ± they will go as fast
as the vehicle goes. If you have to stop or turn
quickly, or if there is a crash, they'll keep going.
{CAUTION:
Things you put inside your vehicle can strike
and injure people in a sudden stop or turn, or
in a crash.
·Put things in the cargo area of your
vehicle. Try to spread the weight evenly.
·Never stack heavier things, like suitcases,
inside the vehicle so that some of them
are above the tops of the seats.
·Don't leave an unsecured child restraint in
your vehicle.
·When you carry something inside the
vehicle, secure it whenever you can.
·Don't leave a seat folded down unless you
need to.
Automatic Level Control
On vehicles equipped with the automatic level control,
the rear of the vehicle is automatically kept level as you
load or unload your vehicle. However, you should still
not exceed the GVWR or the GAWR.
If the engine is running or the ignition key is in
ACCESSORY or when Retained Accessory Power
(RAP) is active, you may hear the compressor operating
when you load or unload your vehicle, and periodically
as the system self-adjusts. This is normal. See
ªRetained Accessory Powerº under
Ignition Positions on
page 2-31.
The compressor should operate for brief periods of time.
If the sound continues for an extended period of time,
your vehicle needs service.
Using heavier suspension components to get added
durability might not change your weight ratings. Ask your
dealer to help you load your vehicle the right away.
4-35
Page 446 of 486
At Least Once a Year
Key Lock Cylinders Service
Lubricate the key lock cylinders with the lubricant
speci®ed in Part D.
Body Lubrication Service
Lubricate all key lock cylinders, hood latch assemblies,
secondary latches, pivots, spring anchor and release
pawl, hood and door hinges, rear folding seats, fuel door
hinge, liftgate hinges, power sliding door cable and
sliding door track(s). Part D tells you what to use. More
frequent lubrication may be required when exposed
to a corrosive environment.
Starter Switch Check
{CAUTION:
When you are doing this inspection, the
vehicle could move suddenly. If the vehicle
moves, you or others could be injured.
1. Before you start, be sure you have enough room
around the vehicle.
2. Firmly apply both the parking brake and the regular
brake. See
Parking Brake on page 2-38if
necessary.
Do not use the accelerator pedal, and be ready to
turn off the engine immediately if it starts.
3. Try to start the engine in each gear. The starter
should work only in PARK (P) or NEUTRAL (N).
If the starter works in any other position, your
vehicle needs service.
6-12