display CHEVROLET VENTURE 2004 1.G Repair Manual
[x] Cancel search | Manufacturer: CHEVROLET, Model Year: 2004, Model line: VENTURE, Model: CHEVROLET VENTURE 2004 1.GPages: 516, PDF Size: 3.33 MB
Page 291 of 516
Headphones
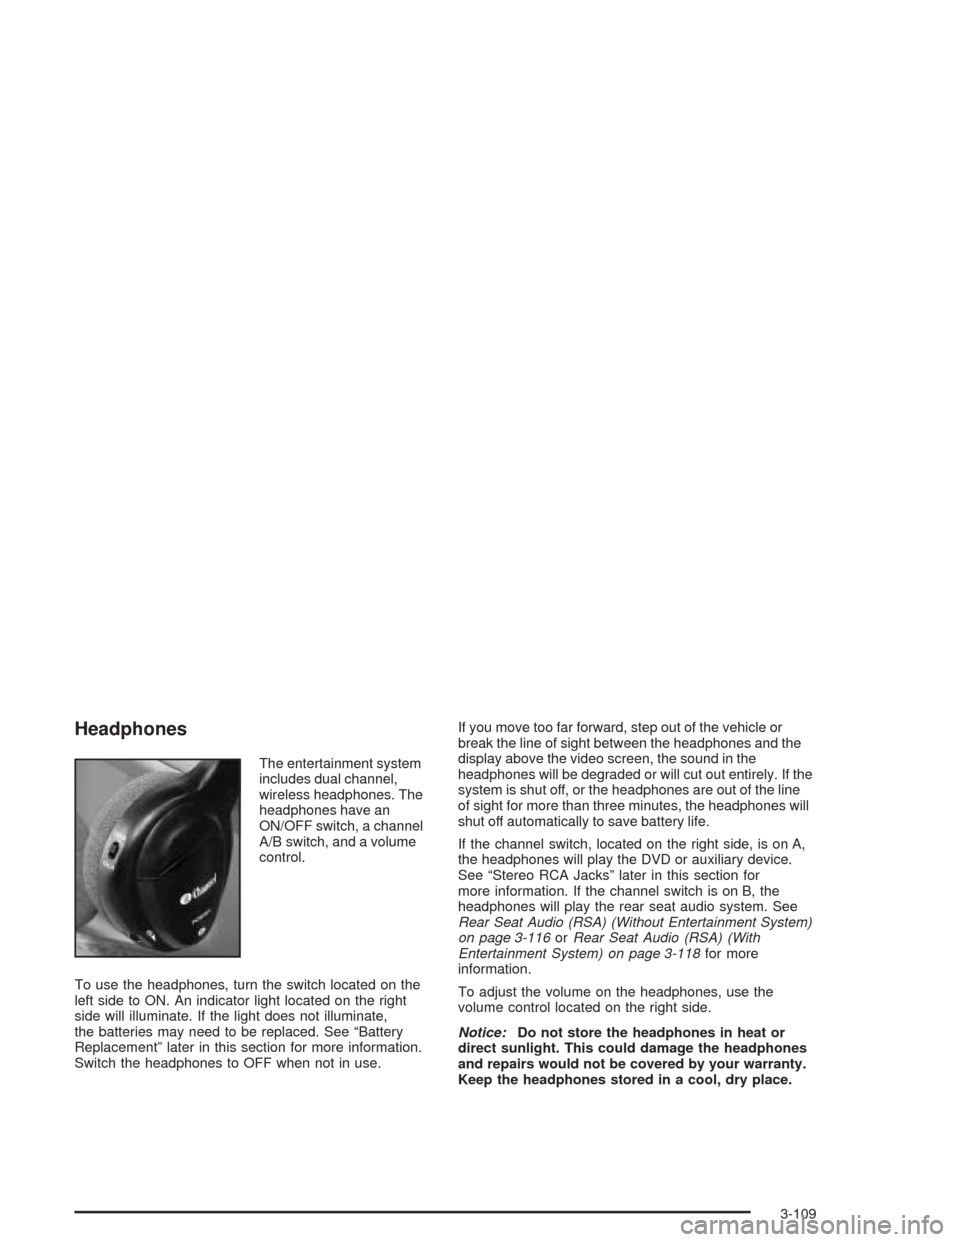
The entertainment system
includes dual channel,
wireless headphones. The
headphones have an
ON/OFF switch, a channel
A/B switch, and a volume
control.
To use the headphones, turn the switch located on the
left side to ON. An indicator light located on the right
side will illuminate. If the light does not illuminate,
the batteries may need to be replaced. See “Battery
Replacement” later in this section for more information.
Switch the headphones to OFF when not in use.If you move too far forward, step out of the vehicle or
break the line of sight between the headphones and the
display above the video screen, the sound in the
headphones will be degraded or will cut out entirely. If the
system is shut off, or the headphones are out of the line
of sight for more than three minutes, the headphones will
shut off automatically to save battery life.
If the channel switch, located on the right side, is on A,
the headphones will play the DVD or auxiliary device.
See “Stereo RCA Jacks” later in this section for
more information. If the channel switch is on B, the
headphones will play the rear seat audio system. See
Rear Seat Audio (RSA) (Without Entertainment System)
on page 3-116orRear Seat Audio (RSA) (With
Entertainment System) on page 3-118for more
information.
To adjust the volume on the headphones, use the
volume control located on the right side.
Notice:Do not store the headphones in heat or
direct sunlight. This could damage the headphones
and repairs would not be covered by your warranty.
Keep the headphones stored in a cool, dry place.
3-109
Page 295 of 516
Playing a Disc
To play a disc, gently insert the disc with the label side
up into the loading slot until it stops. The DVD player
will continue loading the disc and the player will
automatically start.
If a disc is already in the player, press the play/pause
button on the DVD player faceplate or on the remote
control.
Some DVDs will not allow fast forwarding or skipping of
the copyright information or the previews. Some
DVDs will begin playing the movie automatically after
the previews have �nished, there may be a delay of up
to 30 seconds. If the DVD does not begin playing
the movie automatically, press the play/pause button on
the DVD player faceplate or the remote control. If the
DVD still does not play, refer to the on-screen
instructions.
Stopping and Resuming Playback
To stop playing a disc, press the stop/eject button on
the DVD player.
To resume playback, press the play/pause button. The
movie will start playing from where it was last stopped
if the disc has not been ejected. If the disc has
been ejected, the player will start playing at the
beginning.
Ejecting a Disc
Press the stop/eject button on the DVD player once to
stop and a second time to eject the disc.
If a disc is ejected from the player, but not removed,
the DVD player will reload the disc after a short period
of time.
Remote Control
To use the remote control, aim it at the display above
the video screen and press the desired button.
Direct sunlight or very bright light may affect the ability
of the entertainment system to receive signals from
the remote control. Be sure the remote’s batteries are
not discharged, as this will also affect the function of the
remote control. Objects blocking the line of sight may
also affect the function of the remote control.
Notice:Storing the remote control in a hot area or
in direct sunlight may damage it, and the repairs
would not be covered by your warranty. Keep
the remote control stored in a cool, dry place.
3-113
Page 300 of 516
Rear Seat Audio (RSA)
(With Entertainment System)
This feature allows rear seat passengers to listen to and
control any of the sources: radio, CDs, DVD, and
auxiliary device. However, the rear seat passengers can
only control the sources that the front seat passengers
are not listening to. For example, rear seat passengers
may listen to and control a CD through headphones
while the driver listens to the radio through the
front speakers. The rear seat passengers have control
of the volume for each set of headphones.
The front seat audio controls always have priority over
the RSA controls. If the front seat passengers switch
the source for the main radio to a remote source,
the RSA will not be able to control the remote source.
You can operate the RSA when the main radio is off.
The DVD or auxiliary device will always be available on
channel A of the headphones. All other sources are
available on channel B. You will not be able to listen to
XM, on channel B, if you are listening to a DVD or
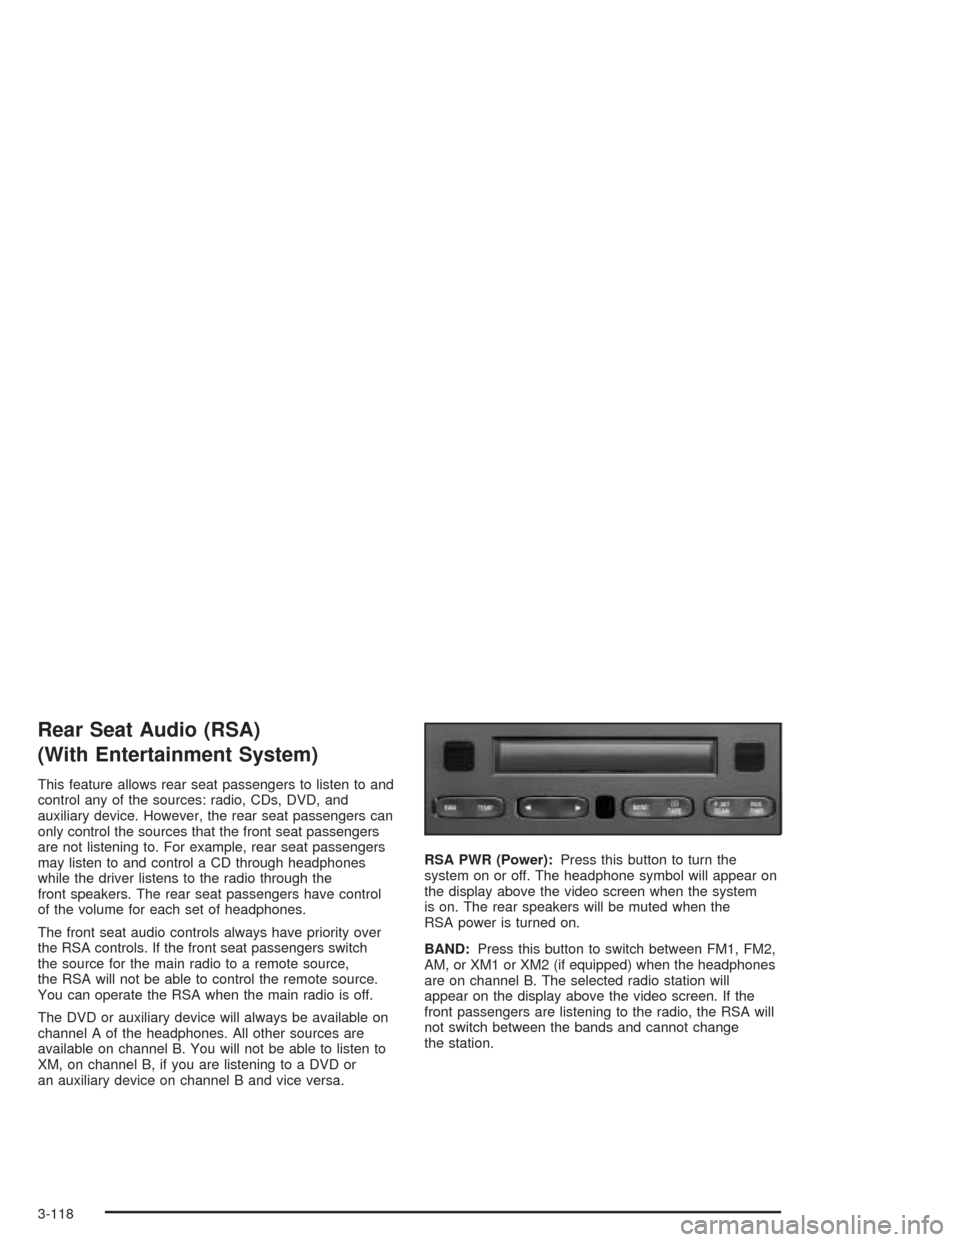
an auxiliary device on channel B and vice versa.RSA PWR (Power):Press this button to turn the
system on or off. The headphone symbol will appear on
the display above the video screen when the system
is on. The rear speakers will be muted when the
RSA power is turned on.
BAND:Press this button to switch between FM1, FM2,
AM, or XM1 or XM2 (if equipped) when the headphones
are on channel B. The selected radio station will
appear on the display above the video screen. If the
front passengers are listening to the radio, the RSA will
not switch between the bands and cannot change
the station.
3-118
Page 301 of 516
qr(Tune):When listening to the radio, press the
right or the left arrow to go to the next or the previous
station and stay there. This function is inactive if
the front seat passengers are listening to the radio.
When a CD is playing, press the right arrow to go to the
next track on the CD. Press the left arrow to go to the
start of the current track, if more than eight seconds
have played. This function is inactive if the front
seat passengers are listening to a CD.
P.SET SCAN (Preset Scan):Press and hold this
button to scan the preset radio stations set on the
pushbuttons on the main radio. The radio will go to a
preset station stored on the pushbuttons, play for a few
seconds, then go on to the next preset station. The
selected radio station will appear on the display above
the video screen. Press this button again to stop
scanning presets. This function is inactive if the front
seat passengers are listening to the radio.
When a CD is playing in the six-disc CD changer, press
this button to select the next CD, if multiple CDs are
loaded. This function is inactive if the front seat
passengers are listening to a CD.
CD TAPE:Press this button to switch between playing
a CD, a DVD, or an auxiliary device when the
headphones are on channel B. If one of the devices are
not loaded, the system will skip over the device when
this button is pressed.Theft-Deterrent Feature
(Non-RDS Radios)
THEFTLOCK®is designed to discourage theft of your
vehicle’s radio. The feature works automatically by
learning a portion of the Vehicle Identi�cation Number
(VIN). If the radio is moved to a different vehicle, it
will not operate and LOCKED will appear on the display.
When the radio and vehicle are turned off, the blinking
red light indicates that THEFTLOCK
®is armed.
With THEFTLOCK
®activated, the radio will not operate
if stolen.
Theft-Deterrent Feature
(RDS Radios)
THEFTLOCK®is designed to discourage theft of your
vehicle’s radio. The feature works automatically by
learning a portion of the Vehicle Identi�cation Number
(VIN). If the radio is moved to a different vehicle, it
will not operate and LOCKED will appear on the display.
When the ignition is off and RAP is not active, the
blinking red light indicates that THEFTLOCK
®is armed.
With THEFTLOCK
®activated, the radio will not
operate if stolen.
3-119
Page 302 of 516
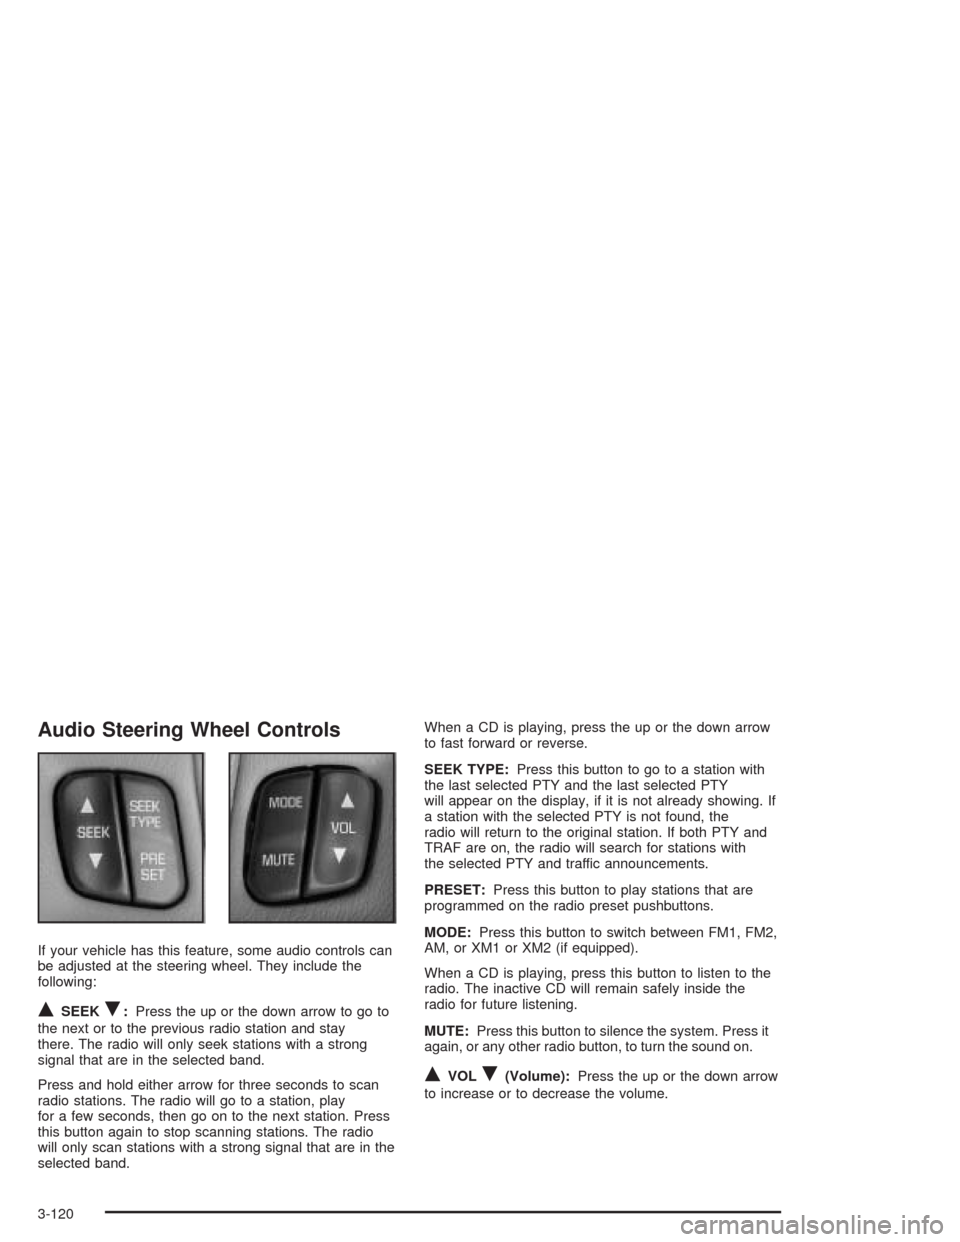
Audio Steering Wheel Controls
If your vehicle has this feature, some audio controls can
be adjusted at the steering wheel. They include the
following:
QSEEKR:Press the up or the down arrow to go to
the next or to the previous radio station and stay
there. The radio will only seek stations with a strong
signal that are in the selected band.
Press and hold either arrow for three seconds to scan
radio stations. The radio will go to a station, play
for a few seconds, then go on to the next station. Press
this button again to stop scanning stations. The radio
will only scan stations with a strong signal that are in the
selected band.When a CD is playing, press the up or the down arrow
to fast forward or reverse.
SEEK TYPE:Press this button to go to a station with
the last selected PTY and the last selected PTY
will appear on the display, if it is not already showing. If
a station with the selected PTY is not found, the
radio will return to the original station. If both PTY and
TRAF are on, the radio will search for stations with
the selected PTY and traffic announcements.
PRESET:Press this button to play stations that are
programmed on the radio preset pushbuttons.
MODE:Press this button to switch between FM1, FM2,
AM, or XM1 or XM2 (if equipped).
When a CD is playing, press this button to listen to the
radio. The inactive CD will remain safely inside the
radio for future listening.
MUTE:Press this button to silence the system. Press it
again, or any other radio button, to turn the sound on.
QVOLR(Volume):Press the up or the down arrow
to increase or to decrease the volume.
3-120
Page 303 of 516
Radio Reception
AM
The range for most AM stations is greater than for FM,
especially at night. The longer range can cause
station frequencies to interfere with each other. Static
can occur on AM stations caused by things like
storms and power lines. Try reducing the treble to
reduce this noise.
FM Stereo
FM stereo will give the best sound, but FM signals will
reach only about 10 to 40 miles (16 to 65 km). Tall
buildings or hills can interfere with FM signals, causing
the sound to fade in and out.
XM™ Satellite Radio Service
XM™ Satellite Radio Service gives digital radio
reception from coast to coast. Just as with FM, tall
buildings or hills can interfere with satellite radio signals,
causing the sound to fade in and out. The radio may
display NO SIGNAL to indicate interference.
Care of Your CDs and DVDs
Handle discs carefully. Store them in their original cases
or other protective cases and away from direct sunlight
and dust. If the surface of a disc is soiled, dampen
a clean, soft cloth in a mild, neutral detergent solution
and clean it, wiping from the center to the edge.
Be sure never to touch the side without writing when
handling discs. Pick up discs by grasping the outer
edges or the edge of the hole and the outer edge.
3-121
Page 369 of 516
When to Change Engine Oil
(GM Oil Life System)
Your vehicle has a computer system that lets you know
when to change the engine oil and �lter. This is based on
engine revolutions and engine temperature, and not on
mileage. Based on driving conditions, the mileage at
which an oil change will be indicated can vary
considerably. For the oil life system to work properly, you
must reset the system every time the oil is changed.
When the system has calculated that oil life has been
diminished, it will indicate that an oil change is
necessary. A CHANGE ENGINE OIL message will
come on. Change your oil as soon as possible within
the next two times you stop for fuel. It is possible that, if
you are driving under the best conditions, the oil life
system may not indicate that an oil change is necessary
for over a year. However, your engine oil and �lter
must be changed at least once a year and at this time
the system must be reset. Your dealer has GM-trained
people who will perform this work using genuine
GM parts and reset the system. It is also important to
check your oil regularly and keep it at the proper level.
If the system is ever reset accidentally, you must
change your oil at 3,000 miles (5 000 km) since your
last oil change. Remember to reset the oil life system
whenever the oil is changed.
How to Reset the Change Engine Oil
Message
The GM Oil Life System calculates when to change
your engine oil and �lter based on vehicle use. Anytime
your oil is changed, reset the system so it can
calculate when the next oil change is required. If a
situation occurs where you change your oil prior to a
CHANGE ENGINE OIL message being turned on, reset
the system.
1. With the ignition key in RUN but the engine off,
repeatedly push the trip/reset button until OIL is
displayed on the Driver Information Center (DIC).
2. Once OIL is displayed, push and hold the trip/reset
button for �ve seconds. The number will disappear
and be replaced by 100 (indicating 100% oil life
remaining).
3. Turn the key to OFF.
If the CHANGE ENGINE OIL message comes back on
when you start your vehicle, the engine oil life system
has not reset. Repeat the procedure.
5-17
Page 461 of 516
Fuse Usage
LH HEADLP
LOWNot Used
LH HEADLP
HIGHNot Used
Blank Not Used
Blank Not Used
Blank Not Used
RAP RELAYRetained Accessory Power (RAP)
Relay
Blank Not Used
HVAC/DIC/DRL/
HEATED SEATAir Inlet Actuator, DIC Display, DRL
Control Module, Heater-A/C Control,
Temperature Door Actuator (Front)
and Rear Window Defogger Relay
BCM PRGRAM BCM Programming
RH HEAD LP
LOWNot Used
RH HEAD LP
HIGHNot Used
PCM/ABSIGN MAIN Relay and PCM,
Electronic Brake Control ModuleCircuit Breaker Usage
HEADLAMPDaytime Running Lamps (DRL)
Control Module, Headlamp and
Instrument Panel Dimmer Switch
PWR SLD DR Power Sliding Door
PWR WDO Front Power Windows
PWR/HEATED
SEAT PSDSix-Way Power Seats and Rear
Side Door Actuator Motor
FRT HVAC HI
BLWRBlower Motor Hi Speed Relay
Module
Underhood Fuse Block
This fuse block is located
in the engine compartment,
in front of the windshield
washer �uid reservoir. See
Engine Compartment
Overview on page 5-12for
more information on
location.
The fuses marked spare are available if a replacement
fuse is needed.
5-109
Page 463 of 516
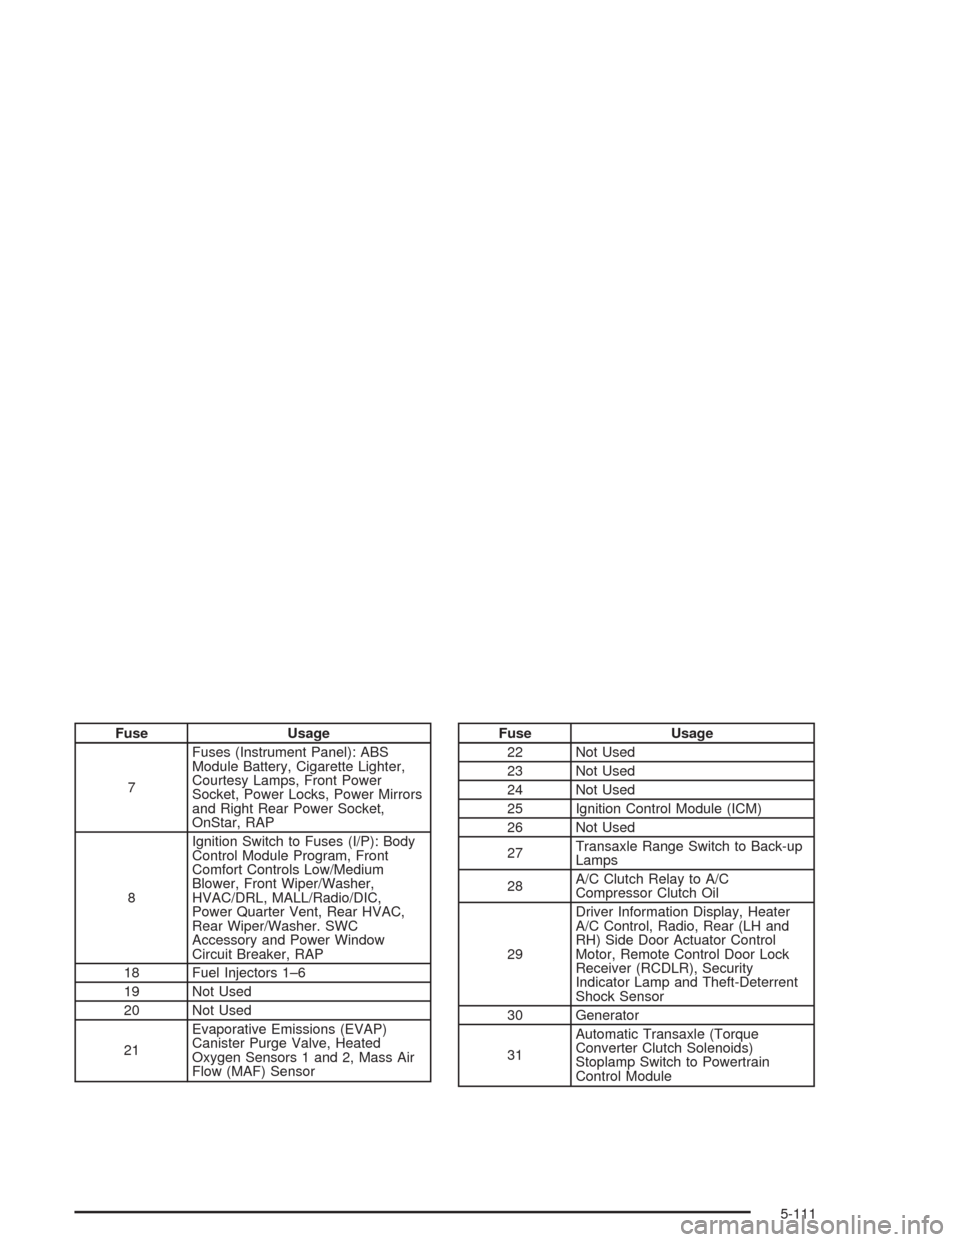
Fuse Usage
7Fuses (Instrument Panel): ABS
Module Battery, Cigarette Lighter,
Courtesy Lamps, Front Power
Socket, Power Locks, Power Mirrors
and Right Rear Power Socket,
OnStar, RAP
8Ignition Switch to Fuses (I/P): Body
Control Module Program, Front
Comfort Controls Low/Medium
Blower, Front Wiper/Washer,
HVAC/DRL, MALL/Radio/DIC,
Power Quarter Vent, Rear HVAC,
Rear Wiper/Washer. SWC
Accessory and Power Window
Circuit Breaker, RAP
18 Fuel Injectors 1–6
19 Not Used
20 Not Used
21Evaporative Emissions (EVAP)
Canister Purge Valve, Heated
Oxygen Sensors 1 and 2, Mass Air
Flow (MAF) SensorFuse Usage
22 Not Used
23 Not Used
24 Not Used
25 Ignition Control Module (ICM)
26 Not Used
27Transaxle Range Switch to Back-up
Lamps
28A/C Clutch Relay to A/C
Compressor Clutch Oil
29Driver Information Display, Heater
A/C Control, Radio, Rear (LH and
RH) Side Door Actuator Control
Motor, Remote Control Door Lock
Receiver (RCDLR), Security
Indicator Lamp and Theft-Deterrent
Shock Sensor
30 Generator
31Automatic Transaxle (Torque
Converter Clutch Solenoids)
Stoplamp Switch to Powertrain
Control Module
5-111
Page 478 of 516
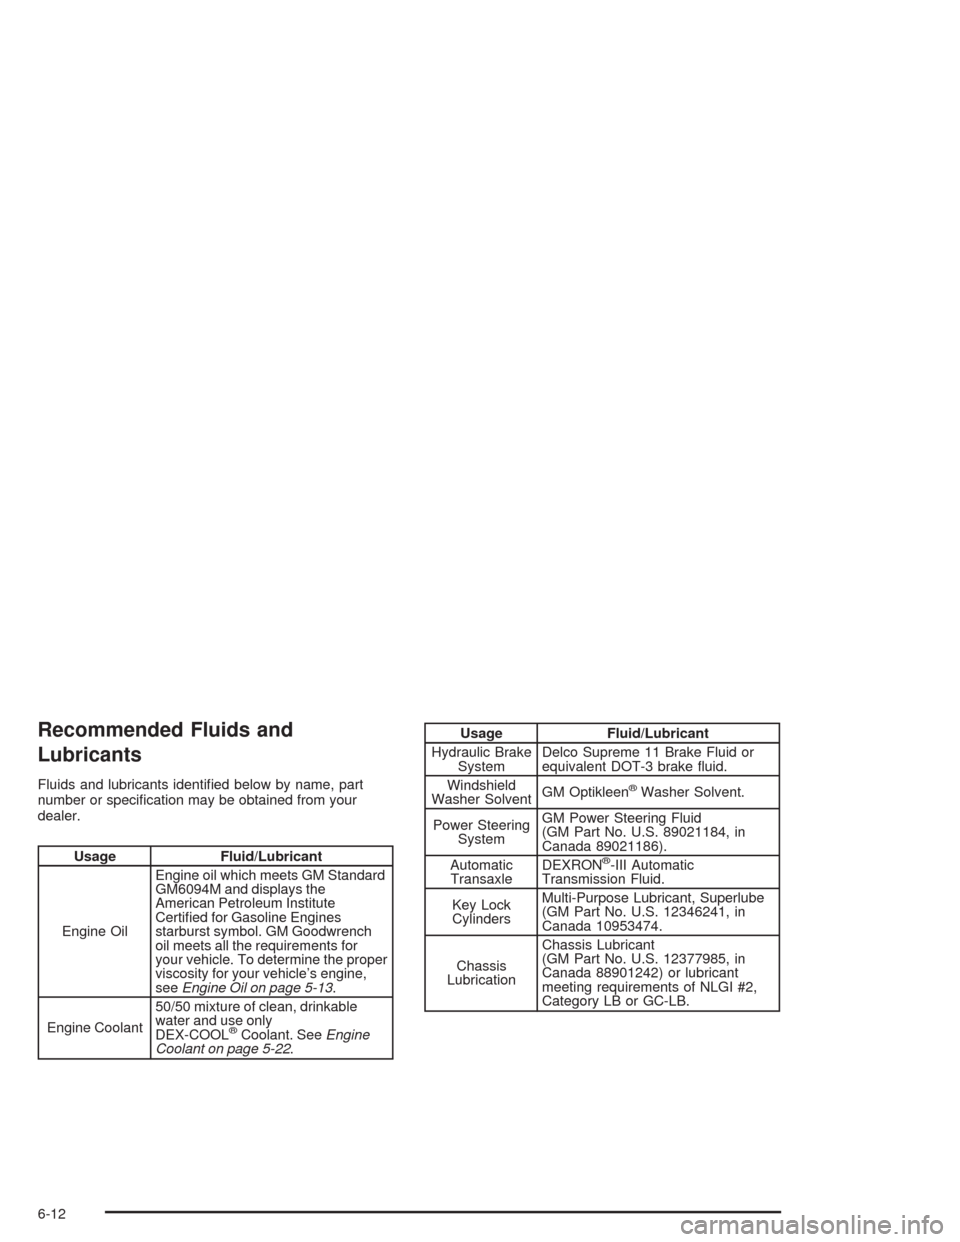
Recommended Fluids and
Lubricants
Fluids and lubricants identi�ed below by name, part
number or speci�cation may be obtained from your
dealer.
Usage Fluid/Lubricant
Engine OilEngine oil which meets GM Standard
GM6094M and displays the
American Petroleum Institute
Certi�ed for Gasoline Engines
starburst symbol. GM Goodwrench
oil meets all the requirements for
your vehicle. To determine the proper
viscosity for your vehicle’s engine,
seeEngine Oil on page 5-13.
Engine Coolant50/50 mixture of clean, drinkable
water and use only
DEX-COOL
®Coolant. SeeEngine
Coolant on page 5-22.
Usage Fluid/Lubricant
Hydraulic Brake
SystemDelco Supreme 11 Brake Fluid or
equivalent DOT-3 brake �uid.
Windshield
Washer SolventGM Optikleen
®Washer Solvent.
Power Steering
SystemGM Power Steering Fluid
(GM Part No. U.S. 89021184, in
Canada 89021186).
Automatic
TransaxleDEXRON
®-III Automatic
Transmission Fluid.
Key Lock
CylindersMulti-Purpose Lubricant, Superlube
(GM Part No. U.S. 12346241, in
Canada 10953474.
Chassis
LubricationChassis Lubricant
(GM Part No. U.S. 12377985, in
Canada 88901242) or lubricant
meeting requirements of NLGI #2,
Category LB or GC-LB.
6-12