headlamp CHEVROLET VENTURE 2005 1.G User Guide
[x] Cancel search | Manufacturer: CHEVROLET, Model Year: 2005, Model line: VENTURE, Model: CHEVROLET VENTURE 2005 1.GPages: 470, PDF Size: 2.76 MB
Page 309 of 470
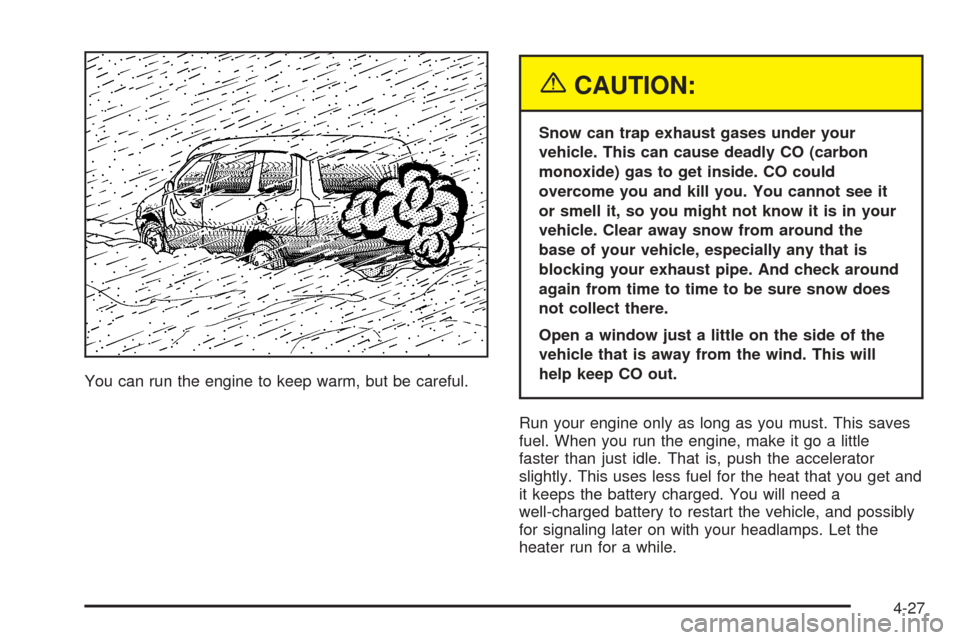
You can run the engine to keep warm, but be careful.
{CAUTION:
Snow can trap exhaust gases under your
vehicle. This can cause deadly CO (carbon
monoxide) gas to get inside. CO could
overcome you and kill you. You cannot see it
or smell it, so you might not know it is in your
vehicle. Clear away snow from around the
base of your vehicle, especially any that is
blocking your exhaust pipe. And check around
again from time to time to be sure snow does
not collect there.
Open a window just a little on the side of the
vehicle that is away from the wind. This will
help keep CO out.
Run your engine only as long as you must. This saves
fuel. When you run the engine, make it go a little
faster than just idle. That is, push the accelerator
slightly. This uses less fuel for the heat that you get and
it keeps the battery charged. You will need a
well-charged battery to restart the vehicle, and possibly
for signaling later on with your headlamps. Let the
heater run for a while.
4-27
Page 327 of 470
Service............................................................5-3
Doing Your Own Service Work.........................5-4
Adding Equipment to the Outside of
Your Vehicle..............................................5-5
Fuel................................................................5-5
Gasoline Octane............................................5-5
Gasoline Speci�cations....................................5-5
California Fuel...............................................5-6
Additives.......................................................5-6
Fuels in Foreign Countries...............................5-7
Filling Your Tank............................................5-8
Filling a Portable Fuel Container.....................5-10
Checking Things Under the Hood....................5-10
Hood Release..............................................5-11
Engine Compartment Overview.......................5-12
Engine Oil...................................................5-13
Engine Oil Life System..................................5-16
Engine Air Cleaner/Filter................................5-17
Automatic Transaxle Fluid..............................5-19
Engine Coolant.............................................5-22
Radiator Pressure Cap..................................5-25
Engine Overheating.......................................5-25
Overheated Engine Protection Operating Mode . . .5-27
Cooling System............................................5-28
Power Steering Fluid.....................................5-34
Windshield Washer Fluid................................5-35Brakes........................................................5-36
Battery........................................................5-39
Jump Starting...............................................5-40
Bulb Replacement..........................................5-45
Halogen Bulbs..............................................5-45
Headlamps..................................................5-46
Front Turn Signal, Sidemarker and
Parking Lamps..........................................5-48
Taillamps, Turn Signal, Stoplamps and
Back-up Lamps.........................................5-50
Replacement Bulbs.......................................5-51
Windshield Wiper Blade Replacement..............5-52
Tires..............................................................5-53
Tire Sidewall Labelling...................................5-54
Tire Terminology and De�nitions.....................5-56
In�ation - Tire Pressure.................................5-59
Tire Inspection and Rotation...........................5-60
When It Is Time for New Tires.......................5-61
Buying New Tires.........................................5-62
Uniform Tire Quality Grading..........................5-63
Wheel Alignment and Tire Balance..................5-64
Wheel Replacement......................................5-64
Tire Chains..................................................5-66
Accessory In�ator.........................................5-66
If a Tire Goes Flat........................................5-68
Changing a Flat Tire.....................................5-69
Section 5 Service and Appearance Care
5-1
Page 328 of 470
Removing the Spare Tire and Tools................5-70
Removing the Flat Tire and Installing
the Spare Tire..........................................5-73
Secondary Latch System...............................5-78
Storing a Flat or Spare Tire and Tools............5-80
Compact Spare Tire......................................5-82
Appearance Care............................................5-83
Fabric/Carpet...............................................5-83
Vinyl...........................................................5-85
Leather.......................................................5-85
Instrument Panel..........................................5-85
Interior Plastic Components............................5-85
Child Restraint Pad.......................................5-85
Glass Surfaces.............................................5-85
Care of Safety Belts and Built-in Child
Restraint Harness......................................5-86
Weatherstrips...............................................5-86
Washing Your Vehicle...................................5-86
Cleaning Exterior Lamps/Lenses.....................5-86
Finish Care..................................................5-87
Windshield, Backglass, and Wiper Blades.........5-87Aluminum Wheels.........................................5-88
Tires...........................................................5-88
Sheet Metal Damage.....................................5-89
Finish Damage.............................................5-89
Underbody Maintenance................................5-89
Chemical Paint Spotting.................................5-89
Vehicle Care/Appearance Materials..................5-90
Vehicle Identi�cation......................................5-91
Vehicle Identi�cation Number (VIN).................5-91
Service Parts Identi�cation Label.....................5-91
Electrical System............................................5-92
Add-On Electrical Equipment..........................5-92
Headlamp Wiring..........................................5-92
Windshield Wiper Fuses................................5-92
Power Windows and Other Power Options.......5-92
Fuses and Circuit Breakers............................5-92
Instrument Panel Fuse Block..........................5-93
Underhood Fuse Block..................................5-96
Capacities and Speci�cations..........................5-99
Section 5 Service and Appearance Care
5-2
Page 372 of 470
Headlamps
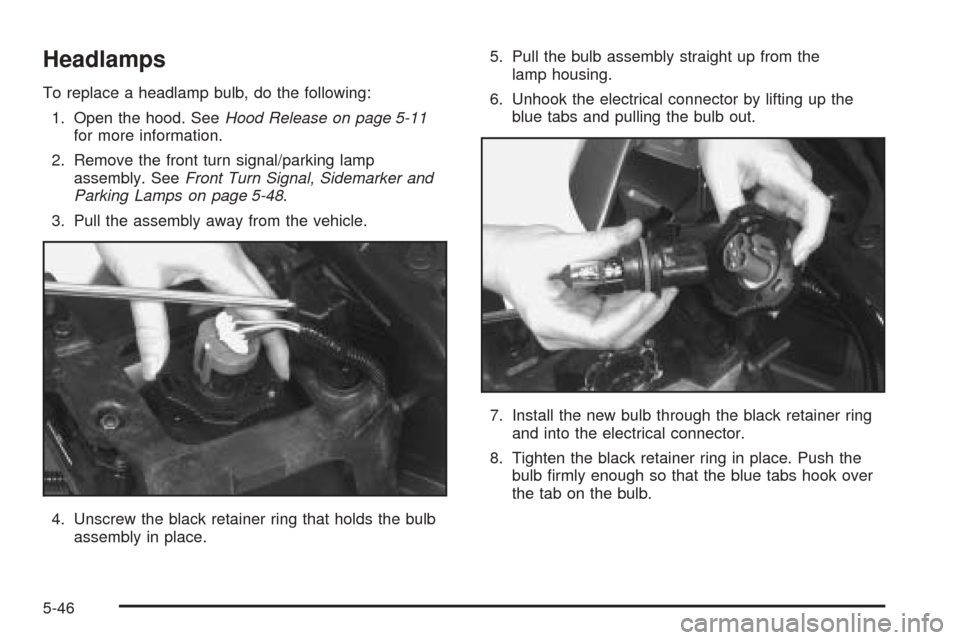
To replace a headlamp bulb, do the following:
1. Open the hood. SeeHood Release on page 5-11
for more information.
2. Remove the front turn signal/parking lamp
assembly. SeeFront Turn Signal, Sidemarker and
Parking Lamps on page 5-48.
3. Pull the assembly away from the vehicle.
4. Unscrew the black retainer ring that holds the bulb
assembly in place.5. Pull the bulb assembly straight up from the
lamp housing.
6. Unhook the electrical connector by lifting up the
blue tabs and pulling the bulb out.
7. Install the new bulb through the black retainer ring
and into the electrical connector.
8. Tighten the black retainer ring in place. Push the
bulb �rmly enough so that the blue tabs hook over
the tab on the bulb.
5-46
Page 373 of 470
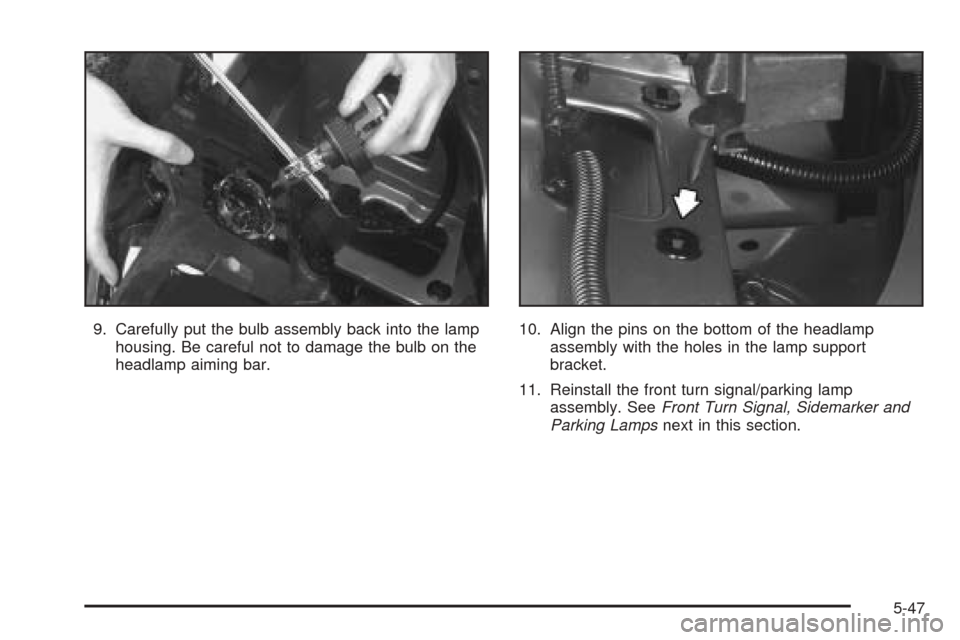
9. Carefully put the bulb assembly back into the lamp
housing. Be careful not to damage the bulb on the
headlamp aiming bar.10. Align the pins on the bottom of the headlamp
assembly with the holes in the lamp support
bracket.
11. Reinstall the front turn signal/parking lamp
assembly. SeeFront Turn Signal, Sidemarker and
Parking Lampsnext in this section.
5-47
Page 374 of 470
Front Turn Signal, Sidemarker and
Parking Lamps
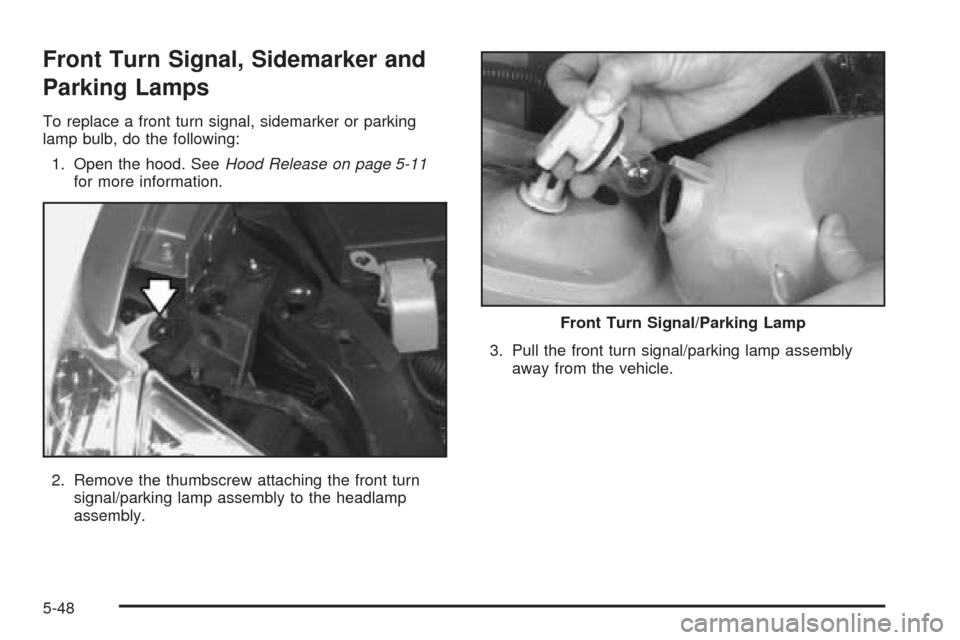
To replace a front turn signal, sidemarker or parking
lamp bulb, do the following:
1. Open the hood. SeeHood Release on page 5-11
for more information.
2. Remove the thumbscrew attaching the front turn
signal/parking lamp assembly to the headlamp
assembly.3. Pull the front turn signal/parking lamp assembly
away from the vehicle.
Front Turn Signal/Parking Lamp
5-48
Page 375 of 470
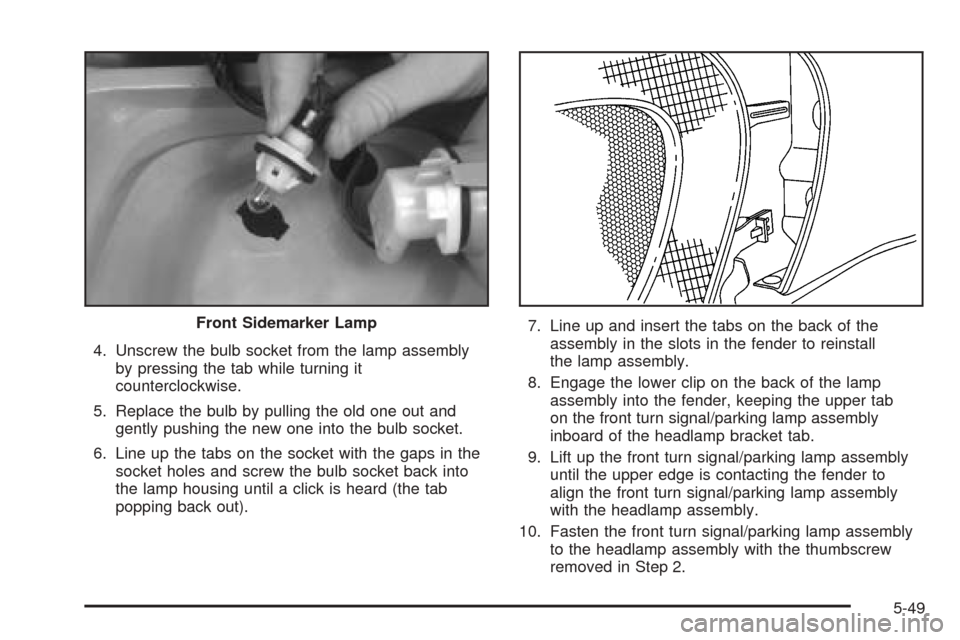
4. Unscrew the bulb socket from the lamp assembly
by pressing the tab while turning it
counterclockwise.
5. Replace the bulb by pulling the old one out and
gently pushing the new one into the bulb socket.
6. Line up the tabs on the socket with the gaps in the
socket holes and screw the bulb socket back into
the lamp housing until a click is heard (the tab
popping back out).7. Line up and insert the tabs on the back of the
assembly in the slots in the fender to reinstall
the lamp assembly.
8. Engage the lower clip on the back of the lamp
assembly into the fender, keeping the upper tab
on the front turn signal/parking lamp assembly
inboard of the headlamp bracket tab.
9. Lift up the front turn signal/parking lamp assembly
until the upper edge is contacting the fender to
align the front turn signal/parking lamp assembly
with the headlamp assembly.
10. Fasten the front turn signal/parking lamp assembly
to the headlamp assembly with the thumbscrew
removed in Step 2. Front Sidemarker Lamp
5-49
Page 377 of 470
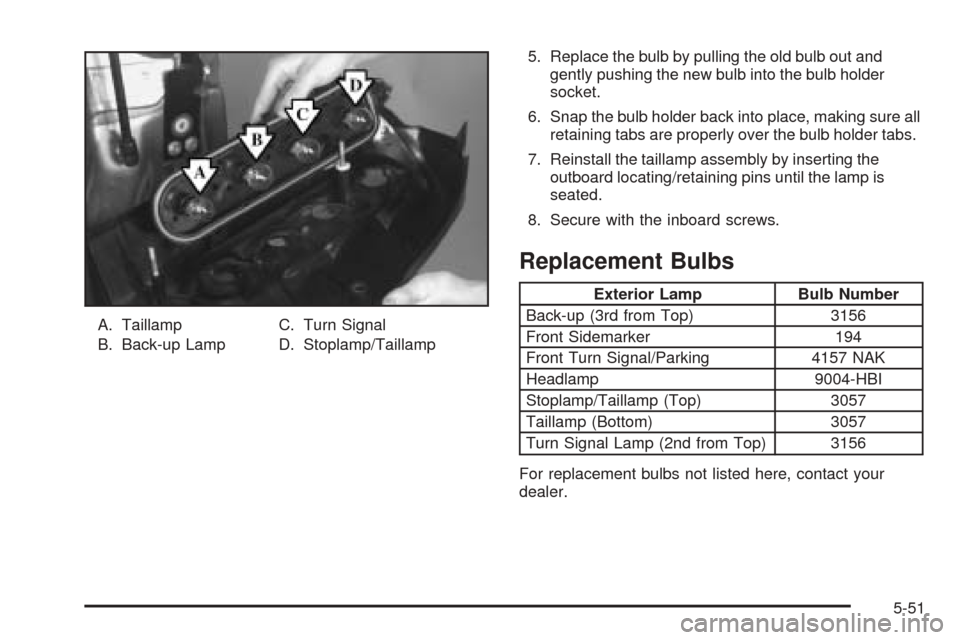
A. Taillamp
B. Back-up LampC. Turn Signal
D. Stoplamp/Taillamp5. Replace the bulb by pulling the old bulb out and
gently pushing the new bulb into the bulb holder
socket.
6. Snap the bulb holder back into place, making sure all
retaining tabs are properly over the bulb holder tabs.
7. Reinstall the taillamp assembly by inserting the
outboard locating/retaining pins until the lamp is
seated.
8. Secure with the inboard screws.
Replacement Bulbs
Exterior Lamp Bulb Number
Back-up (3rd from Top) 3156
Front Sidemarker 194
Front Turn Signal/Parking 4157 NAK
Headlamp 9004-HBI
Stoplamp/Taillamp (Top) 3057
Taillamp (Bottom) 3057
Turn Signal Lamp (2nd from Top) 3156
For replacement bulbs not listed here, contact your
dealer.
5-51
Page 391 of 470
If you need to replace any of your wheels, wheel bolts
or wheel nuts, replace them only with new GM
original equipment parts. This way, you will be sure to
have the right wheel, wheel bolts and wheel nuts
for your vehicle.
{CAUTION:
Using the wrong replacement wheels, wheel
bolts or wheel nuts on your vehicle can be
dangerous. It could affect the braking and
handling of your vehicle, make your tires lose
air and make you lose control. You could have
a collision in which you or others could be
injured. Always use the correct wheel, wheel
bolts and wheel nuts for replacement.
Notice:The wrong wheel can also cause problems
with bearing life, brake cooling, speedometer or
odometer calibration, headlamp aim, bumper height,
vehicle ground clearance and tire or tire chain
clearance to the body and chassis.
SeeChanging a Flat Tire on page 5-69for more
information.
Used Replacement Wheels
{CAUTION:
Putting a used wheel on your vehicle is
dangerous. You can’t know how it’s been used
or how far it’s been driven. It could fail
suddenly and cause a crash. If you have to
replace a wheel, use a new GM original
equipment wheel.
5-65
Page 418 of 470
Electrical System
Add-On Electrical Equipment
Notice:Don’t add anything electrical to your vehicle
unless you check with your dealer �rst. Some
electrical equipment can damage your vehicle and
the damage wouldn’t be covered by your warranty.
Some add-on electrical equipment can keep other
components from working as they should.
Your vehicle has an airbag system. Before attempting to
add anything electrical to your vehicle, seeServicing
Your Airbag-Equipped Vehicle on page 1-88.
Headlamp Wiring
The headlamp wiring is protected by an internal circuit
breaker in the instrument panel fuse panel. An electrical
overload will cause the lamps to go on and off, or in
some cases to remain off. If this happens, have
your headlamp wiring checked right away.
Windshield Wiper Fuses
The windshield wiper motor is protected by an internal
circuit breaker and a fuse. If the motor overheats due to
heavy snow, etc., the wiper will stop until the motor
cools. If the overload is caused by some electrical
problem, be sure to get it �xed.
Power Windows and Other Power
Options
Circuit breakers in the instrument panel fuse panel
protect the power windows and other power accessories.
When the current load is too heavy, the circuit breaker
opens and closes, protecting the circuit until the
problem is �xed.
Fuses and Circuit Breakers
The wiring circuits in your vehicle are protected from
short circuits by a combination of fuses, circuit breakers,
and fusible thermal links.
Look at the silver-colored band inside the fuse. If the
band is broken or melted, replace the fuse. Be sure you
replace a bad fuse with a new one of the identical
size and rating.
5-92