door lock CHEVROLET VENTURE 2005 1.G Owners Manual
[x] Cancel search | Manufacturer: CHEVROLET, Model Year: 2005, Model line: VENTURE, Model: CHEVROLET VENTURE 2005 1.GPages: 470, PDF Size: 2.76 MB
Page 1 of 470
Seats and Restraint Systems........................... 1-1
Front Seats ............................................... 1-3
Rear Seats ............................................... 1-6
Safety Belts ............................................. 1-28
Child Restraints ....................................... 1-48
Airbag System ......................................... 1-78
Restraint System Check ............................1-88
Features and Controls ..................................... 2-1
Keys ........................................................ 2-3
Doors and Locks ....................................... 2-8
Windows ................................................. 2-22
Theft-Deterrent Systems ............................2-25
Starting and Operating Your Vehicle ...........2-29
Mirrors .................................................... 2-41
OnStar
®System ...................................... 2-42
HomeLink®Transmitter ............................. 2-43
Storage Areas ......................................... 2-47
Vehicle Personalization .............................2-55
Instrument Panel ............................................. 3-1
Instrument Panel Overview .......................... 3-4
Climate Controls ...................................... 3-24
Warning Lights, Gages, and Indicators ........3-32
Message Center ....................................... 3-46
Driver Information Center (DIC) ..................3-53
Audio System(s) ....................................... 3-56Driving Your Vehicle
....................................... 4-1
Your Driving, the Road, and Your Vehicle ........ 4-2
Towing ................................................... 4-34
Service and Appearance Care .......................... 5-1
Service ..................................................... 5-3
Fuel ......................................................... 5-5
Checking Things Under the Hood ...............5-10
Bulb Replacement .................................... 5-45
Windshield Wiper Blade Replacement .........5-52
Tires ...................................................... 5-53
Appearance Care ..................................... 5-83
Vehicle Identi�cation
................................. 5-91
Electrical System ...................................... 5-92
Capacities and Speci�cations .....................5-99
Maintenance Schedule ..................................... 6-1
Maintenance Schedule ................................ 6-2
Customer Assistance and Information .............. 7-1
Customer Assistance and Information ........... 7-2
Reporting Safety Defects ...........................7-10
Index ................................................................ 1
2005 Chevrolet Venture Owner ManualM
Page 31 of 470
Stowable Seat
Your vehicle may have a stowable seat. The stowable
seat is a full bench seat and comes with the convenience
center. SeeConvenience Center on page 2-53for more
information. The stowable seat can be removed and
replaced, or with the seatback folded, it can lie �ush with
the convenience center.
Folding the Seatback
{CAUTION:
If the seatback is not locked, it could move
forward in a sudden stop or crash. That could
cause injury to the person sitting there. Always
press rearward on the seatback to be sure it
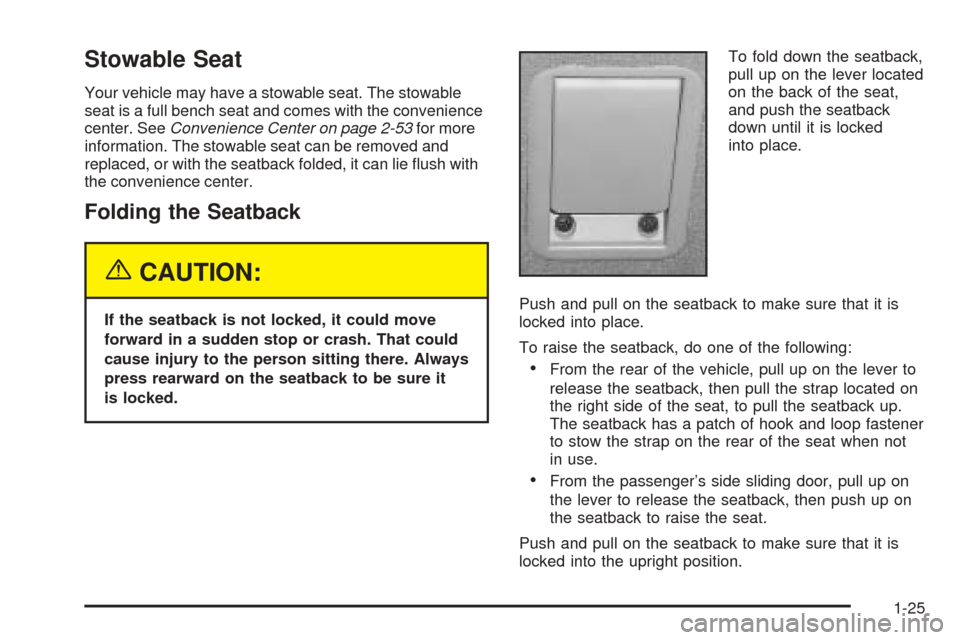
is locked.To fold down the seatback,
pull up on the lever located
on the back of the seat,
and push the seatback
down until it is locked
into place.
Push and pull on the seatback to make sure that it is
locked into place.
To raise the seatback, do one of the following:
From the rear of the vehicle, pull up on the lever to
release the seatback, then pull the strap located on
the right side of the seat, to pull the seatback up.
The seatback has a patch of hook and loop fastener
to stow the strap on the rear of the seat when not
in use.
From the passenger’s side sliding door, pull up on
the lever to release the seatback, then push up on
the seatback to raise the seat.
Push and pull on the seatback to make sure that it is
locked into the upright position.
1-25
Page 40 of 470
How to Wear Safety Belts Properly
This part is only for people of adult size.
Be aware that there are special things to know about
safety belts and children. And there are different
rules for smaller children and babies. If a child will be
riding in your vehicle, seeOlder Children on page 1-48
orInfants and Young Children on page 1-51. Follow
those rules for everyone’s protection.
First, you will want to know which restraint systems your
vehicle has.
We will start with the driver position.
Driver Position
Lap-Shoulder Belt
The driver has a lap-shoulder belt. Here is how to wear
it properly.
1. Close and lock the door.
2. Adjust the seat so you can sit up straight. To see
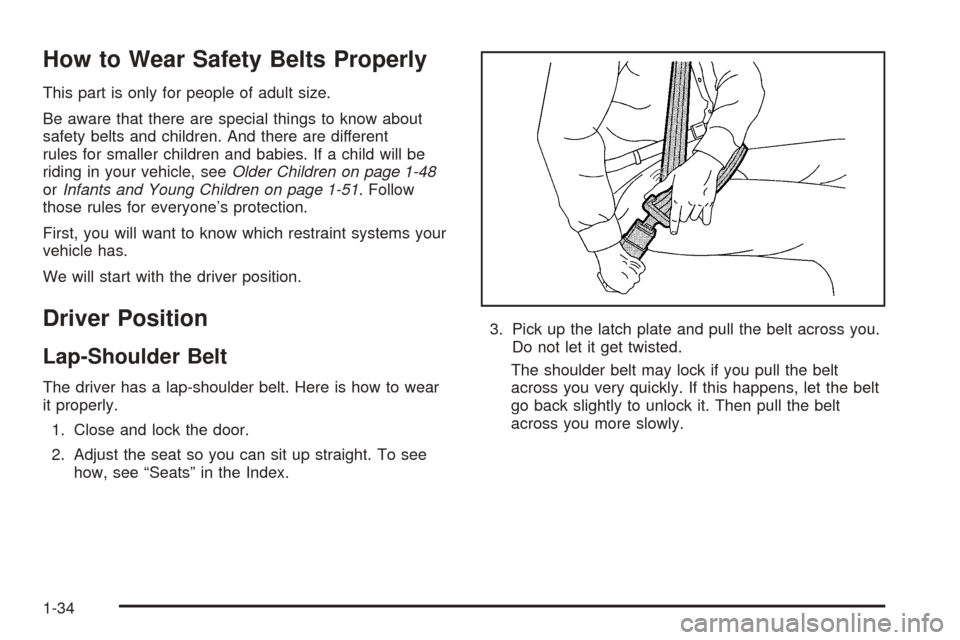
how, see “Seats” in the Index.3. Pick up the latch plate and pull the belt across you.
Do not let it get twisted.
The shoulder belt may lock if you pull the belt
across you very quickly. If this happens, let the belt
go back slightly to unlock it. Then pull the belt
across you more slowly.
1-34
Page 47 of 470
To unlatch the belt, just push the button on the buckle.
The belt should go back out of the way.
Before you close the door, be sure the belt is out of the
way. If you slam the door on it, you can damage
both the belt and your vehicle.
Shoulder Belt Height Adjustment
Before you begin to drive, move the shoulder belt
adjuster to the height that is right for you.
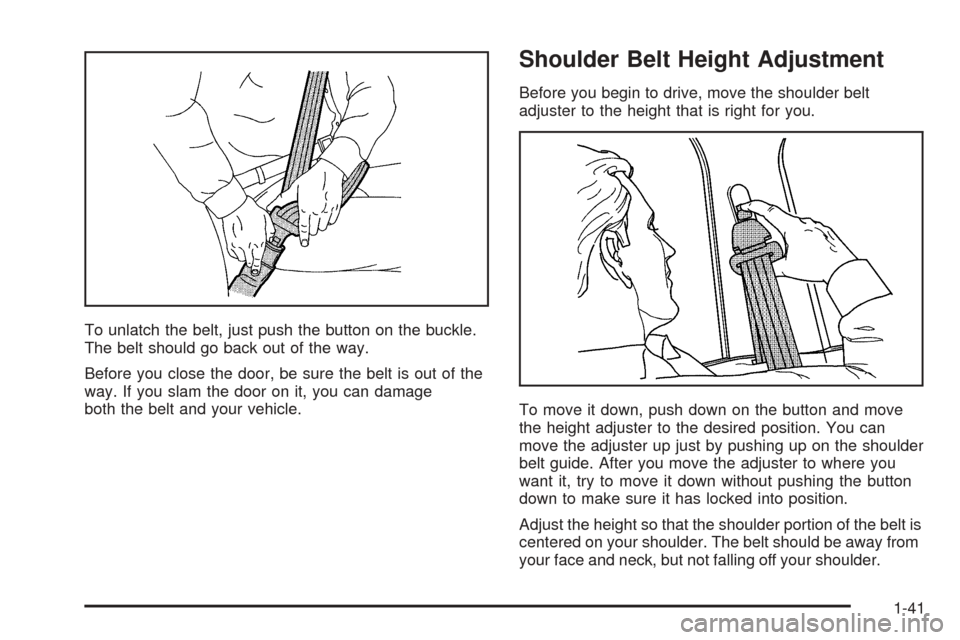
To move it down, push down on the button and move
the height adjuster to the desired position. You can
move the adjuster up just by pushing up on the shoulder
belt guide. After you move the adjuster to where you
want it, try to move it down without pushing the button
down to make sure it has locked into position.
Adjust the height so that the shoulder portion of the belt is
centered on your shoulder. The belt should be away from
your face and neck, but not falling off your shoulder.
1-41
Page 97 of 470
Keys...............................................................2-3
Remote Keyless Entry System.........................2-4
Remote Keyless Entry System Operation...........2-5
Doors and Locks.............................................2-8
Door Locks....................................................2-8
Power Door Locks........................................2-10
Last Door Closed Locking..............................2-10
Programmable Automatic Door Locks..............2-11
Lockout Protection........................................2-11
Dual Sliding Doors........................................2-12
Power Sliding Door (PSD)..............................2-15
Liftgate........................................................2-20
Windows........................................................2-22
Manual Windows..........................................2-22
Power Windows............................................2-23
Side Window Latches....................................2-23
Power Rear Quarter Windows........................2-24
Sun Visors...................................................2-24
Theft-Deterrent Systems..................................2-25
Content Theft-Deterrent.................................2-25
PASS-Key
®III ..............................................2-27
PASS-Key®III Operation...............................2-27Starting and Operating Your Vehicle................2-29
New Vehicle Break-In....................................2-29
Ignition Positions..........................................2-30
Retained Accessory Power (RAP)...................2-31
Starting Your Engine.....................................2-31
Engine Coolant Heater..................................2-32
Automatic Transaxle Operation.......................2-33
Parking Brake..............................................2-36
Shifting Into Park (P).....................................2-37
Shifting Out of Park (P).................................2-38
Parking Over Things That Burn.......................2-39
Engine Exhaust............................................2-39
Running Your Engine While You Are Parked.......2-40
Mirrors...........................................................2-41
Manual Rearview Mirror.................................2-41
Outside Power Mirrors...................................2-41
Outside Convex Mirror...................................2-41
Outside Heated Mirrors..................................2-42
OnStar
®System.............................................2-42
HomeLink®Transmitter...................................2-43
Programming the HomeLink®Transmitter.........2-44
Section 2 Features and Controls
2-1
Page 98 of 470
Storage Areas................................................2-47
Glove Box...................................................2-47
Cupholder(s)................................................2-48
Overhead Console........................................2-48
Front Seat Storage Net.................................2-50
Luggage Carrier...........................................2-50
Rear Storage Area........................................2-51
Convenience Net..........................................2-52
Convenience Center......................................2-53Vehicle Personalization...................................2-55
Entering Programming Mode..........................2-55
Delayed Illumination and Exit Lighting..............2-56
Automatic Door Locks...................................2-57
Last Door Locking and Lockout Deterrent.........2-58
Remote Driver Unlock Control........................2-59
Remote Lock and Unlock Con�rmation.............2-60
Content Theft-Deterrent System......................2-61
Arming and Disarming the Content
Theft-Deterrent System...............................2-62
Exiting Programming Mode.............................2-64
Section 2 Features and Controls
2-2
Page 100 of 470
Your vehicle’s key can be used for the ignition as well
as the driver’s door lock and storage compartments.
If you need a new key, contact your dealer, who
can obtain the correct key code.
Your vehicle has the PASS-Key
®III vehicle theft
system. The key has a transponder in the key head that
matches a decoder in the vehicle’s steering column.
If a replacement key or any additional key is needed,
you must purchase this key from your dealer. The
key will have PK3 stamped on it. Keep the bar code tag
that came with the original keys. Give this tag to your
dealer if you need a new key made.
Any new PASS-Key
®III key must be programmed
before it will start your vehicle. SeePASS-Key®III on
page 2-27for more information on programming
your new key.
Notice:If you ever lock your keys in your vehicle,
you may have to damage the vehicle to get in.
Be sure you have spare keys.
If you ever do get locked out of your vehicle, see
Roadside Assistance Program on page 7-6for more
information.
If your vehicle is equipped with the OnStar
®system with
an active subscription and you lock your keys inside
the vehicle, OnStar
®may be able to send a command to
unlock your vehicle. SeeOnStar®System on page 2-42
for more information.
Remote Keyless Entry System
If equipped, the keyless entry system operates on a
radio frequency subject to Federal Communications
Commission (FCC) Rules and with Industry Canada.
This device complies with Part 15 of the FCC Rules.
Operation is subject to the following two conditions:
1. This device may not cause interference.
2. This device must accept any interference received,
including interference that may cause undesired
operation of the device.
This device complies with RSS-210 of Industry Canada.
Operation is subject to the following two conditions:
1. This device may not cause interference.
2. This device must accept any interference received,
including interference that may cause undesired
operation of the device.
Changes or modi�cations to this system by other than
an authorized service facility could void authorization to
use this equipment.
2-4
Page 101 of 470
At times you may notice a decrease in range. This is
normal for any remote keyless entry system. If the
transmitter does not work or if you have to stand closer
to your vehicle for the transmitter to work, try this:
Check the distance. You may be too far from your
vehicle. You may need to stand closer during
rainy or snowy weather.
Check the location. Other vehicles or objects may
be blocking the signal. Take a few steps to the
left or right, hold the transmitter higher, and
try again.
Check to determine if battery replacement is
necessary. See “Battery Replacement” under
Remote Keyless Entry System Operation on
page 2-5.
If you are still having trouble, see your dealer or a
quali�ed technician for service.
Remote Keyless Entry System
Operation
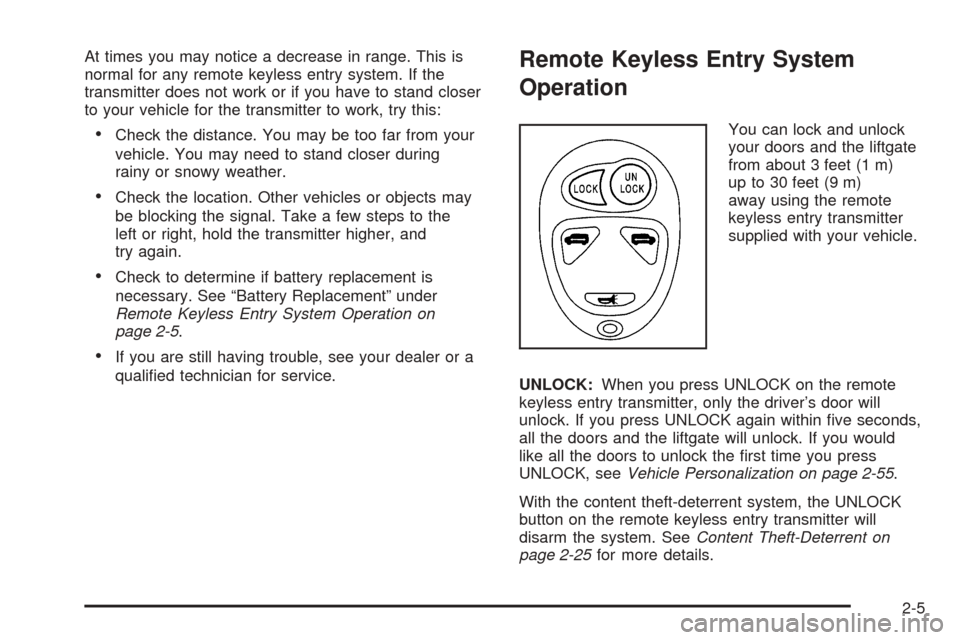
You can lock and unlock
your doors and the liftgate
from about 3 feet (1 m)
up to 30 feet (9 m)
away using the remote
keyless entry transmitter
supplied with your vehicle.
UNLOCK:When you press UNLOCK on the remote
keyless entry transmitter, only the driver’s door will
unlock. If you press UNLOCK again within �ve seconds,
all the doors and the liftgate will unlock. If you would
like all the doors to unlock the �rst time you press
UNLOCK, seeVehicle Personalization on page 2-55.
With the content theft-deterrent system, the UNLOCK
button on the remote keyless entry transmitter will
disarm the system. SeeContent Theft-Deterrent on
page 2-25for more details.
2-5
Page 102 of 470
When you use your remote keyless entry transmitter to
unlock your vehicle or to operate the power sliding
door(s), the parking lamps will �ash to let you know the
command was received.
If you would like to change the way the parking lamps
operate with remote unlock con�rmation, seeVehicle
Personalization on page 2-55.
LOCK:To lock all doors, press LOCK on the remote
keyless entry transmitter. SeePower Door Locks
on page 2-10for more details on the power door lock
features. With the content theft-deterrent system,
the LOCK button may arm the system. SeeContent
Theft-Deterrent on page 2-25for more details.
When you use the remote keyless entry transmitter to
lock your vehicle, the parking lamps will �ash to let you
know the command has been received. If you press
the LOCK button again, within �ve seconds, the horn will
sound and the parking lamps will �ash to let you
know the vehicle is already locked.
If you would like to change the way the parking lamps
and horn operate with remote lock con�rmation,
seeVehicle Personalization on page 2-55.Remote Alarm
When you press the horn button on the remote keyless
entry transmitter, the parking lamps will �ash and the
horn will sound. This will allow you to attract attention,
if needed.
Press this button again to stop the alarm from sounding.
Remote Power Sliding Door Operation
If your vehicle has the power sliding door, your
remote keyless entry transmitter will have a button that
has a van symbol on it. Press it to open or close the
sliding door. SeePower Sliding Door (PSD) on
page 2-15.
If your vehicle has the dual power sliding doors, your
remote keyless entry transmitter will have two buttons
that have a van symbol on them. The van symbol on the
left is for the driver’s side sliding door and the van
symbol on the right is for the passenger’s side sliding
door. SeePower Sliding Door (PSD) on page 2-15.
If the power sliding door(s) is locked, �rst unlock
all doors, then press the van symbol to open the power
sliding door(s). The parking lamps will �ash when
the right button with the van symbol is pressed and they
will not �ash when the left button with the van symbol
is pressed. Press the van symbol again to close
the sliding door(s). SeePower Sliding Door (PSD) on
page 2-15for more information.
2-6
Page 103 of 470
You can operate the power sliding door(s) with the
remote keyless entry transmitter only when the power
sliding door override switch(es) on the overhead console
is turned off. SeePower Sliding Door (PSD) on
page 2-15.
If your vehicle’s fuel �ller door is opened, the driver’s side
power sliding door will not open completely. Do not try to
force the door. Once the fuel �ller door is closed, the
driver’s side sliding door can be opened normally.
Matching Transmitter(s) to Your
Vehicle
Each remote keyless entry transmitter is coded to
prevent another transmitter from unlocking your vehicle.
If a transmitter is lost or stolen, a replacement can
be purchased through your dealer. Remember to bring
any remaining transmitters with you when you go to
your dealer. When the dealer matches the replacement
transmitter to your vehicle, any remaining transmitters
must also be matched. Once your dealer has coded the
new transmitter, the lost transmitter will not unlock
your vehicle. Each vehicle can have a maximum of
four transmitters matched to it.
See your dealer to match transmitters to another
vehicle.
Battery Replacement
Under normal use, the battery in your remote keyless
entry transmitter should last about three years.
You can tell the battery is weak if the transmitter will not
work at the normal range in any location. If you have
to get close to your vehicle before the transmitter works,
it is probably time to change the battery.
Notice:When replacing the battery, use care not to
touch any of the circuitry. Static from your body
transferred to these surfaces may damage the
transmitter.
1. Insert a �at object, such as a coin, into the slot on
the side of the transmitter and twist it to separate
the halves.
2-7