CHEVROLET VOLT 2011 Owner's Manual
Manufacturer: CHEVROLET, Model Year: 2011, Model line: VOLT, Model: CHEVROLET VOLT 2011Pages: 516, PDF Size: 6.61 MB
Page 351 of 516

Black plate (49,1)Chevrolet Volt Owner Manual - 2011
Driving and Operating 9-49
When the System Does Not
Seem To Work Properly
The RVC system may not work
properly or display a clear image if:
.The RVC is turned off.
See“Turning the Rear Vision
Camera System On or Off”
earlier in this section.
.It is dark.
.The sun or the beam of
headlamps is shining directly
into the camera lens.
.Ice, snow, mud, or anything else
has built up on the camera lens.
Clean the lens, rinse it with
water, and wipe it with a soft
cloth.
.The back of the vehicle was in
an accident. The position and
mounting angle of the camera
can change or the camera can
be affected. Be sure to have
the camera and its position and
mounting angle checked at your
dealer.
Charging
Plug-In Charging
This section explains the process
for charging the vehicle's high
voltage battery. Do not allow the
vehicle to remain in temperature
extremes for long periods without
being driven or plugged in. It is
recommended that the vehicle
be plugged in when temperatures
are below 0°C (32°F) and above
32°C (90°F) to maximize high
voltage battery life.
The charging system may run fans
and pumps that result in sounds
from the vehicle while it is turned
off. Additional unexpected clicking
sounds may be experienced caused
by the electrical devices used while
charging.
Charging
Start Charge
1. The charge port door release button is on the driver door inner
trim panel. With the vehicle in
P (Park), press the button for
one second and release to open
the charge port door. The charge
port door can also be opened
using the RKE transmitter.
See Remote Keyless Entry
(RKE) System Operation on
page 2‑3.
Page 352 of 516
Black plate (50,1)Chevrolet Volt Owner Manual - 2011
9-50 Driving and Operating
In cold weather conditions, ice
may form around the charge port
door. The charge port door may
not open on the first attempt.
Remove ice from the area and
repeat attempting to open the
charge port door.
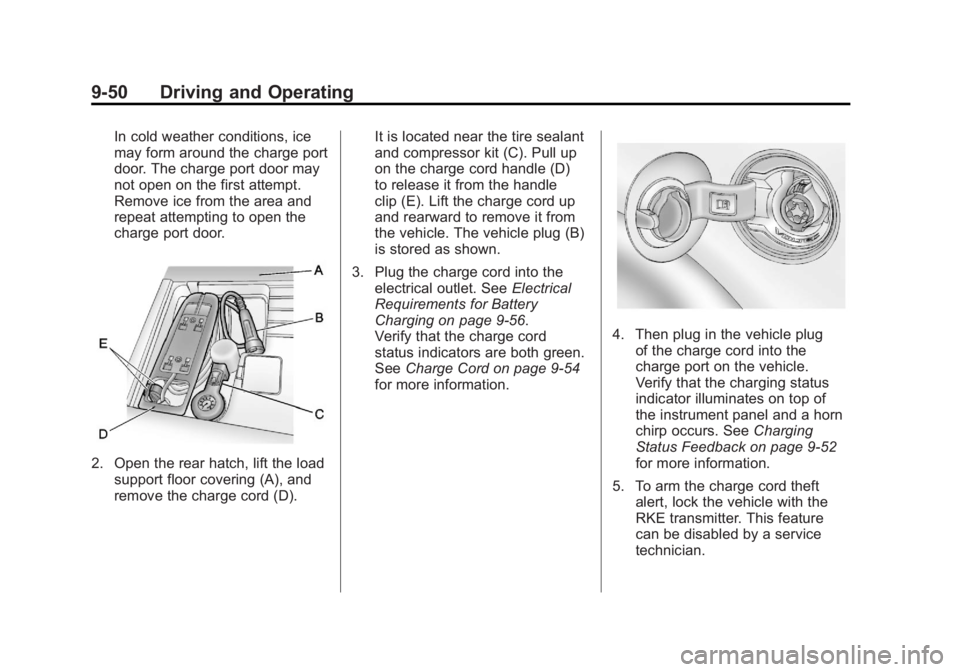
2. Open the rear hatch, lift the loadsupport floor covering (A), and
remove the charge cord (D). It is located near the tire sealant
and compressor kit (C). Pull up
on the charge cord handle (D)
to release it from the handle
clip (E). Lift the charge cord up
and rearward to remove it from
the vehicle. The vehicle plug (B)
is stored as shown.
3. Plug the charge cord into the electrical outlet. See Electrical
Requirements for Battery
Charging on page 9‑56.
Verify that the charge cord
status indicators are both green.
See Charge Cord on page 9‑54
for more information.
4. Then plug in the vehicle plug of the charge cord into the
charge port on the vehicle.
Verify that the charging status
indicator illuminates on top of
the instrument panel and a horn
chirp occurs. See Charging
Status Feedback on page 9‑52
for more information.
5. To arm the charge cord theft alert, lock the vehicle with the
RKE transmitter. This feature
can be disabled by a service
technician.
Page 353 of 516
Black plate (51,1)Chevrolet Volt Owner Manual - 2011
Driving and Operating 9-51
End Charge
1. Unlock the vehicle with the RKEtransmitter to disarm the charge
cord theft alert.
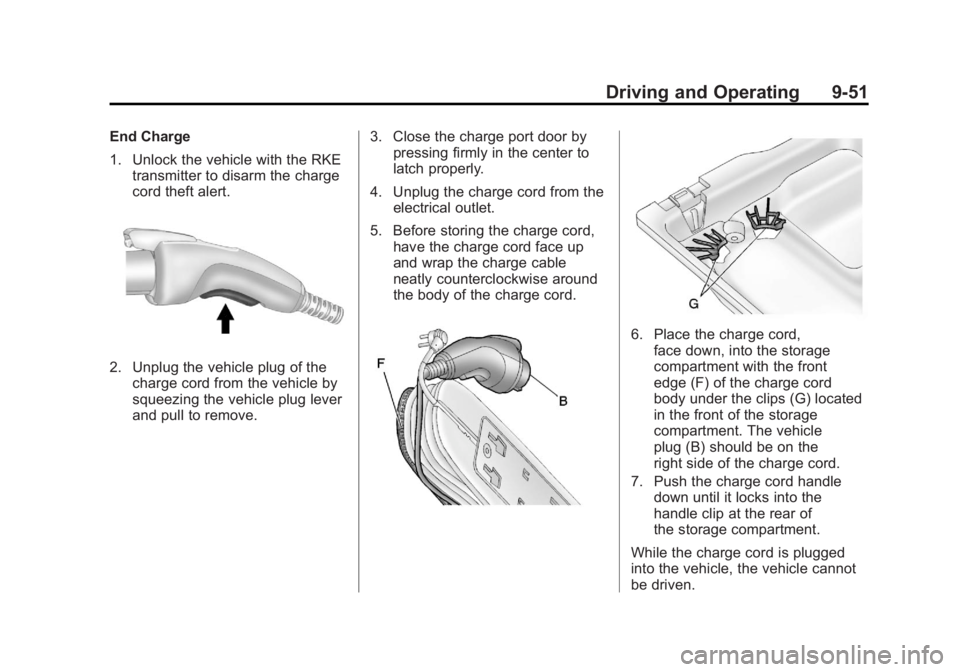
2. Unplug the vehicle plug of thecharge cord from the vehicle by
squeezing the vehicle plug lever
and pull to remove. 3. Close the charge port door by
pressing firmly in the center to
latch properly.
4. Unplug the charge cord from the electrical outlet.
5. Before storing the charge cord, have the charge cord face up
and wrap the charge cable
neatly counterclockwise around
the body of the charge cord.
6. Place the charge cord,face down, into the storage
compartment with the front
edge (F) of the charge cord
body under the clips (G) located
in the front of the storage
compartment. The vehicle
plug (B) should be on the
right side of the charge cord.
7. Push the charge cord handle down until it locks into the
handle clip at the rear of
the storage compartment.
While the charge cord is plugged
into the vehicle, the vehicle cannot
be driven.
Page 354 of 516
Black plate (52,1)Chevrolet Volt Owner Manual - 2011
9-52 Driving and Operating
Delayed Charging
Override
To temporarily override a delayed
charge event, unplug the charge
cord from the charge port and then
plug it back in within five seconds.
A single horn chirp will sound and
charging will begin immediately.
To cancel a temporary override,
unplug the charge cord, wait for
10 seconds, and then plug the
charge cord back in. A double horn
chirp will sound and charging will
be delayed.
See“Programmable Charging” in
Charging on page 5‑33 for advance
charge scheduling options.
Charging Status
Feedback
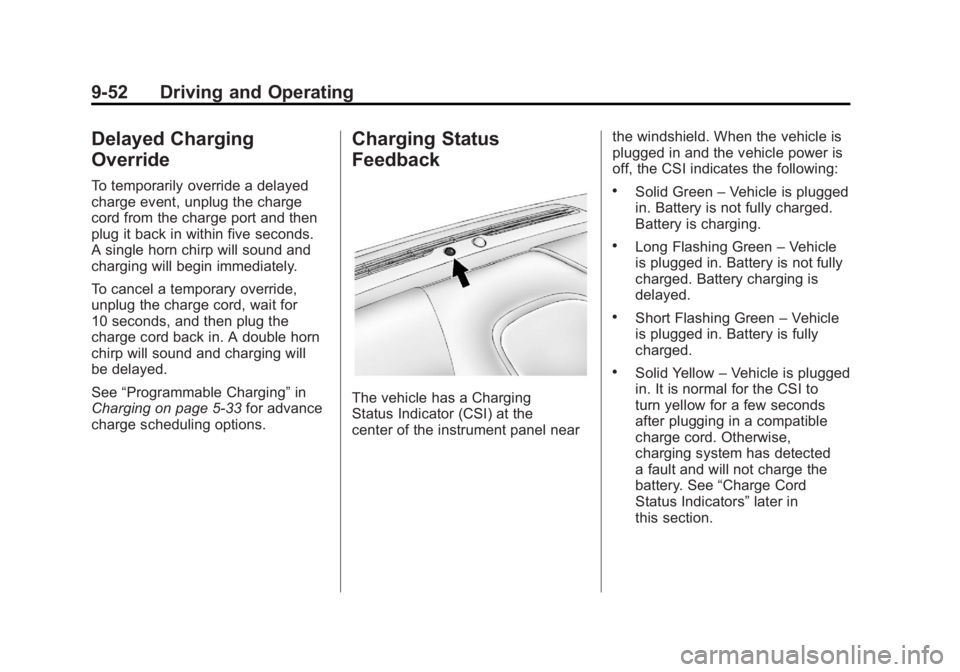
The vehicle has a Charging
Status Indicator (CSI) at the
center of the instrument panel near the windshield. When the vehicle is
plugged in and the vehicle power is
off, the CSI indicates the following:
.Solid Green
–Vehicle is plugged
in. Battery is not fully charged.
Battery is charging.
.Long Flashing Green –Vehicle
is plugged in. Battery is not fully
charged. Battery charging is
delayed.
.Short Flashing Green –Vehicle
is plugged in. Battery is fully
charged.
.Solid Yellow –Vehicle is plugged
in. It is normal for the CSI to
turn yellow for a few seconds
after plugging in a compatible
charge cord. Otherwise,
charging system has detected
a fault and will not charge the
battery. See “Charge Cord
Status Indicators” later in
this section.
Page 355 of 516
Black plate (53,1)Chevrolet Volt Owner Manual - 2011
Driving and Operating 9-53
The system may be thermally
conditioning the battery during
any of the states above, requiring
electrical energy to be transferred
to the vehicle.
If the vehicle is plugged in and
vehicle power is on, the CSI will be
on solid green. The same is true
during a remote start if the vehicle
is plugged in.
If the vehicle is plugged in and the
CSI is off, a charging fault has been
detected. See“Charge Cord Status
Indicators” later in this section.
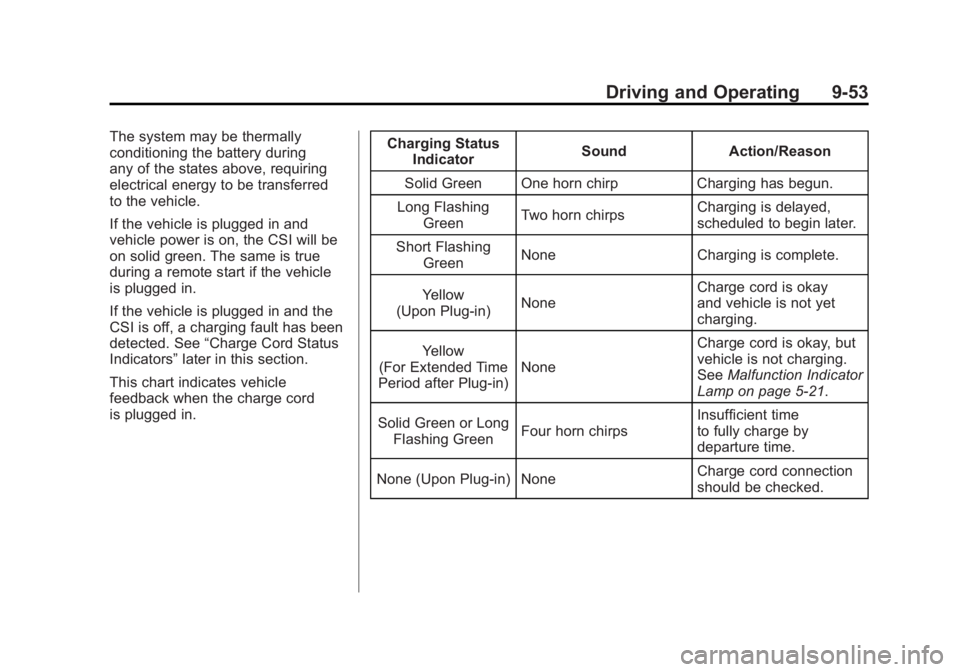
This chart indicates vehicle
feedback when the charge cord
is plugged in. Charging Status
Indicator Sound Action/Reason
Solid Green One horn chirp Charging has begun.
Long Flashing Green Two horn chirps Charging is delayed,
scheduled to begin later.
Short Flashing Green None Charging is complete.
Yellow
(Upon Plug‐in) None Charge cord is okay
and vehicle is not yet
charging.
Yellow
(For Extended Time
Period after Plug‐in) None Charge cord is okay, but
vehicle is not charging.
See
Malfunction Indicator
Lamp on page 5‑21.
Solid Green or Long Flashing Green Four horn chirps Insufficient time
to fully charge by
departure time.
None (Upon Plug‐in) None Charge cord connection
should be checked.
Page 356 of 516
Black plate (54,1)Chevrolet Volt Owner Manual - 2011
9-54 Driving and Operating
Charging StatusIndicator Sound Action/Reason
None (After Green or Yellow CSI
Indication Observed) None Charge cord connection
should be checked.
See
Malfunction Indicator
Lamp on page 5‑21.
None Repeated horn chirps
This feature can be
disabled by a service
technician.
To stop this alert, do one
of the following:
.Unplug the
charge cord.
.Press Unlock symbol
on the RKE.
.Press and hold the
Panic Alarm symbol
on the RKE, then
press again to stop
the panic alarm.
.Press the horn pad. Electricity was
interrupted before
charging was complete.
Charge Cord
See
Radio Frequency
Statement on page 13‑28 for
information regarding Part 15
of the Federal Communications
Commission (FCC) rules and
Industry Canada Standards
RSS-210/220/310.
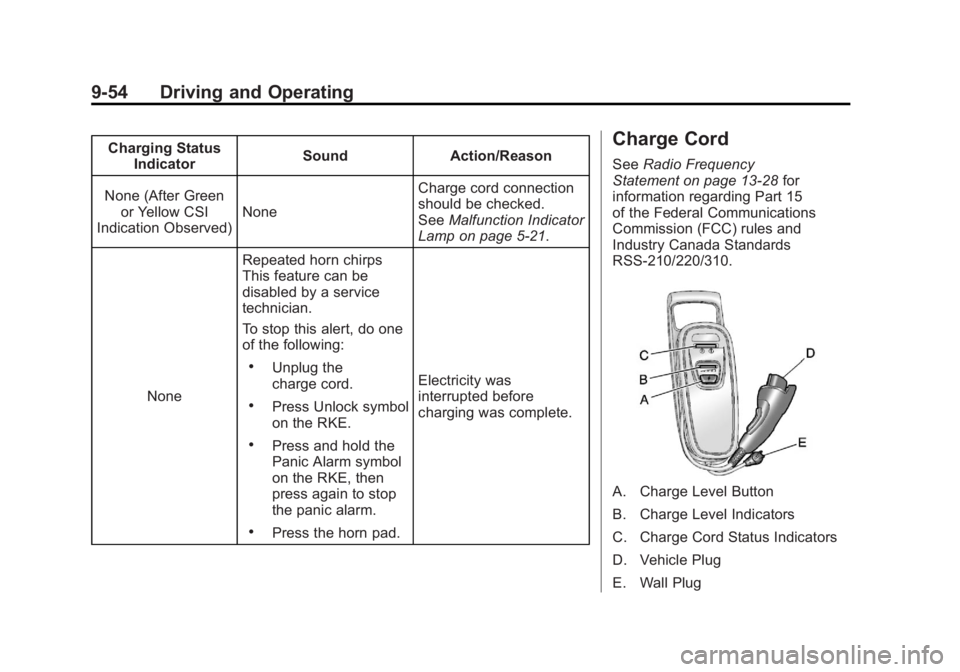
A. Charge Level Button
B. Charge Level Indicators
C. Charge Cord Status Indicators
D. Vehicle Plug
E. Wall Plug
Page 357 of 516
Black plate (55,1)Chevrolet Volt Owner Manual - 2011
Driving and Operating 9-55
A portable charge cord used to
charge the vehicle high voltage
battery is stored under the rear
luggage compartment.
The charge cord used to charge the
vehicle is a high‐powered electrical
device. During normal operation, the
AC wall plug of the charge cord may
feel warm. The AC wall plug must fit
tightly into an AC outlet that is in
good condition.
{WARNING
Using the charge cord with a
worn or damaged AC outlet
may cause burns or start a fire.
Periodically, check the AC wall
plug and charge cord while the
vehicle is charging. If the AC wall
plug feels hot, unplug the charge
cord and have the AC outlet
replaced by a qualified electrician.
Replace the charge cord if the AC
wall plug or cord are damaged.
Do not use an AC outlet that is
worn or damaged.
{WARNING
An extension cord should not
be used to charge the vehicle.
Use of an extension cord may
increase the risk of electric
shock or other hazards.
If an extension cord is used
because of limited access
to 120V AC power, use the
following safeguards:
The 120V AC outlet should be
GFCI protected.
The extension cord should be:
.GFCI protected.
.12 or 14 gage, 3 conductor.
.Rated for outdoor.
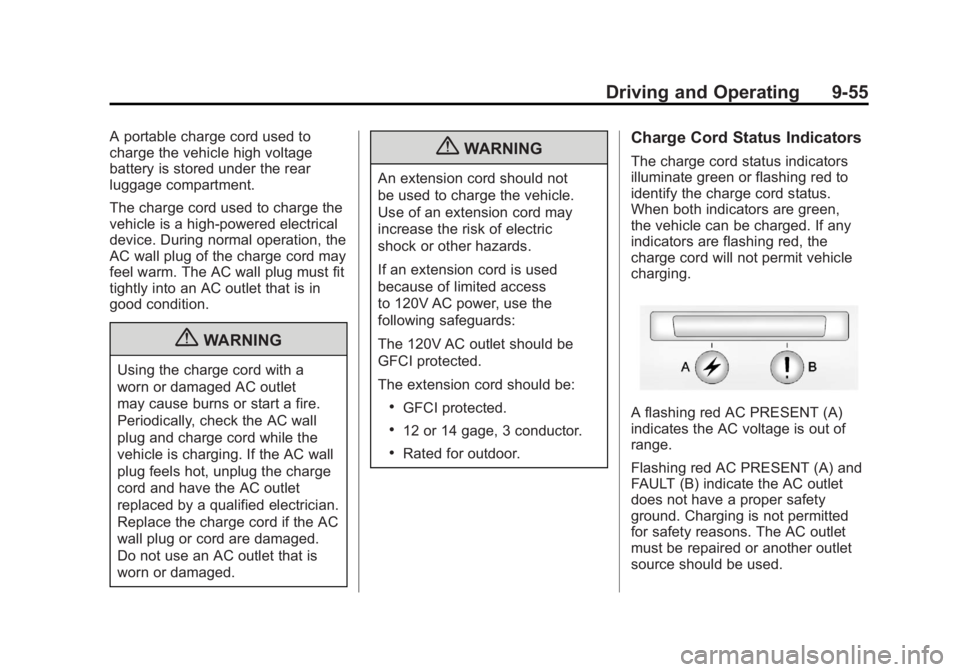
Charge Cord Status Indicators
The charge cord status indicators
illuminate green or flashing red to
identify the charge cord status.
When both indicators are green,
the vehicle can be charged. If any
indicators are flashing red, the
charge cord will not permit vehicle
charging.
A flashing red AC PRESENT (A)
indicates the AC voltage is out of
range.
Flashing red AC PRESENT (A) and
FAULT (B) indicate the AC outlet
does not have a proper safety
ground. Charging is not permitted
for safety reasons. The AC outlet
must be repaired or another outlet
source should be used.
Page 358 of 516
Black plate (56,1)Chevrolet Volt Owner Manual - 2011
9-56 Driving and Operating
A flashing red FAULT (B) indicates a
charge cord fault. The charge cord
will attempt to reset automatically.
If the flashing red FAULT (B)
continues for more than
30 seconds, unplug the charge
cord from the wall to reset. If the
fault remains, see your dealer for
service.
Charge Level Button
Two charge levels are available by
pressing the charge level button.
Select reduced or normal level.
The charge level cannot be
changed when the vehicle plug is
plugged into the charge port on the
vehicle. If the charge level button
is pressed while the vehicle plug is
plugged into the charge port on the
vehicle, the charge level indicatorswill flash briefly. To change the
charge level, unplug the vehicle
plug from the charge port on the
vehicle and select the desired
charge level.
Normal Level:
This level is
recommended. All four charge
level indicators will be lit.
Reduced Level: Use when the
electrical current is limited. Two
charge level indicators will be lit.
Vehicle Plug
The vehicle plug attaches to the
charge port on the vehicle. There
is a flashlight built into the vehicle
plug that can be used by squeezing
the vehicle plug lever. The flashlight
will turn off when the connection is
complete and the lever is released.
Electrical Requirements
for Battery Charging
The AC outlet must have a
grounded, dedicated, 15 amp or
greater, three‐prong wall plug.
That means there should be no
other major appliances connected
to the same circuit. If it is not a
dedicated circuit, the current rating
of the outlet circuit breaker could
be exceeded and cause it to trip
or open. The vehicle can be
charged in the reduced level mode.
See “Charge Level Button” in this
section. Reduced level mode allows
a non‐dedicated circuit to be used
but increases the charging time.
This vehicle is capable of being
charged with a variety of standard
vehicle charging equipment.
Page 359 of 516
Black plate (57,1)Chevrolet Volt Owner Manual - 2011
Driving and Operating 9-57
The following are the minimum
requirements for circuits used to
charge this vehicle:
.120V/15Amp
.240V/20Amp
Charging equipment with a
rating of at least 240V/20Amp
will provide the fastest charging
time to recharge the high voltage
battery. 240V/40Amp circuits
provide flexibility for future vehicle
charging needs. Contact your
dealer for more information.
Do not use non‐grounded electrical
plug adapters.
Notice: Do not use portable or
stationary backup generating
equipment to charge the vehicle.
This may cause damage to the
vehicle's charging system. Only
charge the vehicle from utility
supplied power.
Fuel
Use of the recommended fuel
is an important part of the proper
maintenance of this vehicle.
To help keep the engine clean
and maintain optimum vehicle
performance, we recommend
the use of gasoline advertised as
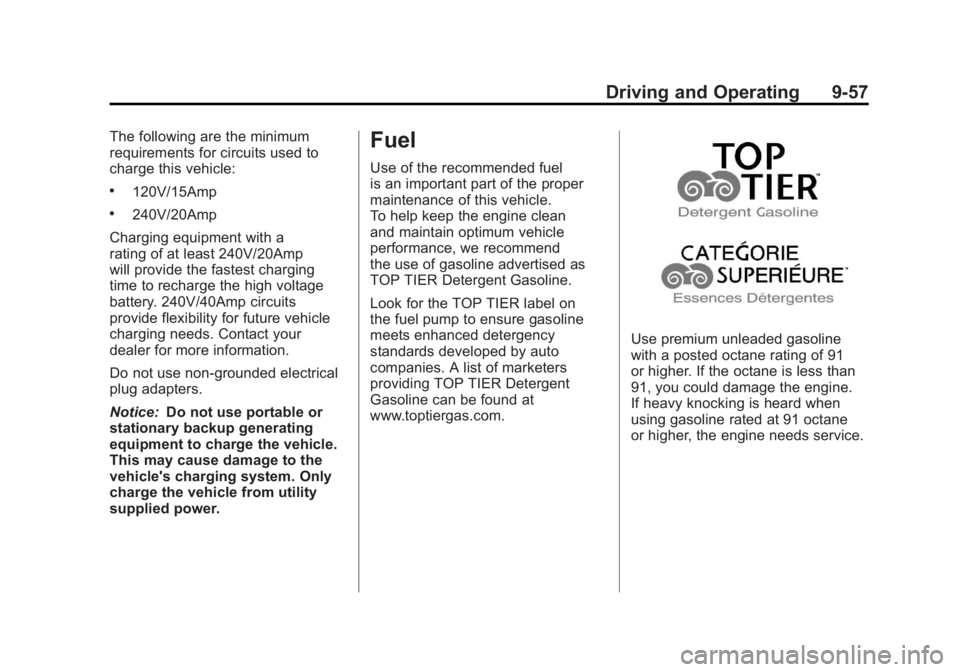
TOP TIER Detergent Gasoline.
Look for the TOP TIER label on
the fuel pump to ensure gasoline
meets enhanced detergency
standards developed by auto
companies. A list of marketers
providing TOP TIER Detergent
Gasoline can be found at
www.toptiergas.com.
Use premium unleaded gasoline
with a posted octane rating of 91
or higher. If the octane is less than
91, you could damage the engine.
If heavy knocking is heard when
using gasoline rated at 91 octane
or higher, the engine needs service.
Page 360 of 516
Black plate (58,1)Chevrolet Volt Owner Manual - 2011
9-58 Driving and Operating
Gasoline Specifications
(U.S. and Canada Only)
At a minimum, gasoline should
meet ASTM specification
D 4814 in the United States or
CAN/CGSB‐3.5 or 3.511 in Canada.
Some gasolines contain an
octane-enhancing additive called
methylcyclopentadienyl manganese
tricarbonyl (MMT). We recommend
against the use of gasolines
containing MMT. SeeFuel Additives
on page 9‑59 for additional
information.
California Fuel
Requirements
If the vehicle is certified to meet
California Emissions Standards,
it is designed to operate on fuels
that meet California specifications.
See the underhood emission control
label. If this fuel is not available in
states adopting California Emissions
Standards, the vehicle will operate
satisfactorily on fuels meeting
federal specifications, but emission
control system performance might
be affected. The malfunction
indicator lamp could turn on and the
vehicle might fail a smog‐check test.
See Malfunction Indicator Lamp on
page 5‑21. If this occurs, return to
your authorized dealer for diagnosis.
If it is determined that the condition
is caused by the type of fuel used,
repairs might not be covered by the
vehicle warranty.
Fuels in Foreign
Countries
Never use leaded gasoline or any
other fuel not recommended in the
previous text on fuel. Costly repairs
caused by use of improper fuel
would not be covered by the vehicle
warranty.
To check the fuel availability, ask
an auto club, or contact a major oil
company that does business in the
country where you will be driving.