CHEVROLET VOLT 2012 1.G Owners Manual
Manufacturer: CHEVROLET, Model Year: 2012, Model line: VOLT, Model: CHEVROLET VOLT 2012 1.GPages: 454, PDF Size: 7.89 MB
Page 281 of 454
Black plate (43,1)Chevrolet Volt Owner Manual - 2012
Driving and Operating 9-43
{WARNING
The Ultrasonic Front and Rear
Parking Assist (UFRPA) system
does not replace driver vision.
It cannot detect:
.Objects that are below the
bumper, under the vehicle,
or too close or far from the
vehicle.
.Children, pedestrians,
bicyclists, or pets.
If you do not use proper care
before moving forward and while
backing up, vehicle damage,
injury, or death could occur. Even
with UFRPA, always check in
front of the vehicle before moving
forward and behind the vehicle
before backing up. While moving
forward and backing up, be sure
to look for objects and check the
vehicle mirrors.
How the System Works
When the vehicle is shifted into
R (Reverse) the front and rear
sensors are automatically turned on.
After the vehicle is shifted out of
R (Reverse), the rear sensors are
turned off and the front sensors stay
on until the vehicle is above a
speed of 8 km/h (5 mph). For the
front park assist system to be active
again without shifting into
R (Reverse), the park assist button
in the overhead console must be
pressed. See “Turning the System
On and Off” later in this section.
UFRPA operates only at speeds
less than 8 km/h (5 mph).
When the vehicle is in N (Neutral),
the system may be active. If the
vehicle is in a car wash, the sensors
may detect objects in the car wash.
See “Turning the System On and
Off” later in this section to turn the
system off. High-toned beeps from the front
speakers are for objects detected
near the front bumper. Low-toned
beeps from the rear speakers are
for objects detected near the rear
bumper. The interval between the
beeps becomes shorter as the
vehicle gets closer to the obstacle.
When the distance is less than
30 cm (12 in) the beeping is a
continuous tone for five seconds.
To be detected, objects must be at
least 25 cm (10 in) off the ground
and below hatch level. Objects must
also be within 1.2 m (4 ft) in front of
the vehicle and 2.5 m (8 ft) from the
rear bumper. This distance may be
less during warmer or humid
weather.
Page 282 of 454
Black plate (44,1)Chevrolet Volt Owner Manual - 2012
9-44 Driving and Operating
Objects Detected by Both the
Front and Rear Sensors
In general, if objects are detected at
the same time near both the front
and rear bumpers while backing up,
the beeps only sound to indicate
that objects are close to the rear
bumper.
However, if an object comes within
0.3 m (1 ft) of the front bumper while
the vehicle is backing up and at the
same time there is another object
further than 0.3 m (1 ft) from the rear
bumper, then the beeps only sound
to indicate the object that is closer
to the front bumper.Turning the System On and Off
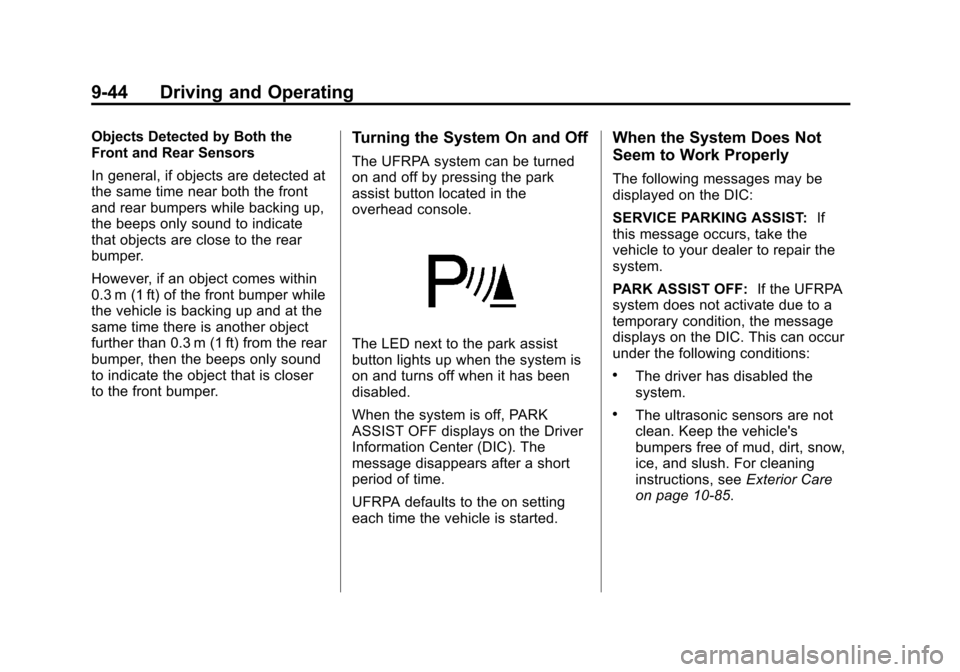
The UFRPA system can be turned
on and off by pressing the park
assist button located in the
overhead console.
The LED next to the park assist
button lights up when the system is
on and turns off when it has been
disabled.
When the system is off, PARK
ASSIST OFF displays on the Driver
Information Center (DIC). The
message disappears after a short
period of time.
UFRPA defaults to the on setting
each time the vehicle is started.
When the System Does Not
Seem to Work Properly
The following messages may be
displayed on the DIC:
SERVICE PARKING ASSIST:If
this message occurs, take the
vehicle to your dealer to repair the
system.
PARK ASSIST OFF: If the UFRPA
system does not activate due to a
temporary condition, the message
displays on the DIC. This can occur
under the following conditions:
.The driver has disabled the
system.
.The ultrasonic sensors are not
clean. Keep the vehicle's
bumpers free of mud, dirt, snow,
ice, and slush. For cleaning
instructions, see Exterior Care
on page 10‑85.
Page 283 of 454
Black plate (45,1)Chevrolet Volt Owner Manual - 2012
Driving and Operating 9-45
.The park assist sensors are
covered by frost or ice. Frost or
ice can form around and behind
the sensors and may not always
be seen; this can occur after
washing the vehicle in cold
weather. The message may not
clear until the frost or ice has
melted.
.An object was hanging out of the
hatch during the last drive cycle.
Once the object is removed,
UFRPA will return to normal
operation.
.An object or cover is attached to
the front of the vehicle.
.The bumper is damaged. Take
the vehicle to your dealer to
repair the system.
.Other conditions, such as
vibrations from a jackhammer or
the compression of air brakes on
a very large truck, are affecting
system performance.
Rear Vision
Camera (RVC)
The vehicle may have a Rear Vision
Camera (RVC) system. Read this
entire section before using it.
The RVC system can assist the
driver when backing up by
displaying a view of the area behind
the vehicle.
{WARNING
The RVC system does not display
pedestrians, bicyclists, animals,
or any other object located
outside the camera's field of view,
below the bumper, or under the
vehicle.(Continued)
WARNING (Continued)
Do not back the vehicle using
only the RVC screen or by using
the screen during longer, higher
speed backing maneuvers,
or where there could be
cross-traffic. Perceived distances
may be different from actual
distances.
Failure to use proper care before
backing may result in injury,
death, or vehicle damage. Always
check before backing by checking
behind and around the vehicle.
Page 284 of 454
Black plate (46,1)Chevrolet Volt Owner Manual - 2012
9-46 Driving and Operating
How the System Works
When the vehicle is shifted into
R (Reverse), the image of the area
behind the vehicle appears
in the center stack display
with the message CHECK
SURROUNDINGS FOR SAFETY.
The previous screen displays when
the vehicle is shifted out of
R (Reverse) after approximately
10 seconds.
To cancel the delay, do one of the
following:
.Press a button on the
infotainment system.
.Shift into P (Park).
.Reach a vehicle speed of
8 km/h (5 mph).
Turning the Rear Vision Camera
System On or Off
To turn the RVC system on or off:
1. Shift into P (Park).
2. Press the CONFIG button on the center stack. 3. Select Display.
4. Select Camera. When a
checkmark appears next to
Camera, then the RVC system
is on.
Symbols
The navigation system may have a
feature that lets the driver view
symbols on the navigation screen
while using the RVC. The Ultrasonic
Front and Rear Parking Assist
(UFRPA) system must not be
disabled to use the caution symbols.
The error message REAR PARKING
ASSIST SYMBOLS UNAVAILABLE
may display if UFRPA has been
disabled and the symbols have
been turned on. See Ultrasonic
Parking Assist on page 9‑42.
The symbols appear and may cover
an object when viewing the
navigation screen when an object is
detected by the UFRPA system. To turn the symbols on or off:
1. Shift into P (Park).
2. Press the CONFIG button on the
center stack.
3. Select Display.
4. Select Symbols. When a checkmark appears next to
Symbols, symbols will appear.
Guidelines
The RVC system has a guideline
overlay that can help the driver align
the vehicle when backing into a
parking spot.
To turn the guidelines on or off:
1. Shift into P (Park).
2. Press the CONFIG button on the center stack.
3. Select Display.
4. Select Guidelines. When a checkmark appears next to
Guidelines, guidelines will
appear.
Page 285 of 454
Black plate (47,1)Chevrolet Volt Owner Manual - 2012
Driving and Operating 9-47
Rear Vision Camera Error
Messages
SERVICE REAR VISION CAMERA
SYSTEM:If this message appears
in the center stack display, the
system is not receiving information it
requires from other vehicle systems.
If any other problem occurs or if a
problem persists, see your dealer.
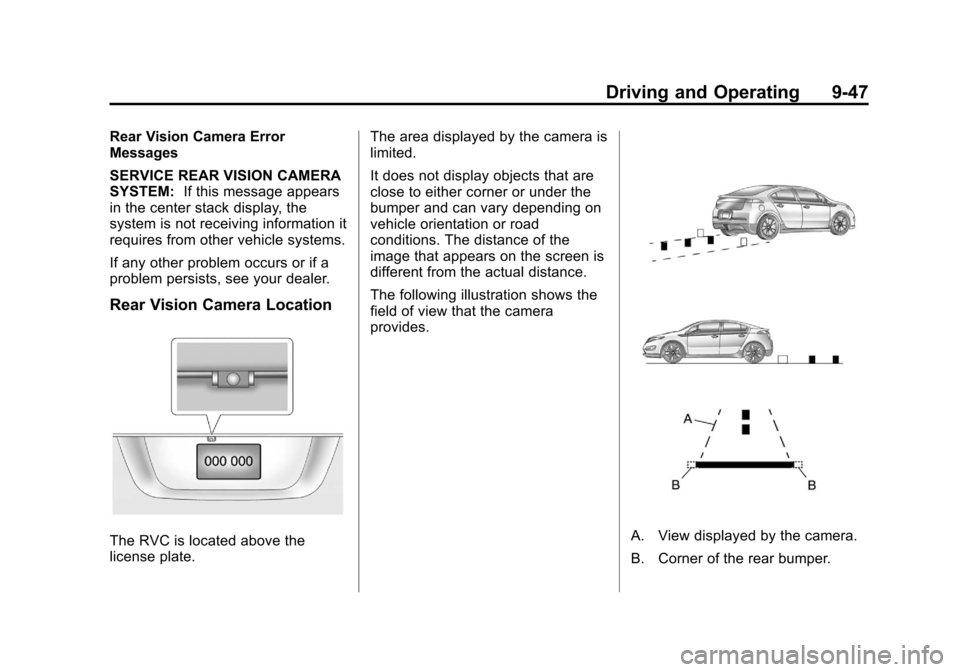
Rear Vision Camera Location
The RVC is located above the
license plate. The area displayed by the camera is
limited.
It does not display objects that are
close to either corner or under the
bumper and can vary depending on
vehicle orientation or road
conditions. The distance of the
image that appears on the screen is
different from the actual distance.
The following illustration shows the
field of view that the camera
provides.A. View displayed by the camera.
B. Corner of the rear bumper.
Page 286 of 454
Black plate (48,1)Chevrolet Volt Owner Manual - 2012
9-48 Driving and Operating
When the System Does Not
Seem To Work Properly
The RVC system may not work
properly or display a clear image if:
.The RVC is turned off. See
“Turning the Rear Vision Camera
System On or Off”earlier in this
section.
.It is dark.
.The sun or the beam of
headlamps is shining directly
into the camera lens.
.Ice, snow, mud, or anything else
has built up on the camera lens.
Clean the lens, rinse it with
water, and wipe it with a soft
cloth.
.The back of the vehicle was in
an accident. The position and
mounting angle of the camera
can change or the camera can
be affected. Be sure to have the
camera and its position and
mounting angle checked at your
dealer.
Charging
Plug-In Charging
This section explains the process
for charging the vehicle's high
voltage battery. Do not allow the
vehicle to remain in temperature
extremes for long periods without
being driven or plugged in. It is
recommended that the vehicle be
plugged in when temperatures are
below 0°C (32°F) and above 32°C
(90°F) to maximize high voltage
battery life. The charging system may run fans
and pumps that result in sounds
from the vehicle while it is turned
off. Additional unexpected clicking
sounds may be caused by the
electrical devices used while
charging.
While the charge cord is plugged
into the vehicle, the vehicle cannot
be driven.
Page 287 of 454
Black plate (49,1)Chevrolet Volt Owner Manual - 2012
Driving and Operating 9-49
Charging
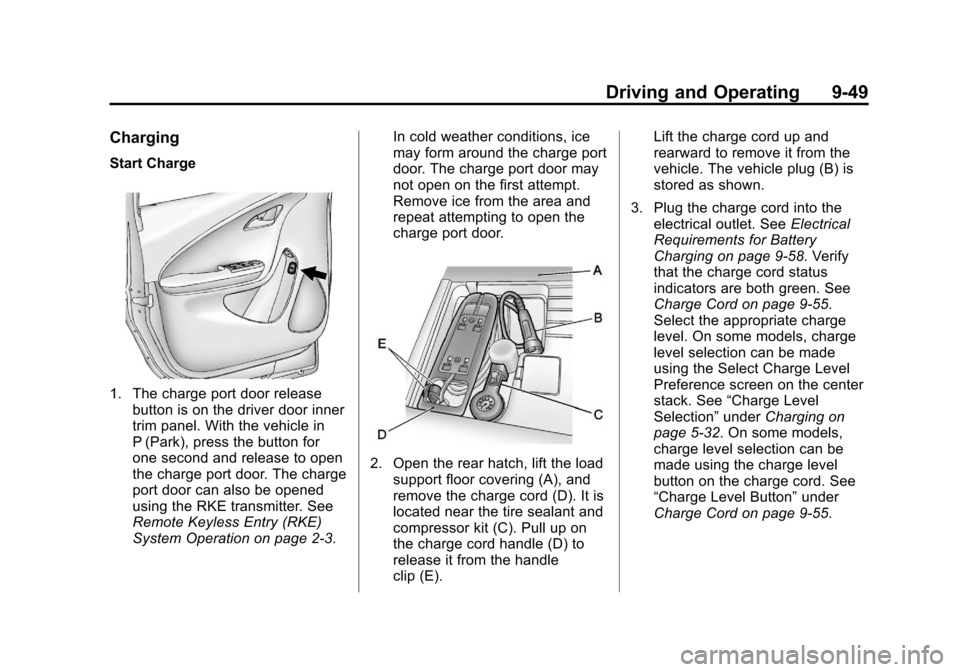
Start Charge
1. The charge port door releasebutton is on the driver door inner
trim panel. With the vehicle in
P (Park), press the button for
one second and release to open
the charge port door. The charge
port door can also be opened
using the RKE transmitter. See
Remote Keyless Entry (RKE)
System Operation on page 2‑3. In cold weather conditions, ice
may form around the charge port
door. The charge port door may
not open on the first attempt.
Remove ice from the area and
repeat attempting to open the
charge port door.
2. Open the rear hatch, lift the load
support floor covering (A), and
remove the charge cord (D). It is
located near the tire sealant and
compressor kit (C). Pull up on
the charge cord handle (D) to
release it from the handle
clip (E). Lift the charge cord up and
rearward to remove it from the
vehicle. The vehicle plug (B) is
stored as shown.
3. Plug the charge cord into the electrical outlet. See Electrical
Requirements for Battery
Charging on page 9‑58. Verify
that the charge cord status
indicators are both green. See
Charge Cord on page 9‑55.
Select the appropriate charge
level. On some models, charge
level selection can be made
using the Select Charge Level
Preference screen on the center
stack. See “Charge Level
Selection” underCharging on
page 5‑32. On some models,
charge level selection can be
made using the charge level
button on the charge cord. See
“Charge Level Button” under
Charge Cord on page 9‑55.
Page 288 of 454
Black plate (50,1)Chevrolet Volt Owner Manual - 2012
9-50 Driving and Operating
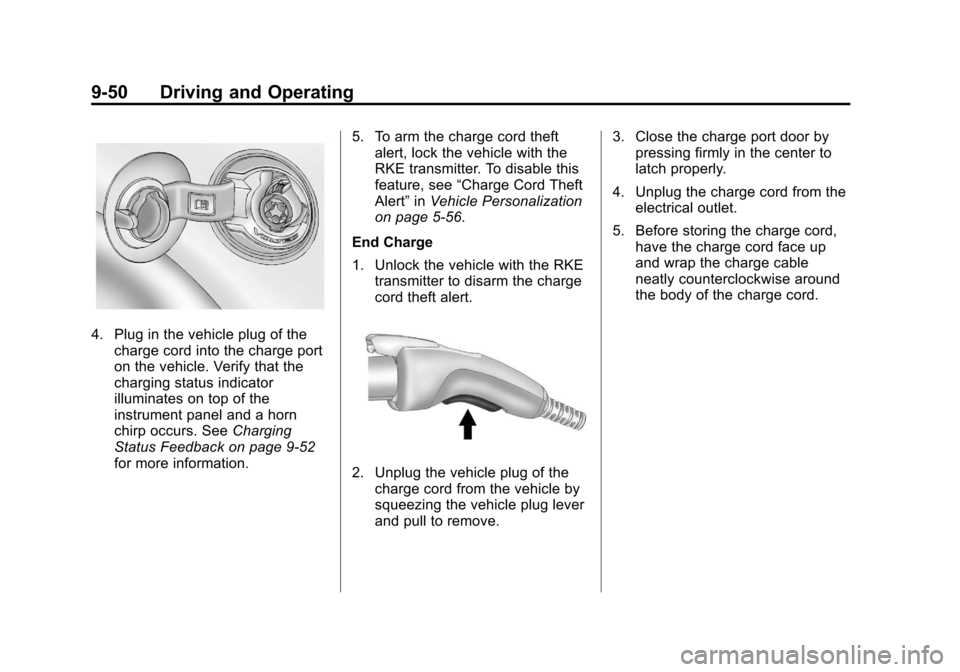
4. Plug in the vehicle plug of thecharge cord into the charge port
on the vehicle. Verify that the
charging status indicator
illuminates on top of the
instrument panel and a horn
chirp occurs. See Charging
Status Feedback on page 9‑52
for more information. 5. To arm the charge cord theft
alert, lock the vehicle with the
RKE transmitter. To disable this
feature, see “Charge Cord Theft
Alert” inVehicle Personalization
on page 5‑56.
End Charge
1. Unlock the vehicle with the RKE transmitter to disarm the charge
cord theft alert.
2. Unplug the vehicle plug of thecharge cord from the vehicle by
squeezing the vehicle plug lever
and pull to remove. 3. Close the charge port door by
pressing firmly in the center to
latch properly.
4. Unplug the charge cord from the electrical outlet.
5. Before storing the charge cord, have the charge cord face up
and wrap the charge cable
neatly counterclockwise around
the body of the charge cord.
Page 289 of 454
Black plate (51,1)Chevrolet Volt Owner Manual - 2012
Driving and Operating 9-51
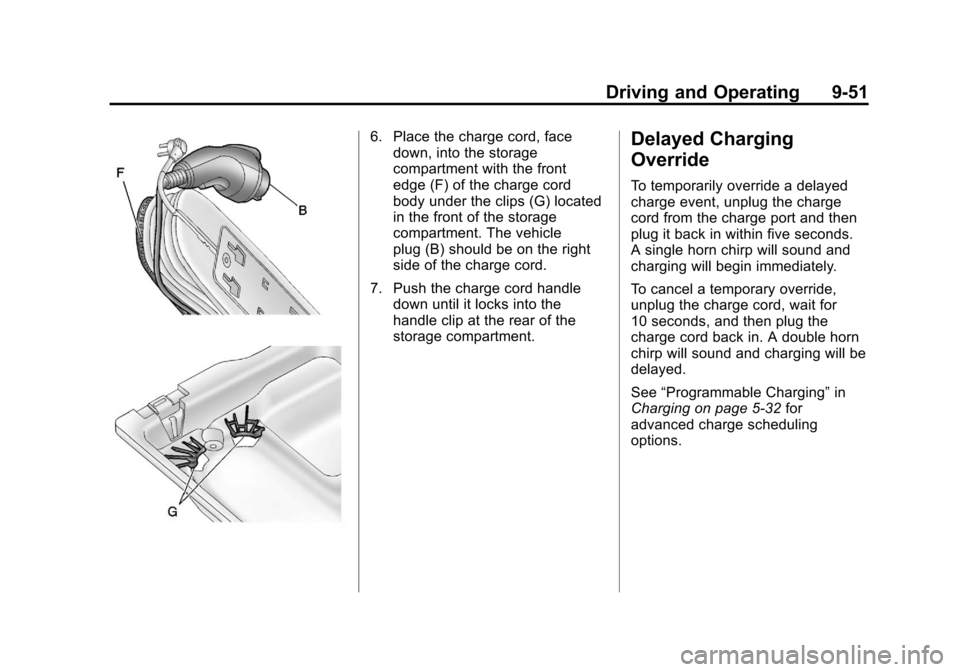
6. Place the charge cord, facedown, into the storage
compartment with the front
edge (F) of the charge cord
body under the clips (G) located
in the front of the storage
compartment. The vehicle
plug (B) should be on the right
side of the charge cord.
7. Push the charge cord handle down until it locks into the
handle clip at the rear of the
storage compartment.Delayed Charging
Override
To temporarily override a delayed
charge event, unplug the charge
cord from the charge port and then
plug it back in within five seconds.
A single horn chirp will sound and
charging will begin immediately.
To cancel a temporary override,
unplug the charge cord, wait for
10 seconds, and then plug the
charge cord back in. A double horn
chirp will sound and charging will be
delayed.
See “Programmable Charging” in
Charging on page 5‑32 for
advanced charge scheduling
options.
Page 290 of 454
Black plate (52,1)Chevrolet Volt Owner Manual - 2012
9-52 Driving and Operating
Charging Status
Feedback
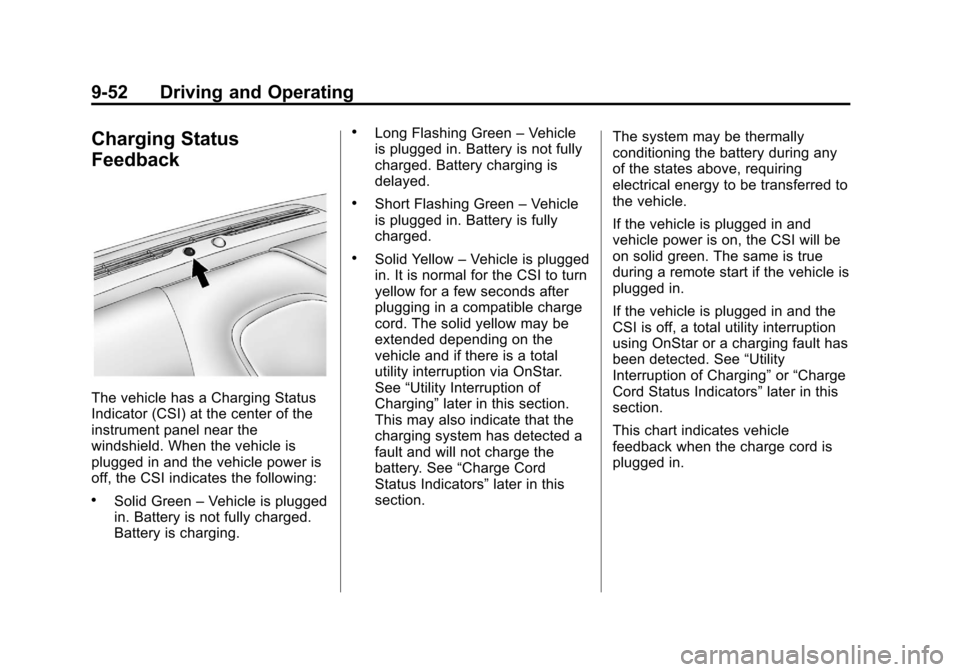
The vehicle has a Charging Status
Indicator (CSI) at the center of the
instrument panel near the
windshield. When the vehicle is
plugged in and the vehicle power is
off, the CSI indicates the following:
.Solid Green–Vehicle is plugged
in. Battery is not fully charged.
Battery is charging.
.Long Flashing Green –Vehicle
is plugged in. Battery is not fully
charged. Battery charging is
delayed.
.Short Flashing Green –Vehicle
is plugged in. Battery is fully
charged.
.Solid Yellow –Vehicle is plugged
in. It is normal for the CSI to turn
yellow for a few seconds after
plugging in a compatible charge
cord. The solid yellow may be
extended depending on the
vehicle and if there is a total
utility interruption via OnStar.
See “Utility Interruption of
Charging” later in this section.
This may also indicate that the
charging system has detected a
fault and will not charge the
battery. See “Charge Cord
Status Indicators” later in this
section. The system may be thermally
conditioning the battery during any
of the states above, requiring
electrical energy to be transferred to
the vehicle.
If the vehicle is plugged in and
vehicle power is on, the CSI will be
on solid green. The same is true
during a remote start if the vehicle is
plugged in.
If the vehicle is plugged in and the
CSI is off, a total utility interruption
using OnStar or a charging fault has
been detected. See
“Utility
Interruption of Charging” or“Charge
Cord Status Indicators” later in this
section.
This chart indicates vehicle
feedback when the charge cord is
plugged in.