CHEVROLET VOLT 2015 2.G Owners Manual
Manufacturer: CHEVROLET, Model Year: 2015, Model line: VOLT, Model: CHEVROLET VOLT 2015 2.GPages: 387, PDF Size: 12.83 MB
Page 311 of 387
Black plate (68,1)Chevrolet VOLT Owner Manual (GMNA-Localizing-U.S./Canada-7695131) -
2015 - crc - 4/25/14
10-68 Vehicle Care
The tire sealant and compressor kit
has an accessory adapter located in
a compartment on the bottom of its
housing that may be used to inflate
air mattresses, balls, etc.
Removal and Installation of the
Sealant Canister
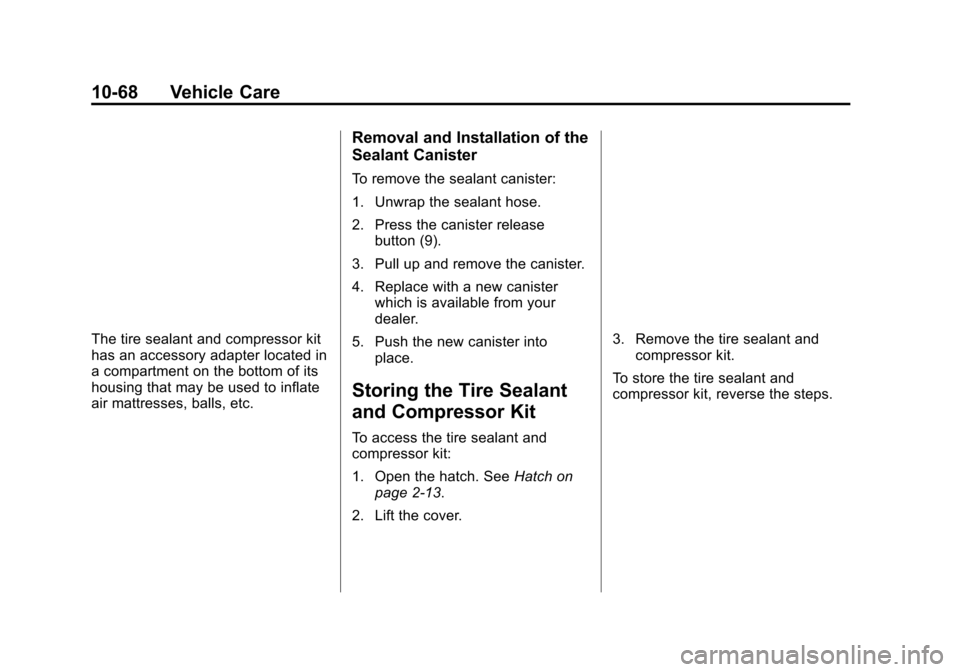
To remove the sealant canister:
1. Unwrap the sealant hose.
2. Press the canister releasebutton (9).
3. Pull up and remove the canister.
4. Replace with a new canister which is available from your
dealer.
5. Push the new canister into place.
Storing the Tire Sealant
and Compressor Kit
To access the tire sealant and
compressor kit:
1. Open the hatch. See Hatch on
page 2-13.
2. Lift the cover.
3. Remove the tire sealant and compressor kit.
To store the tire sealant and
compressor kit, reverse the steps.
Page 312 of 387
Black plate (69,1)Chevrolet VOLT Owner Manual (GMNA-Localizing-U.S./Canada-7695131) -
2015 - crc - 4/25/14
Vehicle Care 10-69
Jump Starting
Jump starting is connecting jumper
cables between the two vehicles to
enable vehicle starting. If the Volt or
another vehicle has a run-down
12-volt battery, it can be jump
started using good condition jumper
cables. There are different
procedures depending on if the Volt
has a run-down battery or another
vehicle has a run-down battery.
Read the appropriate procedures
that follow.
{Warning
The high voltage battery cannot
be jump started either with
another vehicle or battery
charger. Personal injury, death,
or damage to the vehicle could
result.
{Warning
Batteries are dangerous and can
cause injury. Batteries contain
acid and can explode or ignite.
They contain electricity that can
burn. Follow the exact steps
provided or injuries could occur.
Using an open flame near a
battery can cause battery gas to
explode; you or others could be
hurt. Battery acid can cause
blindness.
Be sure the battery in the other
vehicle has enough water. Add
water if the level is low. A low
water level could cause explosive
gas to be present.
Battery fluid contains acid that
can burn. If battery fluid gets in
eyes or on skin; flush with water
and get medical help immediately.
{Warning
Electric fans can start up even
when the engine is not running
and can cause injury. Keep
hands, clothing, and tools away
from any underhood electric fans.
{Caution
Ignoring these steps could result
in costly damage to the vehicle
that would not be covered by the
vehicle warranty. Trying to start
the vehicle by pushing or pulling it
will not work, and it could damage
the vehicle.
Jump Starting the Volt
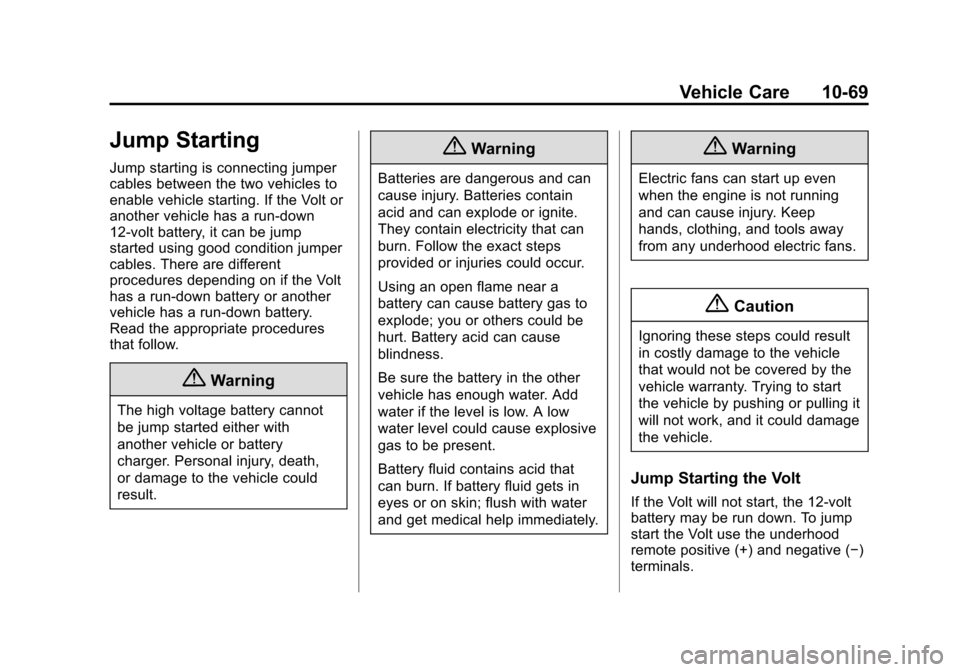
If the Volt will not start, the 12-volt
battery may be run down. To jump
start the Volt use the underhood
remote positive (+) and negative (−)
terminals.
Page 313 of 387

Black plate (70,1)Chevrolet VOLT Owner Manual (GMNA-Localizing-U.S./Canada-7695131) -
2015 - crc - 4/25/14
10-70 Vehicle Care
1. Remote Positive (+) Terminal
2. Remote Negative (−)Terminal
1. The other vehicle used to jumpstart the Volt must have a 12-volt
battery with a negative ground
system.
{Caution
If the other vehicle does not have
a 12-volt system with a negative
ground, both vehicles can be
(Continued)
Caution (Continued)
damaged. Only use a vehicle that
has a 12-volt system with a
negative ground for jump starting.
2. Park both vehicles close enough so that the jumper cables can
reach both vehicles' positive (+)
and negative (−) terminals. The
vehicles must not touch each
other. It could cause an
unwanted ground connection
that could damage both vehicles'
electrical systems.
Put both vehicles in P (Park) for
an automatic transmission or
electric drive unit. For a manual
transmission, place the vehicle
in Neutral and set the parking
brake.
{Caution
If any accessories are left on or
plugged in during the jump
starting procedure, they could be
damaged. The repairs would not
be covered by the vehicle
warranty. Whenever possible, turn
off or unplug all accessories on
either vehicle when jump starting.
3. Turn off the ignition on the other vehicle. Turn off the radio, all
lamps, and accessories that are
not needed in both vehicles.
Unplug accessories from the
cigarette lighter or the accessory
power outlets. This avoids
sparks and helps save both
batteries and accessories.
4. Locate the positive (+) and negative (−) terminals on the
other vehicle.
5. Open the hood to locate the positive (+) and negative (−)
terminals on your Volt. Open the
Page 314 of 387

Black plate (71,1)Chevrolet VOLT Owner Manual (GMNA-Localizing-U.S./Canada-7695131) -
2015 - crc - 4/25/14
Vehicle Care 10-71
access cover for the remote
positive (+) terminal (1). The
remote negative (−) terminal (2)
for the Volt is a stud marked
GND (−) on the driver side of the
engine compartment.
6. Check that the jumper cables do not have loose or missing
insulation or a shock could result
and the vehicles could be
damaged.
Before connecting the jumper
cables, here are some basic
things to know. Positive (+)
jumper cable goes to positive (+)
battery terminal or a remote
positive (+) terminal if available.
Negative (−) jumper cable goes
to negative (−) battery terminal
or a remote negative (−) terminal
if available. Do not connect
positive (+) to negative (−) or
there will be a short that may
damage the battery and other
parts of the vehicle.{Caution
If the jumper cables are
connected or removed in the
wrong order, electrical shorting
may occur and damage the
vehicle. The repairs would not be
covered by the vehicle warranty.
Always connect and remove the
jumper cables in the correct order,
making sure that the cables do
not touch each other or other
metal.
Connecting the Jumper Cables
1. Connect the red positive (+) jumper cable to the remote
positive (+) terminal (1) of your
Volt. Do not let the other end of
the cable touch metal.
2. Connect the other end of the red positive (+) jumper cable to the
positive (+) terminal of the other
vehicle. 3. Connect the black negative (−)
jumper cable to the negative (−)
battery terminal of the other
vehicle battery. Do not let the
other end touch anything until
the next step.
4. Connect the other end of the black negative (−) jumper cable
to the remote negative (−)
terminal (2) of your Volt.
5. Press the POWER
Obutton to
start. This will wake up the
electronics on the Volt. After the
instrument cluster initializes, the
Volt will use power from the high
voltage battery to charge the
12-volt battery. The jumper
cables can then be
disconnected. If the Volt does
not start, call your dealer or
Roadside Assistance. See
Roadside Assistance Program
on page 13-5.
Page 315 of 387
Black plate (72,1)Chevrolet VOLT Owner Manual (GMNA-Localizing-U.S./Canada-7695131) -
2015 - crc - 4/25/14
10-72 Vehicle Care
Disconnecting the Jumper Cables
1. Disconnect the blacknegative (−) jumper cable from
the Volt. Do not let the other end
of the cable touch anything until
after the next step.
2. Disconnect the black negative (−) jumper cable from
the other vehicle with the good
battery.
3. Disconnect the red positive (+) jumper cable from the other
vehicle. Do not let the other end
of the cable touch anything until
after the next step.
4. Disconnect the red positive (+) jumper cable from the Volt.
5. Return the positive (+) and negative (−) terminal covers to
their original positions.
Jump Starting Another Vehicle
When using the Volt to jump start
another vehicle with a run-down
battery, jumper cables are
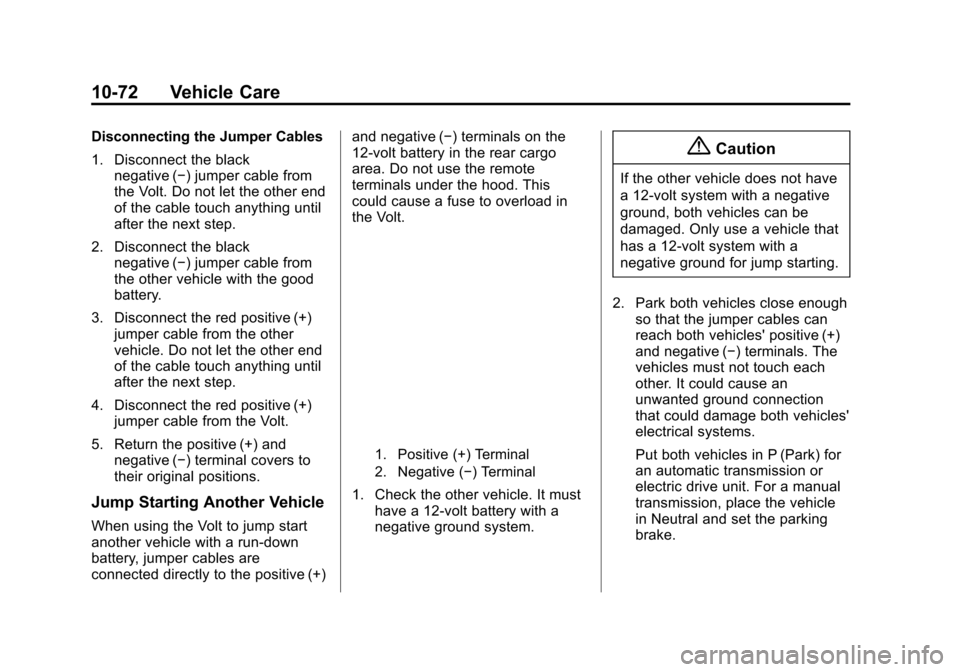
connected directly to the positive (+) and negative (−) terminals on the
12-volt battery in the rear cargo
area. Do not use the remote
terminals under the hood. This
could cause a fuse to overload in
the Volt.
1. Positive (+) Terminal
2. Negative (−) Terminal
1. Check the other vehicle. It must
have a 12-volt battery with a
negative ground system.
{Caution
If the other vehicle does not have
a 12-volt system with a negative
ground, both vehicles can be
damaged. Only use a vehicle that
has a 12-volt system with a
negative ground for jump starting.
2. Park both vehicles close enough so that the jumper cables can
reach both vehicles' positive (+)
and negative (−) terminals. The
vehicles must not touch each
other. It could cause an
unwanted ground connection
that could damage both vehicles'
electrical systems.
Put both vehicles in P (Park) for
an automatic transmission or
electric drive unit. For a manual
transmission, place the vehicle
in Neutral and set the parking
brake.
Page 316 of 387

Black plate (73,1)Chevrolet VOLT Owner Manual (GMNA-Localizing-U.S./Canada-7695131) -
2015 - crc - 4/25/14
Vehicle Care 10-73
{Caution
If any accessories are left on or
plugged in during the jump
starting procedure, they could be
damaged. The repairs would not
be covered by the vehicle
warranty. Whenever possible, turn
off or unplug all accessories on
either vehicle when jump starting.
3. Turn off both vehicles. Turn off the radio, all lamps, and
accessories that are not needed
in both vehicles. Unplug
accessories from the cigarette
lighter or the accessory power
outlets. This avoids sparks and
helps save both batteries and
accessories.
4. Locate the positive (+) and negative (−) terminals on the
vehicle with the run-down
battery. 5. Locate the positive (+) and
negative (−) battery terminals on
the Volt. The access cover is
under the load floor access
cover in the rear cargo area.
Open the access covers for the
positive (+) terminal (1) and the
negative (−) terminal (2).
6. Check that the jumper cables do not have loose or missing
insulation or a shock could result
and the vehicles could be
damaged.
Before connecting the jumper
cables, here are some basic
things to know. Positive (+)
jumper cable goes to positive (+)
battery terminal or a remote
positive (+) terminal if available.
Negative (−) jumper cable goes
to remote negative (−) terminal if
available, or a heavy, unpainted
metal engine part or a solid
engine ground on the vehicle
with the run-down battery. Do not connect positive (+) to
negative (−) or there will be a
short that may damage the
battery or other parts of the
vehicle. Do not connect the
negative (−) cable to the
negative (−) terminal on the
run-down battery because this
can cause sparks.
{Caution
If the jumper cables are
connected or removed in the
wrong order, electrical shorting
may occur and damage the
vehicle. The repairs would not be
covered by the vehicle warranty.
Always connect and remove the
jumper cables in the correct order,
making sure that the cables do
not touch each other or other
metal.
Page 317 of 387

Black plate (74,1)Chevrolet VOLT Owner Manual (GMNA-Localizing-U.S./Canada-7695131) -
2015 - crc - 4/25/14
10-74 Vehicle Care
Connecting the Jumper Cables
1. Connect the red positive (+)jumper cable to the positive (+)
terminal of the other vehicle with
the run-down battery. Use a
remote positive (+) terminal if
available. Do not let the other
end touch metal.
2. Connect the other end of the red positive (+) jumper cable to the
positive (+) battery terminal of
the Volt.
3. Connect the black negative (−) jumper cable to the negative (−)
battery terminal of the Volt. Do
not let the other end touch
anything until the next step.
4. Make the final connection to a heavy, unpainted metal engine
part or to the remote negative (−)
terminal on the other vehicle
with the run-down battery. 5. Press the POWERObutton to
start the Volt. This will wake up
the electronics on the Volt. The
engine will only start if it is
needed.
6. Try to start the other vehicle that had the run-down battery. If it
will not start after a few tries, it
probably needs service.
Disconnecting the Jumper Cables
1. Disconnect the black negative (−) jumper cable from
the other vehicle that had the
run-down battery. Do not let the
other end of the cable touch
anything until after the next step.
2. Disconnect the black negative (−) jumper cable from
the Volt. 3. Disconnect the red positive (+)
jumper cable from the Volt. Do
not let the other end of the cable
touch anything until after the
next step.
4. Disconnect the red positive (+) jumper cable from the other
vehicle.
5. Return the positive (+) and negative (−) terminal covers to
their original positions.
Page 318 of 387
Black plate (75,1)Chevrolet VOLT Owner Manual (GMNA-Localizing-U.S./Canada-7695131) -
2015 - crc - 4/25/14
Vehicle Care 10-75
Towing the Vehicle
{Caution
Incorrectly towing a disabled
vehicle may cause damage to the
vehicle. The disabled vehicle
should be towed on a flatbed car
carrier. Use care when there is
low ground clearance and/or
special equipment. Attempting to
pull the vehicle onto a flatbed
without following the proper steps
could damage the vehicle.
Consult your dealer or a
professional towing service if the
disabled vehicle must be towed.
To load a vehicle onto a flatbed
carrier:
1. The vehicle must be on a flat surface.
2. The front tires must be properly inflated. If necessary, move a
rear tire to the front to replace a
flat or damaged tire.
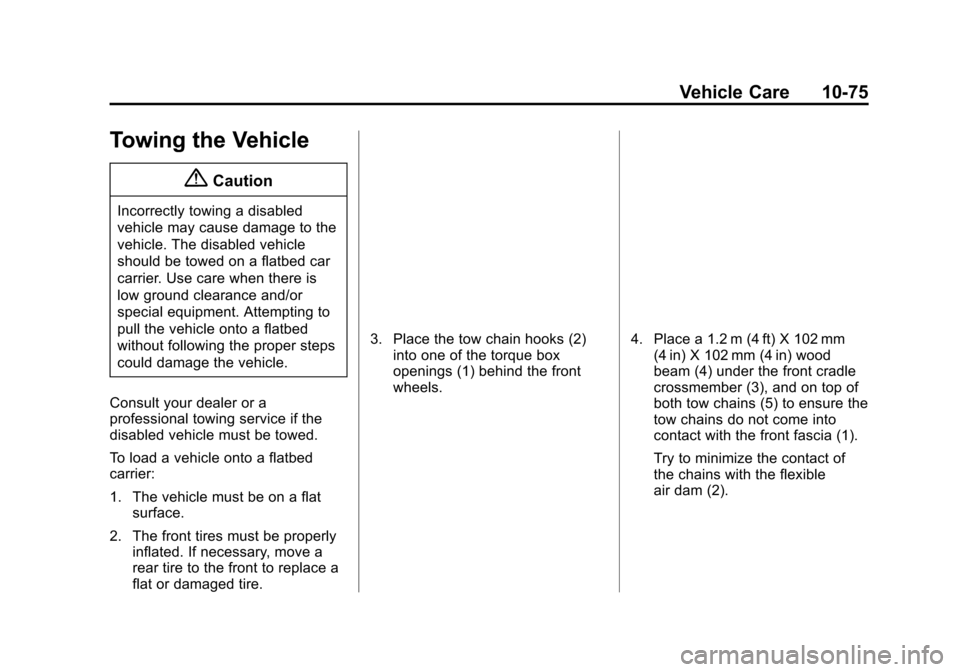
3. Place the tow chain hooks (2)
into one of the torque box
openings (1) behind the front
wheels.4. Place a 1.2 m (4 ft) X 102 mm(4 in) X 102 mm (4 in) wood
beam (4) under the front cradle
crossmember (3), and on top of
both tow chains (5) to ensure the
tow chains do not come into
contact with the front fascia (1).
Try to minimize the contact of
the chains with the flexible
air dam (2).
Page 319 of 387
Black plate (76,1)Chevrolet VOLT Owner Manual (GMNA-Localizing-U.S./Canada-7695131) -
2015 - crc - 4/25/14
10-76 Vehicle Care
5. Ramps (2) are required for thefront fascia (3) to clear the
flatbed (1). The ramp height
should be approximately 102 mm
(4 in). Lower the flatbed onto the
set of ramps.
{Caution
If ramps are not used, the front
fascia will come into contact with
the flatbed and may cause
damage. Always use ramps. 6. After the front tires are on the
flatbed adjust the flatbed upward
to provide additional clearance
between the air dam, fascia, and
flatbed.
7. When the fascia has enough clearance to clear the flatbed,
lower the flatbed, and finish
pulling the vehicle onto the
flatbed.
8. Use the proper nylon strap harnesses around the tires to
secure them to the flatbed car
carrier.
If the vehicle is parked off the
shoulder of the road, at an angle
that it cannot be pulled onto a
flatbed, a hook/chain can be placed
into either of the front torque box
openings to pull the vehicle onto a
flat surface. Make sure that the
chains do not come in contact with
the rocker panel (1) or the front
fascia (2).
Page 320 of 387
Black plate (77,1)Chevrolet VOLT Owner Manual (GMNA-Localizing-U.S./Canada-7695131) -
2015 - crc - 4/25/14
Vehicle Care 10-77
{Caution
When using tow straps to move
the vehicle, damage may occur if
the tow straps contact the rear
fascia. Do not let the tow straps
contact the rear fascia.
If you cannot access the front
torque box openings, wrap a tow
strap through one, or both of the
rear trailing arms (1) between the
bushing and torque tube, and pull
the vehicle onto a flat surface. Do
not wrap the tow strap around the
rear torque tube (2).
Recreational Vehicle
Towing
Recreational vehicle towing refers to
towing the vehicle behind another
vehicle such as a motor home. The
two most common types of
recreational vehicle towing are
known as dinghy towing and dolly
towing. Dinghy towing is towing the vehicle with all four wheels on the
ground. Dolly towing is towing the
vehicle with two wheels on the
ground and two wheels up on a
device known as a dolly.
Here are some important things to
consider before recreational vehicle
towing:
.The towing capacity of the
towing vehicle. Read the tow
vehicle manufacturer's
recommendations.
.How far the vehicle can be
towed. Some vehicles have
restrictions on how far and how
long they can tow.
.Whether the vehicle has the
proper towing equipment. See
your dealer or trailering
professional for additional advice
and equipment
recommendations.
.Is the vehicle ready to be towed.
Just as preparing the vehicle for
a long trip, make sure the
vehicle is prepared to be towed.
Dinghy Towing
{Caution
If the vehicle is towed with all four
wheels on the ground, the drive
unit could be damaged. Repairs
would not be covered by the
vehicle warranty. Do not tow the
vehicle with all four wheels on the
ground.
The vehicle was not designed to be
towed with all four wheels on the
ground. If the vehicle must be