clock CHEVROLET VOLT 2016 2.G Owner's Manual
[x] Cancel search | Manufacturer: CHEVROLET, Model Year: 2016, Model line: VOLT, Model: CHEVROLET VOLT 2016 2.GPages: 366, PDF Size: 5.4 MB
Page 292 of 366

Chevrolet VOLT Owner Manual (GMNA-Localizing-U.S/Canada/Mexico-
9159388) - 2016 - crc - 5/20/15
Vehicle Care 291
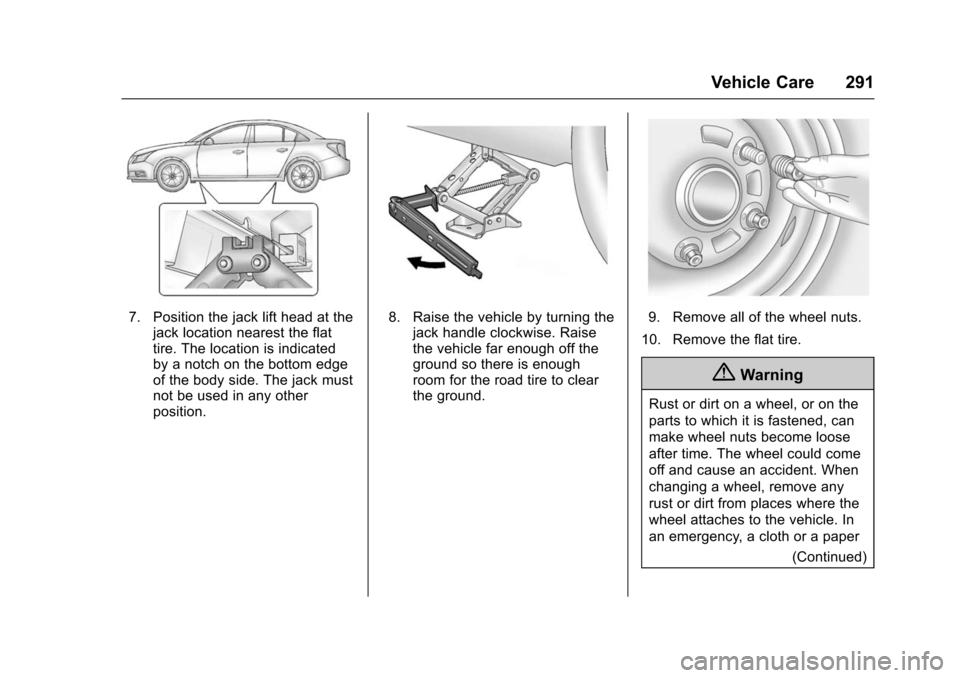
7. Position the jack lift head at thejack location nearest the flat
tire. The location is indicated
by a notch on the bottom edge
of the body side. The jack must
not be used in any other
position.8. Raise the vehicle by turning thejack handle clockwise. Raise
the vehicle far enough off the
ground so there is enough
room for the road tire to clear
the ground.9. Remove all of the wheel nuts.
10. Remove the flat tire.
{Warning
Rust or dirt on a wheel, or on the
parts to which it is fastened, can
make wheel nuts become loose
after time. The wheel could come
off and cause an accident. When
changing a wheel, remove any
rust or dirt from places where the
wheel attaches to the vehicle. In
an emergency, a cloth or a paper (Continued)
Page 293 of 366

Chevrolet VOLT Owner Manual (GMNA-Localizing-U.S/Canada/Mexico-
9159388) - 2016 - crc - 5/20/15
292 Vehicle Care
Warning (Continued)
towel can be used; however, use
a scraper or wire brush later to
remove all rust or dirt.
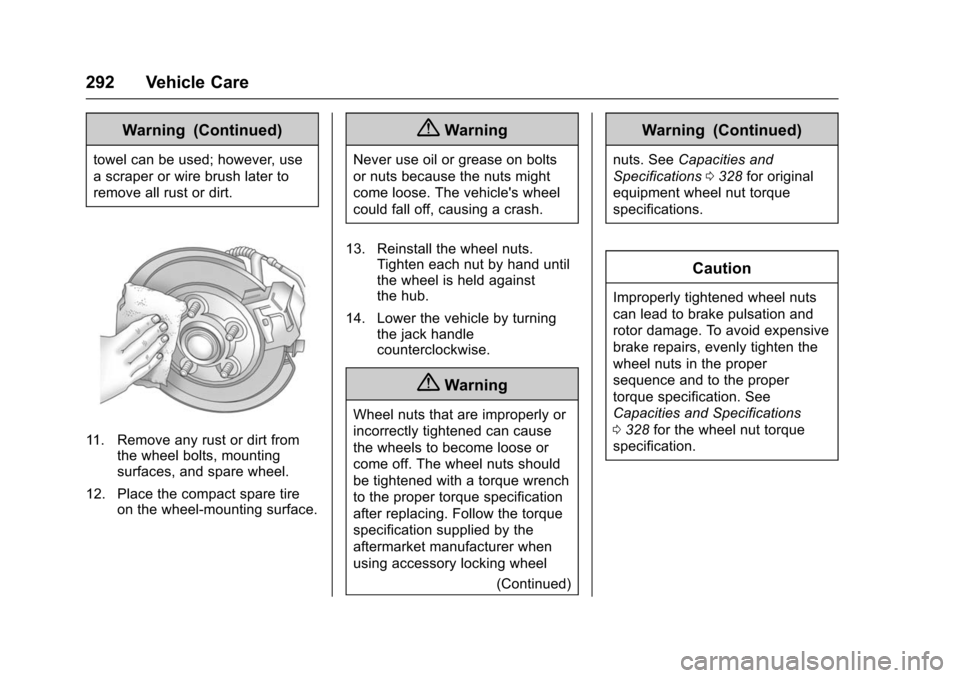
11. Remove any rust or dirt fromthe wheel bolts, mounting
surfaces, and spare wheel.
12. Place the compact spare tire on the wheel-mounting surface.
{Warning
Never use oil or grease on bolts
or nuts because the nuts might
come loose. The vehicle's wheel
could fall off, causing a crash.
13. Reinstall the wheel nuts. Tighten each nut by hand until
the wheel is held against
the hub.
14. Lower the vehicle by turning the jack handle
counterclockwise.
{Warning
Wheel nuts that are improperly or
incorrectly tightened can cause
the wheels to become loose or
come off. The wheel nuts should
be tightened with a torque wrench
to the proper torque specification
after replacing. Follow the torque
specification supplied by the
aftermarket manufacturer when
using accessory locking wheel
(Continued)
Warning (Continued)
nuts. SeeCapacities and
Specifications 0328 for original
equipment wheel nut torque
specifications.
Caution
Improperly tightened wheel nuts
can lead to brake pulsation and
rotor damage. To avoid expensive
brake repairs, evenly tighten the
wheel nuts in the proper
sequence and to the proper
torque specification. See
Capacities and Specifications
0 328 for the wheel nut torque
specification.
Page 294 of 366

Chevrolet VOLT Owner Manual (GMNA-Localizing-U.S/Canada/Mexico-
9159388) - 2016 - crc - 5/20/15
Vehicle Care 293
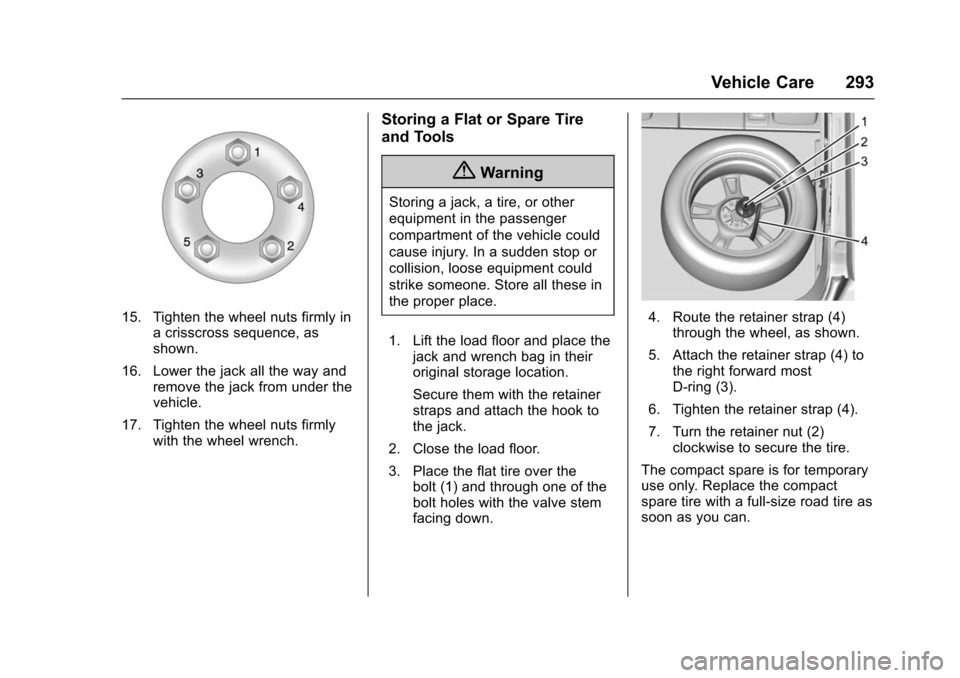
15. Tighten the wheel nuts firmly ina crisscross sequence, as
shown.
16. Lower the jack all the way and remove the jack from under the
vehicle.
17. Tighten the wheel nuts firmly with the wheel wrench.
Storing a Flat or Spare Tire
and Tools
{Warning
Storing a jack, a tire, or other
equipment in the passenger
compartment of the vehicle could
cause injury. In a sudden stop or
collision, loose equipment could
strike someone. Store all these in
the proper place.
1. Lift the load floor and place the jack and wrench bag in their
original storage location.
Secure them with the retainer
straps and attach the hook to
the jack.
2. Close the load floor.
3. Place the flat tire over the bolt (1) and through one of the
bolt holes with the valve stem
facing down.
4. Route the retainer strap (4)through the wheel, as shown.
5. Attach the retainer strap (4) to the right forward most
D-ring (3).
6. Tighten the retainer strap (4).
7. Turn the retainer nut (2) clockwise to secure the tire.
The compact spare is for temporary
use only. Replace the compact
spare tire with a full-size road tire as
soon as you can.
Page 357 of 366

Chevrolet VOLT Owner Manual (GMNA-Localizing-U.S/Canada/Mexico-
9159388) - 2016 - crc - 5/20/15
356 Index
Automatic (cont'd)Headlamp System . . . . . . . . . . . . 148
B
Battery . . . . . . . . . . . . . . . . . . . . . . . . . 104
Power Protection . . . . . . . . . . . . . 152
Battery - North America . . . . 245, 295
Battery and Charging Messages. . . . . . . . . . . . . . . . . . . . . 130
Battery Gauge
High Voltage . . . . . . . . . . . . . . . . . . 104
Blade Replacement, Wiper . . . . . 248
Brake Parking, Electric . . . . . . . . . . . . . . 185
System Warning Light . . . . . . . . .110
Brakes . . . . . . . . . . . . . . . . . . . . . . . . . . 243 Antilock . . . . . . . . . . . . . . . . . . . . . . . 184
Fluid . . . . . . . . . . . . . . . . . . . . . . . . . . 243
Regenerative Braking . . . . . . . . . 187
System Messages . . . . . . . . . . . . 130
Braking . . . . . . . . . . . . . . . . . . . . . . . . . 163
Break-In, New Vehicle . . . . . . . . . . 171
Bulb Replacement . . . . . . . . . . . . . . 251 Halogen Bulbs . . . . . . . . . . . . . . . . 249
Headlamp Aiming . . . . . . . . . . . . . 249
Headlamps . . . . . . . . . . . . . . . . . . . 249
License Plate Lamps . . . . . . . . . 250
Taillamps . . . . . . . . . . . . . . . . . . . . . 250
Buying New Tires . . . . . . . . . . . . . . . 276
C
Calibration . . . . . . . . . . . . . . . . . . . . . . . 97
California Fuel Requirements . . . . . . . . . . . 220
Perchlorate MaterialsRequirements . . . . . . . . . . . . . . . 226
California Proposition
65 Warning . . . . . . . . . .226, 245, 295
Canadian Vehicle Owners . . . . . . . . 2
Capacities and
Specifications . . . . . . . . . . . . . . . . . 328
Carbon Monoxide Engine Exhaust . . . . . . . . . . . . . . . 182
Hatch . . . . . . . . . . . . . . . . . . . . . . . . . . . 41
Winter Driving . . . . . . . . . . . . . . . . 167
Cargo Cover . . . . . . . . . . . . . . . . . . . . . . . . . . . 93
Caution, Danger, and Warning . . . . 3
Center Console Storage . . . . . . . . . 93
Center Stack Display . . . . . . . . . . . 116
Chains, Tire . . . . . . . . . . . . . . . . . . . . 280
Charge Cord . . . . . . . . . . . . . . . . . . . . 210
Charging
Delay Override . . . . . . . . . . . . . . . 206
Electrical Requirements . . . . . . 218
Plug-In . . . . . . . . . . . . . . . . . . . . . . . 205
Programmable . . . . . . . . . . . . . . . . .118 Charging (cont'd)
Utility Interruption . . . . . . . . . . . . . 218
Wireless . . . . . . . . . . . . . . . . . . . . . . . . 99
Charging Status Screens . . . . . . . 207
Charging System Light . . . . . . . . . 108
Check
Malfunction IndicatorEngine Light . . . . . . . . . . . . . . . . 109
Child Restraints
Infants and Young Children . . . . . 75
Lower Anchors and Tethersfor Children . . . . . . . . . . . . . . . . . . . 80
Older Children . . . . . . . . . . . . . . . . . . 74
Securing . . . . . . . . . . . . . . . . . . . . 87, 89
Systems . . . . . . . . . . . . . . . . . . . . . . . . 78
Cleaning Exterior Care . . . . . . . . . . . . . . . . . 304
Interior Care . . . . . . . . . . . . . . . . . . 309
Climate Control Systems Automatic . . . . . . . . . . . . . . . . . . . . . 154
Clock . . . . . . . . . . . . . . . . . . . . . . . . . . . . 97
Cluster, Instrument . . . . . . . . . . . . . 100
Collision Damage Repair . . . . . . . 338
Compact Spare Tire . . . . . . . . . . . . 294
Compartments Storage . . . . . . . . . . . . . . . . . . . . . . . . . 92
Compass . . . . . . . . . . . . . . . . . . . . . . . . 97 Messages . . . . . . . . . . . . . . . . . . . . 131