run engine CHEVROLET VOLT 2018 Owner's Guide
[x] Cancel search | Manufacturer: CHEVROLET, Model Year: 2018, Model line: VOLT, Model: CHEVROLET VOLT 2018Pages: 379, PDF Size: 5.65 MB
Page 187 of 379
Chevrolet VOLT Owner Manual (GMNA-Localizing-U.S./Canada/Mexico-
11349113) - 2018 - crc - 10/12/17
186 Driving and Operating
The vehicle has an Electric Parking
Brake (EPB). The EPB can always
be activated, even if the ignition is
off. To prevent draining the battery,
avoid repeated cycles of the EPB
system when the engine is not
running.
The system has a
Yor PARK
Electric Parking Brake light, and a
8
Service Parking Brake light.
See Electric Parking Brake Light
0 117 and Service Electric Parking
Brake Light 0117.
Before leaving the vehicle, check for
the
Yor PARK light to ensure that
the parking brake is applied.
EPB Apply
To apply the EPB:
1. Be sure the vehicle is at a complete stop.
2. Pull the EPB switch momentarily.
The
Yor PARK light will flash and
then stay on once the EPB is fully
applied. If the
Yor PARK light flashes continuously, then the EPB
is only partially applied or there is a
problem with the EPB. A DIC
message will display. Release the
EPB and try to apply it again. If the
light does not come on, or keeps
flashing, have the vehicle serviced.
Do not drive the vehicle if the
Yor
PARK light is flashing. See your
dealer. See Electric Parking Brake
Light 0117.
If the
8light is on, press and hold
the EPB switch. Continue to hold
the switch until the
Yor PARK
light remains on. If the
8light
remains on, see your dealer.
If the EPB is applied while the
vehicle is moving, the vehicle will
decelerate as long as the switch is
pressed. If the switch is pressed
until the vehicle comes to a stop,
the EPB will remain applied.
The vehicle may automatically apply
the EPB in some situations when
the vehicle is not moving. This is
normal, and is done to periodically
check the correct operation of the
EPB system. If the EPB fails to apply, block the
rear wheels to prevent vehicle
movement.
EPB Release
To release the EPB:
1. Turn the ignition on or to ACC/ ACCESSORY.
2. Apply and hold the brake pedal.
3. Press the EPB switch momentarily.
The EPB is released when the
Y
or PARK light is off.
If the
8light is on, release the EPB
by pressing and holding the EPB
switch. Continue to hold the switch
until the
Yor PARK light is off.
If either light stays on after release
is attempted, see your dealer.
Page 232 of 379
Chevrolet VOLT Owner Manual (GMNA-Localizing-U.S./Canada/Mexico-
11349113) - 2018 - crc - 10/12/17
Driving and Operating 231
4. After refueling, reinstall the fuelcap by turning it clockwise until
it clicks. Close the fuel door.
{Warning
Overfilling the fuel tank by more
than three clicks of a standard fill
nozzle may cause:
. Vehicle performance issues,
including engine stalling and
damage to the fuel system.
. Fuel spills.
. Potential fuel fires.
Be careful not to spill fuel. Wait a
few seconds after you have finished
pumping before removing the
nozzle. Clean fuel from painted
surfaces as soon as possible. See
Exterior Care 0315.
{Warning
If a fire starts while you are
refueling, do not remove the
nozzle. Shut off the flow of fuel by
shutting off the pump or by
notifying the station attendant.
Leave the area immediately.
Caution
If a new fuel cap is needed, be
sure to get the right type of cap
from your dealer. The wrong type
of fuel cap may not fit properly,
may cause the malfunction
indicator lamp to light, and could
damage the fuel tank and
emissions system. See
Malfunction Indicator Lamp
(Check Engine Light) 0114.
Filling a Portable Fuel
Container
{Warning
Filling a portable fuel container
while it is in the vehicle can cause
fuel vapors that can ignite either
by static electricity or other
means. You or others could be
badly burned and the vehicle
could be damaged. Always:
. Use approved fuel
containers.
. Remove the container from
the vehicle, trunk, or pickup
bed before filling.
. Place the container on the
ground.
. Place the nozzle inside the
fill opening of the container
before dispensing fuel, and
keep it in contact with the fill
opening until filling is
complete.
(Continued)
Page 244 of 379

Chevrolet VOLT Owner Manual (GMNA-Localizing-U.S./Canada/Mexico-
11349113) - 2018 - crc - 10/12/17
Vehicle Care 243
include engine revolutions, engine
temperature, and miles driven.
Based on driving conditions, the
mileage at which an oil change is
indicated can vary considerably. For
the oil life system to work properly,
the system must be reset every time
the oil is changed.
When the system has calculated
that oil life has been diminished, it
indicates that an oil change is
necessary. A CHANGE ENGINE
OIL SOON message comes on.
Change the oil as soon as possible
within the next 1 000 km (600 mi).
It is possible that, if driving under
the best conditions, the oil life
system might indicate that an oil
change is not necessary for up to
two years. The engine oil and filter
must be changed at least once
every two years and, at this time,
the system must be reset. Your
dealer has trained service people
who will perform this work and reset
the system. It is also important to
check the oil regularly over the
course of an oil drain interval and
keep it at the proper level.If the system is ever reset
accidentally, the oil must be
changed at 5 000 km (3,000 mi)
since the last oil change.
Remember to reset the oil life
system whenever the oil is changed.
How to Reset the Engine Oil
Life System
Reset the system whenever the
engine oil is changed so that the
system can calculate the next
engine oil change. To reset the
system:
1. Select REMAINING OIL LIFE on the DIC menu.
2. Press and hold
Vfor several
seconds while the Oil Life
display is active to reset the Oil
Life system.
3. 100% OIL LIFE will be displayed when the oil life
system is successfully reset.
The oil life system can also be reset
as follows: 1. Select REMAINING OIL LIFE on the DIC menu. 2. Fully press and release the
accelerator pedal three times
within five seconds.
If the CHANGE ENGINE OIL SOON
message comes back on when the
vehicle is started, the engine oil life
system has not reset. Repeat the
procedure.
Engine Air Cleaner/Filter
The engine air cleaner/filter is in the
engine compartment on the
passenger side of the vehicle. See
Engine Compartment Overview
0 239.
When to Inspect the Engine Air
Filter
For intervals on changing and
inspecting the engine air cleaner/
filter, see Maintenance Schedule
0 327.
How to Inspect the Engine Air
Filter
Do not start the engine or have the
engine running with the engine air
cleaner/filter housing open. Before
removing the engine air cleaner/
Page 246 of 379
Chevrolet VOLT Owner Manual (GMNA-Localizing-U.S./Canada/Mexico-
11349113) - 2018 - crc - 10/12/17
Vehicle Care 245
Cooling System (Engine)
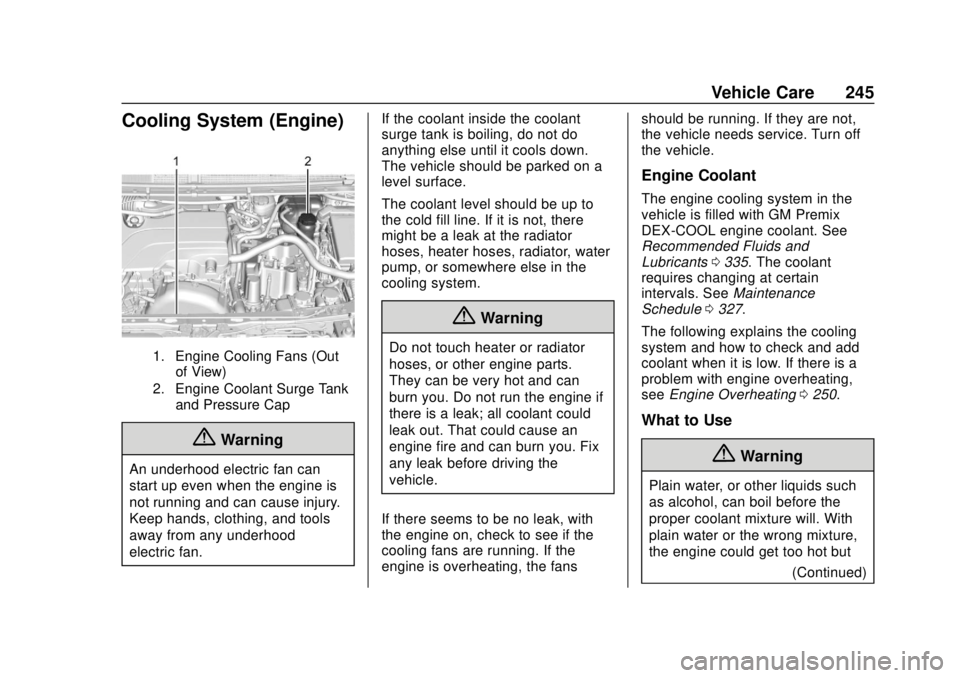
1. Engine Cooling Fans (Outof View)
2. Engine Coolant Surge Tank and Pressure Cap
{Warning
An underhood electric fan can
start up even when the engine is
not running and can cause injury.
Keep hands, clothing, and tools
away from any underhood
electric fan. If the coolant inside the coolant
surge tank is boiling, do not do
anything else until it cools down.
The vehicle should be parked on a
level surface.
The coolant level should be up to
the cold fill line. If it is not, there
might be a leak at the radiator
hoses, heater hoses, radiator, water
pump, or somewhere else in the
cooling system.
{Warning
Do not touch heater or radiator
hoses, or other engine parts.
They can be very hot and can
burn you. Do not run the engine if
there is a leak; all coolant could
leak out. That could cause an
engine fire and can burn you. Fix
any leak before driving the
vehicle.
If there seems to be no leak, with
the engine on, check to see if the
cooling fans are running. If the
engine is overheating, the fans should be running. If they are not,
the vehicle needs service. Turn off
the vehicle.
Engine Coolant
The engine cooling system in the
vehicle is filled with GM Premix
DEX-COOL engine coolant. See
Recommended Fluids and
Lubricants
0335. The coolant
requires changing at certain
intervals. See Maintenance
Schedule 0327.
The following explains the cooling
system and how to check and add
coolant when it is low. If there is a
problem with engine overheating,
see Engine Overheating 0250.
What to Use
{Warning
Plain water, or other liquids such
as alcohol, can boil before the
proper coolant mixture will. With
plain water or the wrong mixture,
the engine could get too hot but
(Continued)
Page 248 of 379
Chevrolet VOLT Owner Manual (GMNA-Localizing-U.S./Canada/Mexico-
11349113) - 2018 - crc - 10/12/17
Vehicle Care 247
The coolant level should be at or
above the cold fill line on the
coolant surge tank. If it is not, there
could be a leak in the cooling
system.
How to Add Coolant to the
Coolant Surge Tank
{Warning
Spilling coolant on hot engine
parts can burn you. Coolant
contains ethylene glycol and it will
burn if the engine parts are hot
enough.
{Warning
An underhood electric fan can
start up even when the engine is
not running and can cause injury.
Keep hands, clothing, and tools
away from any underhood
electric fan.
{Warning
Steam and scalding liquids from a
hot cooling system are under
pressure. Turning the pressure
cap, even a little, can cause them
to come out at high speed and
you could be burned. Never turn
the cap when the cooling system,
including the pressure cap, is hot.
Wait for the cooling system and
pressure cap to cool.
Caution
Failure to follow the specific
coolant fill procedure could cause
system damage. If coolant is not
visible in the hybrid surge tank(s),
contact your dealer.
If coolant is needed, add the proper
GM Premix DEX-COOL engine
coolant at the coolant surge tank.
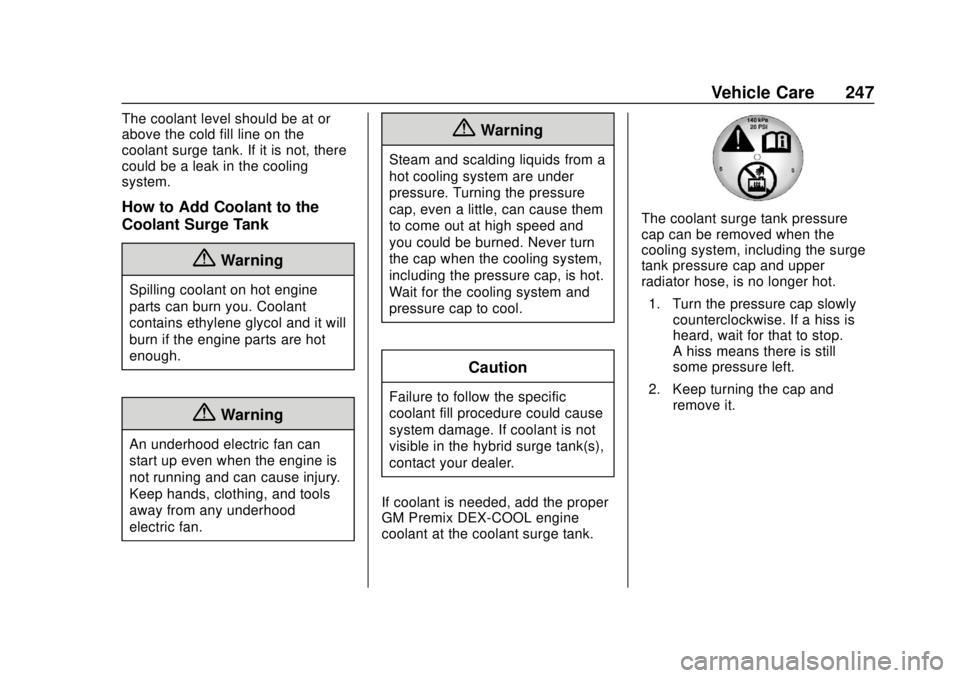
The coolant surge tank pressure
cap can be removed when the
cooling system, including the surge
tank pressure cap and upper
radiator hose, is no longer hot. 1. Turn the pressure cap slowly counterclockwise. If a hiss is
heard, wait for that to stop.
A hiss means there is still
some pressure left.
2. Keep turning the cap and remove it.
Page 251 of 379
Chevrolet VOLT Owner Manual (GMNA-Localizing-U.S./Canada/Mexico-
11349113) - 2018 - crc - 10/12/17
250 Vehicle Care
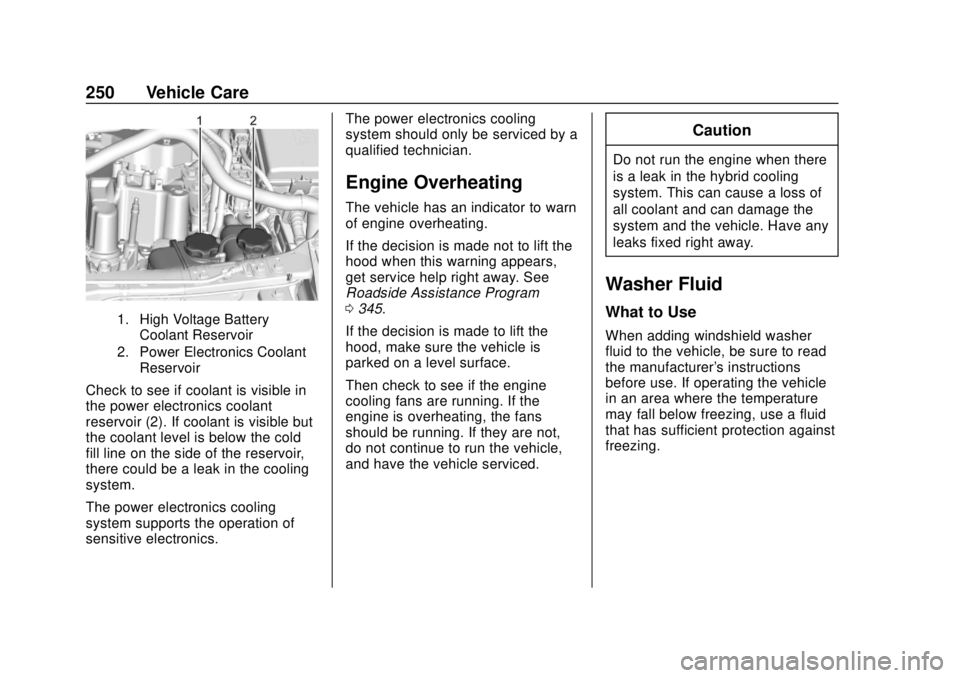
1. High Voltage BatteryCoolant Reservoir
2. Power Electronics Coolant Reservoir
Check to see if coolant is visible in
the power electronics coolant
reservoir (2). If coolant is visible but
the coolant level is below the cold
fill line on the side of the reservoir,
there could be a leak in the cooling
system.
The power electronics cooling
system supports the operation of
sensitive electronics. The power electronics cooling
system should only be serviced by a
qualified technician.
Engine Overheating
The vehicle has an indicator to warn
of engine overheating.
If the decision is made not to lift the
hood when this warning appears,
get service help right away. See
Roadside Assistance Program
0
345.
If the decision is made to lift the
hood, make sure the vehicle is
parked on a level surface.
Then check to see if the engine
cooling fans are running. If the
engine is overheating, the fans
should be running. If they are not,
do not continue to run the vehicle,
and have the vehicle serviced.
Caution
Do not run the engine when there
is a leak in the hybrid cooling
system. This can cause a loss of
all coolant and can damage the
system and the vehicle. Have any
leaks fixed right away.
Washer Fluid
What to Use
When adding windshield washer
fluid to the vehicle, be sure to read
the manufacturer's instructions
before use. If operating the vehicle
in an area where the temperature
may fall below freezing, use a fluid
that has sufficient protection against
freezing.
Page 266 of 379
Chevrolet VOLT Owner Manual (GMNA-Localizing-U.S./Canada/Mexico-
11349113) - 2018 - crc - 10/12/17
Vehicle Care 265
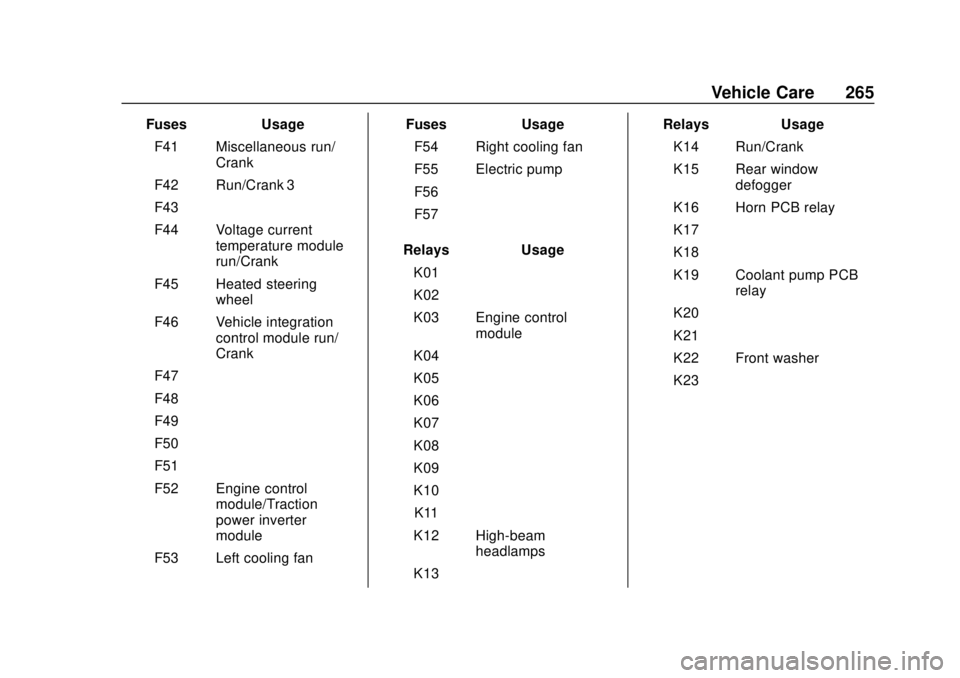
FusesUsage
F41 Miscellaneous run/ Crank
F42 Run/Crank 3
F43 –
F44 Voltage current temperature module
run/Crank
F45 Heated steering wheel
F46 Vehicle integration control module run/
Crank
F47 –
F48 –
F49 –
F50 –
F51 –
F52 Engine control module/Traction
power inverter
module
F53 Left cooling fan Fuses
Usage
F54 Right cooling fan
F55 Electric pump
F56 –
F57 –
Relays Usage
K01 –
K02 –
K03 Engine control module
K04 –
K05 –
K06 –
K07 –
K08 –
K09 –
K10 –
K11 –
K12 High-beam headlamps
K13 – Relays
Usage
K14 Run/Crank
K15 Rear window defogger
K16 Horn PCB relay
K17 –
K18 –
K19 Coolant pump PCB relay
K20 –
K21 –
K22 Front washer
K23 –
Page 294 of 379
Chevrolet VOLT Owner Manual (GMNA-Localizing-U.S./Canada/Mexico-
11349113) - 2018 - crc - 10/12/17
Vehicle Care 293
Warning (Continued)
enter the vehicle. Engine exhaust
contains carbon monoxide (CO)
which cannot be seen or smelled.
It can cause unconsciousness
and even death. Never run the
engine in an enclosed area that
has no fresh air ventilation. For
more information, seeEngine
Exhaust 0182.
{Warning
Overinflating a tire could cause
the tire to rupture and you or
others could be injured. Be sure
to read and follow the tire sealant
and compressor kit instructions
and inflate the tire to its
recommended pressure. Do not
exceed the recommended
pressure.
{Warning
Storing the tire sealant and
compressor kit or other
equipment in the passenger
compartment of the vehicle could
cause injury. In a sudden stop or
collision, loose equipment could
strike someone. Store the tire
sealant and compressor kit in its
original location.
If this vehicle has a tire sealant and
compressor kit, there may not be a
spare tire or tire changing
equipment, and on some vehicles
there may not be a place to store
a tire.
The tire sealant and compressor
can be used to temporarily seal
punctures up to 6 mm (0.25 in) in
the tread area of the tire. It can also
be used to inflate an
underinflated tire.
If the tire has been separated from
the wheel, has damaged sidewalls,
or has a large puncture, the tire is
too severely damaged for the tire sealant and compressor kit to be
effective. See
Roadside Assistance
Program 0345.
Read and follow all of the tire
sealant and compressor kit
instructions.
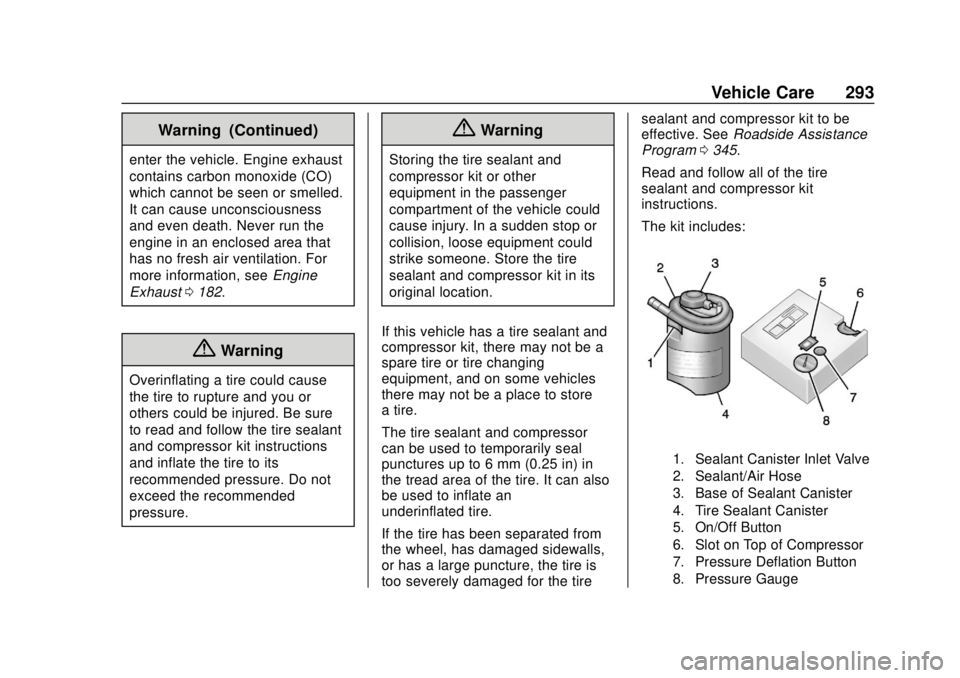
The kit includes:
1. Sealant Canister Inlet Valve
2. Sealant/Air Hose
3. Base of Sealant Canister
4. Tire Sealant Canister
5. On/Off Button
6. Slot on Top of Compressor
7. Pressure Deflation Button
8. Pressure Gauge
Page 307 of 379
Chevrolet VOLT Owner Manual (GMNA-Localizing-U.S./Canada/Mexico-
11349113) - 2018 - crc - 10/12/17
306 Vehicle Care
Jump Starting
Jump Starting - North
America
Jump starting is connecting jumper
cables between the two vehicles to
enable vehicle starting. If the Volt or
another vehicle has a run-down
12-volt battery, it can be jump
started using good condition jumper
cables. There are different
procedures depending on if the Volt
has a run-down battery or another
vehicle has a run-down battery.
Read the appropriate procedures
that follow.
{Warning
The high voltage battery cannot
be jump started either with
another vehicle or battery
charger. Personal injury, death,
or damage to the vehicle could
result.
{Warning
WARNING:Battery posts,
terminals, and related
accessories contain lead and lead
compounds, chemicals known to
the State of California to cause
cancer and birth defects or other
reproductive harm. Batteries also
contain other chemicals known to
the State of California to cause
cancer. WASH HANDS AFTER
HANDLING. For more information
go to www.P65Warnings.ca.gov/
passenger-vehicle.
See California Proposition
65 Warning 0235 and the back
cover.
{Warning
Batteries can hurt you. They can
be dangerous because:
. They contain acid that can
burn you.
(Continued)
Warning (Continued)
.They contain gas that can
explode or ignite.
. They contain enough
electricity to burn you.
If you do not follow these steps
exactly, some or all of these
things can hurt you.
{Warning
Electric fans can start up even
when the engine is not running
and can cause injury. Keep
hands, clothing, and tools away
from any underhood electric fans.
Caution
Ignoring these steps could result
in costly damage to the vehicle
that would not be covered by the (Continued)
Page 311 of 379

Chevrolet VOLT Owner Manual (GMNA-Localizing-U.S./Canada/Mexico-
11349113) - 2018 - crc - 10/12/17
310 Vehicle Care
Caution
If any accessories are left on or
plugged in during the jump
starting procedure, they could be
damaged. The repairs would not
be covered by the vehicle
warranty. Whenever possible, turn
off or unplug all accessories on
either vehicle when jump starting.
3. Turn off both vehicles. Turn off the radio, all lamps, and
accessories that are not
needed in both vehicles.
Unplug accessories from the
cigarette lighter or the
accessory power outlets. This
avoids sparks and helps save
both batteries and accessories.
4. Locate the positive (+) and negative (−) terminals on the
vehicle with the run-down
battery.
5. Locate the positive (+) and negative (−) battery terminals
on the Volt. The 12-volt battery
is under the load floor in the rear cargo area. Open the
access covers for the
positive (+) terminal (1) and the
negative (−) terminal (2).
6. Check that the jumper cables do not have loose or missing
insulation or a shock could
result and the vehicles could
be damaged.
Before connecting the jumper
cables, here are some basic
things to know. Positive (+)
jumper cable goes to
positive (+) battery terminal or
a remote positive (+) terminal if
available. Negative (−) jumper
cable goes to remote
negative (−) terminal if
available, or a heavy,
unpainted metal engine part or
a solid engine ground on the
vehicle with the run-down
battery.
Do not connect positive (+) to
negative (−) or there will be a
short that may damage the
battery or other parts of the
vehicle. Do not connect the
negative (−) cable to the negative (−) terminal on the
run-down battery because this
can cause sparks.
Caution
If the jumper cables are
connected or removed in the
wrong order, electrical shorting
may occur and damage the
vehicle. The repairs would not be
covered by the vehicle warranty.
Always connect and remove the
jumper cables in the correct order,
making sure that the cables do
not touch each other or other
metal.
Connecting the Jumper Cables 1. Connect the red positive (+) jumper cable to the positive (+)
terminal of the other vehicle
with the run-down battery. Use
a remote positive (+) terminal if
available. Do not let the other
end touch metal.