ac system CHEVROLET VOLT 2018 Repair Manual
[x] Cancel search | Manufacturer: CHEVROLET, Model Year: 2018, Model line: VOLT, Model: CHEVROLET VOLT 2018Pages: 379, PDF Size: 5.65 MB
Page 94 of 379
Chevrolet VOLT Owner Manual (GMNA-Localizing-U.S./Canada/Mexico-
11349113) - 2018 - crc - 10/12/17
Seats and Restraints 93
Warning (Continued)
forward-facing child restraint in
the front outboard passenger
seat, always move the seat as far
back as it will go. It is better to
secure the child restraint in a
rear seat.
SeePassenger Sensing System
0 71 for additional information.
If the child restraint uses a top
tether, see Lower Anchors and
Tethers for Children (LATCH
System) 084 for top tether anchor
locations.
Do not secure a child seat in a
position without a top tether anchor
if a national or local law requires
that the top tether be anchored, or if
the instructions that come with the
child restraint say that the top strap
must be anchored.
In Canada, the law requires that
forward-facing child restraints have
a top tether, and that the tether be
attached. When using the lap-shoulder belt to
secure the child restraint in this
position, follow the instructions that
came with the child restraint and the
following instructions:
1. Move the seat as far back as it will go before securing the
forward-facing child restraint.
Move the seat upward or the
seatback to an upright position,
if needed, to get a tight
installation of the child
restraint.
When the passenger sensing
system has turned off the front
outboard passenger frontal
airbag and knee airbag, the off
indicator on the passenger
airbag status indicator should
light and stay lit when you start
the vehicle. See Passenger
Airbag Status Indicator 0113.
2. Put the child restraint on the seat.
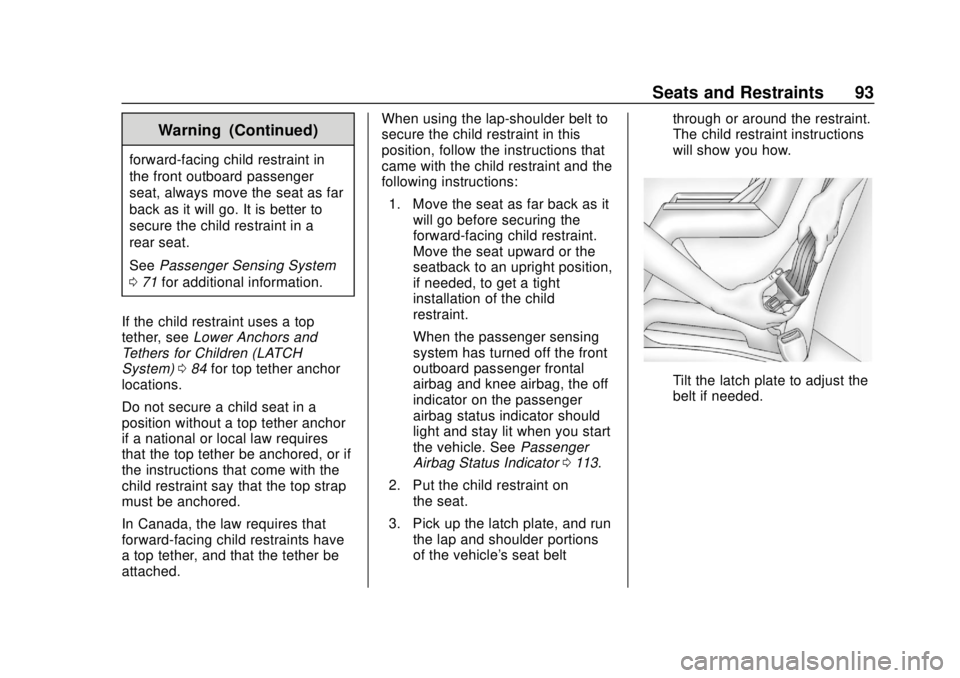
3. Pick up the latch plate, and run the lap and shoulder portions
of the vehicle's seat belt through or around the restraint.
The child restraint instructions
will show you how.
Tilt the latch plate to adjust the
belt if needed.
Page 95 of 379
Chevrolet VOLT Owner Manual (GMNA-Localizing-U.S./Canada/Mexico-
11349113) - 2018 - crc - 10/12/17
94 Seats and Restraints
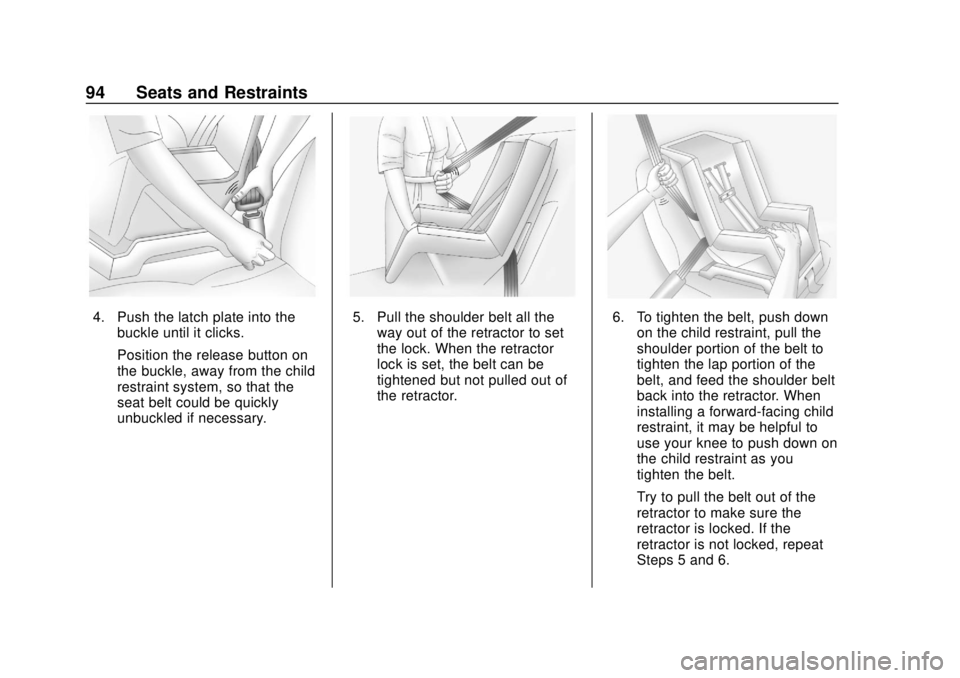
4. Push the latch plate into thebuckle until it clicks.
Position the release button on
the buckle, away from the child
restraint system, so that the
seat belt could be quickly
unbuckled if necessary.5. Pull the shoulder belt all theway out of the retractor to set
the lock. When the retractor
lock is set, the belt can be
tightened but not pulled out of
the retractor.6. To tighten the belt, push downon the child restraint, pull the
shoulder portion of the belt to
tighten the lap portion of the
belt, and feed the shoulder belt
back into the retractor. When
installing a forward-facing child
restraint, it may be helpful to
use your knee to push down on
the child restraint as you
tighten the belt.
Try to pull the belt out of the
retractor to make sure the
retractor is locked. If the
retractor is not locked, repeat
Steps 5 and 6.
Page 96 of 379
Chevrolet VOLT Owner Manual (GMNA-Localizing-U.S./Canada/Mexico-
11349113) - 2018 - crc - 10/12/17
Seats and Restraints 95
7. Before placing a child in thechild restraint, make sure it is
securely held in place. To
check, grasp the child restraint
at the seat belt path and
attempt to move it side to side
and back and forth. When the
child restraint is properly
installed, there should be no
more than 2.5 cm (1 in) of
movement.
If the airbags are off, the off
indicator in the passenger airbag
status indicator will come on and
stay on when the vehicle is started.
If a child restraint has been installed
and the on indicator is lit, see “If the
On Indicator Is Lit for a Child
Restraint” underPassenger Sensing
System 071.
To remove the child restraint,
unbuckle the vehicle seat belt and
let it return to the stowed position.
Page 100 of 379
Chevrolet VOLT Owner Manual (GMNA-Localizing-U.S./Canada/Mexico-
11349113) - 2018 - crc - 10/12/17
Instruments and Controls 99
Instruments and
Controls
Controls
Steering Wheel Adjustment . . . 100
Steering Wheel Controls . . . . . . 100
Heated Steering Wheel . . . . . . . 100
Horn . . . . . . . . . . . . . . . . . . . . . . . . . . 100
Pedestrian Safety Signal . . . . . 100
Windshield Wiper/Washer . . . . 101
Compass . . . . . . . . . . . . . . . . . . . . . 102
Clock . . . . . . . . . . . . . . . . . . . . . . . . . 102
Power Outlets . . . . . . . . . . . . . . . . 103
Wireless Charging . . . . . . . . . . . . 103
Warning Lights, Gauges, and
Indicators
Warning Lights, Gauges, andIndicators . . . . . . . . . . . . . . . . . . . 106
Instrument Cluster . . . . . . . . . . . . 106
Speedometer . . . . . . . . . . . . . . . . . 110
Odometer . . . . . . . . . . . . . . . . . . . . . 110
Trip Odometer . . . . . . . . . . . . . . . . 110
Battery Gauge (High Voltage) . . . . . . . . . . . . . . . . . . . . . 110
Fuel Gauge . . . . . . . . . . . . . . . . . . . 110
Driver Efficiency Gauge . . . . . . . 111
Power Indicator Gauge . . . . . . . 112 Seat Belt Reminders . . . . . . . . . . 112
Airbag Readiness Light . . . . . . . 113
Passenger Airbag Status
Indicator . . . . . . . . . . . . . . . . . . . . . 113
Charging System Light (12-Volt
Battery) . . . . . . . . . . . . . . . . . . . . . 114
Malfunction Indicator Lamp (Check Engine Light) . . . . . . . . 114
Brake System Warning Light . . . . . . . . . . . . . . . . . . . . . . . . 116
Electric Parking Brake Light . . . . . . . . . . . . . . . . . . . . . . . . 117
Service Electric Parking Brake Light . . . . . . . . . . . . . . . . . . . . . . . . 117
Antilock Brake System (ABS) Warning Light . . . . . . . . . . . . . . . 117
Sport Mode Light . . . . . . . . . . . . . 118
Mountain Mode Light . . . . . . . . . 118
Hold Mode Light . . . . . . . . . . . . . . 118
Lane Keep Assist (LKA) Light . . . . . . . . . . . . . . . . . . . . . . . . 118
Vehicle Ahead Indicator . . . . . . . 119
Traction Off Light . . . . . . . . . . . . . 119
StabiliTrak OFF Light . . . . . . . . . 119
Traction Control System (TCS)/ StabiliTrak Light . . . . . . . . . . . . . 119
Engine Coolant Temperature Warning Light . . . . . . . . . . . . . . . 120
Tire Pressure Light . . . . . . . . . . . 120
Engine Oil Pressure Light . . . . 120 Low Fuel Warning Light . . . . . . 121
Security Light . . . . . . . . . . . . . . . . . 121
Vehicle Ready Light . . . . . . . . . . 121
High-Beam On Light . . . . . . . . . . 122
Lamps On Reminder . . . . . . . . . 122
Cruise Control Light . . . . . . . . . . 122
Door Ajar Light . . . . . . . . . . . . . . . 122
Information Displays
Power Flows . . . . . . . . . . . . . . . . . 123
Programmable Charging . . . . . . 123
Energy Information . . . . . . . . . . . 132
Driver Information
Center (DIC) . . . . . . . . . . . . . . . . 133
Vehicle Messages
Vehicle Messages . . . . . . . . . . . . 136
Propulsion PowerMessages . . . . . . . . . . . . . . . . . . . 136
Vehicle Speed Messages . . . . . 137
Vehicle Personalization
Vehicle Personalization . . . . . . . 137
Page 101 of 379
Chevrolet VOLT Owner Manual (GMNA-Localizing-U.S./Canada/Mexico-
11349113) - 2018 - crc - 10/12/17
100 Instruments and Controls
Controls
Steering Wheel
Adjustment
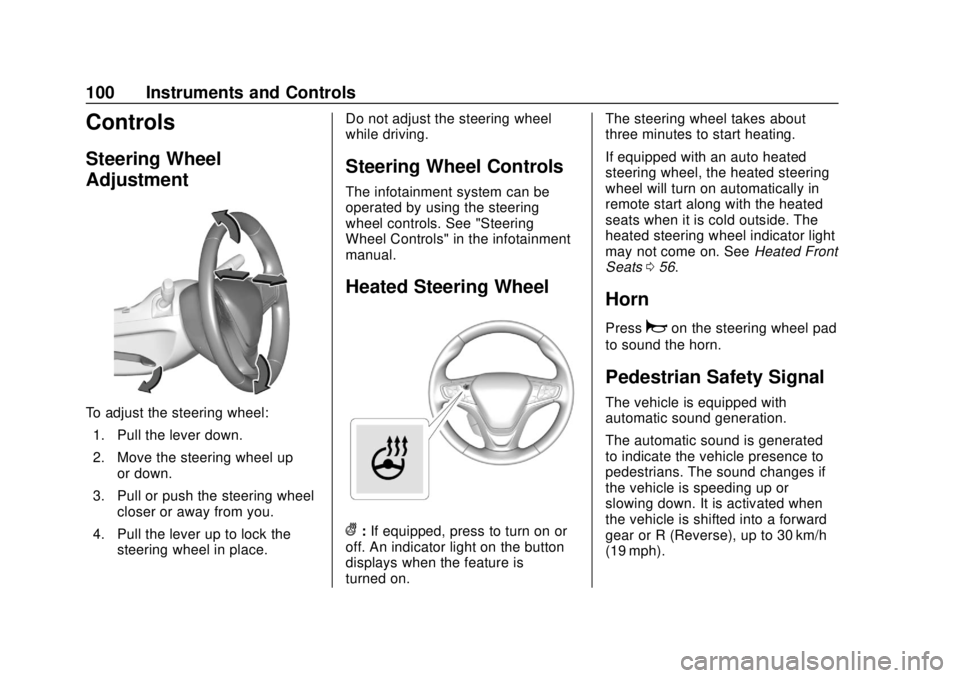
To adjust the steering wheel:1. Pull the lever down.
2. Move the steering wheel up or down.
3. Pull or push the steering wheel closer or away from you.
4. Pull the lever up to lock the steering wheel in place. Do not adjust the steering wheel
while driving.
Steering Wheel Controls
The infotainment system can be
operated by using the steering
wheel controls. See "Steering
Wheel Controls" in the infotainment
manual.
Heated Steering Wheel
(:
If equipped, press to turn on or
off. An indicator light on the button
displays when the feature is
turned on. The steering wheel takes about
three minutes to start heating.
If equipped with an auto heated
steering wheel, the heated steering
wheel will turn on automatically in
remote start along with the heated
seats when it is cold outside. The
heated steering wheel indicator light
may not come on. See
Heated Front
Seats 056.
Horn
Pressaon the steering wheel pad
to sound the horn.
Pedestrian Safety Signal
The vehicle is equipped with
automatic sound generation.
The automatic sound is generated
to indicate the vehicle presence to
pedestrians. The sound changes if
the vehicle is speeding up or
slowing down. It is activated when
the vehicle is shifted into a forward
gear or R (Reverse), up to 30 km/h
(19 mph).
Page 102 of 379
Chevrolet VOLT Owner Manual (GMNA-Localizing-U.S./Canada/Mexico-
11349113) - 2018 - crc - 10/12/17
Instruments and Controls 101
Windshield Wiper/Washer
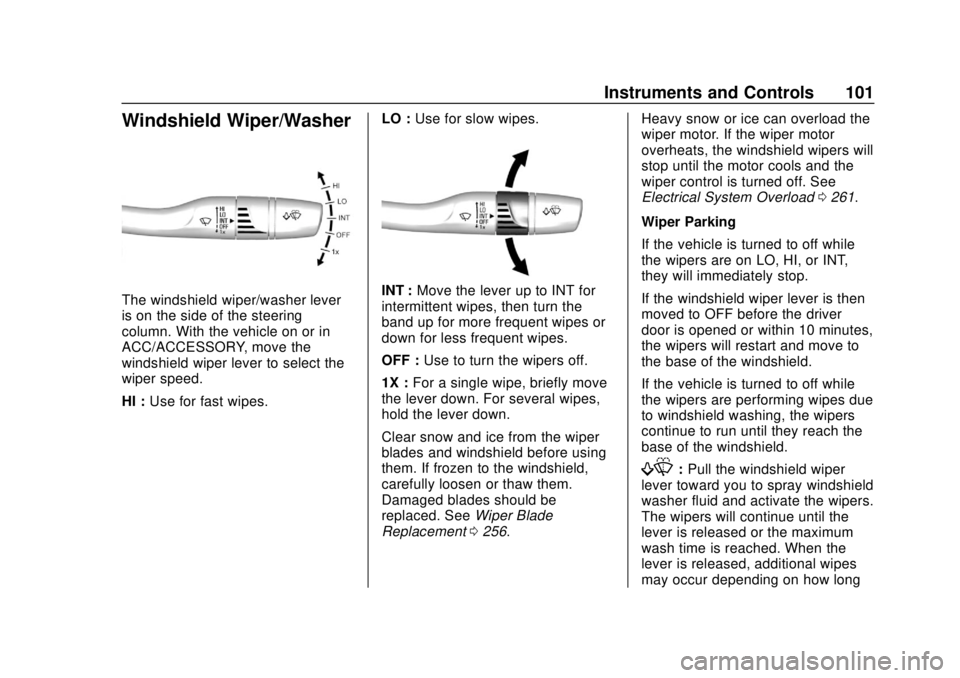
The windshield wiper/washer lever
is on the side of the steering
column. With the vehicle on or in
ACC/ACCESSORY, move the
windshield wiper lever to select the
wiper speed.
HI :Use for fast wipes. LO :
Use for slow wipes.INT : Move the lever up to INT for
intermittent wipes, then turn the
band up for more frequent wipes or
down for less frequent wipes.
OFF : Use to turn the wipers off.
1X : For a single wipe, briefly move
the lever down. For several wipes,
hold the lever down.
Clear snow and ice from the wiper
blades and windshield before using
them. If frozen to the windshield,
carefully loosen or thaw them.
Damaged blades should be
replaced. See Wiper Blade
Replacement 0256. Heavy snow or ice can overload the
wiper motor. If the wiper motor
overheats, the windshield wipers will
stop until the motor cools and the
wiper control is turned off. See
Electrical System Overload
0261.
Wiper Parking
If the vehicle is turned to off while
the wipers are on LO, HI, or INT,
they will immediately stop.
If the windshield wiper lever is then
moved to OFF before the driver
door is opened or within 10 minutes,
the wipers will restart and move to
the base of the windshield.
If the vehicle is turned to off while
the wipers are performing wipes due
to windshield washing, the wipers
continue to run until they reach the
base of the windshield.
f: Pull the windshield wiper
lever toward you to spray windshield
washer fluid and activate the wipers.
The wipers will continue until the
lever is released or the maximum
wash time is reached. When the
lever is released, additional wipes
may occur depending on how long
Page 103 of 379
Chevrolet VOLT Owner Manual (GMNA-Localizing-U.S./Canada/Mexico-
11349113) - 2018 - crc - 10/12/17
102 Instruments and Controls
the windshield washer had been
activated. SeeWasher Fluid0250
for information on filling the
windshield washer fluid reservoir.
{Warning
In freezing weather, do not use
the washer until the windshield is
warmed. Otherwise the washer
fluid can form ice on the
windshield, blocking your vision.
Compass
The vehicle may have a compass
display on the Driver Information
Center (DIC). The compass receives
its heading and other information
from the Global Positioning
System (GPS) antenna, StabiliTrak,
and vehicle speed information.
The compass system is designed to
operate for a certain number of
miles or degrees of turn before
needing a signal from the GPS
satellites. When the compass
display shows CAL, drive the
vehicle for a short distance in an open area where it can receive a
GPS signal. The compass system
will automatically determine when a
GPS signal is restored and provide
a heading again.
Clock
Setting the Time and Date
To set the time:
1. Touch SETTINGS on the Home Page, then touch Time
and Date.
2. Touch Set Time, then touch
«
orªto increase or decrease
hours, minutes, and AM or PM.
Touch 12–24 Hr for 12 or
24 hour clock.
3. Touch
Sto go back to the
previous menu.
Autoset requires an active OnStar
service plan.
If auto timing is set, the time
displayed on the clock may not
update immediately when driving
into a new time zone. To set the date:
1. Touch SETTINGS on the Home Page, then touch Time
and Date.
2. Touch Set Date, then touch
«
orªto increase or decrease
month, day, or year.
3. Touch
Sto go back to the
previous menu.
To set the clock display:
1. Touch SETTINGS on the Home Page, then touch Time
and Date.
2. Touch Clock Display, then touch Off or On to turn the
clock display off or on.
3. Touch
Sto go back to the
previous menu.
Page 104 of 379
Chevrolet VOLT Owner Manual (GMNA-Localizing-U.S./Canada/Mexico-
11349113) - 2018 - crc - 10/12/17
Instruments and Controls 103
Power Outlets
The accessory power outlets can be
used to plug in electrical equipment,
such as a cell phone or MP3 player.
There are two accessory power
outlets:
.In the storage area below the
climate control system.
. On the rear of the front console
armrest.
The power outlets supply power
while the vehicle is on, or if the
vehicle is in Retained Accessory
Power (RAP). See Retained
Accessory Power (RAP) 0174.
Lift the cover to access and replace
when not in use.
Certain accessory plugs may not be
compatible with the accessory
power outlet and could overload
vehicle or adapter fuses. If a
problem is experienced, see your
dealer. When adding electrical equipment,
be sure to follow the installation
instructions included with the
equipment. See
Add-On Electrical
Equipment 0232.
Caution
Hanging heavy equipment from
the power outlet can cause
damage not covered by the
vehicle warranty. The power
outlets are designed for
accessory power plugs only, such
as cell phone charge cords.
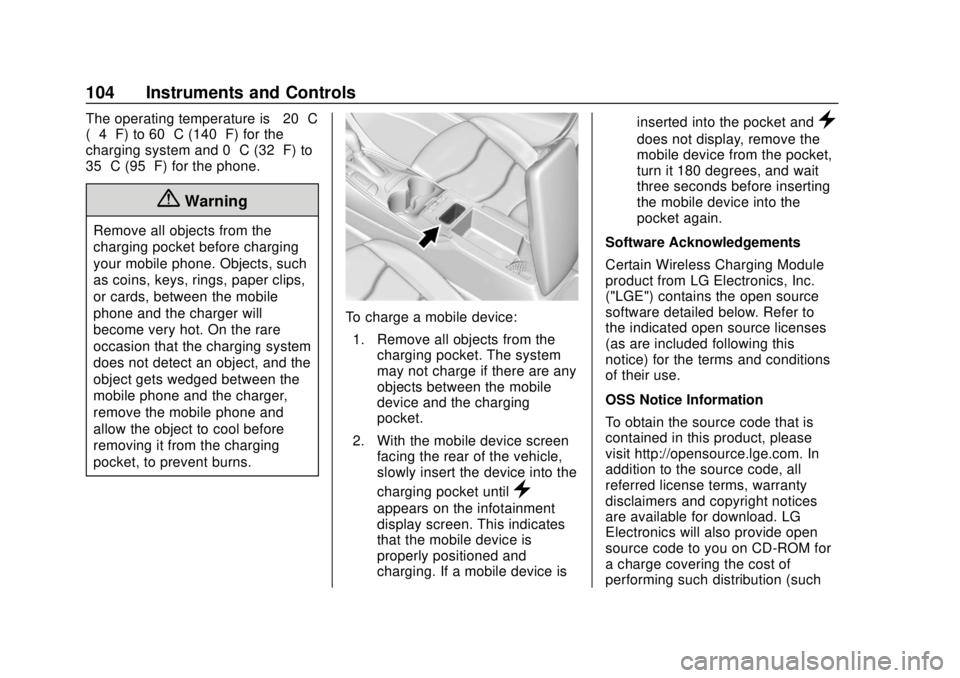
Wireless Charging
The vehicle may have a wireless
charging pocket inside the armrest
of the center console. The system
operates at 145 kHz and wirelessly
charges one Qi compatible mobile
device. The power output of the
system is capable of charging at a
rate up to 1 amp (5W), as requested
by the compatible mobile device.
See Radio Frequency Statement
0 351. To check for phone or other device
compatibility:
.
In the U.S., see
my.chevrolet.com/learn.
. In Canada, see
gmtotalconnect.ca.
. Or, see your dealer for details.
{Warning
Wireless charging can affect the
operation of an implanted
pacemaker or other medical
devices. If you have one, it is
recommended to consult with
your doctor before using the
wireless charging system.
The vehicle must be on or in ACC/
ACCESSORY, or Retained
Accessory Power (RAP) must be
active. The wireless charging
feature may not correctly indicate
charging when the vehicle is in RAP.
See Retained Accessory Power
(RAP) 0174.
Page 105 of 379
Chevrolet VOLT Owner Manual (GMNA-Localizing-U.S./Canada/Mexico-
11349113) - 2018 - crc - 10/12/17
104 Instruments and Controls
The operating temperature is−20 °C
(−4 °F) to 60 °C (140 °F) for the
charging system and 0 °C (32 °F) to
35 °C (95 °F) for the phone.
{Warning
Remove all objects from the
charging pocket before charging
your mobile phone. Objects, such
as coins, keys, rings, paper clips,
or cards, between the mobile
phone and the charger will
become very hot. On the rare
occasion that the charging system
does not detect an object, and the
object gets wedged between the
mobile phone and the charger,
remove the mobile phone and
allow the object to cool before
removing it from the charging
pocket, to prevent burns.
To charge a mobile device:
1. Remove all objects from the charging pocket. The system
may not charge if there are any
objects between the mobile
device and the charging
pocket.
2. With the mobile device screen facing the rear of the vehicle,
slowly insert the device into the
charging pocket until
}
appears on the infotainment
display screen. This indicates
that the mobile device is
properly positioned and
charging. If a mobile device is inserted into the pocket and
}
does not display, remove the
mobile device from the pocket,
turn it 180 degrees, and wait
three seconds before inserting
the mobile device into the
pocket again.
Software Acknowledgements
Certain Wireless Charging Module
product from LG Electronics, Inc.
("LGE") contains the open source
software detailed below. Refer to
the indicated open source licenses
(as are included following this
notice) for the terms and conditions
of their use.
OSS Notice Information
To obtain the source code that is
contained in this product, please
visit http://opensource.lge.com. In
addition to the source code, all
referred license terms, warranty
disclaimers and copyright notices
are available for download. LG
Electronics will also provide open
source code to you on CD-ROM for
a charge covering the cost of
performing such distribution (such
Page 107 of 379
Chevrolet VOLT Owner Manual (GMNA-Localizing-U.S./Canada/Mexico-
11349113) - 2018 - crc - 10/12/17
106 Instruments and Controls
Warning Lights,
Gauges, and
Indicators
Warning lights and gauges can
signal that something is wrong
before it becomes serious enough
to cause an expensive repair or
replacement. Paying attention to the
warning lights and gauges could
prevent injury.
Some warning lights come on briefly
when the propulsion system is
started to indicate they are working.
When one of the warning lights
comes on and stays on while
driving, or when one of the gauges
shows there may be a problem,
check the section that explains what
to do. Waiting to do repairs can be
costly and even dangerous.
Instrument Cluster
The instrument cluster displays a
preview of information that includes
electric range, charging, odometer,and battery status. This happens
upon entry when the driver door is
opened before starting the vehicle.
The CHARGING OVERRIDE/
INTERRUPTION OCCURRED
message may display to indicate
that a charging override or
interruption has occurred due to one
or more of the following events:
.
Override of the charge settings
by the owner using OnStar.
. Unintended interruption of AC
power at the vehicle's
charge port.
. Interruption of charging by the
utility company using OnStar as
authorized by the vehicle owner.