check engine light CHEVROLET VOLT 2019 User Guide
[x] Cancel search | Manufacturer: CHEVROLET, Model Year: 2019, Model line: VOLT, Model: CHEVROLET VOLT 2019Pages: 373, PDF Size: 5.66 MB
Page 220 of 373
Chevrolet VOLT Owner Manual (GMNA-Localizing-U.S./Canada/Mexico-
12163007) - 2019 - CRC - 11/5/18
Driving and Operating 219
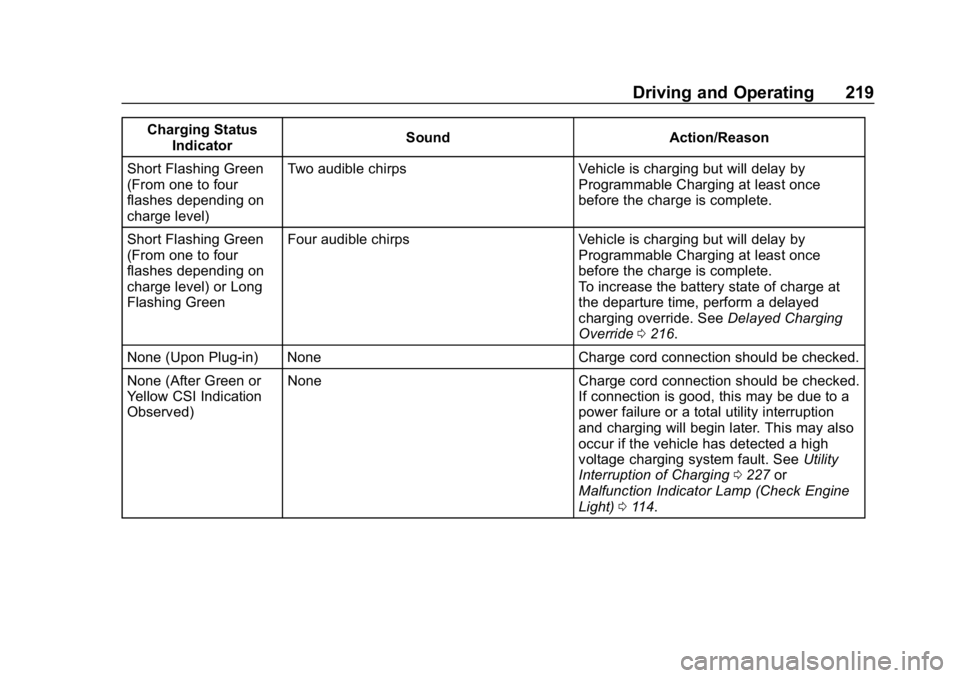
Charging StatusIndicator Sound Action/Reason
Short Flashing Green
(From one to four
flashes depending on
charge level) Two audible chirps Vehicle is charging but will delay by
Programmable Charging at least once
before the charge is complete.
Short Flashing Green
(From one to four
flashes depending on
charge level) or Long
Flashing Green Four audible chirps Vehicle is charging but will delay by
Programmable Charging at least once
before the charge is complete.
To increase the battery state of charge at
the departure time, perform a delayed
charging override. SeeDelayed Charging
Override 0216.
None (Upon Plug-in) None Charge cord connection should be checked.
None (After Green or
Yellow CSI Indication
Observed) None Charge cord connection should be checked.
If connection is good, this may be due to a
power failure or a total utility interruption
and charging will begin later. This may also
occur if the vehicle has detected a high
voltage charging system fault. SeeUtility
Interruption of Charging 0227 or
Malfunction Indicator Lamp (Check Engine
Light) 0114.
Page 233 of 373
Chevrolet VOLT Owner Manual (GMNA-Localizing-U.S./Canada/Mexico-
12163007) - 2019 - CRC - 11/5/18
232 Driving and Operating
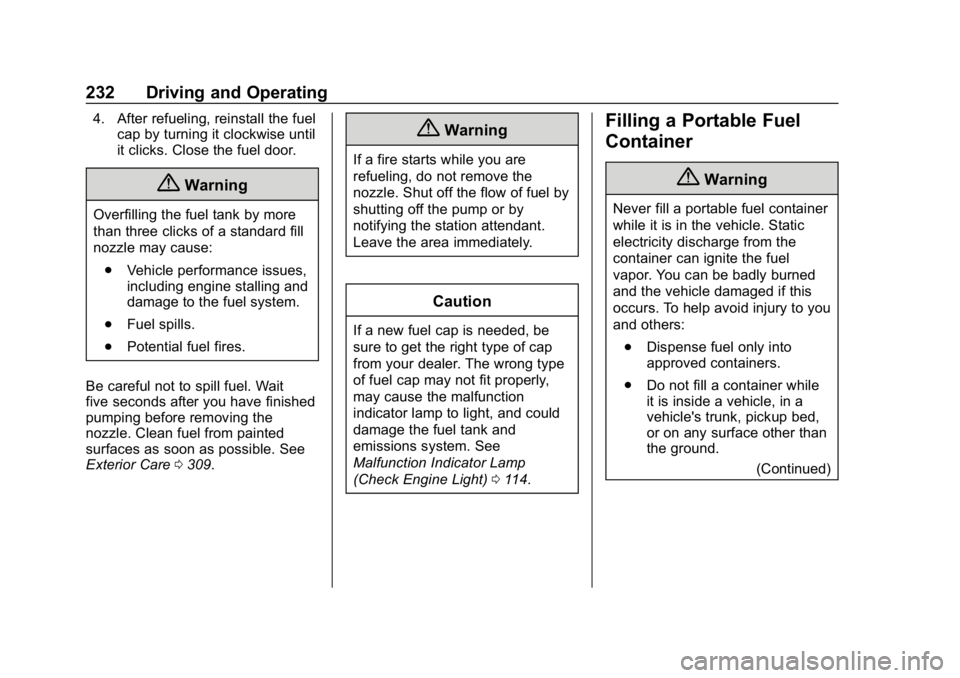
4. After refueling, reinstall the fuelcap by turning it clockwise until
it clicks. Close the fuel door.
{Warning
Overfilling the fuel tank by more
than three clicks of a standard fill
nozzle may cause:
. Vehicle performance issues,
including engine stalling and
damage to the fuel system.
. Fuel spills.
. Potential fuel fires.
Be careful not to spill fuel. Wait
five seconds after you have finished
pumping before removing the
nozzle. Clean fuel from painted
surfaces as soon as possible. See
Exterior Care 0309.
{Warning
If a fire starts while you are
refueling, do not remove the
nozzle. Shut off the flow of fuel by
shutting off the pump or by
notifying the station attendant.
Leave the area immediately.
Caution
If a new fuel cap is needed, be
sure to get the right type of cap
from your dealer. The wrong type
of fuel cap may not fit properly,
may cause the malfunction
indicator lamp to light, and could
damage the fuel tank and
emissions system. See
Malfunction Indicator Lamp
(Check Engine Light) 0114.
Filling a Portable Fuel
Container
{Warning
Never fill a portable fuel container
while it is in the vehicle. Static
electricity discharge from the
container can ignite the fuel
vapor. You can be badly burned
and the vehicle damaged if this
occurs. To help avoid injury to you
and others:
. Dispense fuel only into
approved containers.
. Do not fill a container while
it is inside a vehicle, in a
vehicle's trunk, pickup bed,
or on any surface other than
the ground.
(Continued)
Page 234 of 373
Chevrolet VOLT Owner Manual (GMNA-Localizing-U.S./Canada/Mexico-
12163007) - 2019 - CRC - 11/5/18
Driving and Operating 233
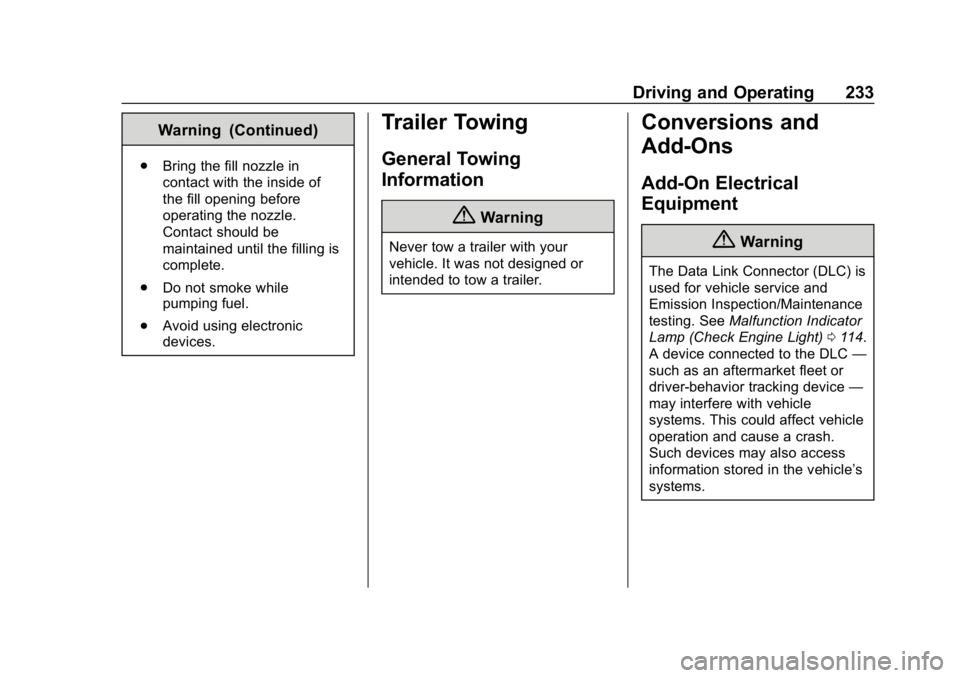
Warning (Continued)
.Bring the fill nozzle in
contact with the inside of
the fill opening before
operating the nozzle.
Contact should be
maintained until the filling is
complete.
. Do not smoke while
pumping fuel.
. Avoid using electronic
devices.
Trailer Towing
General Towing
Information
{Warning
Never tow a trailer with your
vehicle. It was not designed or
intended to tow a trailer.
Conversions and
Add-Ons
Add-On Electrical
Equipment
{Warning
The Data Link Connector (DLC) is
used for vehicle service and
Emission Inspection/Maintenance
testing. See Malfunction Indicator
Lamp (Check Engine Light) 0114.
A device connected to the DLC —
such as an aftermarket fleet or
driver-behavior tracking device —
may interfere with vehicle
systems. This could affect vehicle
operation and cause a crash.
Such devices may also access
information stored in the vehicle’s
systems.
Page 236 of 373
Chevrolet VOLT Owner Manual (GMNA-Localizing-U.S./Canada/Mexico-
12163007) - 2019 - CRC - 11/5/18
Vehicle Care 235
Vehicle Care
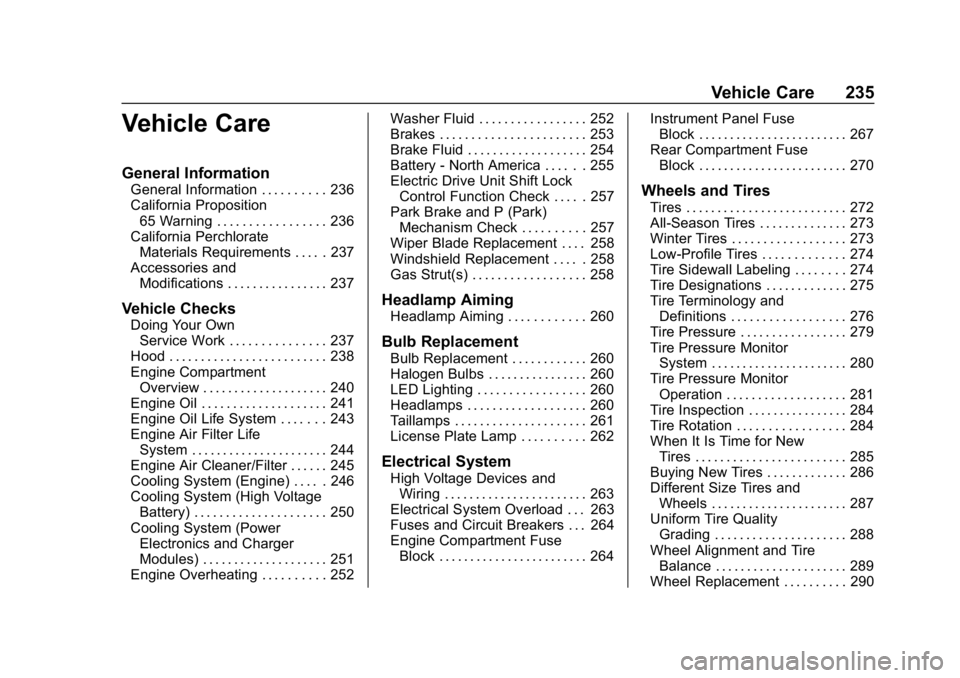
General Information
General Information . . . . . . . . . . 236
California Proposition65 Warning . . . . . . . . . . . . . . . . . 236
California Perchlorate Materials Requirements . . . . . 237
Accessories and Modifications . . . . . . . . . . . . . . . . 237
Vehicle Checks
Doing Your OwnService Work . . . . . . . . . . . . . . . 237
Hood . . . . . . . . . . . . . . . . . . . . . . . . . 238
Engine Compartment Overview . . . . . . . . . . . . . . . . . . . . 240
Engine Oil . . . . . . . . . . . . . . . . . . . . 241
Engine Oil Life System . . . . . . . 243
Engine Air Filter Life System . . . . . . . . . . . . . . . . . . . . . . 244
Engine Air Cleaner/Filter . . . . . . 245
Cooling System (Engine) . . . . . 246
Cooling System (High Voltage Battery) . . . . . . . . . . . . . . . . . . . . . 250
Cooling System (Power Electronics and Charger
Modules) . . . . . . . . . . . . . . . . . . . . 251
Engine Overheating . . . . . . . . . . 252 Washer Fluid . . . . . . . . . . . . . . . . . 252
Brakes . . . . . . . . . . . . . . . . . . . . . . . 253
Brake Fluid . . . . . . . . . . . . . . . . . . . 254
Battery - North America . . . . . . 255
Electric Drive Unit Shift Lock
Control Function Check . . . . . 257
Park Brake and P (Park) Mechanism Check . . . . . . . . . . 257
Wiper Blade Replacement . . . . 258
Windshield Replacement . . . . . 258
Gas Strut(s) . . . . . . . . . . . . . . . . . . 258
Headlamp Aiming
Headlamp Aiming . . . . . . . . . . . . 260
Bulb Replacement
Bulb Replacement . . . . . . . . . . . . 260
Halogen Bulbs . . . . . . . . . . . . . . . . 260
LED Lighting . . . . . . . . . . . . . . . . . 260
Headlamps . . . . . . . . . . . . . . . . . . . 260
Taillamps . . . . . . . . . . . . . . . . . . . . . 261
License Plate Lamp . . . . . . . . . . 262
Electrical System
High Voltage Devices and Wiring . . . . . . . . . . . . . . . . . . . . . . . 263
Electrical System Overload . . . 263
Fuses and Circuit Breakers . . . 264
Engine Compartment Fuse Block . . . . . . . . . . . . . . . . . . . . . . . . 264 Instrument Panel Fuse
Block . . . . . . . . . . . . . . . . . . . . . . . . 267
Rear Compartment Fuse Block . . . . . . . . . . . . . . . . . . . . . . . . 270
Wheels and Tires
Tires . . . . . . . . . . . . . . . . . . . . . . . . . . 272
All-Season Tires . . . . . . . . . . . . . . 273
Winter Tires . . . . . . . . . . . . . . . . . . 273
Low-Profile Tires . . . . . . . . . . . . . 274
Tire Sidewall Labeling . . . . . . . . 274
Tire Designations . . . . . . . . . . . . . 275
Tire Terminology andDefinitions . . . . . . . . . . . . . . . . . . 276
Tire Pressure . . . . . . . . . . . . . . . . . 279
Tire Pressure Monitor System . . . . . . . . . . . . . . . . . . . . . . 280
Tire Pressure Monitor Operation . . . . . . . . . . . . . . . . . . . 281
Tire Inspection . . . . . . . . . . . . . . . . 284
Tire Rotation . . . . . . . . . . . . . . . . . 284
When It Is Time for New Tires . . . . . . . . . . . . . . . . . . . . . . . . 285
Buying New Tires . . . . . . . . . . . . . 286
Different Size Tires and Wheels . . . . . . . . . . . . . . . . . . . . . . 287
Uniform Tire Quality Grading . . . . . . . . . . . . . . . . . . . . . 288
Wheel Alignment and Tire Balance . . . . . . . . . . . . . . . . . . . . . 289
Wheel Replacement . . . . . . . . . . 290
Page 255 of 373
Chevrolet VOLT Owner Manual (GMNA-Localizing-U.S./Canada/Mexico-
12163007) - 2019 - CRC - 11/5/18
254 Vehicle Care
Brake Fluid
The brake master cylinder reservoir
is filled with GM approved DOT 3
brake fluid as indicated on the
reservoir cap. SeeEngine
Compartment Overview 0240 for
the location of the reservoir.
Checking Brake Fluid
With the vehicle in P (Park) on a
level surface, the brake fluid level
should be between the minimum
and maximum marks on the brake
fluid reservoir.
There are only two reasons why the
brake fluid level in the reservoir may
go down:
. Normal brake lining wear. When
new linings are installed, the
fluid level goes back up. .
A fluid leak in the brake
hydraulic system. Have the
brake hydraulic system fixed.
With a leak, the brakes will not
work well.
Always clean the brake fluid
reservoir cap and the area around
the cap before removing it.
Do not top off the brake fluid.
Adding fluid does not correct a leak.
If fluid is added when the linings are
worn, there will be too much fluid
when new brake linings are
installed. Add or remove fluid, as
necessary, only when work is done
on the brake hydraulic system.
{Warning
If too much brake fluid is added, it
can spill on the engine and burn,
if the engine is hot enough. You
or others could be burned, and
the vehicle could be damaged.
Add brake fluid only when work is
done on the brake hydraulic
system. When the brake fluid falls to a low
level, the brake warning light comes
on. See
Brake System Warning
Light 0116.
Brake fluid absorbs water over time
which degrades the effectiveness of
the brake fluid. Replace brake fluid
at the specified intervals to prevent
increased stopping distance. See
Maintenance Schedule 0321.
What to Add
Use only GM approved DOT 3
brake fluid from a clean, sealed
container. See Recommended
Fluids and Lubricants 0329.
{Warning
The wrong or contaminated brake
fluid could result in damage to the
brake system. This could result in
the loss of braking leading to a
possible injury. Always use the
proper GM approved brake fluid.
Page 305 of 373
Chevrolet VOLT Owner Manual (GMNA-Localizing-U.S./Canada/Mexico-
12163007) - 2019 - CRC - 11/5/18
304 Vehicle Care
Caution
If any accessories are left on or
plugged in during the jump
starting procedure, they could be
damaged. The repairs would not
be covered by the vehicle
warranty. Whenever possible, turn
off or unplug all accessories on
either vehicle when jump starting.
3. Turn off both vehicles. Turn off the radio, all lamps, and
accessories that are not
needed in both vehicles.
Unplug accessories from the
cigarette lighter or the
accessory power outlets. This
avoids sparks and helps save
both batteries and accessories.
4. Locate the positive (+) and negative (−) terminals on the
vehicle with the run-down
battery.
5. Locate the positive (+) and negative (−) battery terminals
on the Volt. The 12-volt battery
is under the load floor in the rear cargo area. Open the
access covers for the
positive (+) terminal (1) and the
negative (−) terminal (2).
6. Check that the jumper cables do not have loose or missing
insulation or a shock could
result and the vehicles could
be damaged.
Before connecting the jumper
cables, here are some basic
things to know. Positive (+)
jumper cable goes to
positive (+) battery terminal or
a remote positive (+) terminal if
available. Negative (−) jumper
cable goes to remote
negative (−) terminal if
available, or a heavy,
unpainted metal engine part or
a solid engine ground on the
vehicle with the run-down
battery.
Do not connect positive (+) to
negative (−) or there will be a
short that may damage the
battery or other parts of the
vehicle. Do not connect the
negative (−) cable to the negative (−) terminal on the
run-down battery because this
can cause sparks.
Caution
If the jumper cables are
connected or removed in the
wrong order, electrical shorting
may occur and damage the
vehicle. The repairs would not be
covered by the vehicle warranty.
Always connect and remove the
jumper cables in the correct order,
making sure that the cables do
not touch each other or other
metal.
Connecting the Jumper Cables 1. Connect the red positive (+) jumper cable to the positive (+)
terminal of the other vehicle
with the run-down battery. Use
a remote positive (+) terminal if
available. Do not let the other
end touch metal.
Page 328 of 373
Chevrolet VOLT Owner Manual (GMNA-Localizing-U.S./Canada/Mexico-
12163007) - 2019 - CRC - 11/5/18
Service and Maintenance 327
Battery
The 12-volt battery supplies power
to start the engine and operate any
additional electrical accessories.
.To avoid break-down or failure to
start the vehicle, maintain a
battery with full cranking power.
. Trained dealer technicians have
the diagnostic equipment to test
the battery and ensure that the
connections and cables are
corrosion-free.
Belts
. Belts may need replacing if they
squeak or show signs of
cracking or splitting.
. Trained dealer technicians have
access to tools and equipment
to inspect the belts and
recommend adjustment or
replacement when necessary. Brakes
Brakes stop the vehicle and are
crucial to safe driving.
.
Signs of brake wear may include
chirping, grinding, or squealing
noises, or difficulty stopping.
. Trained dealer technicians have
access to tools and equipment
to inspect the brakes and
recommend quality parts
engineered for the vehicle.
Fluids
Proper fluid levels and approved
fluids protect the vehicle’s systems
and components. See
Recommended Fluids and
Lubricants 0329 for GM approved
fluids.
. Engine oil and windshield
washer fluid levels should be
checked at every fuel fill.
. Instrument cluster lights may
come on to indicate that fluids
may be low and need to be
filled. Hoses
Hoses transport fluids and should
be regularly inspected to ensure
that there are no cracks or leaks.
With a multi-point inspection, your
dealer can inspect the hoses and
advise if replacement is needed.
Lamps
Properly working headlamps,
taillamps, and brake lamps are
important to see and be seen on
the road.
.
Signs that the headlamps need
attention include dimming, failure
to light, cracking, or damage.
The brake lamps need to be
checked periodically to ensure
that they light when braking.
. With a multi-point inspection,
your dealer can check the lamps
and note any concerns.
Page 362 of 373

Chevrolet VOLT Owner Manual (GMNA-Localizing-U.S./Canada/Mexico-
12163007) - 2019 - CRC - 11/5/18
Index 361
IndexA
Accessories andModifications . . . . . . . . . . . . . . . . . . 237
Accessory Power . . . . . . . . . . . . . . . 171
Adaptive Cruise Control . . . . . . . . 191
Add-On Electrical Equipment . . . 233
Additional Information OnStar . . . . . . . . . . . . . . . . . . . . . . . 351
Additional Maintenance and Care . . . . . . . . . . . . . . . . . . . . . . 326
Adjustments Lumbar, Front Seats . . . . . . . . . . . . 55
Air Cleaner/Filter, Engine . . . . . . . 245
Air Conditioning . . . . . . . . . . . . . . . . 150
Air Filter Life System . . . . . . . . . . . . . . . . . . . 244
Air Filter, Passenger Compartment . . . . . . . . . . . . . . . . . 155
Air Vents . . . . . . . . . . . . . . . . . . . . . . . 155
Airbag System
Check . . . . . . . . . . . . . . . . . . . . . . . . . . 79
How Does an AirbagRestrain? . . . . . . . . . . . . . . . . . . . . . 72
Passenger Sensing System . . . . 74
What Makes an Airbag
Inflate? . . . . . . . . . . . . . . . . . . . . . . . . 72
What Will You See after an Airbag Inflates? . . . . . . . . . . . . . . . 72 Airbag System (cont'd)
When Should an Airbag
Inflate? . . . . . . . . . . . . . . . . . . . . . . . . 71
Where Are the Airbags? . . . . . . . . 69
Airbags Adding Equipment to theVehicle . . . . . . . . . . . . . . . . . . . . . . . . 78
Passenger Status Indicator . . . .113
Readiness Light . . . . . . . . . . . . . . .113
Servicing Airbag-Equipped Vehicles . . . . . . . . . . . . . . . . . . . . . . . 78
System Check . . . . . . . . . . . . . . . . . . 67
Alarm Vehicle Security . . . . . . . . . . . . . . . . 46
Alert Lane Change . . . . . . . . . . . . . . . . . 210
Side Blind Zone (SBZA) . . . . . . 210
All-Season Tires . . . . . . . . . . . . . . . . 273
Antilock Brake System (ABS) . . . 182
Warning Light . . . . . . . . . . . . . . . . . .117
Appearance Care Exterior . . . . . . . . . . . . . . . . . . . . . . . 309
Interior . . . . . . . . . . . . . . . . . . . . . . . . 314
Assistance Program, Roadside . . . . . . . . . . . . . . . . . . . . . . 339
Assistance Systems for Driving . . . . . . . . . . . . . . . . . . . . . . . . 206
Page 363 of 373

Chevrolet VOLT Owner Manual (GMNA-Localizing-U.S./Canada/Mexico-
12163007) - 2019 - CRC - 11/5/18
362 Index
Assistance Systems forParking and Backing . . . . . . . . . . 202
Automatic Climate Control System . . . . . . . 150
Door Locks . . . . . . . . . . . . . . . . . . . . . 43
Forward Braking . . . . . . . . . . . . . . 208
Headlamp System . . . . . . . . . . . . 145
B
Battery . . . . . . . . . . . . . . . . . . . . . . . . . 110Exterior Lighting BatterySaver . . . . . . . . . . . . . . . . . . . . . . . 148
Power Protection . . . . . . . . . . . . . 148
Battery - North America . . . . 255, 299
Battery Gauge High Voltage . . . . . . . . . . . . . . . . . . .110
Blade Replacement, Wiper . . . . . 258
Brake
Parking, Electric . . . . . . . . . . . . . . 183
System Warning Light . . . . . . . . .116
Brakes . . . . . . . . . . . . . . . . . . . . . . . . . . 253
Antilock . . . . . . . . . . . . . . . . . . . . . . . 182
Fluid . . . . . . . . . . . . . . . . . . . . . . . . . . 254
Regenerative Braking . . . . . . . . . 185
Braking . . . . . . . . . . . . . . . . . . . . . . . . . 159 Automatic Forward . . . . . . . . . . . 208
Break-In, New Vehicle . . . . . . . . . . 168 Bulb Replacement
Halogen Bulbs . . . . . . . . . . . . . . . . 260
Headlamp Aiming . . . . . . . . . . . . . 260
Headlamps . . . . . . . . . . . . . . . . . . . 260
License Plate Lamps . . . . . . . . . 262
Taillamps . . . . . . . . . . . . . . . . . . . . . 261
Buying New Tires . . . . . . . . . . . . . . . 286
C
Calibration . . . . . . . . . . . . . . . . . . . . . . 104
California Perchlorate Materials
Requirements . . . . . . . . . . . . . . . 237
California Proposition
65 Warning . . . . . . . . . .236, 255, 299, Back Cover
Canadian Vehicle Owners . . . . . . . . 2
Capacities and Specifications . . . . . . . . . . . . . . . . . 333
Carbon Monoxide
Engine Exhaust . . . . . . . . . . . . . . . 180
Hatch . . . . . . . . . . . . . . . . . . . . . . . . . . . 45
Winter Driving . . . . . . . . . . . . . . . . 163
Cargo Cover . . . . . . . . . . . . . . . . . . . . . . . . . . . 99
Tie-Downs . . . . . . . . . . . . . . . . . . . . 100
Caution, Danger, and Warning . . . . 2 Center Console Storage . . . . . . . . . 99
Chains, Tire . . . . . . . . . . . . . . . . . . . . 291
Charge Cord . . . . . . . . . . . . . . . . . . . . 221
Charging
Delay Override . . . . . . . . . . . . . . . 216
Electrical Requirements . . . . . . 228
Plug-In . . . . . . . . . . . . . . . . . . . . . . . 214
Programmable . . . . . . . . . . . . . . . . 123
Utility Interruption . . . . . . . . . . . . . 227
Wireless . . . . . . . . . . . . . . . . . . . . . . 105
Charging Status Screens . . . . . . . 216
Charging System Light . . . . . . . . . 114
Check
Engine Light (MalfunctionIndicator) . . . . . . . . . . . . . . . . . . . . .114
Child Restraints
Infants and Young Children . . . . . 81
Lower Anchors and Tethersfor Children . . . . . . . . . . . . . . . . . . . 87
Older Children . . . . . . . . . . . . . . . . . . 80
Securing . . . . . . . . . . . . . . . . . . . . 93, 95
Systems . . . . . . . . . . . . . . . . . . . . . . . . 84
Circuit Breakers . . . . . . . . . . . . . . . . 264
Cleaning Exterior Care . . . . . . . . . . . . . . . . . 309
Interior Care . . . . . . . . . . . . . . . . . . 314
Climate Control Systems Automatic . . . . . . . . . . . . . . . . . . . . . 150
Page 365 of 373

Chevrolet VOLT Owner Manual (GMNA-Localizing-U.S./Canada/Mexico-
12163007) - 2019 - CRC - 11/5/18
364 Index
Driving for Better EnergyEfficiency . . . . . . . . . . . . . . . . . . . . . . 27
E
Electric Drive Unit . . . . . . . . . . . . . . 181
Electric Drive Unit Shift LockControl Function Check . . . . . . . 257
Electric Mode . . . . . . . . . . . . . . . . . . . 174
Electric Parking Brake . . . . . . . . . . 183
Electric Parking Brake Light . . . . 117
Electrical Equipment, Add-On . . . . . . . . . . . . . . . . . . . . . . . 233
Electrical Requirements for Battery Charging . . . . . . . . . . . . . . 228
Electrical System Engine Compartment FuseBlock . . . . . . . . . . . . . . . . . . . . . . . . 264
Fuses and Circuit Breakers . . . 264
Instrument Panel Fuse Block . . . . . . . . . . . . . . . . . . . . . . . . 267
Overload . . . . . . . . . . . . . . . . . . . . . 263
Rear Compartment Fuse
Block . . . . . . . . . . . . . . . . . . . . . . . . 270
Emergency OnStar . . . . . . . . . . . . . . . . . . . . . . . 350
Energy Efficiency
Driving . . . . . . . . . . . . . . . . . . . . . . . . . . 27
Energy Information . . . . . . . . . . . . . 131 Engine
Air Cleaner/Filter . . . . . . . . . . . . . 245
Check Light (Malfunction
Indicator) . . . . . . . . . . . . . . . . . . . . .114
Compartment Overview . . . . . . . 240
Coolant Temperature Warning Light . . . . . . . . . . . . . . . 120
Cooling System . . . . . 246, 250, 251
Drive Belt Routing . . . . . . . . . . . . 334
Exhaust . . . . . . . . . . . . . . . . . . . . . . 180
Oil Life System . . . . . . . . . . . . . . . 243
Oil Pressure Light . . . . . . . . . . . . 121
Overheating . . . . . . . . . . . . . . . . . . 252
Running While Parked . . . . . . . . 180
Engine Air Filter Life System . . . . 244
Engine Unavailable Out of Fuel . . . . . . . . . . . . . . . . . . . 177
Entry Lighting . . . . . . . . . . . . . . . . . . . 148
Event Data Recorders . . . . . . . . . . 347
Exit Lighting . . . . . . . . . . . . . . . . . . . . 148
Extended Parking . . . . . . . . . . . . . . . 173
Extended Range Mode . . . . . . . . . 174
Extender, Seat Belt . . . . . . . . . . . . . . 66
Exterior Lamp Controls . . . . . . . . . 142
Exterior Lighting Battery Saver . . . . . . . . . . . . . . . . . . . . . . . . . 148
F
Filter,Engine Air Cleaner . . . . . . . . . . . 245
Flash-to-Pass . . . . . . . . . . . . . . . . . . . 144
Flashers, Hazard Warning . . . . . . 145
Flat Tire . . . . . . . . . . . . . . . . . . . . . . . . 291
Floor Mats . . . . . . . . . . . . . . . . . . . . . . 317
Fluid Brakes . . . . . . . . . . . . . . . . . . . . . . . . 254
Washer . . . . . . . . . . . . . . . . . . . . . . . 252
Folding Mirrors . . . . . . . . . . . . . . . . . . 49
Forward Automatic Braking . . . . . 208
Forward Collision Alert (FCA) System . . . . . . . . . . . . . . . . . 206
Frequency Statement Radio . . . . . . . . . . . . . . . . . . . . . . . . . 345
Front Seats Adjustment . . . . . . . . . . . . . . . . . . . . . 54
Heated . . . . . . . . . . . . . . . . . . . . . . . . . 57
Fuel Additives . . . . . . . . . . . . . . . . . . . . . 230
Filling a Portable FuelContainer . . . . . . . . . . . . . . . . . . . 232
Filling the Tank . . . . . . . . . . . . . . . 230
Foreign Countries . . . . . . . . . . . . 230
Gauge . . . . . . . . . . . . . . . . . . . . . . . . . 111
Low Fuel Warning Light . . . . . . . 121
Prohibited Fuels . . . . . . . . . . . . . . 229